| 1. General Ledger (GL) |
| 1.1. Prerequisites for the General Ledger | ||||||
Prerequisites Required GENERAL LEDGER activity:
The account information for the General Ledger must be established in the G/L Account Setup. Users MUST have special rights within the Accounting Security module. Users with “Accounting Supervisor Rights” will automatically have access.
Optional Prerequisites for Entering a New GENERAL LEDGER:
Otherwise must be entered in Sales Order. |
| 1.2. View GL Accounts |
| 1.2.1. Prerequisites for View GL Accounts |
Users MUST have full rights to the "View GL Activity/Reports" in Accounting Security . Users with “Accounting Security Supervisor” rights will automatically have access. |
| 1.2.2. Introduction for View GL Accounts |
The G/L Balances area is designed to allow a quick inquiry as to the balance of one or a series of accounts. The information displayed corresponds to the Closing Balances of the account referenced in the upper part of the screen. |
| 1.2.3. Fields & Defintions for View GL Accounts |
| 1.2.3.1. G/L Balances | |||||||||||||||||||||||
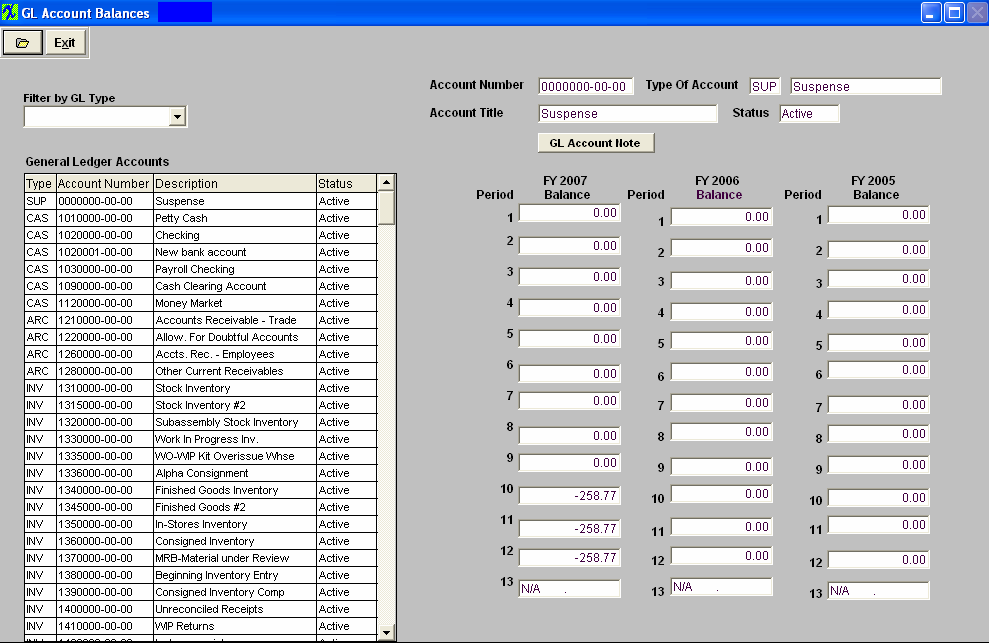
|
| 1.2.3.2. G/L Activity |
| 1.2.3.2.1. G/L Activity | ||||||||||||||||||||
You can sort by: GL Acct. No. (default), Beg. Balance, Debit, Credit or End Balance by depressing the appropriate button. |
| 1.2.3.2.2. G/L Detail | ||||||||||||||||||||
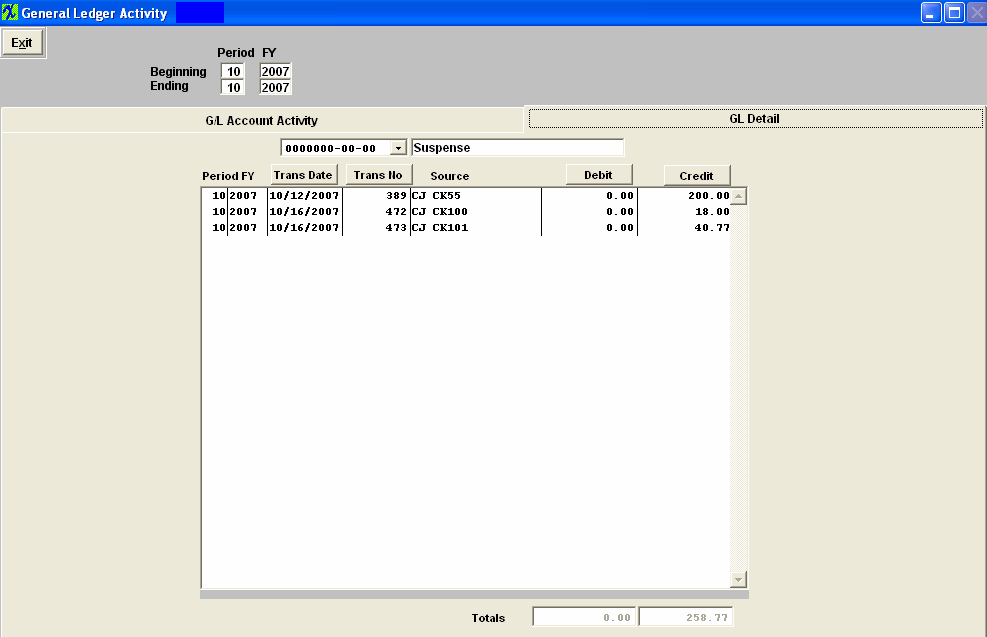
You can sort by: Trans.Date.(default) Trans.No, Debit, or Credit by depressing the appropriate button. |
| 1.2.4. How To ..... for View GL Accounts |
| 1.2.4.1. Find G/L Balances | ||
|
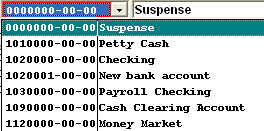
The following screen will appear:  To find a specific record by GL Type, depress the pulldown arrow next to the "Filter by GL Type" box and the following list will appear:
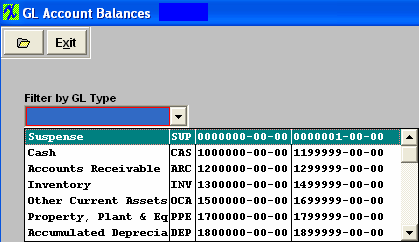 Highlight a GL Type and the screen will populate with the account information for that GL Type.
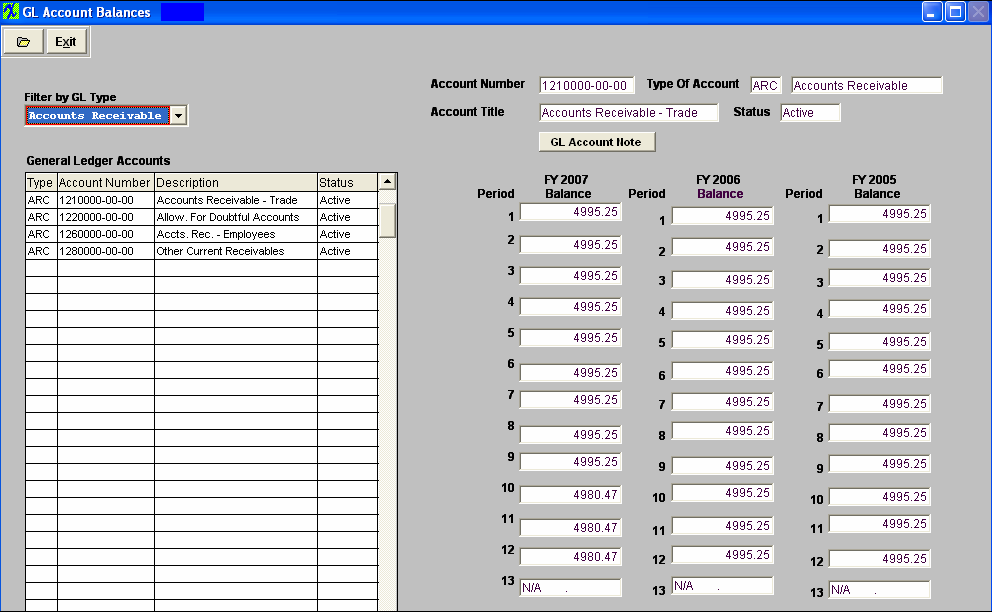 |
| 1.2.4.2. Find G/L Activity | ||||
The following screen will appear:
You can sort by: GL Acct. No. (default), Beg. Balance, Debit, Credit or End Balance by depressing the appropriate button. To view other periods than the Current Period, change the Beginning and/or Ending Period at the top of the screen.
Detail will be available when highlighting an account with amounts in the Debit or Credit columns. Select the GL Detail Tab. Note: that the detail will only show a summary line if the company chose to Post In Summary in the accounting setup. If the company chose to Post In Detail (General Ledger Defaults setup) each transaction that affects the balance of the selected account (selected on the summary screen) for the Period(s) selected will be shown.
You can sort by: Trans.Date.(default) Trans.No, Debit, or Credit by depressing the appropriate button. To view other periods than the Current Period, change the Beginning and/or Ending Period at the top of the screen.
Note: The Transaction Number showing the entire entry can be accessed via G/L Reports Transaction Inquiry.
|
| 1.3. Journal Entries |
| 1.3.1. Journal Entries Introduction |
| Journal Entries are used to adjust Account Balances and to enter Transactions that do not flow from the standard accounts receivable, accounts payable or inventory activity portions of the program.
The ‘Journal Entries’ menu selection brings up a subsidiary menu displaying the 4 journal entry types and activities supported by the ManEx system: General Journal Entries , Standard Journal Entries , Recurring Entry Setup and Automatic Distribution Setup .
Journal Entries are entries made to Adjust Account Balances on a one time or recurring basis. Journal Entry is a straight forward process in which the affected Accounts are selected and debited or credited according to the nature of the transaction desired.
|
| 1.3.2. General Journal Entries |
| 1.3.2.1. Prerequisites for the General Journal Entry |
Users MUST have full rights to the "All Journal Activities" in Accounting Security . Users with “Accounting Security Supervisor” rights will automatically have access. |
| 1.3.2.2. Introduction for the General Journal Entry |
General Journal Entries are to be used to setup opening balances for General Ledger, Accounts Receivable Aging and Accounts Payable Aging. Opening balances for New Bank Accounts MUST be setup in the Bank Setup module.
|
| 1.3.2.3. Fields & Definitions for the General Journal Entry | ||||||||||||||||||||||||||||||
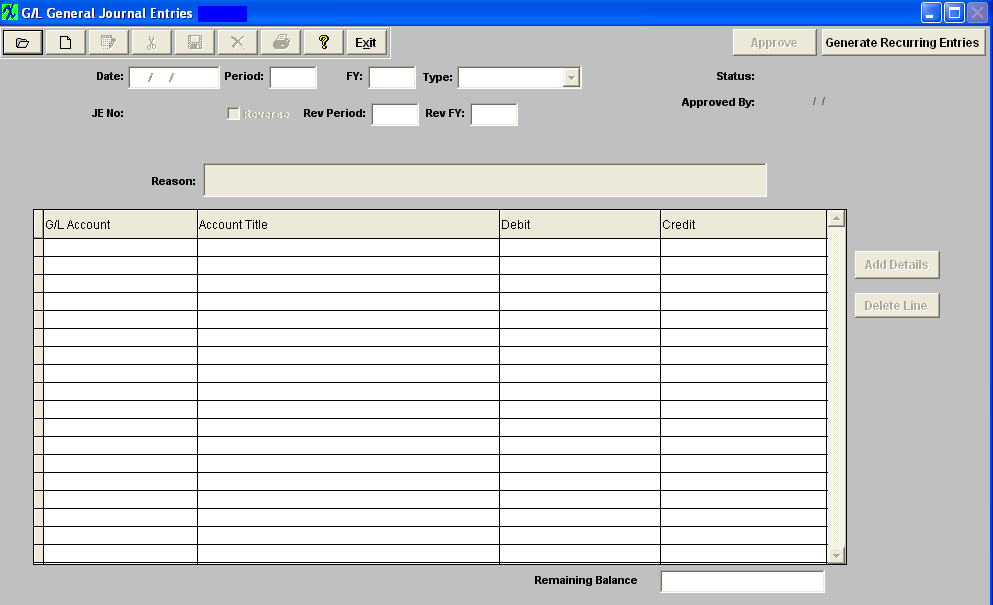 General Journal Entries field definitions
The Journal Number is generated by the system for reference purposes and is reflected in a number of reports including the "Posted Transaction Reports" and the "Detail General Ledger (cross-tabbed) Report". |
| 1.3.2.4. How To ..... for General Journal Entries |
| 1.3.2.4.1. Find a Journal Entry | ||||
The following screen will appear:
When first entering the General Journal Entry area the ‘Find’, ‘Add’, ‘Generate RE/FY Closing’ and ‘Exit’ icons will be available for selection.
Selecting the desired entry will populate the screen as follows:
|
| 1.3.2.4.2. Add a Journal Entry | ||
|
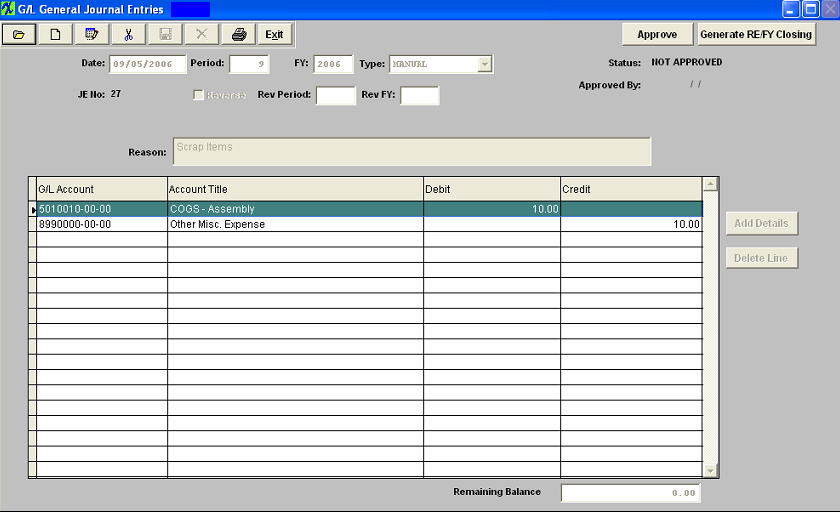
The following Screen will appear:
Depress the Add record action button. The first field (DATE) will default to the last day of the previous fiscal month, but can be changed to any date desired. The date as entered will be the Transaction Date of record so care must be taken to enter a date that lies within the Period you wish to affect with this Entry. Note: That the user will receive a warning message if they attempt to enter a date that is other than the current Fiscal Year. This is only a Warning Message and will allow the user to save the date entered. The ability to post a transaction outside of the current period is affected by the General Ledger Post Default setup, whether postings are allowed in previous periods and fiscal years and future periods.
The TYPE field is a pop up but will default properly to MANUAL when in Add mode. Other types such as STANDARD may be selected within display, if appropriate. Please refer to Standard Journal Entries. STATUS will display ‘NEW’ when adding and will display the appropriate status when displaying a previously added but NOT APPROVED entry and well as an entry that has been POSTED. REVERSE refers to whether this is should be a Reversing Entry. A Reversing Entry is one that cancels itself out upon the Closing of the Period in which it is posted. The Reverse field will default as Unchecked and may be changed if the Transaction is of an appropriate type. REASON is a required field and some text must be entered to allow a successful save of a Journal Entry. Use the TAB key to exit the Reason Field.
The actual data entry occurs in the middle section. Once you tab out of the Reason Field the system will default to the first GL Account Number to be entered. The user must enter a G/L Account directly by typing in the account number. The system will default to the nearest G/L Account match as you type. Then once you hit the Enter/Tab key the system will default in the Account Title Information. Then enter the Debit or Credit Amount.
Depress the "Add Details" button to add another G/L Account.
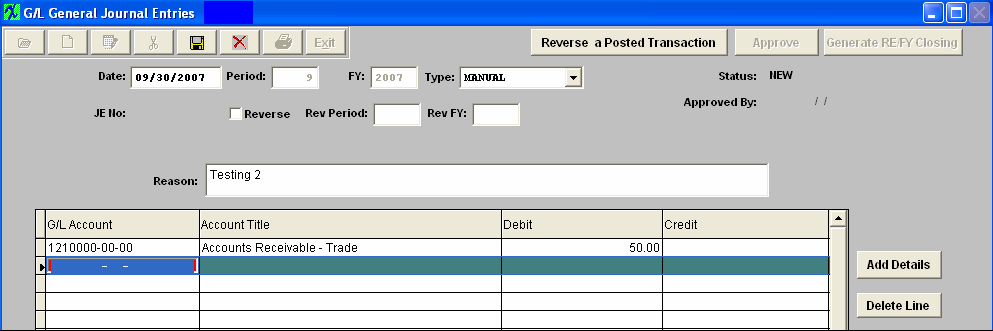 Enter the Debits and Credits until the Remaining Balance at the bottom of the screen equals 0.00.
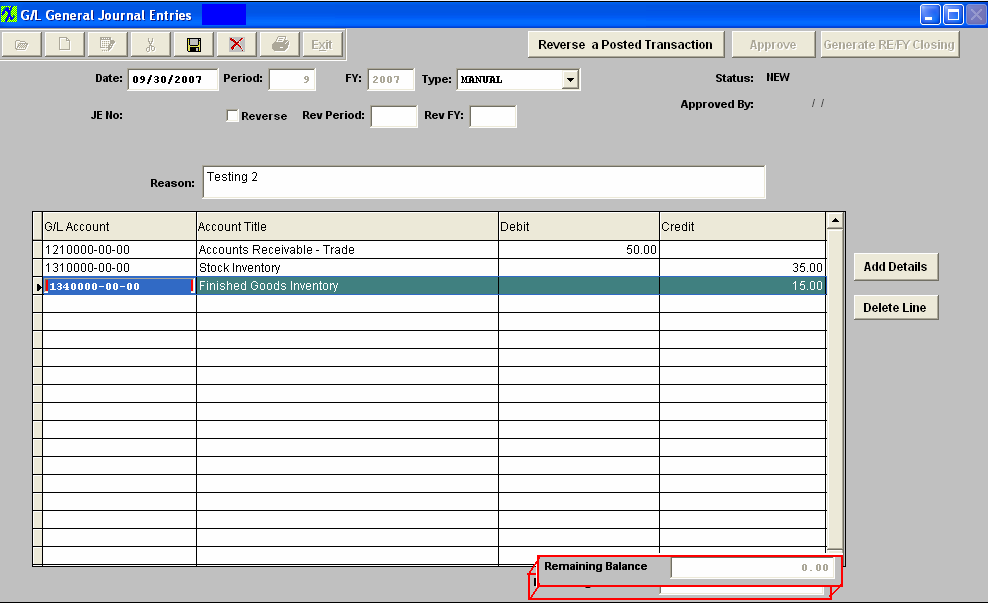 The Abandon changes action button is available at all times during an add operation. The Save record action button will also show as available but will not allow you to save the record until the entire General Journal Entry is in balance (debits = credits). Once the Entry is in Balance, the system will allow you to save the Journal Entry. A General Journal Number will then be assigned to the Transaction.  Journal Entry must be approved before it may be posted. After checking for accuracy, approve a Journal Entry by selecting the ‘Approve’ button and enter an authorized administrative password.
The JE Status will then be changed to Approved.  |
| 1.3.2.4.3. Edit a Journal Entry |
|
Find a Journal Entry you want to Edit. NOTE: The user may edit a ‘NOT APPROVED’ Journal Entry. Once an entry has been ‘APPROVED’ however, another Journal Entry must be entered to clear or reverse it.
The JE will populate the screen:
Depress the Edit action button. All fields are editable. When changes have been completed, depress the Save record action button to save changes or depress the Abandon changes action button to abondaon changes. In order to save the transaction, both DEBITS and CREDITS must equal. The user may generate two types of entries with the ‘Generate RE/FY Closing’ (Generate Recurring entries/ Fiscal Year Closing) button selection.
The first type, Recurring Entries, must be defined under the Recurring Entry Setup module prior to being available as a recurring type. The second type of entry is a special kind of Fiscal Year End Closing Entry, which may be generated after all adjustments have been made for a period but before the actual Period Close Closing Entries zero out the income and expense items for the period and transfer the balance to the Balance Sheet's Retained Earnings. It is important that an entry be created to Close the Income and Expense to the Balance Sheet at the end of each Fiscal Year Period Close. Without such an entry the Balance Sheet will be out of balance by the amount of profit (or loss) incurred, because such an entry was last posted to the Equity Accounts. Such a transfer and closing should not affect reprint of Income Statements for Prior Periods but a Posting to a Prior Period will affect the Balance Sheet / Income Statement for the affected period. A General Journal Entry must be generated to close those Prior Period income and expense items to Retained Earnings if the company chose to allow posting to prior periods. Journal Entry must be approved before it may be posted. After checking for accuracy, approve a Journal Entry by selecting the ‘Approve’ button and enter an authorized administrative password.
|
| 1.3.2.4.4. Reverse a Journal Entry | ||
|
The following Screen will appear:
 Depress the Add button and Create a JE Transaction in the current Period (8), but user would like this JE reversed in a future period. So, they will need to check the "Reverse" box and have it set to reverse in period (10) of 2008. A Reversing Entry is one that cancels itself out upon the Closing of the Period in which it is posted.
 Approve the Entry and it will forward to the GL Release and Posting Screen.
 The JE #20 was properly released and posted in Period (8) of 2008.
 Periods 8 and 9 are closed.
 Upon entering the JE Find screen you can see that the system automatically created the reversing JE waiting for approval.
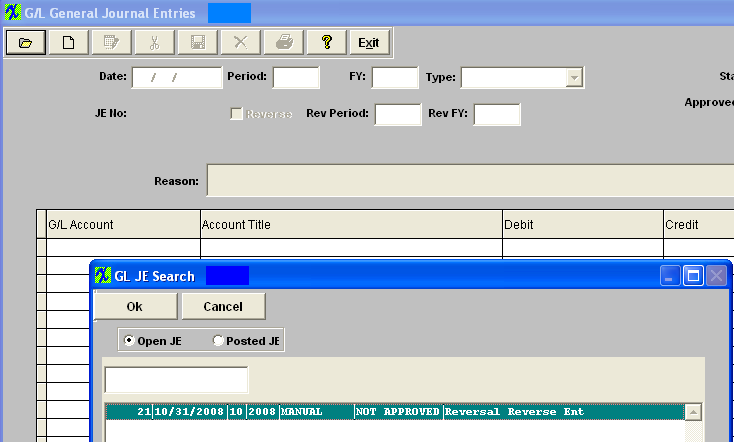 Select one of the line items that are a "Reverse" and "NOT APPROVED" and the information will popluate the screen: The Reverse field will default as checked.
Approve the Entry and it will forward to the GL Release and Posting Screen.
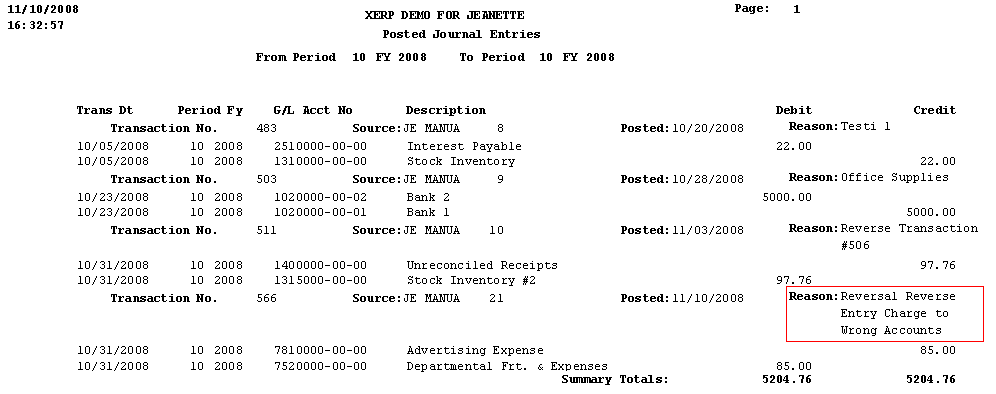
Print out the Posted Journal Entry Report, as displayed: The reason displayed will display as REVERSE.
 |
| 1.3.2.4.5. Reverse a Posted Transaction | ||
|
The following Screen will appear:  Depress the Add record action button, enter your password and the "Reverse a Posted Transaction" button becomes available:  Depress the "Reverse a Posted Transaction" button and the following warning will appear:
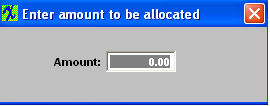
 Depress OK. Enter the number of the transaction you want to reverse into the field shown below and the info will poplulate the screen: Note: User can reverse any posted Transaction from any Prior Period or FY. The Same Transaction can be reversed more than once also.
 Once the Entry is Approved, it will forward to the GL Posting Screen. Post as usual. Print out the Posted Journal Entry Report, as displayed: The reason displayed will display as a Manual reversal and reference the Transaction number reversed.  |
| 1.3.2.5. Reports ..... for the General Journal Entry | ||||
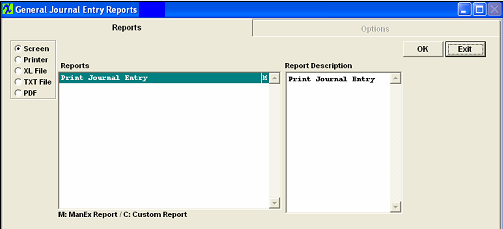
The following screen will appear:
 Find an Existing General Journal Entry
The following report will print:
 |
| 1.3.3. Standard Journal Entry Setup |
| 1.3.3.1. Prerequisites for the Standard Journal Entry |
Users MUST have full rights to the "All Journal Activities" in Accounting Security . Users with “Accounting Security Supervisor” rights will automatically have access. |
| 1.3.3.2. Introduction for a Standard Journal Entry |
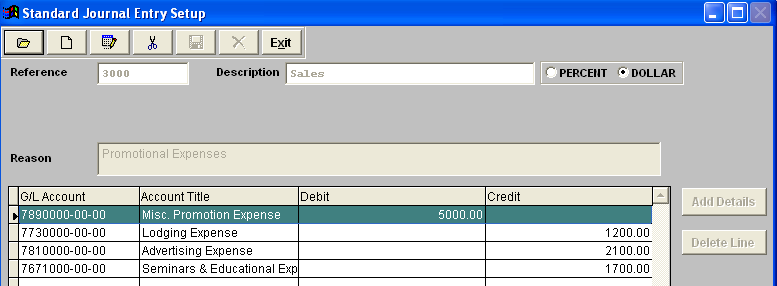
Standard Journal Entries allow the user to set up a “canned” entry that may be used to avoid repetitive entry and save time. A Standard Journal Entry is generated once a month on either a fixed amount or a percentage from one expense account to another and will be generated until they are deleted. A good example would be rent. Say the rent was $10,000 per month and you want to distribute a fixed amount to various departments each month. You would make a Standard Journal entry crediting the general rent account for $10,000 and debit Manufacturing $5000, Admin $2500, and Sales $2500, or you could make it a percentage distributions with 50% going to Mfg, 25% to Admin, and 25% to Sales.
|
| 1.3.3.3. Fields & Definitions for the Standard Journal Entry | ||||||||||||||||||||
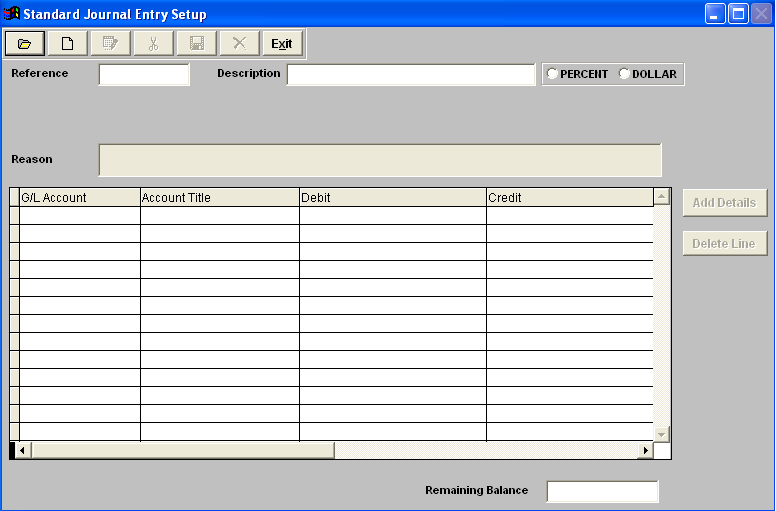 Standard Journal Entries field definitions
|
| 1.3.3.4. How To ...... |
| 1.3.3.4.1. Find a Standard Journal Entry | ||
The following screen will appear:  Depress the Find button, The following listing will appear:
 Select the Standard Journal Entry you are seeking, by either highlighting and double clicking on the Standard Journal Entry, or entering the JE Reference number in the Red Box. The following will appear on the screen:
 |
| 1.3.3.4.2. Add a Standard Journal Entry Setup | ||
Enter a REFERENCE. This is a required field and represents a unique key to differentiate this entry from another that the user must enter. Some mnemonic is helpful to ease location of the record when reviewing entries with the ‘Find’ selection.
Enter the DESCRIPTION. This field allows the user more room to be descriptive about this Journal Entry then is available within the Reference field.
Choose the TYPE. This is a required field and may be either a dollar amount or a percentage. Fixed Dollar Entries may be modified when generated in the General Journal Entry screen, or distributed by Percentage (to distribute overhead to departments for instance).
Enter a REASON. This field must be entered and will be copied along with the specific detail of the Standard Journal Entry. The actual data entry occurs in the middle section. Once you tab out of the Reason Field the system will default to the first GL Account Number to be entered. The user must enter a G/L Account directly by typing in the account number. The system will default to the nearest G/L Account match as you type. Then once you hit the Enter/Tab key the system will default in the Account Title Information. Then enter the Debit or Credit Amount. Depress the "Add Details" button to add another G/L Account. 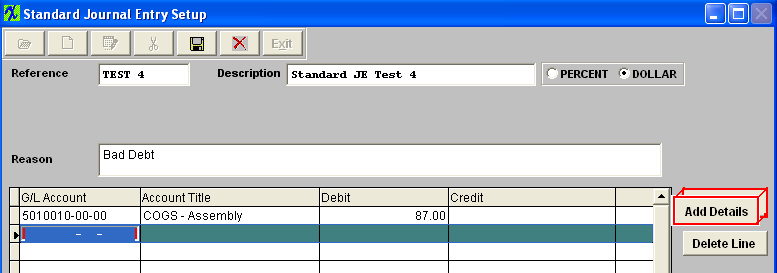 Enter the Debits and Credits until the Remaining Balance at the bottom of the screen equals 0.00. When entering a Percentage Distribution, the percentage must total 100 on each side of the transaction.
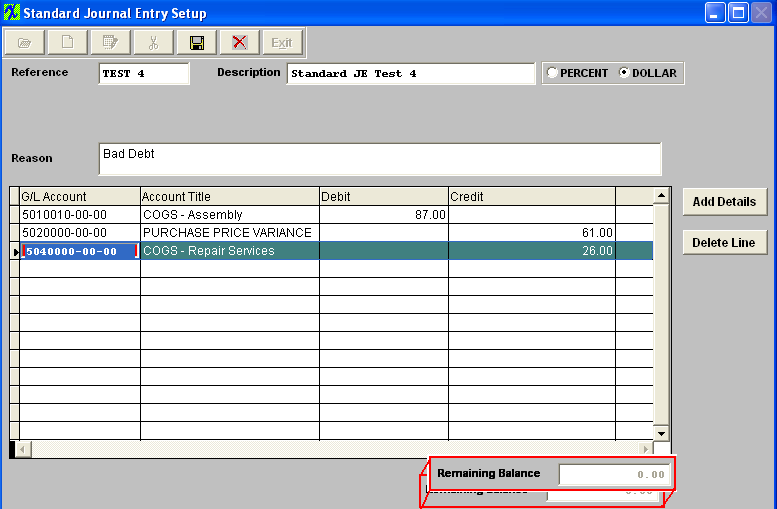 The Abandon changes action button is available at all times during an add operation. The Save record button will also show as available but will not allow you to save the record until the entier Standard Journal Entry is in balance (debits = credits). Once the Entry is in Balance, the system will allow you to save the Standard Entry.
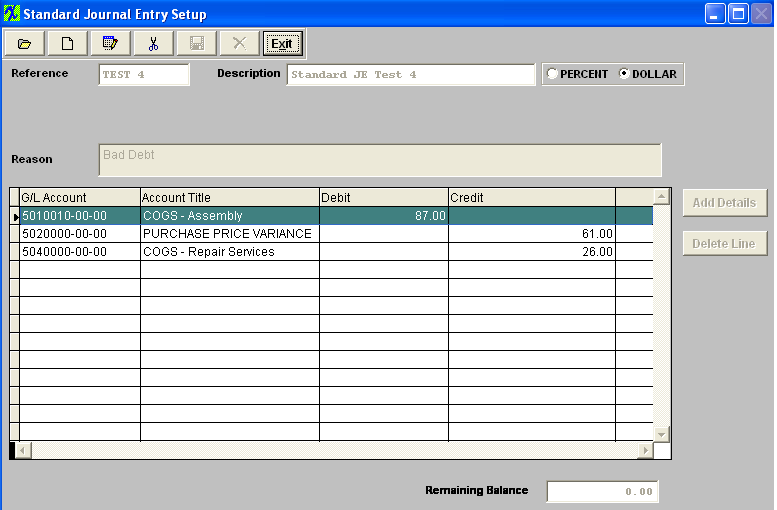 |
| 1.3.3.4.3. Post a Standard Journal Entry | ||||||
The following screen will appear:  Depress the ADD button. Depress the down arrow at the right side of the Type window. The following selection will appear: 
The entry will appear:
 Depress the Save button, the Status changes from "NEW" to "NOT APPROVED" and the Approve button becomes active. Here you may edit the Standard General Jornal Entry by selecting the Edit button or delete the Standard General Journal Entry by selecting the Delete button. Note: Once the Standard General Journal Entry has been ‘Approved’ you will no longer be able to edit or delete the record. 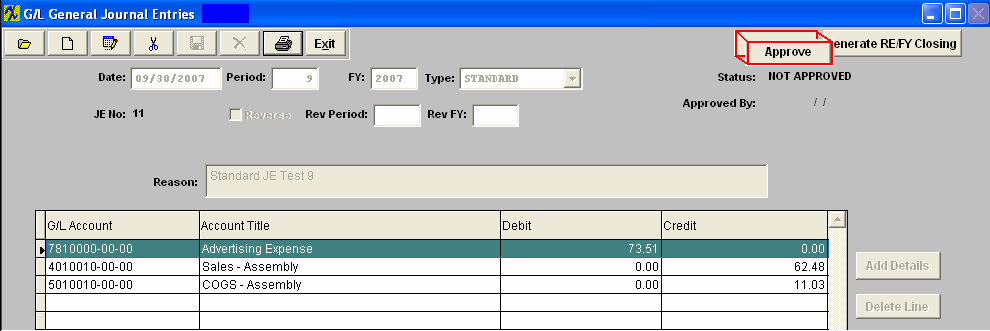 Depress the Approve button. You’ll be prompted for an authorized password. The Status will be changed to "APPROVED", and can now be posted to the General Ledger.  |
| 1.3.4. Recurring Entry Setup |
| 1.3.4.1. Prerequisites for Recurring Entry Setup |
Users MUST have full rights to the "All Journal Activities" in Accounting Security . Users with “Accounting Security Supervisor” rights will automatically have access. |
| 1.3.4.2. Introduction for Recurring Entry |
Recurring Entries are similar to Standard Journal Entries but are interval based. The user can set Recurring Journal Entries to generate every x number of days or periods and save time and effort by avoiding reentering the same posting over and over again. A good example would be an accured interest on a bond. If you have outstanding bonds of $1,000,000 at 6% that will be paid off in one year, so each month for 12 months you would have to accrue the interest liability. In this case you would set up a Recurring Entry to debit the interest expense for $5000, and credit the liability account "Accured Interest Expense" for the same amount. |
| 1.3.4.3. Fields & Definitions for Recurring Entry Setup | ||||||||||||||||||||||||||
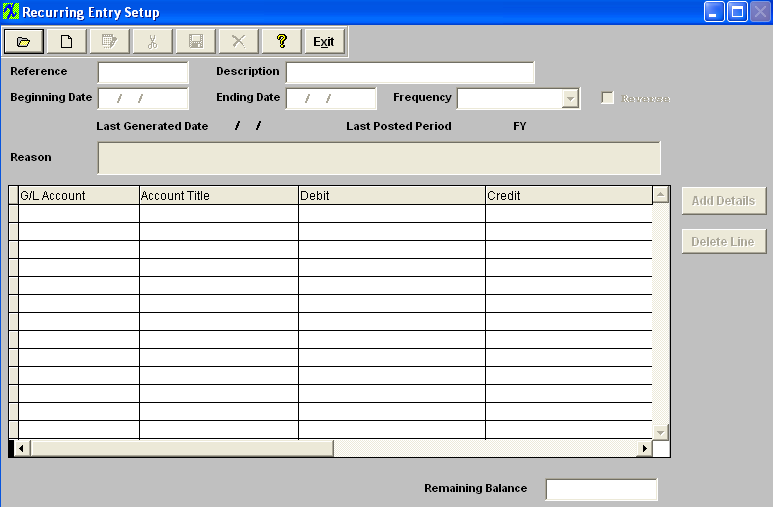
. |
| 1.3.4.4. How To ...... |
| 1.3.4.4.1. Find a Recurring Entry Setup | ||||
The following screen will appear: 
Once selected the record information will appear on screen:
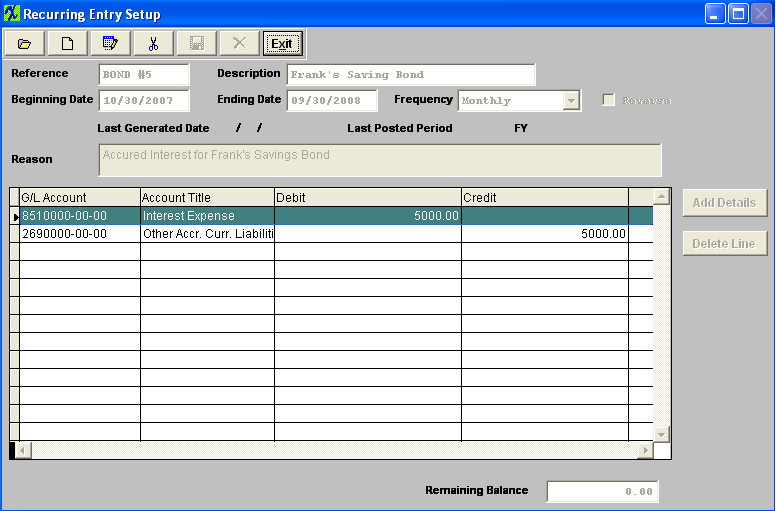 |
| 1.3.4.4.2. Add a Recurring Entry Setup | ||
The following screen will appear:  Selecting the ADD record button will allow the user to enter information about a New Recurring Entry. Enter a unique Reference to this entry, Description, Beginning Date, and Ending Date. Depress the down arrow on the right of the Frequency field and select the desired frequency (Note: That there will be a blank listed in the pull down. This is the way VFP treats a combobox object. Otherwise the field will show some value even if the record is empty and no data has been selected. If this Blank is selected, the system will properly treat the field as still being empty and will prompt the user for the proper selection at the time the record is saved).
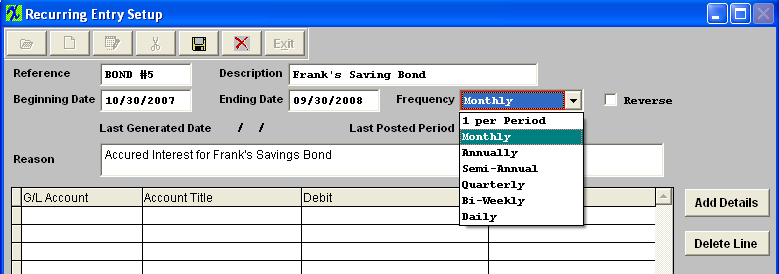 If a reversed entry check the Reverse entry box. Enter a default reason for the generated entry.
The actual data entry occurs in the middle section. Once you tab out of the Reason Field the system will default to the first GL Account Number to be entered. The user must enter a G/L Account directly by typing in the account number. The system will default to the nearest G/L Account match as you type. Then once you hit the Enter/Tab key the system will default in the Account Title Information. Then enter the Debit or Credit Amount. Depress the "Add Details" button to add another G/L Account. The user may choose to delete a line in the template by selecting the appropriate line and depressing the ‘Delete Line’ button. 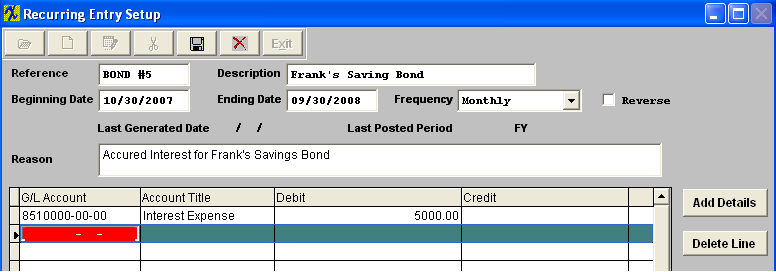 Enter the Debits and Credits until the Remaining Balance at the bottom of the screen equals 0.00.
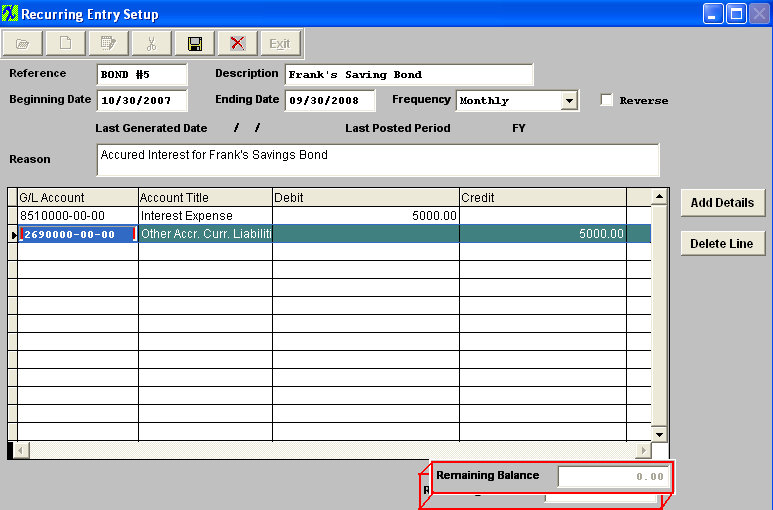 The Abandon changes action button is available at all times during an add operation. The Save record button will also show as available but will not allow you to save the record until the entier Recurring Entry Setup is in balance (debits = credits). Once the Entry is in Balance, the system will allow you to save the Recurring Entry. |
| 1.3.4.4.3. Post a Recurring Entry Setup | ||||||||
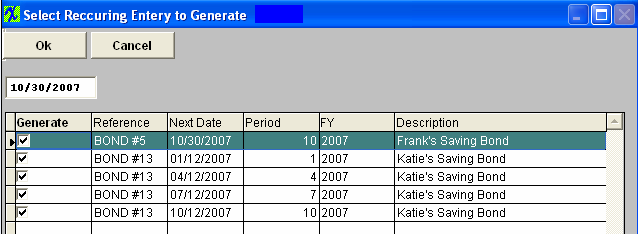
The following screen will appear:  Depress the Generate Recurring Entries button.
The Last generated entry will display on screen as follows: Here you may edit the Recurring General Journal Entry by selecting the Edit button or delete the Recurring General Journal Entry by selecting the Delete button. Note: Once the Recurring General Journal Entry has been ‘Approved’ you will no longer be able to edit or delete the record.  Or Depress the Find Record button, and select the appropriate Open Recurring Journal Entry from the list. 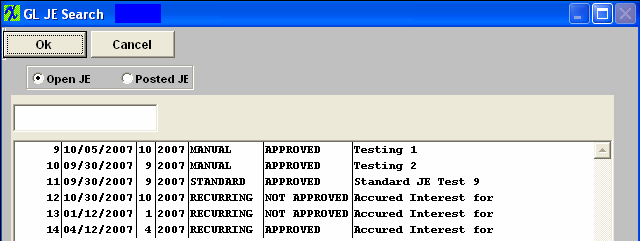 Depress the Approve button. You’ll be prompted for an authorized password. The Status will be changed to "APPROVED", and can now be posted to the General Ledger.  |
| 1.3.4.4.4. Edit a Recurring Entry Setup |
|
Remember that DEBITS must equal CREDITS in order to save.
|
| 1.3.5. Automatic Distribution Setup |
| 1.3.5.1. Prerequisites for Automatic Distribution Setup |
Users MUST have full rights to the "All Journal Activities" in Accounting Security . Users with “Accounting Security Supervisor” rights will automatically have access. |
| 1.3.5.2. Introduction for Automatic Distribution Setup |
Automatic Distributions are used to distribute expenses from one expense account to others after all other transactions have been posted for the month. A good example would be promotional expense. When they write checks the amount of the check is distributed to one account, say "Promotional General", then at the end of the month the total activity in that account for the month is distrubuted to various departments, say Manufacturing 50%, Admin 30%, Sales 20%. So after the automatic distributions have been posted, the "Promotional General" account has a zero balance for the month's activity and the various accounts have their proportional amount of the expense.
Automatic Distributions may be reviewed at period close. |
| 1.3.5.3. Fields & Definitions for Automatic Distribution Setup | ||||||||||||||||
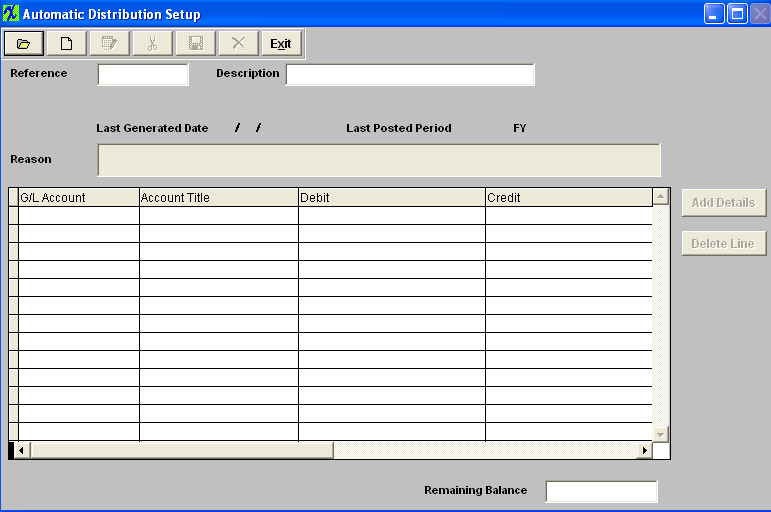
|
| 1.3.5.4. How To ...... for Automatic Distribution Setup |
| 1.3.5.4.1. Find an Automatic Distribution Setup | ||||
The following screen will appear: 
Once selected the record information will appear on screen:
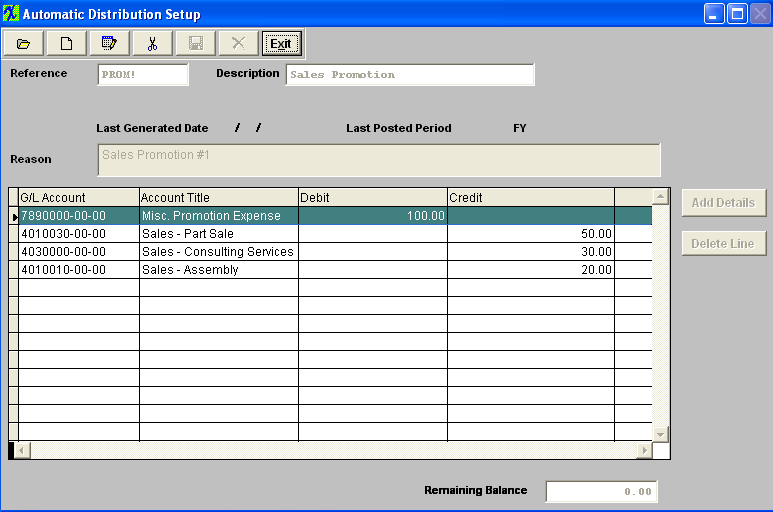 |
| 1.3.5.4.2. Add an Automatic Distribution Setup | ||
The following screen will appear:  Selecting the ADD record button will allow the user to enter information about a New Automatic Distribution Entry. Enter a unique Reference to this entry, Description, and a default reason for the generated entry.
The actual data entry occurs in the middle section. Once you tab out of the Reason Field the system will default to the first GL Account Number to be entered. The user must enter a G/L Account directly by typing in the account number. The system will default to the nearest G/L Account match as you type. Then once you hit the Enter/Tab key the system will default in the Account Title Information. Then enter the Debit or Credit Amount. Depress the "Add Details" button to add another G/L Account. The user may choose to delete a line in the template by selecting the appropriate line and depressing the ‘Delete Line’ button.  Enter the Debits and Credits until the Remaining Balance at the bottom of the screen equals 0.00.
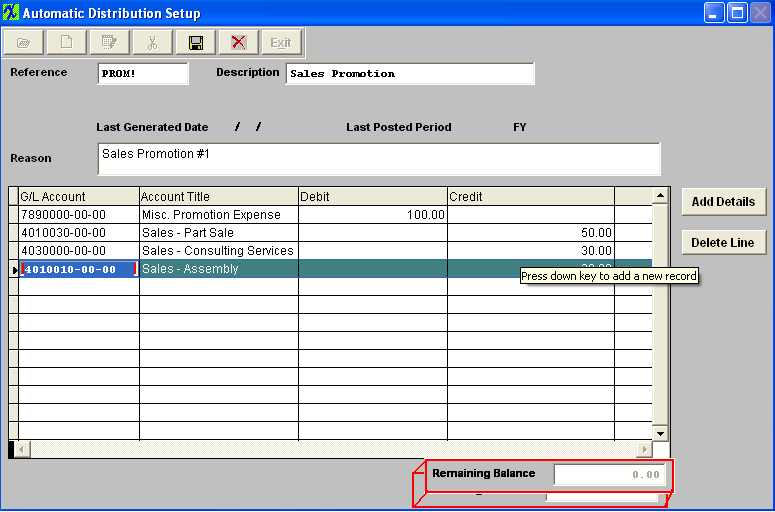 The Abandon changes action button is available at all times during an add operation. The Save record button will also show as available but will not allow you to save the record until the entier Automatic Distribution Setup is in balance (debits = credits). Once the Entry is in Balance, the system will allow you to save the Automatic Distribution Entry.
 |
| 1.3.5.4.3. Edit an Automatic Distribution Setup |
Find an Existing Automatic Distribution Entry
 Now you may edit the Automatic Distribution Entry by selecting the Edit button.  Remember that DEBITS must equal CREDITS in order to save.
|
| 1.4. G/L Release/Posting/Closing |
| 1.4.1. Release and Post to GL |
| 1.4.1.1. Prerequisites for the Release and Post Module | ||||||
Prerequisites Required for General Ledger activity:
In order for the ManEx General Ledger module to work correctly, all the modules in Accounting Setup must be setup properly, along with the following list of modules in System Setup : Inventory Items For Inventory Items, the Standard Cost must be entered: In Systems with ManEx Accounting installed, the amount entered in the Standard Cost field is used for Cost Accounting functions and is subject to strict change control. If ManEx Accounting is not being used, the field can show actual, target or user defined cost. Important Note - If accounting is installed: For ALL buy parts, the Standard Cost field MUST have data entered. If this data is missing (or wrong), the Raw Materials Inventory and the Work In Process (WIP) will be incorrect for the accounting records. Item Master tab – Buy part ·All make parts which are turnkey (not labor only), MUST have data entered in the Standard Cost field. Additionally, the data entered in the Standard Cost field for the make part should equal the sum of the Bill of Materials components. If the sum of the Bill of Materials components does not equal the Standard Cost per the MAKE PART Item Master, a CONFIGURATION VARIANCE will generate. A way to have the system upload these costs automatically is via the Standard Cost Adjustment module.
. |
| 1.4.1.2. Introduction for the GL Release and Post Module |
Release and Posting Information Overview
ManEx has revised and added new features to the Release and Posting to GL screen that will give the user much more detailed information on screen and flexibility. All transaction can be now released and posted from one screen. It also allows the users more control on how they wish to have the accounting records released/posted per transaction. Also, within the Release/Post Screen, where available user has the ability to drill back to the source in which the Transactions originated from. For Example: Within the Release/Post Sales screen the users will see a link back to the Sales Order and/or Invoice that the transaction originated from. If the user depresses this link the system will then bring them back to that module and record for further review.
Note: This screen is a single user screen, to prevent users from attempting to release/post the same record causing duplicated transactions to be posted to the GL.
There are three options for each of the 17 types of transactions to be released and posted.
1) The current method "Manual Release after Review & Manual Post after Review" This means that the transaction must first be released and then posted as two separate activities.
2) "Auto Release & Manual Post after Review" This means that when the transaction is saved or approved in the originating screen, the transaction is placed in the released tables and only has to go through the posting routine to be posted to the General Ledger.
3) "Immediate Auto Release & Post to G/L without Review" This means that when the transaction is saved or approved in the originating screen it is automatically posted to the General Ledger without having to go through any release or posting screen for review.
Postings To General Ledger are created automatically! For example, when a CUSTOMER INVOICE is printed, the system sets up the Underlying Journal Entry ready to post into the General Ledger.
Three Stage Posting Process: As designed, the General Ledger presents a 3 stage reporting/posting process to the user.
The first stage updates the aging reports and happens automatically when a Sales Invoice is printed or a Vendor’s Invoice is reconciled or entered directly into the accounts payable system through the use of a Manual Invoice. In this way the current aging status of both A/R and A/P can be known immediately. The second stage of the process occurs when the user activates the ‘RELEASE TO G/L’ selections. The process creates Underlying Journal Entries for the associated transactions. These Underlying Journals are in turn used in the actual General Ledger update procedure. The third and final stage of the General Ledger posting procedure is the actual posting to the General Ledger from the Underlying Journals. The posting process updates the tables used to present Balance Sheet and Income Statement information to the user.
Posting means that the transaction is recorded in the GLTRANS table. This information is then used in the GL Reports.
The last process is CLOSING A PERIOD and moving the final closing balance information into the appropriate history files. Real Time All of the G/L interfaces are created in a Real Time mode and forward into the various release modules. For example, the instant that the Invoice is printed in the ManEx Administration module, the entry is created and forwards into the Release Sales to General Ledger. The ManEx general ledger system is designed to give the user the widest range of possible entry options while maintaining compatibility with generally accepted accounting principals.
|
| 1.4.1.3. Fields and Defintions for the Release and Post Module |
| 1.4.1.3.1. General Ledger Release & Post Screen | ||||||||||||||||||||||||||||||||||||||||||||||||||||||||||
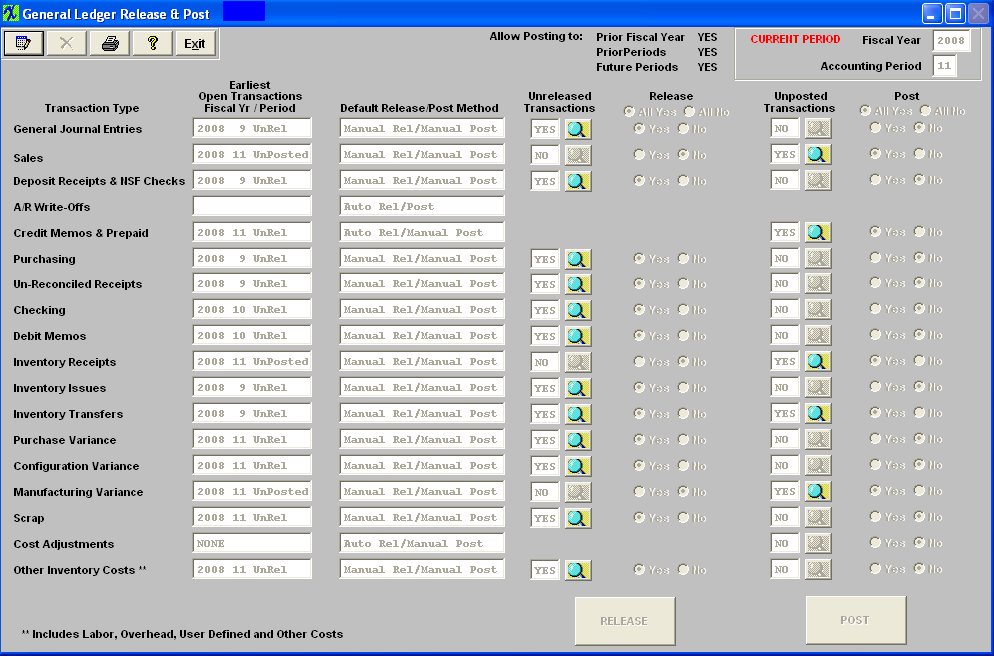
Transaction Types:
|
| 1.4.1.3.2. Release Screen | ||||||||||||||||||||||||||||||||||||||
(Note: The screens may vary in appearance by the type of transaction but basically contain the same information). On some transaction types there will be one grid and on others there will be a second grid showing the details of the transactions. The data can be sorted in various ways by clicking on the column headers that are in bold font. Some types of transactions will allow users to drill back to the source in which the transactions originated from, such as Purchase Order, Sales Order, Work Order, etc. Those will be shown with an underline font.
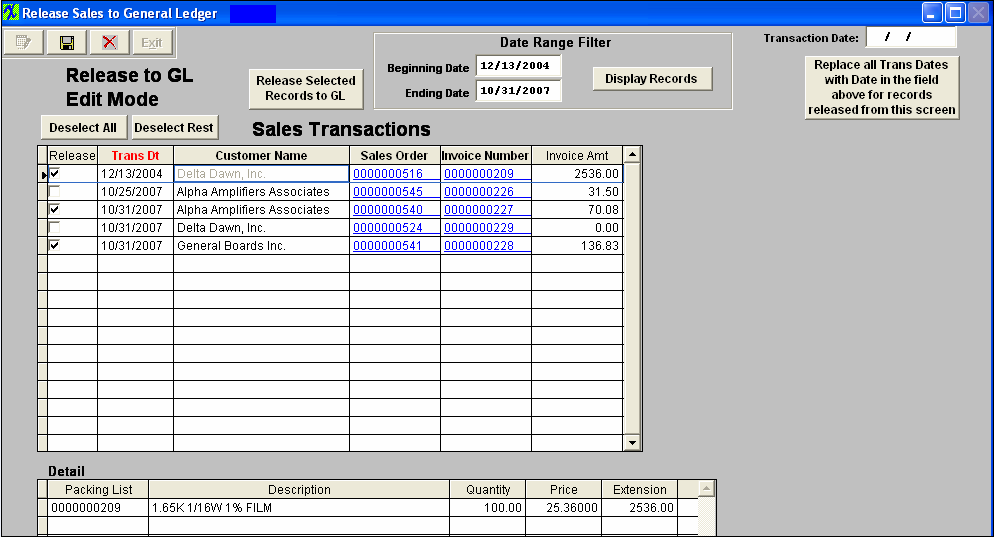
Date Range Filter
Transactions
Detail - This section is just intended to list out the individual items from the transaction and in some cases not actually breaking out the transaction that is going to be created. The Posting screen will display that information such as tax, freight, etc.
|
| 1.4.1.3.3. Post Screen | ||||||||||||||||||||||||||||||||
(Note: The screens may vary in appearance by the type of transaction but basically contain the same information). The transactions that have been released and waiting to be posted will appear in the first (left) grid. The data can be sorted in various ways by clicking on the column headers that are in bold font. Some types of transactions will allow users to drill back to the source in which the transactions originated from, such as Purchase Order, Sales Order, Work Order, etc. Those will be shown with an underline font in the last column. The detail of each transaction will be displayed in the second (right) grid with the GL number and the Debits and Credits.

Date Range Filter
Transactions
Detail
|
| 1.4.1.4. How To ...... for the Release and Post to GL |
| 1.4.1.4.1. Release & Post Information to G/L | ||
The General Ledger Release & Post screen will appear: In the screen below, notice that for the Credit Memos & Prepaid type of transactions, the setup has the Release automatic, but Posting manual. The third column displays this condition, and the Release columns are not shown, but the Posting columns are shown. Likewise, for the A/R Write-offs type of transactions, both are automatic, and neither has the ability to view details nor elect whether or not to Release and Post.  There are two different ways to Release records. User can Release several transactions at once by depressing the Edit button and select or de-select the transactions to be released by depressing the radio next to "Yes" or "No" and depress the "RELEASE" button at the bottom of the screen and this will release all the transactions selected "Yes". Or User can release transactions individually by clicking on one of the magnifying glass buttons under the Unreleased Transactions and the following Release screen will appear: (Note: The screens may vary in appearance by the type of transaction but basically contain the same information). On some transaction types there will be one grid and on others there will be a second grid showing the details of the transactions. The data can be sorted in various ways by clicking on the column headers that are in bold font. Some types of transactions allow drill down to the originial form such as Purchase Order, Sales Order, Work Order, etc. Those will be shown with an underline font. User can select a date range filter to display only those transactions within a given period of time, by entering different Beginning Date and/or Ending Date and depressing the "Display Records" button. 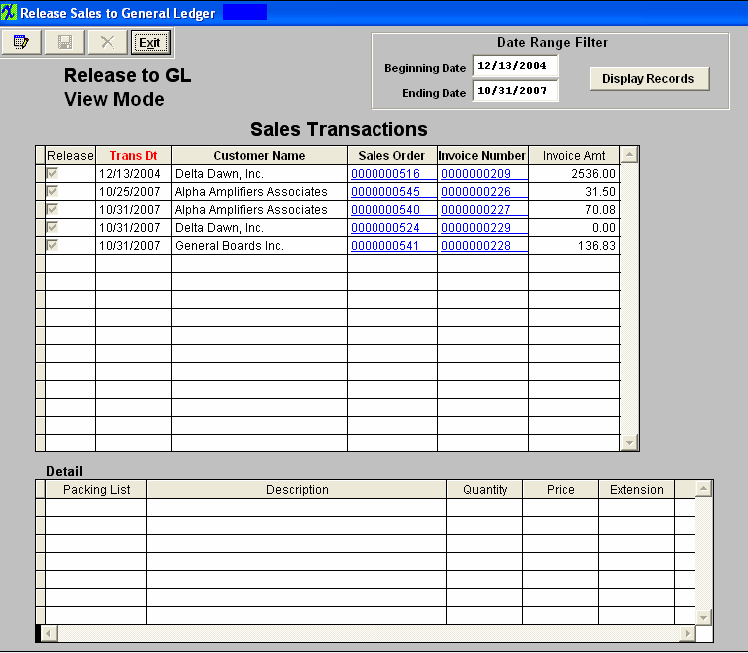 To release transactions, depress the Edit button, the user is notified they are in the "Edit" mode, the Save and Cancel buttons are available, along with the toggle buttons to "Select l/Deselect the transactions to release. Also in the edit mode you have the ability to change the transaction dates for all of the transactions.
 One you have selected the records to be released, Depress the "Release Selected Records to GL". The records selected to be released will be removed from the release screen and the records not selected to be released will stay on screen. Then the magnifying glass for Unposted Transactions will display transactions to be posted.
 Click on one of the magnifying glass buttons under the Unposted Transactions and the following Posting screen will appear: (Note: The screens may vary in appearance by the type of transaction but basically contain the same information). The transactions that have been released and waiting to be posted to the general ledger will appear in the first (left) grid. The data can be sorted in various ways by clicking on the column headers that are in bold font. Some types of transactions allow drill down to the originial form such as Invoice No, Purchase Order, Sales Order, Work Order, etc. Those will be shown with an underline font in the last column. The detail of each transaction will be displayed in the second (right) grid with the GL number and the Debits and Credits. User can select a date range filter to display only those transactions within a given period of time, by entering different Beginning Date and/or Ending Date and depressing the "Display Records" button. Transactions that cannot be posted because of restrictions for past or future period posting will be shaded in RED and the "YesNo" column in the grid is unchecked for those items.
 Depress the Edit button, the user is notified they are in the "Edit" mode, the Save and Cancel buttons are available, along with the toggle buttons to Select/Deselect transactions to be posted. Also in the edit mode you have the ability to change the transaction dates for all of the transactions.
 One you have selected the records to be posted, Depress the "Post Selected Records to GL". The records not selected to be posted will stay on screen, the records selected to be posted will be removed from the post screen and will create a Transaction record as the one displayed below:
 |
| 1.4.1.5. Reports-Variance | ||||||||||||||||||
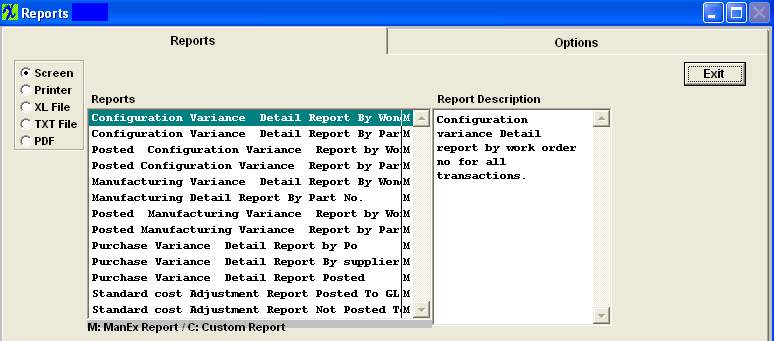
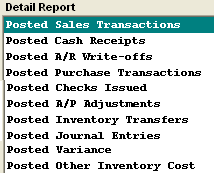
The following screen will appear:

Configuration Variance Detail Report by Work Order No for all Transactions or Configuration Variance Detail Report by Part No for all Transactions
The following report will print: (Note: Report may view differently, depending on Report Selection):
 Posted Configuration Variance Detail Report by Work Order No or Posted Configuration Variance Detail Report by Part No
The following report will print: (Note: Report may view differently, depending on Report Selection):
 Manufacturing Variance Detail Report by Work Order No for all Transactions or Manufacturing Variance Detail Report by Part No for all Transactions
The following report will print: (Note: Report may view differently, depending on Report Selection):
 Posted Manufacturing Variance Report by Work Order No or Posted Manufacturing Variance Report by Part No
The following report will print: (Note: Report may view differently, depending on Report Selection):
 Purchase Variance Detail Report by PO or Purchase Variance Detail Report by Supplier for Variance Transactions Only or Purchase Variance Detail Report Posted
The following report will print: (Note: Report may view differently, depending on Report Selection):
 Standard Cost Adjustment Report Posted to GL by Part No or Standard Cost Adjustment Report Not Posted to GL by Part No
The following report will print: (Note: Report may view differently, depending on Report Selection):

|
| 1.4.2. End of Period & F/Y Closing |
| 1.4.2.1. Prerequisites for the End of Period & FY Closing |
All transactions MUST be released and posted before the "Close Period/Fiscal Year" button will be enabled.
Users MUST have full rights to the "End of Period and FY" in Accounting Security . Users with “Accounting Security Supervisor” rights will automatically have access. Fiscal year end closing is a multi step process. First go through all of the normal Period End Closing routines. Print off all of the desired GL Reports , including a Year End Trial Balance Report. |
| 1.4.2.2. Introduction for the End of Period & F/Y Closing |
The closing of the final period of a fiscal year serves to close the fiscal year itself and to reset the current balance entries. All of the Income Statement Accounts will zero out and post into the Retained Earnings Account.
|
| 1.4.2.3. Fields & Definitions for the End of Period & FY Closing |
| 1.4.2.3.1. GL Fiscal Period Close | ||||||||||

|
| 1.4.2.4. How To ...... for the End of Period & F/Y Closing |
| 1.4.2.4.1. Close End of Period | ||
The following screen will appear displaying the unreleased or unposted transactions for this period and these transactions must be released and posted before the "Close Period/Fiscal Year" button will be available.  Once all transactions are released and posted the following screen will appear and the "Review Auto Distributions JEs for Current Period" button will be available.
 Depress the "Review Auto Distribution JEs for Current Period" button and a list of the calculated Automatice Distributions will be displayed in the grid that will appear. This list will also display any Automatic Distributions that are in the system but have no calculated entries. This can be used to alert the user that something might be wrong with one or more of the Automatic Distributions. If there are Automatic Distributions that need to be posted, the user must click on the "Approve" button that will appear. WHen the approvals are made, a message will appear on the screen and the "Close Period/Fiscal Year" button will be enabled. If there are NO Automatic Disctributions to be posted the following message appears:  Depress OK - the "Close Period/FiscalYear" button becomes enabled and the "Approve" button will not appear: 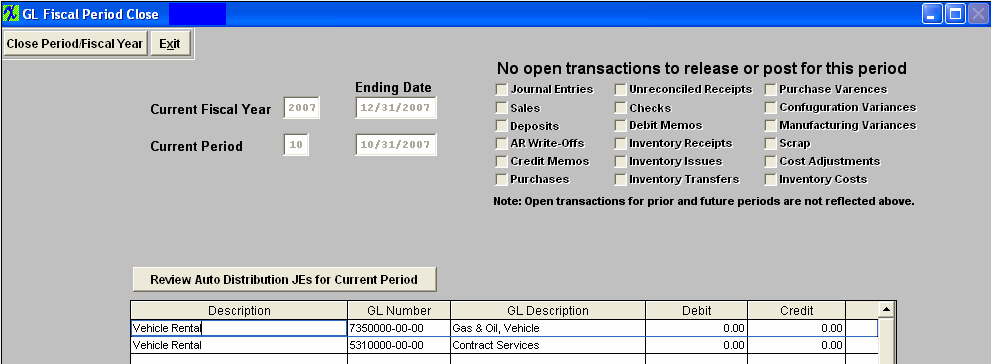 User can choose to enter in Amounts for the Auto Distributions if desired: 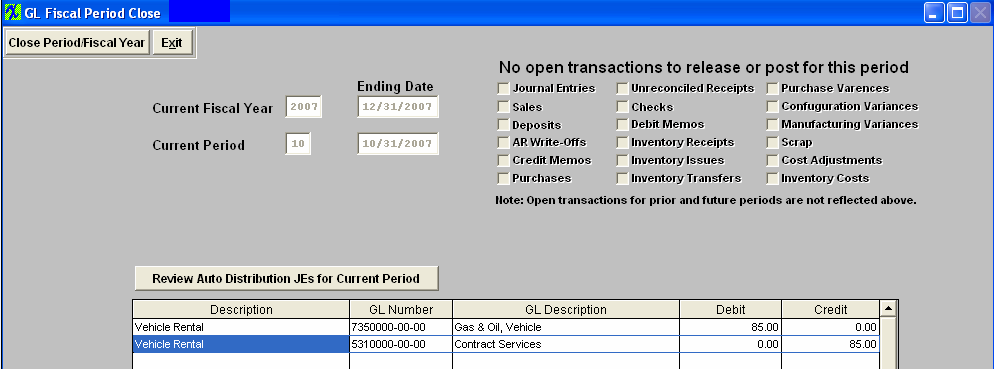 Depress the "Close Period/Fiscal Year" button. The following message will appear:  If you select "NO" you will be returned to the screen and nothing will be processed for the close (including Automatic Distributions). If you are certain that you want to close the Current Period, depress the "Yes" button. Enter your password. The following message will appear: If you do not want to continue the closing depress the "No" button to abandon the process.
 Depress the "Yes" button to continue, and the following message will appear confirming that the period has been closed and the current period has been updated. Depress the "No" button to abandon the process.
 The screen will update to next period and the Exit button will be available.
 |
| 1.4.2.4.2. Fiscal Year Closing | ||
Fiscal Year End Closing
The following screen will appear:
 Depress the "Review Auto Distribution JEs for Current Period" and the following message will appear:
 Depress OK - the following screen will appear so you may enter amount for the Auto Distribution if desired, or Select to Generate & Display Closing JEs for Year End Close:
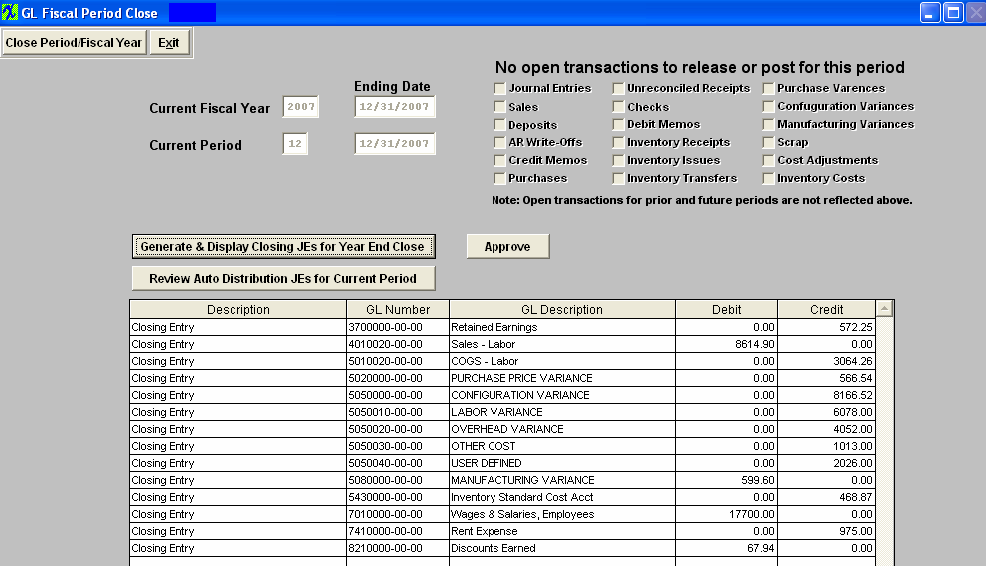
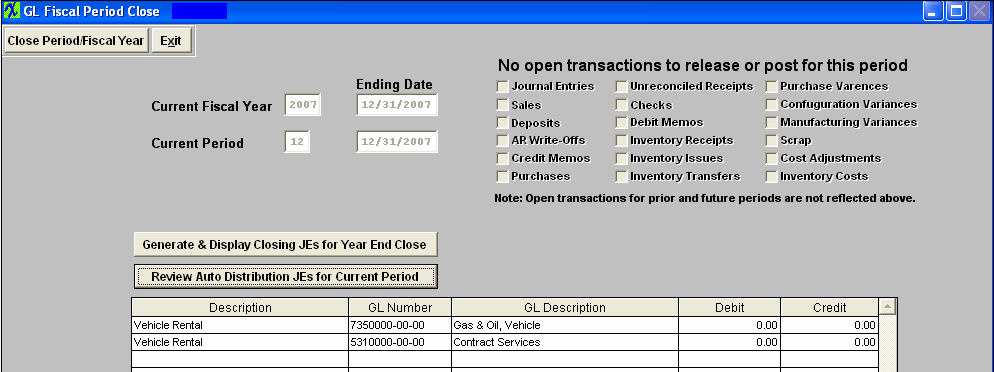 Depress the "Generate & Display Closing JEs for Year End Close" button; the closing Entries waiting to be Approved will be displayed:
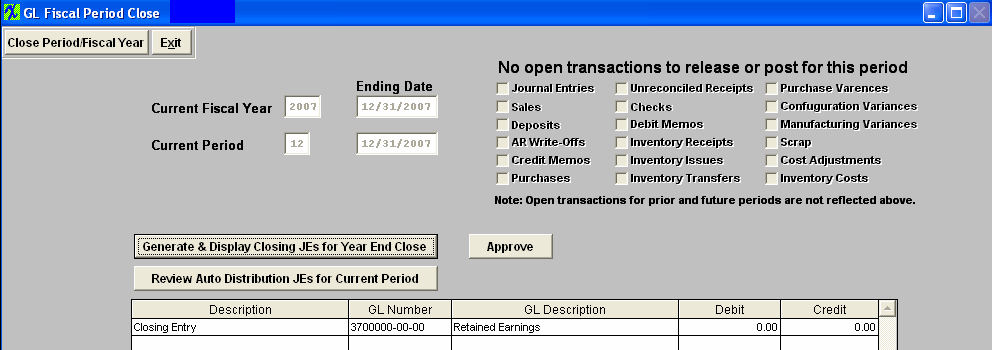
 If the "Closing JEs have been already Generated & Approved in the G/L General Jornal Entry screen, the the following screen will appear allowing user to create a new transaction if needed:
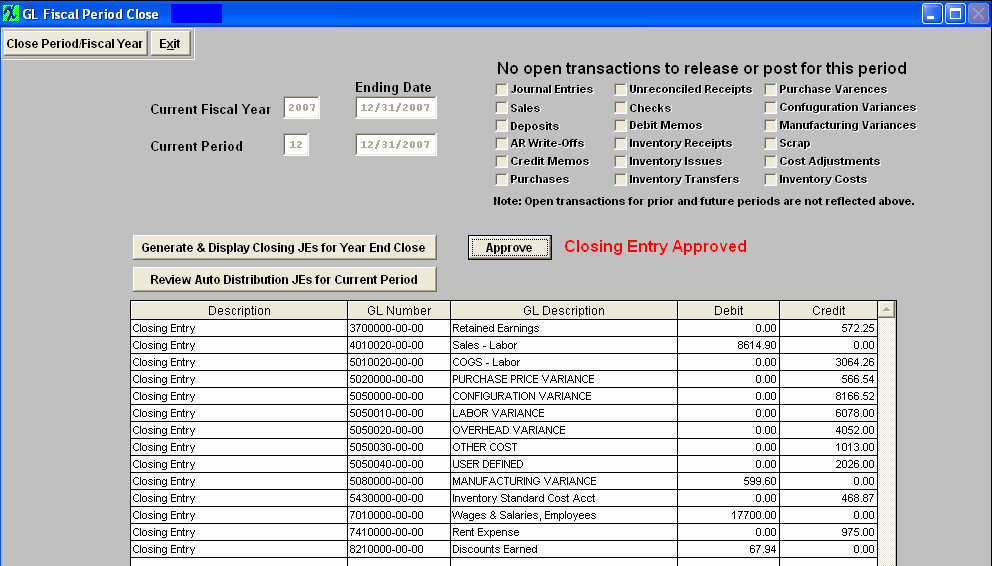
 Depress the "Approve" button and the status will update:
 Depress the "Close Period/Fiscal Year" button and the following message will appear:
 Depress "Yes" to continue the following message will appear:
 Depress "Yes" to continue and the following message will appear:
 Depress "Yes" to continue and the following message will appear:
 Depress OK and the Fiscal Year and period will update
 The Posted Closing Journal Entry
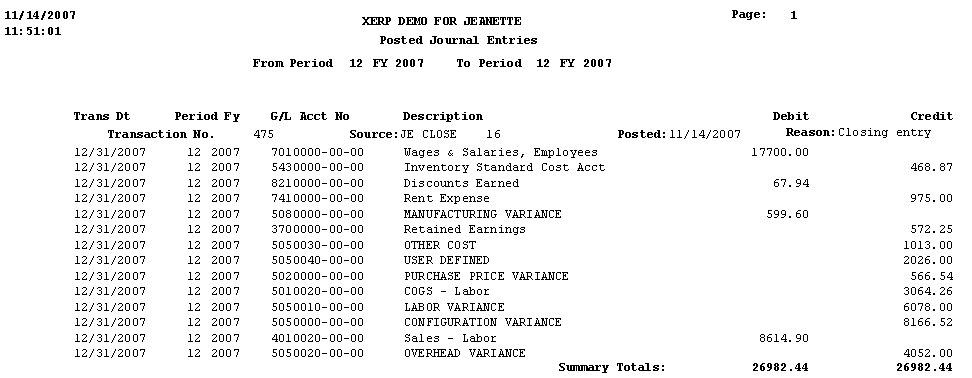
|
| 1.5. General Ledger Reports |
| 1.5.1. Prerequisites for the GL Reports | ||||
Prerequisites Required GENERAL LEDGER activity:
The account information for the General Ledger must be established in the Accounting Setup . Users MUST have full rights to the "View GL Activity/Reports" in Accounting Security . Users with “Accounting Security Supervisor” rights will automatically have access. |
| 1.5.2. Introduction for GL Reports |
OVERVIEW
General Ledger reports are defined in 4 main categories: 1) Static Informational Reports 2) Account Inquiry Reports 3) Summary Reports 4) Posting Reports STATIC INFORMATIONAL REPORTS Static Informational Reports are reports allowing the user to review information entered during the setup phase of the general ledger. Currently the only static informational report is the Chart of Accounts.
|
| 1.5.3. How To .... for the GL Reports |
| 1.5.3.1. Accounts | ||||
Teh following screen will appear:
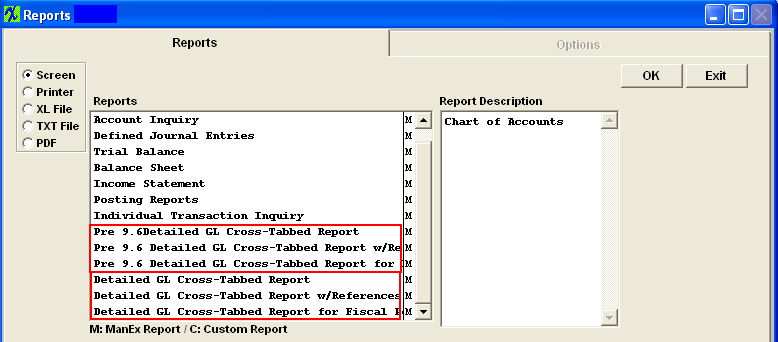 Select the Chart of Accounts report. Then depress the OK button, the following report will be displayed.
ACCOUNT INQUIRY REPORTS
The following report will be displayed.
|
| 1.5.3.2. Journal Entries | ||||
The following screen will appear:

The following report will print: 
|
| 1.5.3.3. Trial Balance | ||||||
The following screen will appear: 
Depress the OK Button and the following report will be displayed (Basic Trial Balance Report) 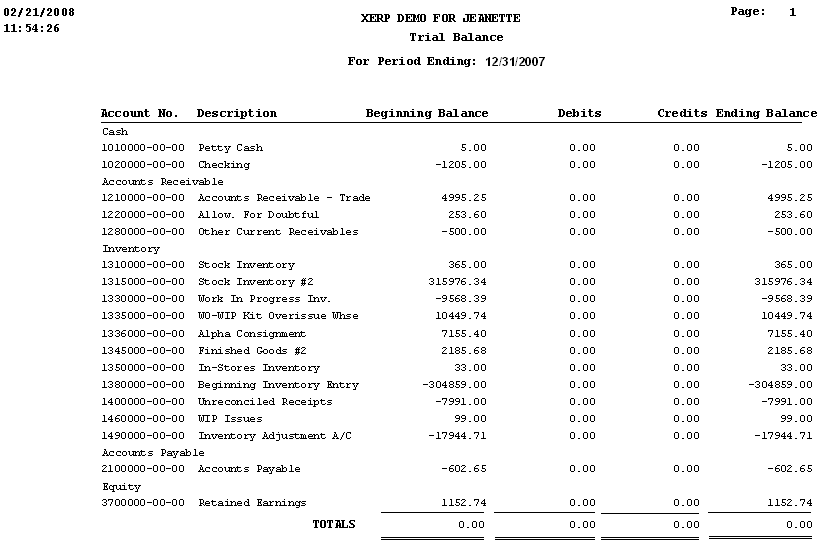
|
| 1.5.3.4. Balance Sheets | ||||||
The following screen will appear: 
OVERVIEW
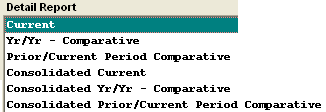
Balance Sheet reporting provides for the printout of ending balance values in a standard format as defined by the user. The Account Type, Account setup and report default definition is defined in the setup modules for the General Ledger . Current period report provides a single column of output while the comparative reports provide for two columns of data to compare one set of data with another. For example, one may compare the current period with the prior period, current period with same period in the previous year, current period and year to date, etc. The three Consolidated reports available are for the users that have multiple divisions setup within the ManEx system. They are the same as the individual balance sheets, but these reports consolidate multiple division into one report.
Note: If the user is having problems with the totaling within the Balance Sheet, the following is the way that the accounting normal balances are established within the ManEx General Ledger Account Ranges for the printing of the financial statements. All asset accounts must be set up with the normal balance value as DEBIT, including contra accounts.The system doesn’t distinguish between a liability and a contra asset on the balance sheet, therefore any contra asset must be identified with a normal balance of debit. This does not mean that the system will treat contra assets as normally having an accounting balance of debit. The debit in this field signifies only that it is part of the asset group and not a part of the liability group for the purpose of printing of the financial statements.
The following report will be displayed (Current BalanceSheet)
 Note: Your Checking amount may not always match your Bank Balance. For more detail see Article #3262 .
|
| 1.5.3.5. Income Statements | ||||||
The following screen will appear: 
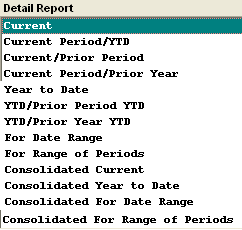
OVERVIEW Income Statement reporting provides for the printing of ad-hoc single period income statements as well as the more traditional period based reports. The Comparative reports provide for two columns of information, for comparative purposes. The Consolidation reports are available for users that have multiple divisions setup with the ManEx system. They are the same as the individual Income Statements, but these reports consolidate multiple divisions into one report. Output of the reports is based on definitions established by the user in the General Ledger setup area of Account Types and Report Defaults.
The following report will be displayed. (Current) 
|
| 1.5.3.6. Posting Reports | ||||||
The following screen will appear: 
The following report will appear:
 |
| 1.5.3.7. Detailed GL Cross-Tabbed Reports | ||||||
The following screen will appear:  Due to the fact that we restructured the Accounting system and where/how the records are stored it was found that the previous Cross-tabbed reports would not be able to display the detailed transaction inforrmation. So we named the previous Cross-tabbed reports to included "Pre 9.6 Detailed GL Cross-Tabbed Reports". These reports will remain available so users can use them to print out any Cross-Tabbed report for Transactions that were created BEFORE updating to 9.6. We then designed new "Detailed GL Cross-Tabbed Reports" to work with 9.6 Accounting. Because of the new structure, the new reports will generate faster due to fewer interim files to be accessed. New records will be displayed on the Detailed GL Cross-Tabbed Reports as well as the Pre 9.6 Detailed GL Cross-Tabbed Reports, but on the Pre 9.6 reports it will display as "Missing Information". The "Detailed GL Cross-Tabbed Reports" and "Individual Transaction Inquiry" are available for the user to drill down into the source of the transaction, which was posted to the General Ledger.
The Detailed GL Cross-Tabbed Reports provides a way to trace activity posted to all accounts during a given date range based on the Transaction date NOT the Posted Date.. The report is sorted by account number so you may see what amounts were posted to the account. A reference number is provided to assist in finding the balancing entries.
NOTE: If user happens to Transfer product back and forth (for example: if user transfers 5 into FGI, then transfers the same 5 back into Stag, then transfers the same 5 back into FGI again) the Total Qty transferred on the "GL X-Tabbed w/Reference" report will reflect 15 which is how many total qty's were transferred. The transaction value itself will be for the quantity of 5, but the reference info will be reflecting the quantity of 15. If users see this on the "GL X-Tabbed Report w/Reference" report, they may want to check the transfer history by highlighting the FGI work center and depressing the "Xfer History" button located in the Shop Floor Tracking module. This will display all the transactions that happen even though it was the for the same quantity.
Highlight one of the Detailed GL Cross-Tabbed Reports from the menu. NOTE: The Detailed GL Cross Tabbed Report for Fiscal Year is the ONLY Cross Tabbed report where the begginning balance will match the Trial Balance report beginning balance. The other Detailed GL Cross Tabbed reports are calculated a bit differently then the Trial Balance report, so they will more than likely never match the Trial Balance rpt.
The following report will be displayed.
Note: "Missing Information" could mean that the inventory part number that was assoicated to this transaction has been deleted from the system.
The Individual Transaction Inquiry is a sister report to the Detailed GL Cross-Tabbed reports, it provides the full entry as referenced by the transaction number, which the user has obtained in the View G/L Activity or the Detailed GL Cross-Tabbed Reports. Highlight the Individual Transaction Inquiry from the menu.
The following report will be displayed. 
|
| 1.6. Budgeting |
| 1.6.1. Prerequisites for Budgeting |
Users MUST have full rights to the "Budgeting" in Accounting Security . Users with “Accounting Security Supervisor” rights will automatically have access. |
| 1.6.2. Introduction for Budgeting |
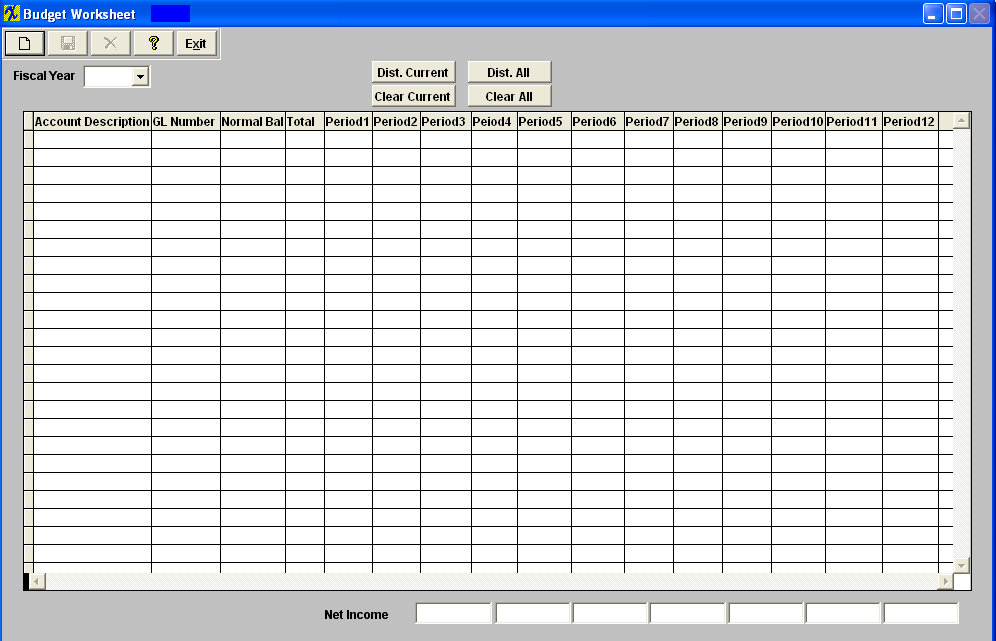
The Budget module is strictly for a quick reference for users to use if they want to put together a simple budget to go by and reference throughout the year. There are no reports in the module that you can use to compare actual to budget or for previous fiscal years. The data entered into this module has no impact on the tables or with any of the other modules in the system. |
| 1.6.3. Fields & Definitions for Budgeting | ||||||||||||||||||||||
|
| 1.6.4. How To ..... for Budgeting |
| 1.6.4.1. Add a Budget | ||||||
The following screen will appear: 
This action will cause the screen to fill with all of the Income Statement Posting Accounts: Displayed will be the Account Description, GL Number and whether the account is defined as a natural debit or credit.
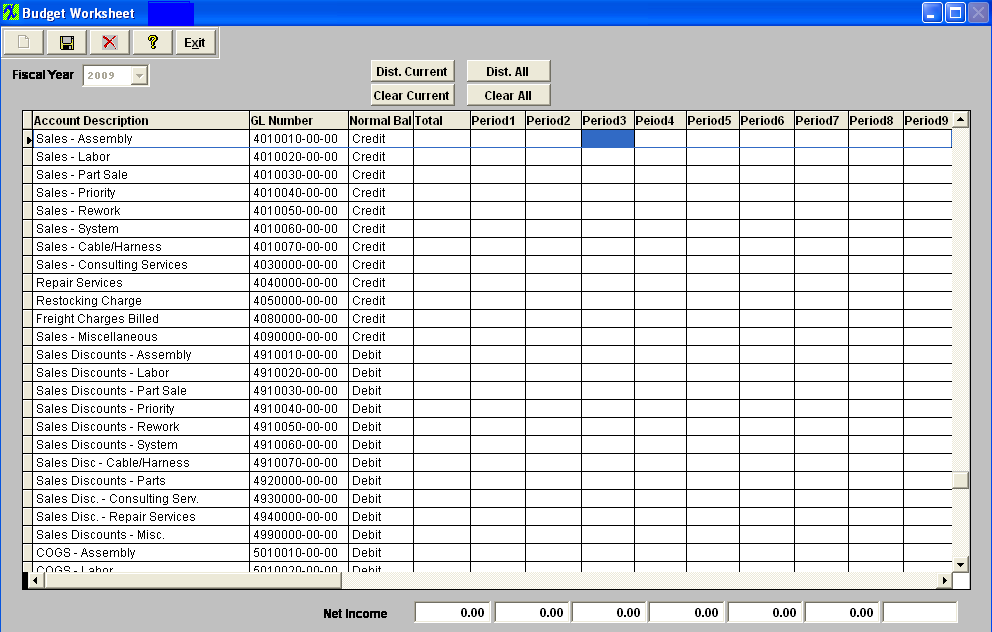 The user enters in the Total Budgeted Amount in the total column. NOTE: Do not be concerned with signs. If you type in everything positively, the system knows the natural +/- condition. Once all of the Totals are entered, the user depresses the "Dist All" button. The system will take the total and divide it by the 12 periods, as displayed below:
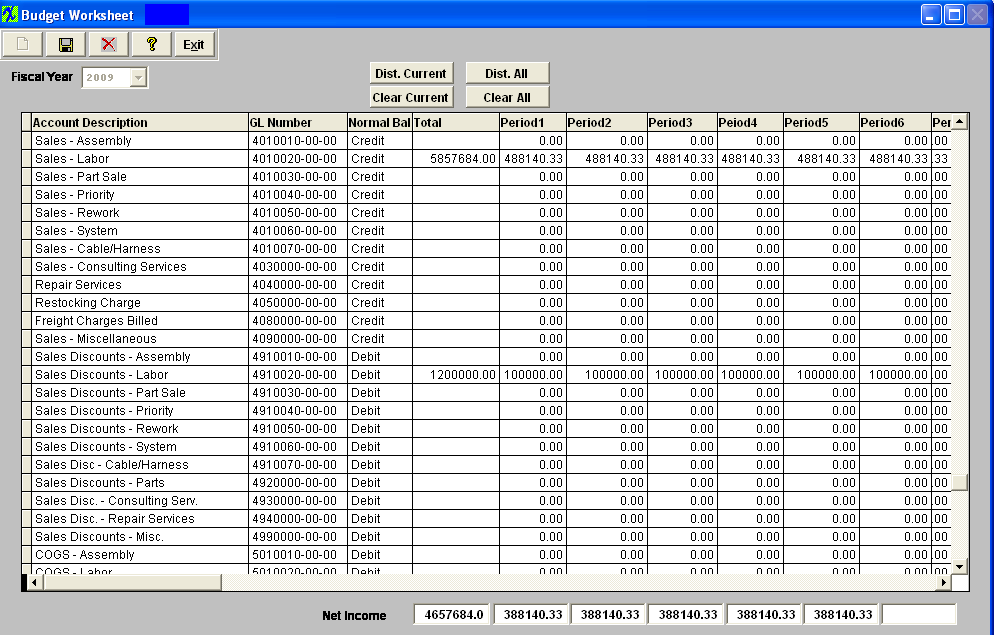 To enter just one line item at a time and to view the results, depress the Dist. Current button. To clear just one line item, highlight it and depress the Clear Current button. To clear All, depress the Clear All Button. Depress the Save button to save changes or depress the Abandon Changes button to abandon changes. |
| 1.7. G/L Consolidation Export |
| 1.7.1. Prerequisites for G/L Consolidation Export |
|
Users MUST have full rights to the "GL Consolidation Export/Import" in Accounting Security . Users with “Accounting Security Supervisor” rights will automatically have access. The user must first set up the GL Divisions/Departments for Headquarters and Local Divisions. Once the consolidating divisions are set up and all of the accounts copied (Note: The Headquarters Division 01 must contain the Local Divisions and the accounts for all of the other divisions), the user may start the consolidation process. |
| 1.7.2. Introduction for G/L Consolidation Export |
The ManEx General Ledger Consolidations assumes that there are more than one independent ManEx systems in use, say one for the Main Company and one or more subsidiaries. There is a Consolidation system which must be Division 00. The Main Company would be Division 01, the Subsidiaries, Division 02, 03, etc.
When the user is satisfied with all of the individual divisional Trial Balances, the import of divisions into the Consolidated Div 00, may take place. Then the user prepares and enters the consolidation elimination journal entries into Division 00. These are setup as reversing entries and are reversed at the beginning of the following month. Once the consolidated elimination journal entries are posted, the user may print off the consolidated Trial Balance. Then the Consolidated financials may be printed. |
| 1.7.3. Fields and Definitions for G/L Consolidation Export | ||||||
|
| 1.7.4. How to ..... for G/L Consolidation Export |
| 1.7.4.1. General Ledger Consolidation Export | ||
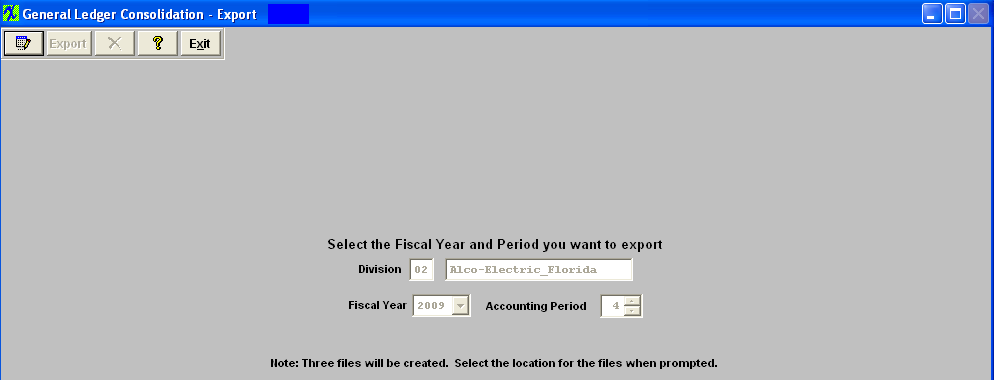
The following screen will appear:
 Depress the Edit button and the "Export" button is enabled:
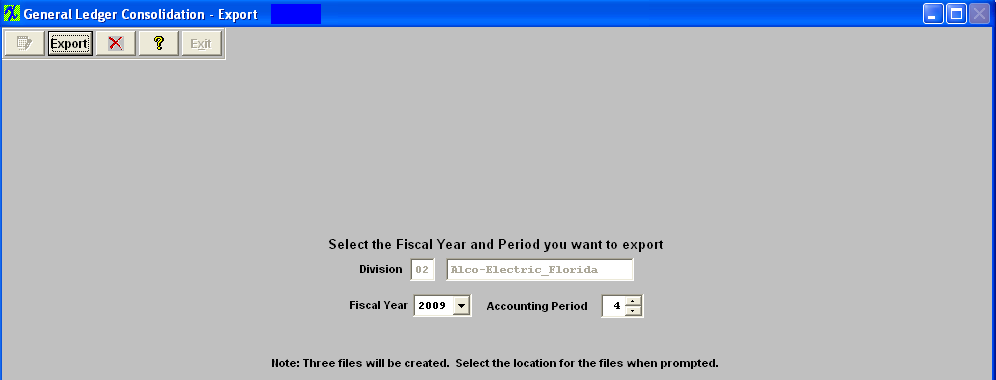 Depress the "Export" button and the Save As screen appears: NOTE: You MUST save the files to the default directory. The program needs to save the files to the working manex directory because that is where it will go to find the exported files when the Consolidation is Imported. (The system will NOT allow you to export to a path that contain spaces).
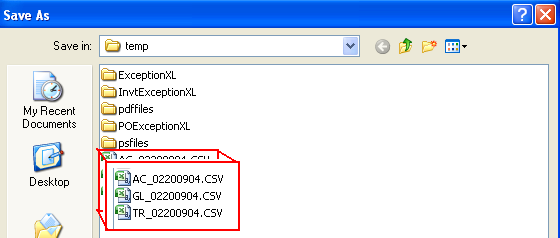
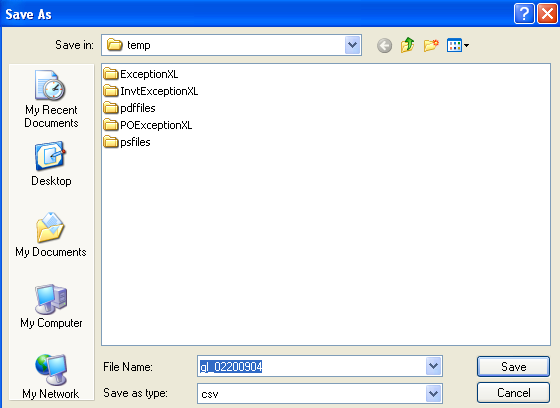 Continue to depress the Save button until the following three files have been saved in the temp file:
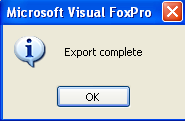
 And the following "Export Complete" screen has appeared:
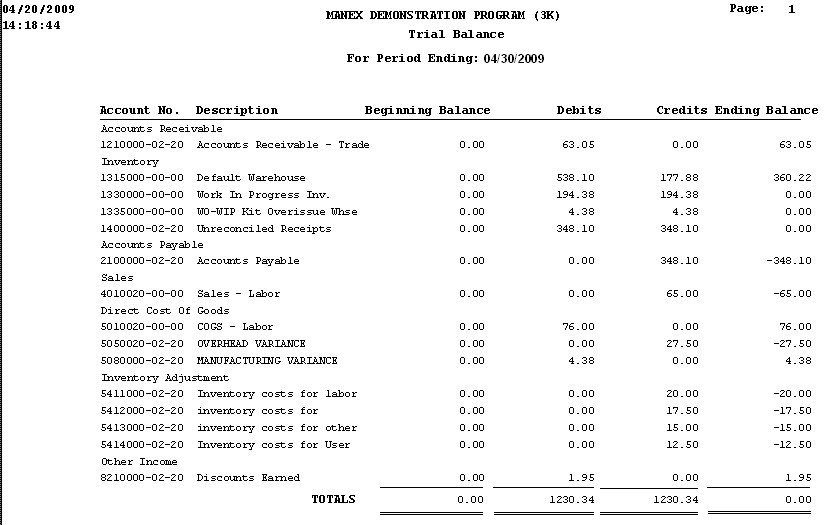
 The Trial Balance report being Exported:
 |
| 1.8. G/L Consolidation Import |
| 1.8.1. Prerequisites for G/L Consolidation Import |
|
Users MUST have full rights to the "GL Consilidation Export/Import" in Accounting Security . Users with “Accounting Security Supervisor” rights will automatically have access. The user must first set up the GL Divisions/Departments for Headquarters and Local Divisions. Once the consolidating divisions are set up and all of the accounts copied (Note: The Headquarters Division 01 must contain the Local Divisions and the accounts for all of the other divisions), the user may start the consolidation process. |
| 1.8.2. Introduction for G/L Consolidation Import |
The ManEx General Ledger Consolidations assumes that there are more than one independent ManEx systems in use, say one for the Main Company and one or more subsidiaries. There is a Consolidation system which must be Division 00. The Main Company would be Division 01, the Subsidiaries, Division 02, 03, etc.
When the user is satisfied with all of the individual divisional Trial Balances, the import of divisions into the Consolidated Div 00, may take place. Then the user prepares and enters the consolidation elimination journal entries into Division 00. These are setup as reversing entries and are reversed at the beginning of the following month. Once the consolidated elimination journal entries are posted, the user may print off the consolidated Trial Balance. Then the Consolidated financials may be printed. |
| 1.8.3. Fields and Definitions for G/L Consolidation Import | ||||||||||
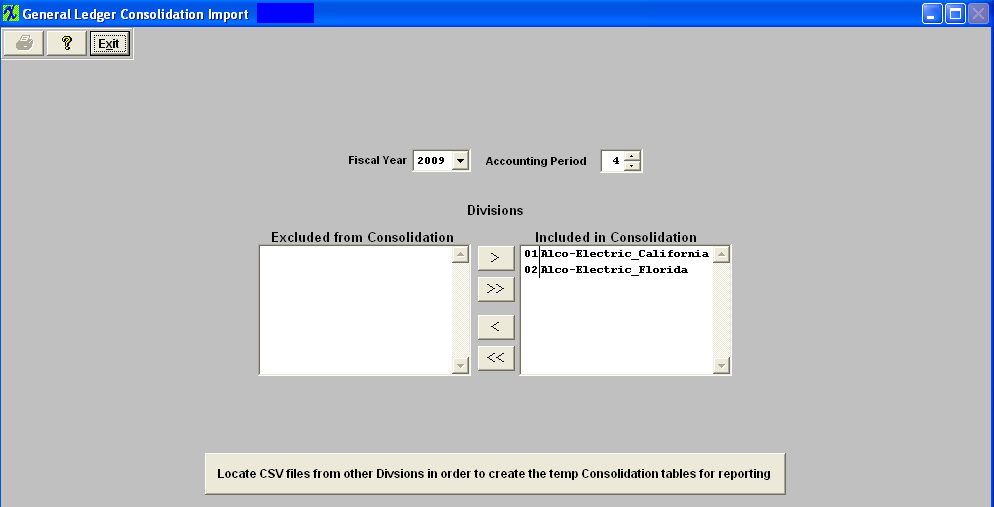
Divisions
|
| 1.8.4. How To ..... for G/L Consolidation Import |
| 1.8.4.1. General Ledger Consolidation Import | ||
The Division Names will forward from the G/L Divisions/Departments setup. Note: Division 00 does not appear because it is reserved for Consolidation. The following screen will become available:  Click on the < > buttons to include or exclude the division(s0 for Consolidation. Depress the "Locat CSV files from ......" The following prompt will appear:  Depress OK and the following screen will appear which includes the files exported from the secondary division(s): Open each file as instructed at the top of the screen.
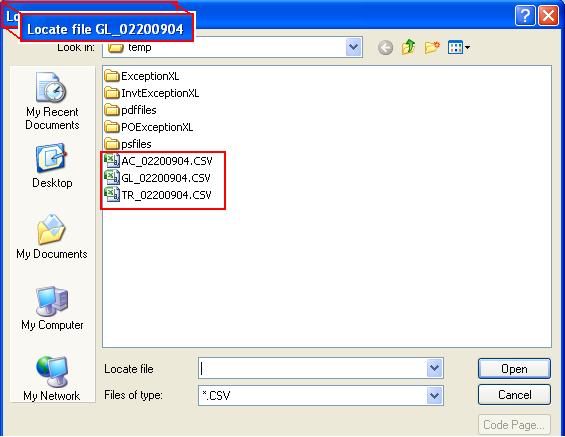 Once all three files have been Opened the following messge will appear informing the user that the Consolidation completed successfully and you may print the consolidated reports.
 Depress the Reports button.
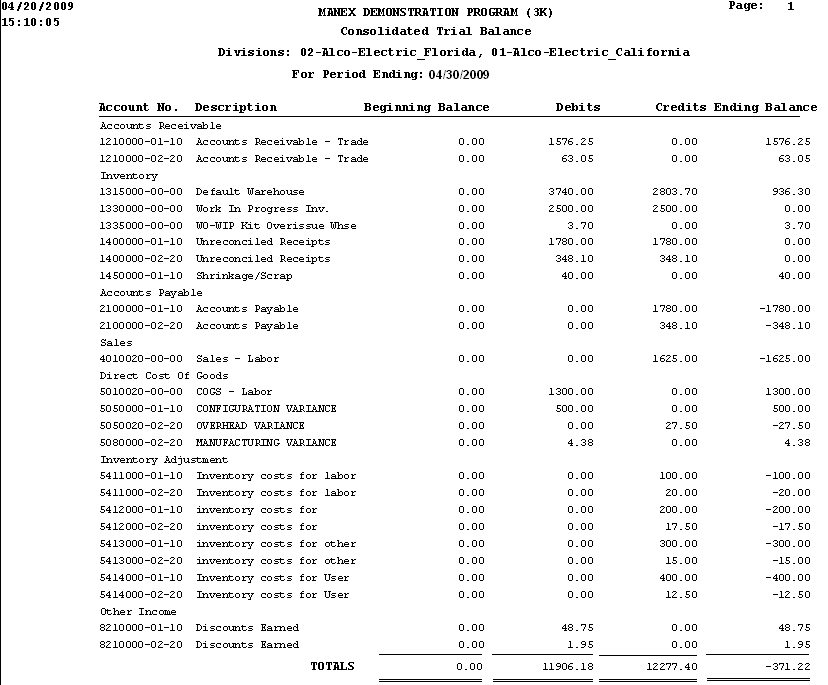
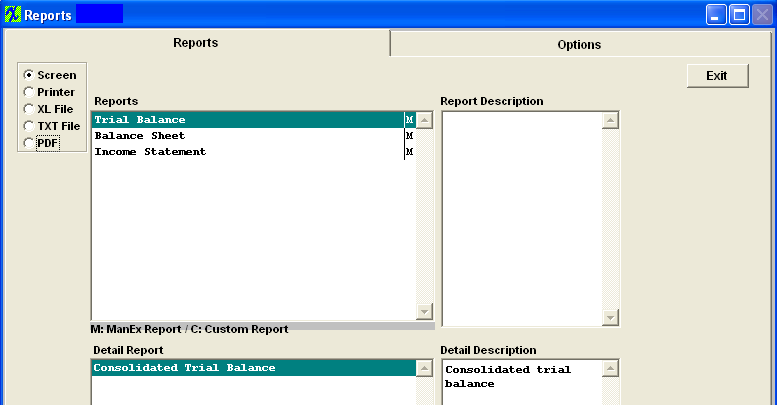 The Trial Balance Report is displaying all of the account activity for the 00, 01, & 02 accounts.
 |
| 1.8.4.2. Consolidating Elimination Entries |
The consolidation elimination entry(ies) is(are) made in the Division 00. It is set up as a Reversing General Journal Entry and is reversed in the next period. |
| 1.8.5. Print The Financials |
Once the user is satisfied with the Consolidated Trial Balance, the financials can be printed. Please refer to the General Ledger Reports module. |
| 1.9. FAQs - General Ledger |
| Facts and Questions for the General Ledger Modules |


