| 1. Inventory Cycle Count |
| 1.1. Prerequisites for Inventory Cycle Count | ||||||||
Prerequisites Required for Using CYCLE COUNT:
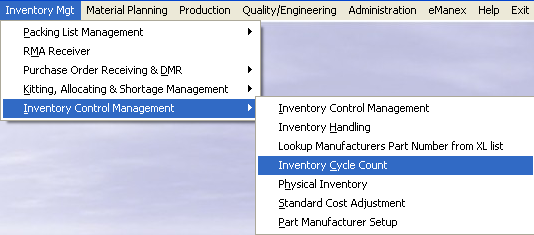
After activation, "Inventory Cycle Count" access for each user must be setup in the ManEx System Security module. Users with “Supervisor Rights” will automatically have access.
The ABC codes must be assigned to each part (within the Item Master) to be counted. Optional Prerequisites for Modifying ABC Codes:
The ABC codes must be established for percentages of value in the ABC Types setup module. There must be a history of inventory issues to establish Estimated Annual Usages.
|
| 1.2. Introduction for Inventory Cycle Count |
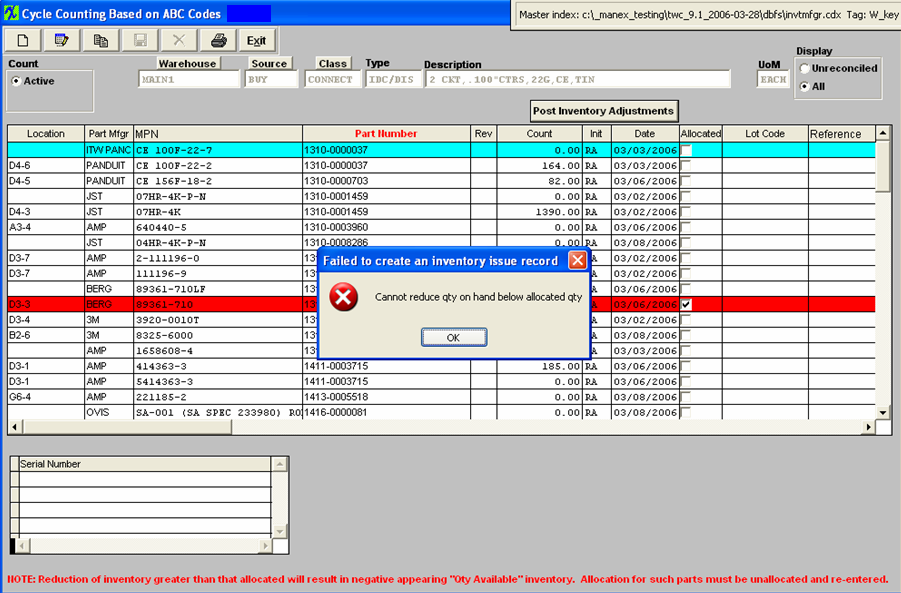
The CYCLE COUNT Module is provided for the user to establish a daily routine for counting INTERNAL inventory. Note: Only user owned inventory will be considered – NOT “consigned” (Customer owned), and/or WO-WIP or WIP locations. If the user needs to count “consigned”, or a smaller range of internal parts outside the ABC Code setup, ManEx suggests to use the Physical Inventory module. Records that have been allocated will display in red within the Inventory Cycle count module. If the users attempt to edit the record that is allocated lower than the allocated qty it will display a message. In-Store inventory will be considered unless the "Ignore In'Store" box is checked within the ABC Types Setup module, if this box is checked then In-Store warehouses will NOT be considered in the Cycle Count.
The ABC codes need to be specifically setup for Make parts, if Make parts are to be included in the cycle count. If an ABC code is setup for a buy part and that ABC code is assigned to a Make part the make part will NOT be included in the cycle count and vica vera. The three steps to completing Cycle counting activities in ManEx are: 1) Create a New List - User generate a list of inventory items to count by clicking the "Run Cycle Count Setup" button (Add button).
2) Count and Record Results - Then the stores keepers physically count the items listed and enter the quantity counted for each item into the cycle count screen.
3) Reconcile Differences - At the conclusion of the data entry, the data is reconciled with the inventory records. If the count is different than the record, then the user is prompted whether to accept the difference or to recount and re-enter. Count adjustments are logged to the GL adjustment account, if accounting is used.
A report is available summarizing and itemizing the results of the cycle count activities. If the user has established cycle count tolerances in the ABC Types setup, then a report will delineate the number of times that the cycle count exceeded the permissible tolerance. The frequency of counting for each part is defined in the ABC Type setup, and based on the ABC Type assigned to each part. There is provision to automatically assign ABC Types after the user has been operating the ManEx system for some time. The user has the option to base the assigned ABC Type on either the current dollar value of the inventory, or the Estimated Annual Usage dollar amount of inventory. If the user chooses to reassign ABC Types automatically, the ABC Type setup must have established the amount (by percentage) of inventory value to be attributed to each ABC Type.
There is also a provision for establishing the EAU (estimated annual usage) for each inventory item. The EAU is based on inventory issues in the last 30 days, weighted by another factor to account for historical issues. In order to create the EAU, there must have a minimum of 30 days activity in issues from stores.
Cycle Counting is the practice of counting a small subset of inventory on a given day. It can be an effective and efficient method for maintaining current on-hand inventory counts. It allows for greater flexibility, greater accuracy, and less interruption to production than an annual physical inventory.
The first step in establishing a cycle counting program, is to determine component groups and group count frequency. Groups are typically designated by their ABC code with A parts counted more often than B parts and B parts counted more often than C parts, and so forth. Some common parameters, in this industry, for determining the correct ABC code are: Value, Lead Time, Usage, EAU Value, and Hybrid. Value - This method groups components according to their on-hand value. The components with the highest on-hand value are counted more frequently than those with a smaller on-hand value. This method is ideal from an accounting perspective as it typically results in a much smaller variance in inventory value, but may not be ideal from a supply chain management perspective since even inexpensive components can cause expensive production delays and missed shipments. This is relatively easy to calculate and can be assigned manually if needed. Lead Time - This method groups components according to their lead time. Components with long lead times will receive more frequent counts and thus have higher inventory accuracy. While this makes sense from a supply chain management perspective, it can lead to high inventory value variances since expensive components don't always have long lead times. This is relatively easy to calculate and can be assigned manually if needed.
Usage - This method groups components by their annual usage (EAU) regardless of their value or lead time. The argument for this method is that the more frequently accessed components have a greater likelihood for inventory variances and should therefore be counted more often. This method tries to reduce the impact of human error in inventory transactions. However, it may not minimize variance in inventory value, or prevent long lead parts from stopping production if those parts are not used as often. This may be a little more difficult to calculate manually, but can be done if needed. EAU Value - This method groups components by the value of the annual usage (EAU). This method attempts to rectify the inventory value variance issue with the Usage method, by including component costs. It is likely to have a lower inventory value variance, but may not fully adjust for inexpensive or low usage parts with long lead times. This may be a little more difficult to calculate manually, but can be done if needed. Hybrid - This method combines any or all of the methods listed above. This method assigns components with high on-hand value, high usage, and/or long lead times to group A. This ensures that parts with the greatest potential for causing production delays or inventory value variances are counted most often. While this can be done manually, it is better to allow the ERP system to assign and adjust the ABC code according to current conditions. The second step is to determine how often each ABC code should be counted. Higher count frequencies lead to more accurate inventory records, but also increased handling costs. Management needs to find a balance between cost and benefit. One common frequency is to count A parts every 30 days, B parts every 120 days, and C parts every 180 days. The third step is to determine the best time of day for cycle counting activities. Ideally this will occur either before production begins, or at a time when production and inventory movement will be at the lowest level of the day. This can be early in the morning before production starts or during the standard lunch break. The fourth step is to determine who should be responsible for performing cycle counting activities. Because cycle counting reduces the daily time required, the focus can shift from speed to accuracy and process improvement. A shift that requires knowledgeable and experienced employees to conduct the cycle counting activities. This is typically limited to employees in inventory. The final step is to start counting and discovering the sources of each significant discrepancy. As part of the counting process, it is imperative to identify why discrepancies exist and work to eliminate the sources. Initially, it is far more important to identify and eliminate sources of discrepancy than to get through the full cycle each period. Not only will eliminating sources of count discrepancies reduce costs and production delays, but it will speed the cycle counting process as well. A well designed and executed cycle counting program should achieve an accuracy of 97% or more. |
| 1.3. Fields & Definitions for Inventory Cycle Count |
| 1.3.1. Main Screen | ||||||||||||||||||||||||||||||||||||||||||||
Main Screen field definitions
The name of the warehouse for the part highlighted.If the warehouse button is depressed, the grid will sort by warehouse. The source of the part number, Make or Buy. If the source button is depressed, the grid will sort by source. The type within the classification of the part number. The description of the part number. The unit of measure of the part number. The warehouse location for the part to be counted. The Manufacturer for the part to be counted. If the source is a buy, the number that the manufacturer has assigned to the part. The Internal Part Number for the item to be counted.Depressing the Part Number button will sort the grid by part number. The Part Number Revision for the item. An item may exist under multiple revisions. The initials of the individual who performed the cycle count. The date that the inventory was counted. The date will default to the current date, but may be over-written. If an inventory part number has allocated inventory, the line will show in red and the Allocated box will have a check mark.This field is a reference field which indicates to the user that there is allocated inventory against this item and the system will not allow you to adjust the qty below the allocated amount. If the part type has been designated as requiring lot tracking, then the lot tracking reference number appears.
|
| 1.3.2. ABC Types |
ABC codes are used as an aid to manage inventory tracking. Traditionally, ABC codes are established to divide the inventory by value, and to guide in the cycle counting of inventory. First the value of all inventory in stores is added up and listed by part in order of the highest extended value first. Then, the top percentage value (e.g. 80 % of the parts value) would be classified as “A” items, and will probably consist of about 10-15% of the inventory part numbers. The next 15% of the value items would be classified as “B” items, and will be in the neighborhood of 20-40% of the part numbers. The last 5% of the value will be classified as “C” items, and represent at least 50% of the part numbers. The user then sets up an inventory counting program called “Cycle Counting”, which assists in counting all inventory over a period of time. The “A” items might be counted completely within each month. Therefore, a list of all of the “A” items (the highest dollar value) is generated, and randomly divided into 20 days, and each day 1/20th of the list counted and checked. The “B” items might be checked every quarter, and the “C” items checked once a year. This is one way to verify the accuracy of stockroom transactions, and to take measures necessary to keep the counts accurate. In ManEx, the ABC codes have a slightly different meaning. In addition to identifying the most or least expensive part numbers, a Dock to Stock period may be included in each ABC code. Dock to Stock is the number of days a part is expected to take to be delivered to the stock room after the part is received on the user’s dock. This duration may include the amount of time it takes to organize the shipment, count the parts, log the receipt into the inventory system, perform incoming inspection, and physically move the parts to stores. Intuitively, the higher dollar parts may have longer dock to stock times because of increased inspection. And the lesser valued parts may not require inspection. Also, for each ABC code, ManEx provides a cycle count tolerance, which, if exceeded, will result in reporting unfavorable inventory control results during cycle counting. These tolerances may be expressed in an absolute dollar value, or a percentage of the inventory being counted. For further information on the cycle count tolerances and what the purpose of setting them up in ManEx is see the attachment <<Cycle Count Tolerance.docx>> And, the ABC code identifies a part source for inventory parts. Because ManEx allows up to 36 ABC codes, it also provides for identifying if a part is a make or buy part. The ABC codes need to be specifically setup for Make parts. If Make parts are to be included in the cycle count. If an ABC code is setup for a buy part and that ABC code is assigned to a Make part the make part will NOT be included in the cycle count and vica vera. Note: If an internal part number does NOT have an ABC code assigned, that part will NEVER be selected for cycle counting. Therefore, all internal parts which the user wished to be cycle counted, MUST have a code in the ABC field in the Inventory Control Item Master.
|
| 1.4. How To ..... for Inventory Cycle Count |
| 1.4.1. Generate Cycle Count List |
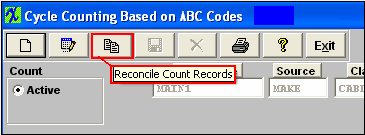
The following screen will appear: When the screen first opens, the user is limited to only five of the seven action buttons shown: Add button (Run a cycle count setup), Edit button (Enter cycle count results), Copy button (Reconcile cycle count data), Print reports, and Exit. This is the first screen to be used in the module. In this screen, a CYCLE COUNT is created (ADD) for viewing, printing and editing.
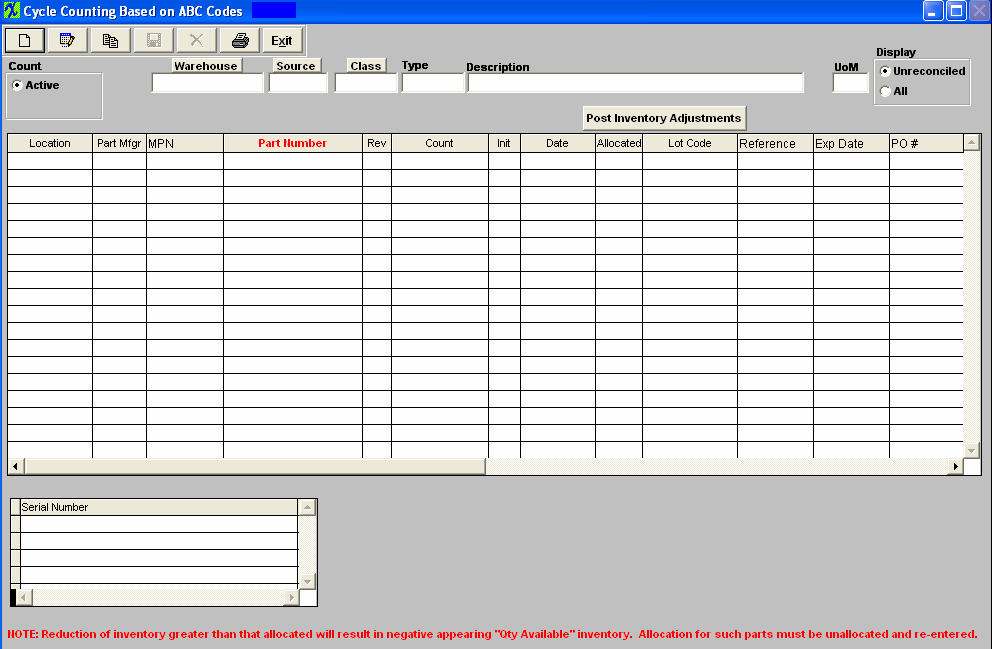 Depress the "Run Cycle Count" button (Add button)
 Records for cycle count will be pulled forward. Note: The user may not ADD a cycle count on a non-working calendar day. However, open cycle count records may be counted, entered and reconciled. Records that have allocations made within the system will be pulled forward for count, these records will be highlighted in RED. Parts in WO-WIP and/or WIP locations will NOT be pulled forward for count.
User may select to Display only the "Unreconciled" parts or "All" parts. Selecting "All" will display parts that are un-reconciled and reconciled but not yet posted.
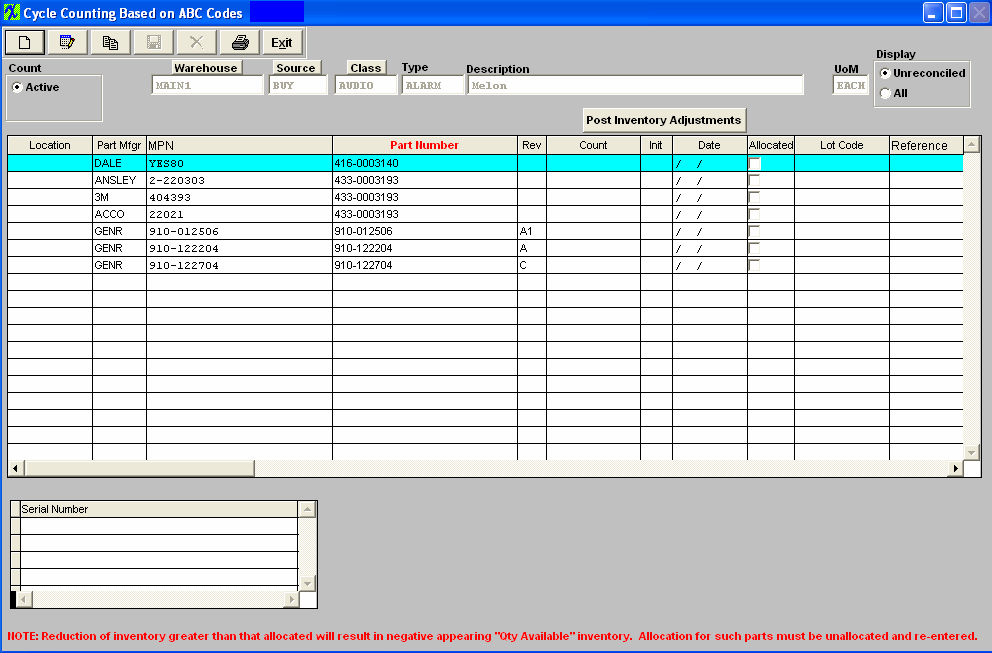 Note: The cycle count module will allow multi-user access to enter and/or reconcile. The users must exit and re-enter to screen to refresh if an action was done on another work station. Only one user may Post.
|
| 1.4.2. Entering Cycle Count Data | ||
The following screen will appear displaying the records pulled forward for cycle count. Note: The user may not ADD a cycle count on a non-working calendar day. However, open cycle count records may be counted, entered and reconciled. Records that have allocations made within the system will be pulled forward for count, these records will be highlighted in RED. Parts in WO-WIP and/or WIP locations will NOT be pulled forward for count.  Depress the Edit Record action button (Enter Cycle Count Results). User will be prompt for password.
 The user then enters the recorded counts in the COUNT column. The counter’s initials and the date counted will update automatically. If the users attempt to edit the record that is allocated lower than the allocated qty it will display a message. If you need to apply the count into the system you must first unallocate some of the inventory via the Inventory Allocation module to free up the amount you are attempting to adjust then return to the count and it will then allow you to post to inventory.
Depress the Save changes action button to save changes, or depress the Abandon changes button to abandon changes. Note: The cycle count module will allow multi-user access to enter and/or reconcile. The users must exit and re-enter to screen to refresh if an action was done on another work station. Only one user may Post.
|
| 1.4.3. Reconciling Cycle Counts and Post Inventory Adjustments | ||
|
The following screen will appear:
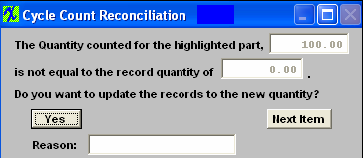
Then system checks the counted quantities entered into the Cycle Count screen and verifies that the count matches the inventory records. If the count matches the inventory record the item drops from the list. If it does not match the inventory record, the following screen appears and the user is asked whether to accept the entered count as the new count, by depressing the "YES" button and entering a reason for the change (cycle count, missing parts, etc) or to wait until the user has had the opportunity to recheck the number and reconcile it at a later time by depress the "Next Item" button..
Items not reconciled will remain on the list until reconciled.
Note: The user should not post the Inventory Adjustments until all of the reconciliation is completed. To record the adjustments in the count into the Inventory Master and to create the applicable accounting entry, depress the "Post Inventory Adjustments" button. You will be prompted for your password. The "Allow Updating Inventory" option button (for Physical Inventory) within the Security module MUST be checked in order to Post Inventory Adjustments. If user does NOT have these special rights they will receive the following message.
  Note, if the inventory item has changed in quantity (due to kitting or an issue via Inventory Handling between the beginning of the cycle count and the reconciliation), the system will alert the user and will print out a report detailing the part number and the discrepancy. The user must change the data entry for the count, and then re-reconcile. Once the system has made the transfer, the following message will appear:
Depress the OK button and all Inventory Adjustments are completed. |
| 1.5. Reports - Inventory Cycle Count | ||||||||||
The following screen will appear:
To obtain the Inventory Cycle Count reports, select the Print button from the ManEx action buttons at the top of the screen.
The following screen will appear: 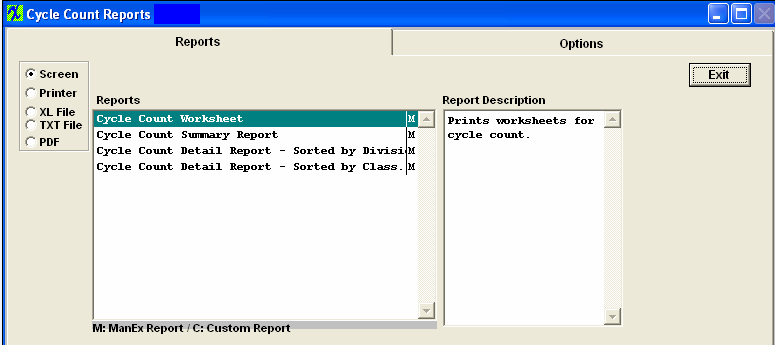
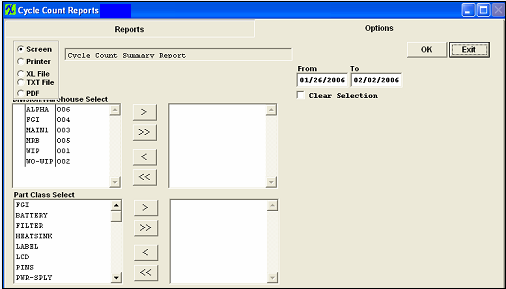
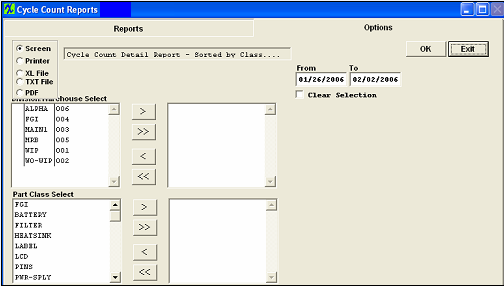
Select the appropriate radio for the output format you desire: Screen, Printer, XL File, TXT File, or PDF. Highlight the desired report and then depress the Option tab if applicable.
The following report is available:
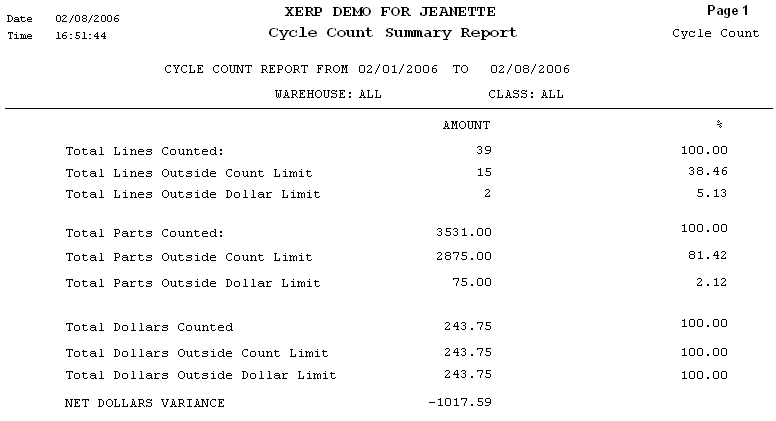
The items are counted and recorded on the sheet, and then data is entered into the xERP System. Cycle Count Summary Report
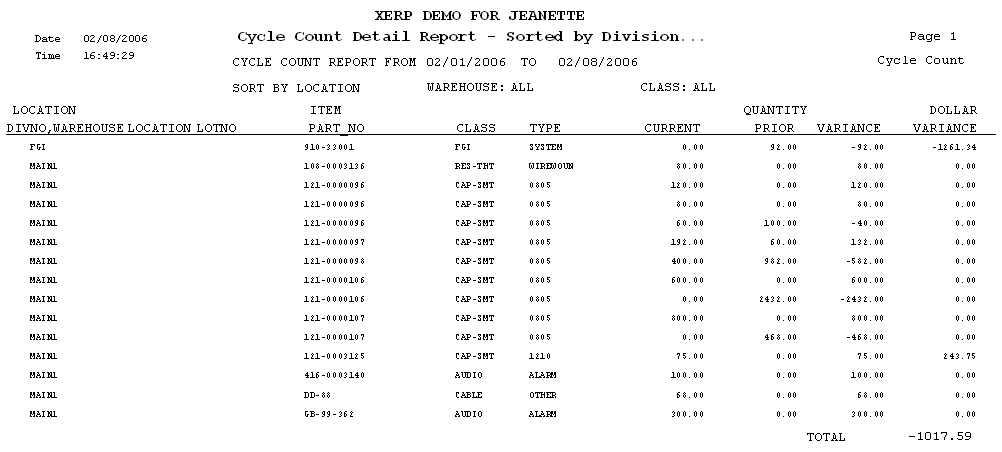
The following report will be displayed.
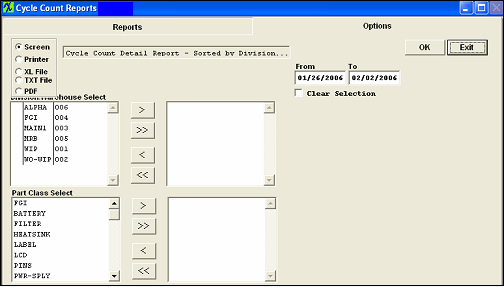
Cycle Count Detail Report - Sorted by Division
Select the date range of interest and the warehouse and part classes to be included. Highlight the Warehouse of interest and depress the > button.If you want all warehouses, depress the >> button. Highlight the Part Class of interest and depress the > button.If you want all of the classes, depress the >> button. Depress the OK button
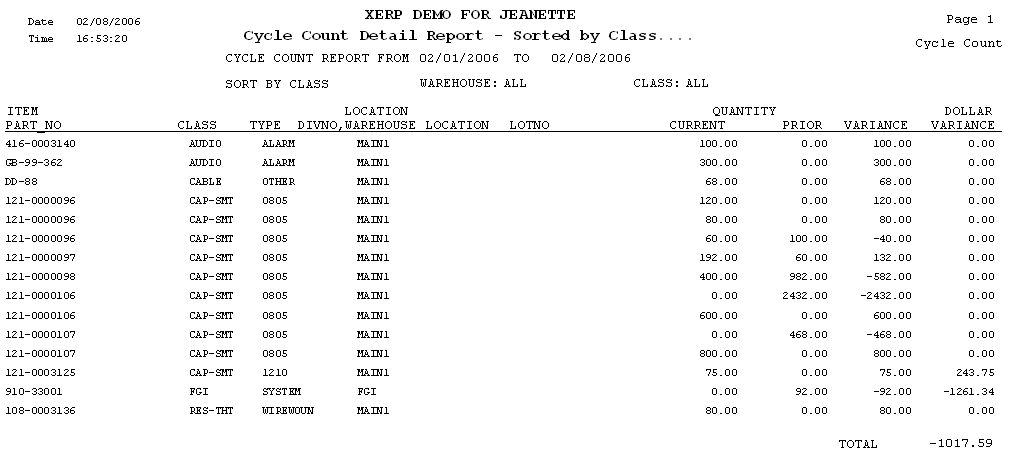
Cycle Count Detail Report - Sorted by Class
Select the date range of interest and the warehouse and part classes to be included. Highlight the Warehouse of interest and depress the > button.If you want all warehouses, depress the >> button. Highlight the Part Class of interest and depress the > button.If you want all of the classes, depress the >> button. Depress the OK button. The following report will be displayed.
|
| 1.6. FAQ - Inventory Cycle Count |
| 1.6.1. How can I clear out a Cycle Count that was started in error? |
For Example, a user has begun the Cycle Count process by pulling items fwd into the module for counting by accident, but for what ever reason, you do not wish to continue on with the reconciliation process of the count. But now those parts are locked in a count and will not be editable throughout the system (Kitting, PO Receiving, Inventory Handling, etc. . . ) If the part is locked in a count you will see messages similar to the below throughout the system.
If you wish to Purge the Cycle Count out of the system you can run the below procedure and any record that has not had a count entered into the Cycle Count module will be cleared.
SQL Manex Only Within SQL Manager run the following: exec sp_ClearAllCC
VFP Instructions Only
Please be sure to follow the procedure below to install this program. It is highly recommended that you follow this procedure on your TEST system first before applying it against your Live ManEx System. 1.) Create a Backup of your Live ManEx System 2.) Extract << purgecc9.exe>> into the ManEx Root Directory 3.) Run the Executable 4.) Verify the Results 5.) Remove << purgecc9.exe>> from the ManEx Root Directory Once satisfied with the results in your test system, you may proceed with your Live ManEx System. Please let me know if you have any questions.
|
| 1.6.2. Why are some ABC type parts no longer being included in the Cycle Count? |
Q. Why are some ABC type parts no longer being included in the Cycle Count?
A. Check your calendar date to be sure it is extended out far enough for the program to find the date in the calendar.
For Example: If the System Admin Calendar setup ends 12/31/2008, and the Cycle count day for "B" type is 180 days, and the cycle count is ran on 10/25/2008 the date would be 1/25/2009, the program will not find 1/25/2009 in calendar, so the "B" type parts are not included in the cycle count. Once the System Admin Calendar is reset to end 12/31/2009 and the Cycle Count is re-ran then the "B" items are included in the Cycle Count.
|


