| 1. BOM Import |
| 1.1. Prerequisites |
To import a BOM, one of the templates below must be used.
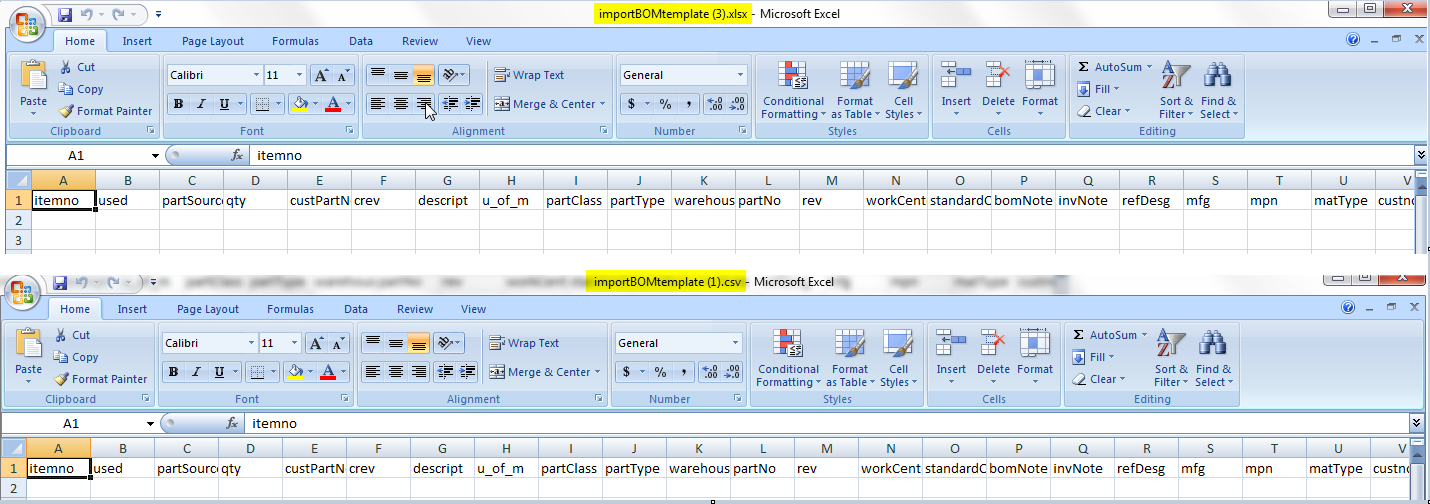 It is okay if you have blank lines, but they should be subsequent lines of the same assembly, NOT the first line item no. First priority is the assynum and rev columns in the spreadsheet,. If you populate that data, in the first item number it will use that as the import record assembly number. NOTE: If you are entering parts for different customers on the same spreadsheet you MUST enter different assynum and/or rev to distinguish between customer parts. If assynum is same it will override customer number and use prior customer linked to that assembly number.
If the assynum and rev columns are blank in the first item no (as in item 1 in this bom) THEN the import will use the file name as the assembly number, then, if the rest of the line items have data that is the same, the system will put it on another import record with the listed number.
Font size: We made it larger so it is easier to read and use on things like a tablet. However, if your screen size is small it may appear too large. |
| 1.2. Introduction |
|
ADDRESS {rootURL} BOM
NOTE: {rootURL} is the URL you use to access web ManEx
AVAILABLE ACTIONS From this screen, the user can:
|
| 1.3. Fields and Definitions |
| 1.3.1. BOM Import Templates | |||||||||||||||||||||||||||||||||||||||||||||||||||||||||||||||||||||||||||||||||||
|
| 1.3.2. Import Screen |

|
| 1.3.3. Upload Screen | ||||||||||||||||||||||||||||||||||||||||||||||||||||||||||||||||||||||||||||
This header will be displayed throughout the WebManEx. For further detail on the header icons see Article #5292.
Depressing the "MX" icon
at the top left hand corner of the screen will list the ManEx modules available.
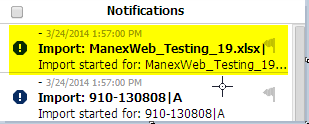
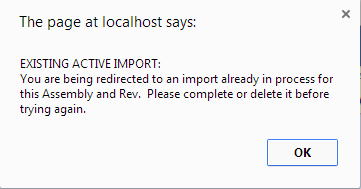
Depressing the "Magnifying Glass" Icon at the top left hand corner of the screen will give the user all the different option to find a record. Depressing on the "Up Arrow" Icon will give the user the opportunity to Change from "New" or "Reports". Depressing on the "Bell" Icon will display a list of BOM Imports that have been started. Depressing the "Clock" Icon will allow you to clock into a Job or Work Order.
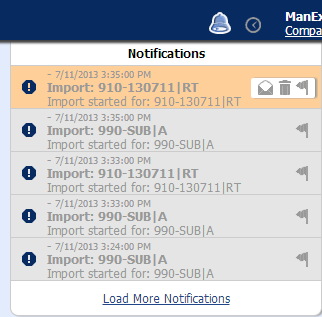
If you attempted to create a new import for the exact same assembly and rev that already exists in the Notifications. The following message will be displayed.
This is to prevent users from accidentally working on multiple versions of the same record and wondering why their last changes weren't sticking, we automatically redirect you to the existing active import. Once you transfer the bom, you can start a new one for the same bom. Or, you can change the part number or rev in order for it to be treated as a new import. Or, you can delete the current active record to start fresh. NOTE: The import in process will NOT exist in the desktop. You must first transfer it in order to see the parts and changes. The "EXISTING ACTIVE IMPORT" is just an import that you can finish and transfer in order to see it in the desktop.  This header will display the Assembly/Rev.; Description; Customer; Part Class; Part Type; for the BOM Upload, along with the Date/Time the Upload was started and the initials of the user that started the upload.
This header has the following action icons:
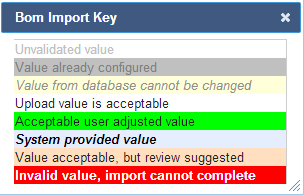
Select the "Validate" button and the Validation screen will appear validating the information entered.
Note: During the Validated processes if the system finds errors these fields will be shaded in Red indicating that these fields have missing or incorrect information. Select the "ShowKey" This screen will display what the field colors stand for:
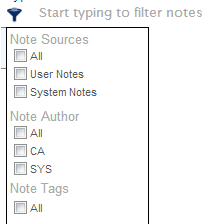
  The Red Note Pad (to the right) will display notes pertaining to this BOM Import and allow user to add or edit the notes.
 Depress the Filter in the left hand corner of the screen to change how the notes are being filtered:
 Flag - on top left of note screen is to Flag the Note.
Clipboard - on top left of note screen is to copy Note to Clipboard.
Tag - on top left of note screen is to Add a Tag to Note.
Trash Can - on top right of note screen is to Delete Note.
Pencil - on top right of note screen is to Edit Note.
Plus Sign - on top right of note screen is to Add new Note.
The "Plus sign" on the top right of BOM Import header is to add a new item to BOM Import.
The "Import Parts" button on top right of BOM Import header is to import BOM to desktop.
The "Trash Can" on the top right of BOM Import header is to delete BOM Import completely.

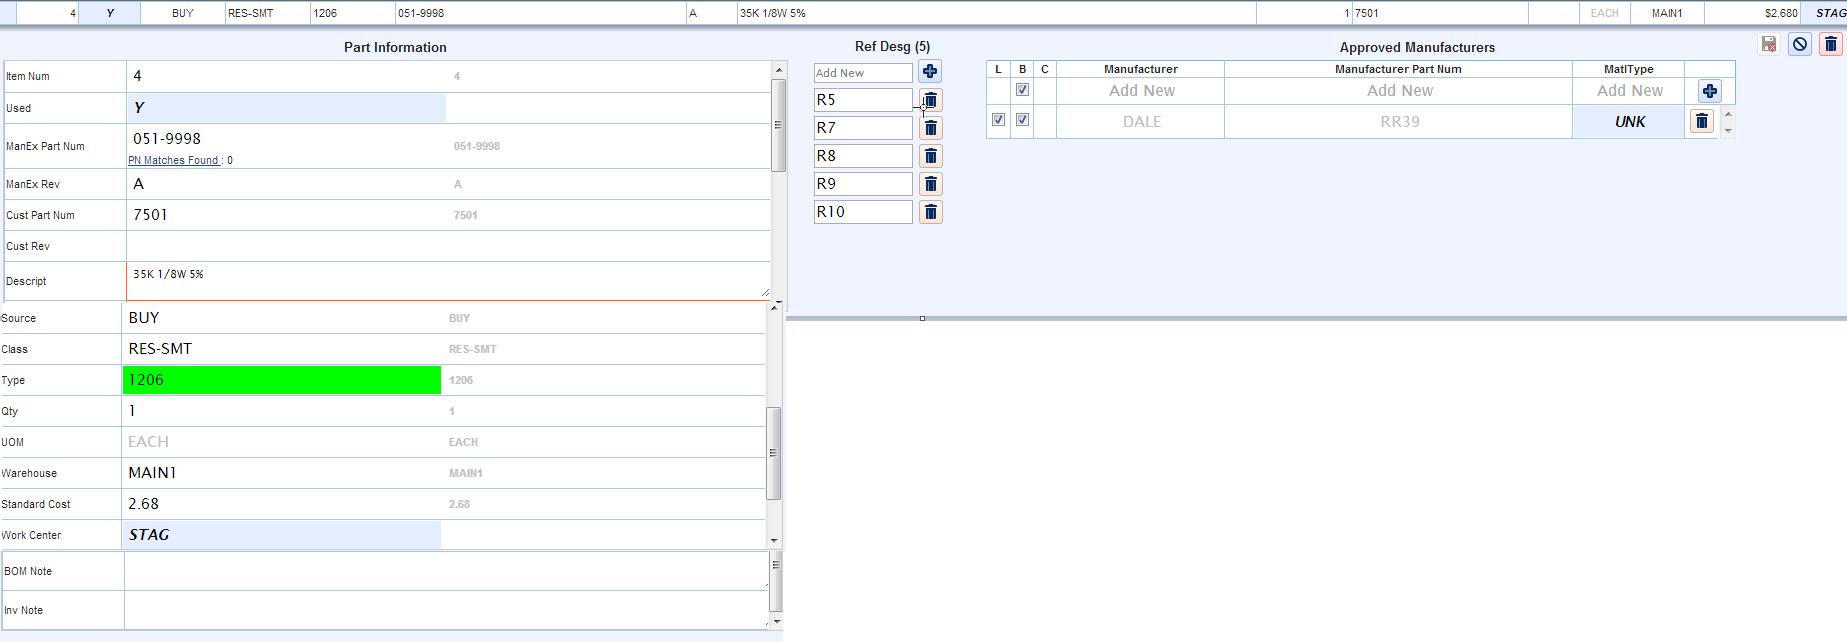 Part Information
Note: The data to the right in gray is the data that was imported originally.
Approved Manufacturers
|

| 1.4. How To |
| 1.4.1. Find a BOM Import that has Already Been Started |
Login to the WebManEx and Select Product Data Management Select Import and the following screen will be displayed
Click on the Bell symbol (with the number 4 by it) up in the right hand corner and a list of Notifications will be displayed of all the Import Started:
 Highlight the Import of interest and the following screen will be displayed:
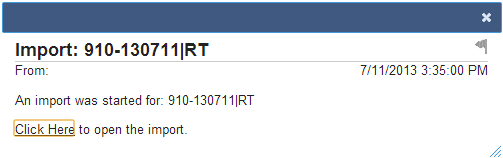 Depress "Click Here" and the import will be displayed on screen:
 If you attempted to create a new import for the exact same assembly and rev that already exists in the Notifications. The following message will be displayed.
This is to prevent users from accidentally working on multiple versions of the same record and wondering why their last changes weren't sticking, we automatically redirect you to the existing active import. Once you transfer the bom, you can start a new one for the same bom. Or, you can change the part number or rev in order for it to be treated as a new import. Or, you can delete the current active record to start fresh. NOTE: The import in process will NOT exist in the desktop. You must first transfer it in order to see the parts and changes. The "EXISTING ACTIVE IMPORT" is just an import that you can finish and transfer in order to see it in the desktop.
|
| 1.4.2. Import BOM |
User MUST first download a blank template and enter the BOM information into the template.
System will look at the Item Number and Description to determine whether it is a different part, if the Item Number and description match then the Shaded parts do NOT have to be populated. The information from the previous lines will be used, when creating the BOM import. If the assynum, assyrev, and assydesc fields are all blank on the first line item, system will use the File Name as the Assembly Number. for further detail see Article 5490. Once the template has been completed with all the BOM information, save the file. Login to the WebManEx and Select Product Data Management Select Import and the following screen will be displayed
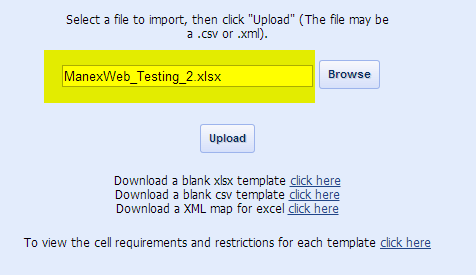
Enter the file name in the field or depress the "Browse" button to locate the file to import.
Once the file has been selected it will be displayed in the Field as displayed below:
Depress the "Upload Button" If you attempted to create a new import for the exact same assembly and rev that already exists in the Notifications. The following message will be displayed.
This is to prevent users from accidentally working on multiple versions of the same record and wondering why their last changes weren't sticking, we automatically redirect you to the existing active import. Once you transfer the bom, you can start a new one for the same bom. Or, you can change the part number or rev in order for it to be treated as a new import. Or, you can delete the current active record to start fresh. NOTE: The import in process will NOT exist in the desktop. You must first transfer it in order to see the parts and changes. The "EXISTING ACTIVE IMPORT" is just an import that you can finish and transfer in order to see it in the desktop. Depress the "Upload" button and the data will be Uploaded into the following screen and Validated.  During the Validated processes if the system finds errors these fields will be shaded in Red indicating that these fields have missing or incorrect information.
Click on an item and all the detail for that item will be displayed. User may make changes/corrections to any of the Part Information, Ref Desg, Manufacturer, Manufacturer Part Numbers, and Material Types. The fields shaded in Red indicates that the information is incorrect or missing and must be corrected before the import process can take place.
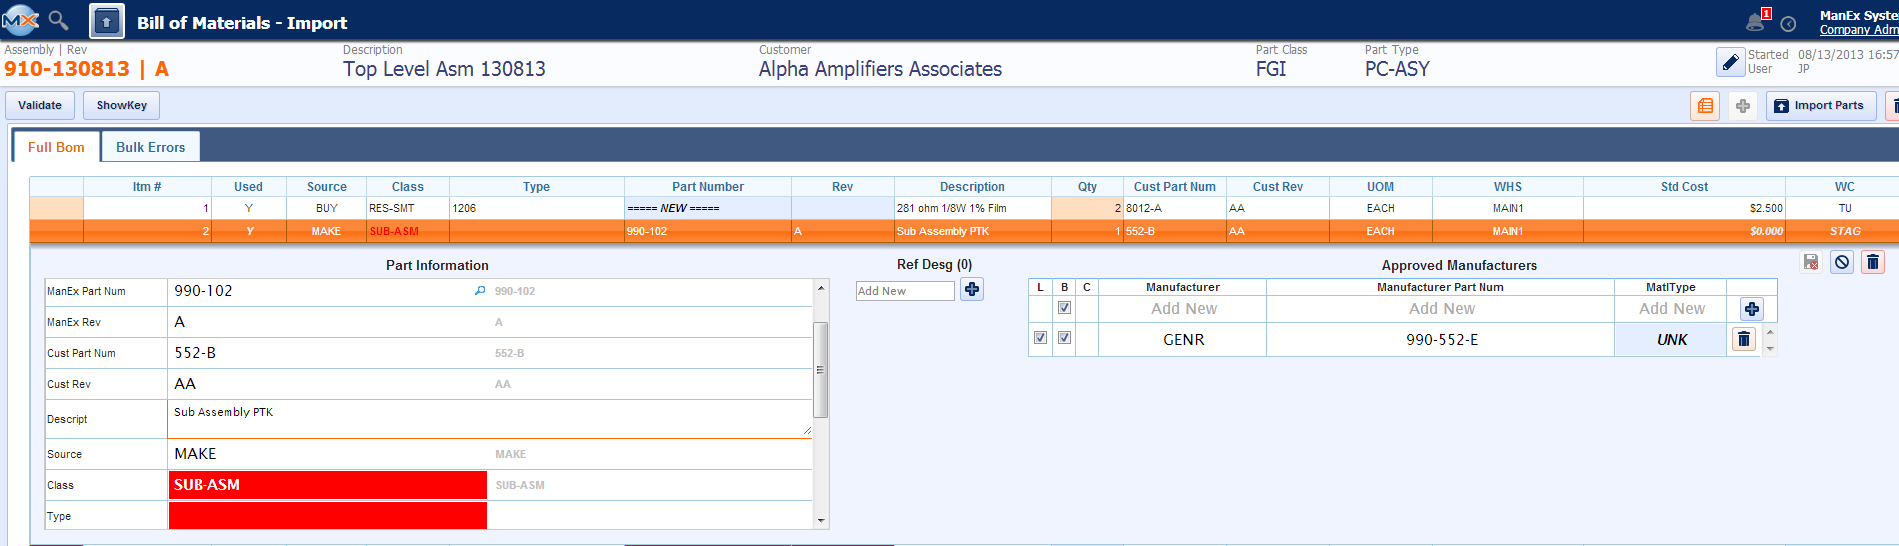 The data to the right on the Part Information screen that is light gray is what was imported from the template.
The Class and Type will have a pull down to select from:
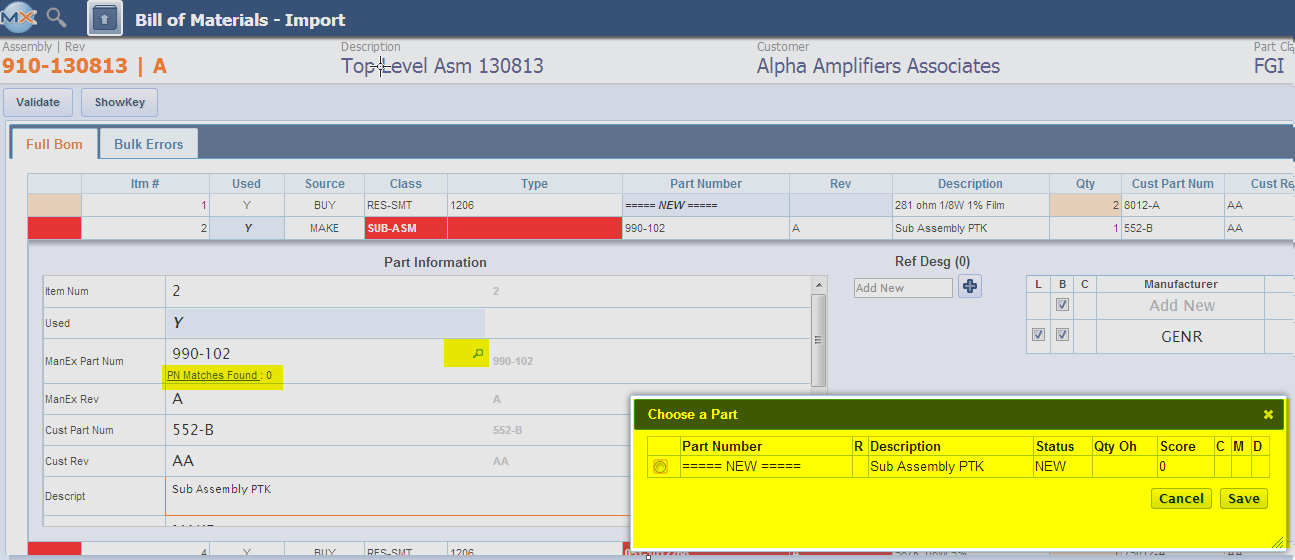
 Clicking on the magnifying glass to the right of the ManEx Part Number will do a search to located any existing parts that are similar to the one entered:
 NOTE: If user has Inventory Part Numbering setup to MANUAL, user has the option to enter a part number in the ManEx Part Num field, or if a ManEx part number exists for the part being imported user may use the existing ManEx part number, but if user does NOT want to use the existing ManEx PN, they MUST select "NEW" and then enter in the part number they want to use. If they have Inventory Part Numbering setup to AUTO then they MUST select an existing PN or have "NEW" in this field, and a part number will be assigned to this part upon import.
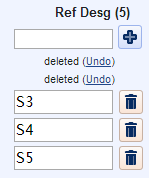
User may add Reference Designators by clicking on the (+). The number of Ref Desg needed for this part will be displayed in (). To remove an existing reference designator click on the (garbage can symbol) to the right of the desg you want to remove, click on the (Undo) to restore the reference designator you removed.
You need to save changes before you can add additional reference designators if you do not (Undo) any of the ones you deleted. If a user adds more ref desg then required at time of upload it will only use the number of ref desg required starting from the top of the list down.
To add a New Mfgr, depress the (+) button on the right and new fields will be displayed in green:
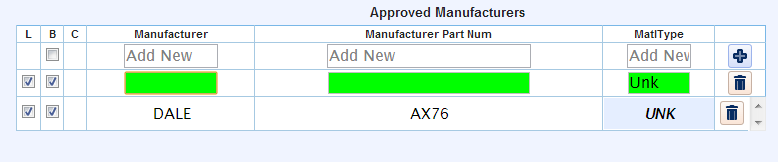 Enter Mfgr, Mfgr PN, and select a new MatlType or leave the default (Unk). Once all the changes have been completed and there are no more fields shaded in RED, depress the "Save & Exit" button, "Cancel" button, or "Delete" button.
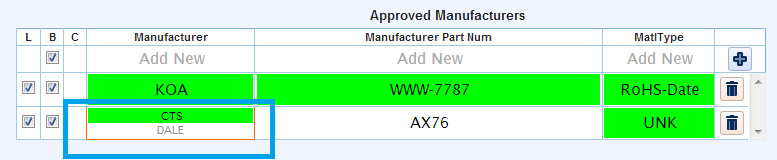
 If users changes the Manufacturer or Manufacturer Part Num then hovers over that field the Mfgr or Mfgr PN originally uploaded will be displayed in gray and the new Mfgr or Mfgr PN will be displayed in black and will be bordered in RED on three sides as displayed below.
 Select the "Validate" button to validate all changes.
Once all the data is correct, user then may select the "Import Parts" button to load the BOM into the ManEx system.
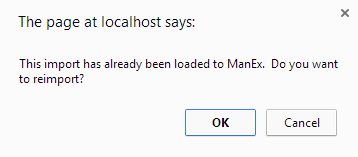
 If the BOM has already been loaded to ManEx user will receive the following message giving the user the option to reimport this BOM.
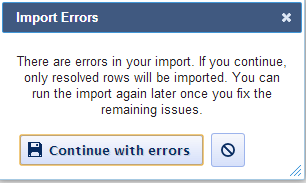
 If user is trying to Import Parts with Errors the following message will be displayed, giving the user the option to continue with errors or cancel import:
 Once the BOM has been loaded to ManEx the Header will turn from White to Gray as displayed below:

|


| 1.5. Limitations to the Reference Designators |
| 1.6. Limitations to the Different Import Template Types |
Assembly Info
Template TypesThe following explains the different limitations to the different Import Template Types that are available in the WebManEx
.XML Map for Excel:
.CSV Template:
.XLSX Template:
.XLS:
|
| 1.7. BOM Import - FAQ |
| 1.7.1. What do the BOM import settings do? | ||
 |
| 1.7.2. How do I Remove Duplicate AVL's? |
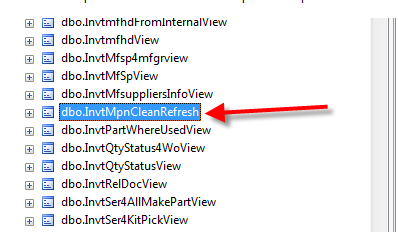
| If a user sees duplicate AVL's in the BOM import list of parts then it means somehow they were able to get a duplicate manufacturer in the database. We have a built in SP (dbo.InvtMpnCleanRefresh) to clear that.
It is attached to this article as well.
|
| 1.7.3. Receiving primary Key violation error upon import. What does it mean? |
Upon import you may be presented with something similar to the error in image below. Typically means on your import template for this BOM you have the same Manufacturer and MPN combination listed more than once when creating a brand new part. Typically won't see this when system matches to existing part #'s.
|

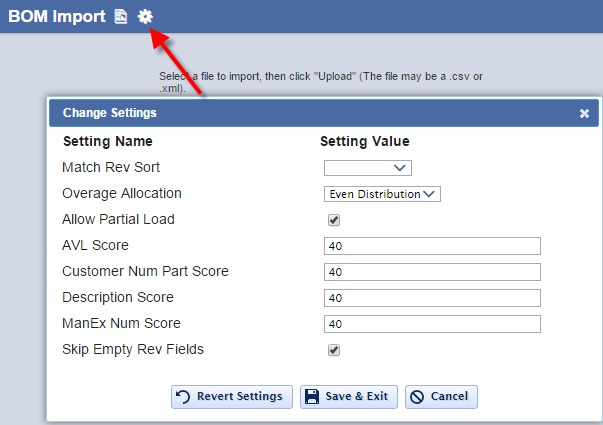
| 1.8. BOM Import Settings | ||
 |