| 1. Material Requirement Planning (MRP) |
| 1.1. Prerequisties for MRP | ||||||||
|
Prerequisites Required for Entering a New MATERIAL REQUIREMENTS PLANNING:
After activation, "Material Requirements Planning" (MRP) access for each user must be setup in the ManEx System Security module. Users with “Supervisor Rights” will automatically have access.
|
| 1.2. Introduction to MRP |
The Material Requirements Planning (MRP) Module is the heart of Inventory Control. In ManEx, the Material Requirements Planning actions drive the user towards zero inventory on hand through the scheduling and rescheduling of open orders for products and parts. When the Material Requirements Planning module runs, it accumulates all of the demands for products and parts, determines the available supply and recommends actions to be taken to meet the demand in the time required. (The attached Print Screens below <<BOM_Setup_MRP_Actions.docx>> displays an example of a BOM setup and how MRP gives the actions). The MRP module will also modify those recommendations by MRP policies established in the MRP Default Setup and in the Inventory Control Mgmt MRP Info for each part. MRP runs through a large number of tables and records to compile its calculations, and provides a snapshot of suggested actions at the same time it is ran. If users are changing things during this process it could definitely cause some strange outcome. To prevent this situation we strongly suggest that you use the Nightly MRP trigger. (Refer to Article #416 for more detail on trigger setup). Note: If you find the need to re-run MRP during the production work day then we suggest that you notify all departments that MRP is going to be ran and ask them to remain out of the system until the MRP run is complete. This will help assure that the most accurate MRP run is possible.
Run Scrap and Setup Scrap If the Top Level Assembly has a run scrap and user would like MRP to calculate this run scrap in the demands for all parts on the BOM, it must be set up in the MRP Defalut Setup Screen. If the user has scrap setup in the Inventory Control module and wants MRP to calculate it they must set it up in MRP Defalut Setup Screen. Note: If this field is changed it will update the setting in the Kit Default Setup and visa versa. If the user wishes for the setup scrap qty’s to be included in the Kitting and MRP calculations, the Setup Stcrp box MUST be checked on the BOM. Checking this box along with a Standard Bld qty will tell the system to use Setup Scrap when calculating the standard cost. Note: The "Exclude Scrap & Setup Scrap" options within the Kitting Setup module will overwrite this option. All lead times are calculated with the Production Calendar. Policies may be used to determine whether the part is ordered on a Lot for
NOTE: When creating a PO for an item with different purchasing and stocking UoMs, be sure to enter the MRP suggestion into the Stocking qty field rather than the purchasing qty field. The system will automatically convert the stocking unit into the purchasing unit for the purchase order qty.
For example if the buyer is creating a PO for an item that is used by inches but sold by the foot, the user would enter qty of 24 into the stocking qty field and the PO would automatically convert it to 2 feet in the purchasing qty field. So the supplier deals in feet, but ManEx deals in inches. The conversion between the two are established in the Unit of Measure & Conversion module.
Article #3597 explains the process MRP goes through to optimize the On-Hand Inventory to Demands.
Buffer times for placing purchase orders and for placing work orders may be defined and included.
The Dock to Stock value (setup in the ABC types ) is taken into consideration for MRP leadtime calculations in the projected requirement of the receipt of purchased parts. (For more detail refer to Article #1469). If a part has a Production Off-set time setup in the Bill of Materials , this is also taken into consideration for MRP leadtime calculations. (For more detail refer to Article #572).
The Material Requirements Planning module will run the Master Production Schedule generation automatically before running the Material Requirements Planning module.
ManEx Material Requirements Planning module may be run without logging users off the system. The work station used to run Material Requirements Planning should have at least 120MB available on the hard drive, and works best with 96MB memory or more. A Material Requirements Planning regeneration creates time-phased material requirements at the part (component) level by netting demand from the Master Production Schedule (MPS), open Sales Orders, Internal orders, Shortages and open Work Orders (released but not picked) against supply from inventory, open purchase orders and Finished Goods. The regeneration must also occur with demand synchronized: Master Production Schedule forecasted demand that has been consumed by Sales Orders should be relieved and Work Orders that are released but not picked should be picked or cancelled.
MRP Actions for Make/Phantom parts - If the actions originates from a higher level assembly for the Make/Phantom, then the MRP will display "Phantom" in the action section. This indicates to the user that there are no actions required and is listed so users can investigate where component actions are originating from. If the Make/Phantom is required directly for an Order itself, it will follow the same WO action rules as a regular Make product.
Planned Purchase Orders from previous demand that have been placed must be entered and/or firmed.
A Firm Planned Purchase Order tells MRP that the purchasing decision was intentional and MRP will NOT try to override. Discrepant material should either be moved into Material Review Board or Inspection Hold for disposition. If Material Review Board or Held material is not to be looked at as available material for Material Requirements Planning purposes, it should be in a Non-nettable warehouse or inventory location. For example: (If parts are rejected in PO receiving the parts are dispositioned into the MRB warehouse (which is Non-nettable) so MRP is not seeing the qty in MRB but is seeing the open PO). Transactions must be current with the location of materials. WIP (Work In Process) shrinkages must be expressed as Work Order shortages in the system.
MRP is designed to calculate from the Kit Shortage and not from the Lead times once the parts have been pulled to the kit and the kit status is changed to "Kit in Process". Once the parts have been pulled to the kit, the systems is assuming that the shortages are needed by the WO due date, rather than the Prooduction lead time, so MRP then calculates using the due date of the WO as the date the materials must be on hand, MRP no longer takes the production lead time into consideration.
NOTE: The Re-Order Point/Qty fields have NO AFFECT on MRP at all. MRP will NOT consider these fields for any calculations (these fields have no connection with MRP). These fields are intended to control stock on overhead items. Print the "Inventory Material Reorder List" report (located in the Inventory Control module) to show items which have dropped below re-order point minimums.
MATERIAL REQUIREMENTS PLANNING PROCESS Confirm status of system data for Material Requirements Planning validity Updated Forecast and Master Schedule Updated Item Master file data Lead Times entered and up to date Shrinkage factors current Order policies set Orders firmed as required Independent Demand items identified Inventories current Receivings current Safety Stocks appropriate Bills of Material current and complete Confirm system availability to run Material Requirements Planning Timing good for snapshot of data Transactions current Set the parameters for running the Material Requirements Planning Netable Inventory Locations flagged Discrepant material dispositioned Horizon set Time fences set for change control Bucket size and number set When executed, the Material Requirements Planning Module takes a snap-shot of the demand for parts and assemblies (created by Sales Orders, Work Order Shortages, Forecasts) and compares it with supply (on-hand inventory, open Purchase Orders with scheduled qty, open Work Orders) in order to generate an Action List of planned new orders and changes to existing ones to meet demand. The comparison is done one day at a time using the make and/or buy parameters from the Item Master/Material Requirements Planning Information screen in Inventory Control Management. The Parameters include: · Order Policy · Minimum Order Quantity · Order Multiples · Purchase Lead Time · Kitting Lead Time · Transit Days · Pull In Days · Push Out Days If the AVL suggested to the PO actions is flagged as "DO NOT PURCHASE" MRP will give Release PO actions if there is a need for the part and the part will be displayed on the Create PO screen with the Mfgr and MPN fields blank. This should flag the user to further investigate and see that it is flagged as "DO NOT PURCHASE" and that they will need to either remove the flag or add additional AVL's to ful-fill the demands. Notice at the top there is a note that explains what the empty "MFGR" field means.
Sales Orders on Hold When the Sales Order is on HOLD it does NOT drive MRP.
User does have the ability to turn off the function of the Sales order driving the demands for the MRP and just use the Work Order for buying components by checking the MRP on Hold box in the Sales Order module per line item or in the System Setup/Sales Order Default module.
If the MRP on Hold is checked in the SO module, MRP will instruct you to cancel all PO(s) you have open for the components needed for this SO.
If the MRP on Hold is checked in the SO module and you create a WO Manually, the MRP will tell you to cancel the WO since there is no SO demand. This can be solved one of two ways. Use the MPS module (Forecast) or Open/Create Firm planned WO’s so the MRP will NOT keep instructing you to cancel the order. This is a perfect solution for customer who wants to build products based on forecast or promised to maintain certain amount of FGI in inventory. The can use the MPS module to accomplish this and use the SO to ship products from FGI inventory. MRP will consider any SO items for the demands unless marked as MRP on Hold. See Article #1244 for further information. Check on Work Orders on either Admin or Production hold. Production Hold on a Work order will disallow movement of the parts. See Article #896 for more detail. MRP is checking work orders to be sure that they aren’t cancelled or closed. Everything else will be considered. MRP checks Sales Orders for OPEN status. Everything else is ignored. If the objective is to stop the shipment from the Sales Order, then in the Sales Order, the user may uncheck the “Sales Ack” box and then shipping won’t be able to initiate a Packing List.
Inventory Items Allocated
MRP does NOT distinguish between inventory items allocated to projects nor Purchase orders allocated to projects in the determination of the available supply (current and future). To do so would enormously complicate the MRP process. MRP WILL determine that the supply will meet the demand, whatever it is.
Should we have locked the requirements by project in MRP, then we could have the situation where we have unallocated inventory on hand, but since it's not for a specific product that requires it, MRP action could create an order action to buy more of the parts specifically for that project. This could result in an enormous amount of excess inventory. Since our objective in MRP is to drive to zero inventory, we do NOT want to ignore any available inventory that might satisfy demands. Conversely, when inventory is allocated to a specific project, and the demands created for another project are analyzed, the inventory on hand will be available to meet the other project demands, but also create the order actions to supply parts for the original project, if there are still demand requirements. In the case of having just enough inventory on hand for a given Project (A), but there are new requirements for Project (B) that precede those for the same parts as project (A), MRP will assume that the inventory on hand will be used for Project (B) first, but get more parts to meet the later date of Project (A). As long as there is inventory available to meet every demand, it will be up to the user to reallocate inventory for the most urgent need. If for some reason user has inventory that belongs to a specific customer and does not want MRP to consider it for any other customer they can change the inventory location to non-nettable.
|
| 1.3. Fields & Definitions for MRP |
| 1.3.1. MRP Action Tab | ||||||||||||||||||||||||||||||||||||||||||||||||||||||||||||||||||||||||||||||||
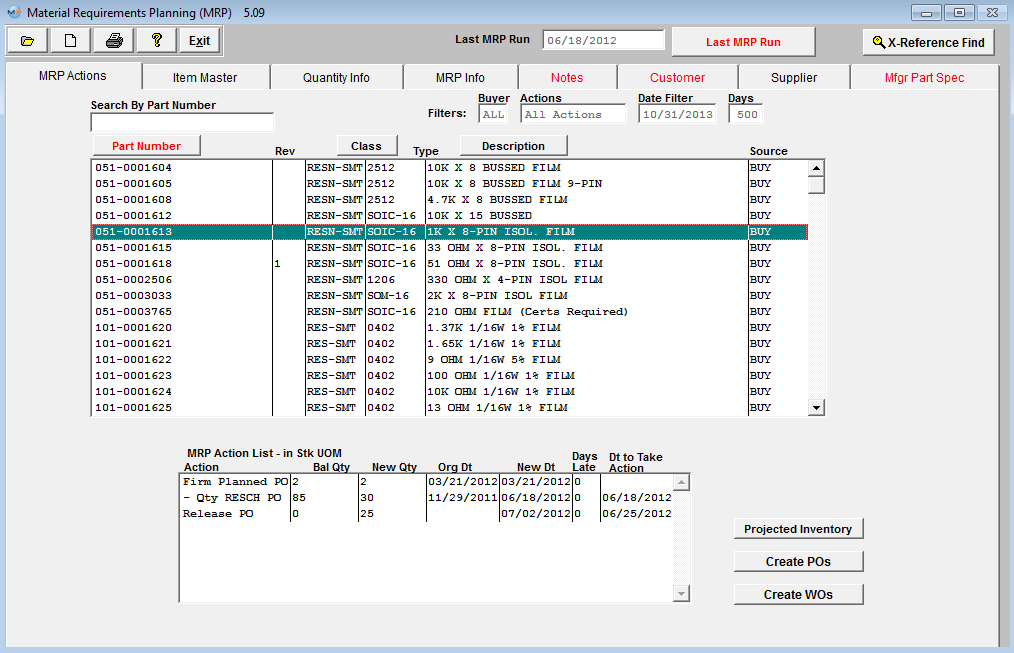 Definition of Material Requirements Planning Action Fields:
Sorting, Searching and Selecting in the MRP Action Screen The user may sort by the Part Number, Class or Description by depressing the appropriate button. To sort the contents of the Summary screen by Part Number, Part Class or Description, click the button. It will turn red and the list will automatically sort in ascending alphanumeric sequence per the selection. To search for an item by Part Class, click Class and enter the first few characters of the Part Class in the Search by Part Class field. The list will scroll down to the first incidence of each character in the sequence entered.If a character is not found in the position typed, the list will scroll to the bottom. To Search for an item by Description starting with the 1st character on the left, click Description and begin entering the first characters in the field. The list will scroll down to the first incidence of each character in the sequence entered.If a character is not found in the position typed, the list will scroll to the bottom. To Search for an item by a word or character string anywhere in the Description, click on Description, click on the Left button next to the Search by Description window (changes to Random). Enter the search word or characters in the window. Hit return and the first match in the list will be highlighted. Click on the window and hit return to highlight the next match in the summary list. After the last match or if a match is not found, the last item in the summary list will be highlighted. To visually search the summary list, use the scroll bar or arrows to the right of the list.The Source (Buy, Make or Phantom) and total On Hand quantity is displayed in the last two columns. For further Details on any item in the Actions main body list, highlight the item by a search or mouse click and select the appropriate Tab to display the desired detail information. To display changes made in other windows or by other users while this window is open, repeat the Material Requirements Find and refresh the screen data. FILTERS:
Main Body
Material Requirements Planning Action List in Stock Units Of Measure: The information listed in this section pertains to the highlighted part number in the main body above. To see the list for another part number, highlight the part number in the main body.
Note: Dates are calculated with the Production Calendar
Defines the Material Requirements Planning action to be taken for the highlighted part. There are several different actions that will appear depending on the part. For example if the Part is a Make/Phantom part and the action originates from a higher level assembly for the Phantom, MRP will display "PHANTOM" in this section and that will indicate to the user that there are no actions required but is listed so users can investigate where component actions are originating from. If the Make/Phantom is required directly for an order itself, it will now follow the same WO action rules as a regular Make Product would. The projected balance of inventory for the part selected. MRP will display the stock qty UOM. Displays the new quantity that the action requires. MRP will instruct you to Purchase the Stock qty UOM, not the Purchase UOM. The PO Module will display the UOM conversion (if applicable). NOTE: When creating a PO for an item with different purchasing and stocking UoMs, be sure to enter the MRP suggestion into the Stocking qty field rather than the purchasing qty field. The system will automatically convert the stocking unit into the purchasing unit for the purchase order qty. For Example: if the item has inches for Stock UoM and Feet for Purchasing UoM, and the MRP demand is 24 , the buyer would enter the qty of 24 into the stocking qty field and the PO would automatically convert it to 2 feet in the purchasing qty field. So the supplier deals in feet, but ManEx deals in inches. The conversion between the two are established in the Unit of Measure & Conversion module. Displays the original (current) date of the existing action. If the action date is earlier than the current date, the number of days late for the action is shown. This is the date by which the action listed must take place. Changing the leadtime of a Buy part will NOT change the due date, only the date to take action. For a Buy part this date is arrived by subtracting the Purchase Lead time from the New Date. For a Make part this date is arrived by subtracting the Kitting and Production Lead times from the New Date which is the Sales Order ship date.
Clicking on the
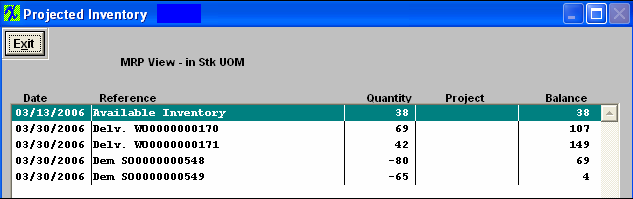
Definition of fields in the Projected Inventory screen:
The projected date of a Materials Requirements Planning action. The Material Requirements Action. The projected balance of inventory for the part selected.
After depressing the Projected inventory button, highlight and double click on a WO, SO, PO, etc. This will bring up another drill down screen as follows which will display the Material Requirements Planning Detail. This screen allows user to Sort, Search, or Drill down to the WO, SO, PO. etc.

Material Requirements Planning Field Definitions:
This is the assembly part number where the component part number is highlighted. This is the balance for the Work Order Listed.
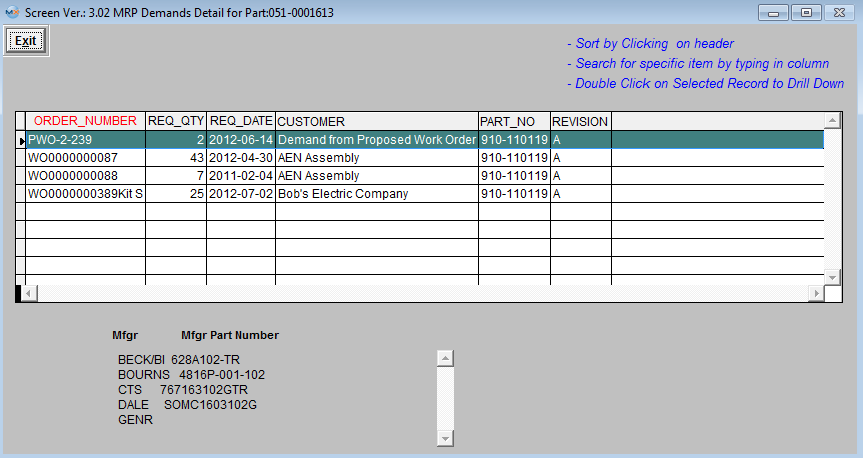
After highlighting and double clicking on a part number in the main body, the Material Requirements Planning Demands and Approved Vendors List will appeared, as displayed below. This screen will allow users to Sort, Search, or Drill Down to the WO, SO, etc. level.
Material Requirements Planning Demands and Approved Vendor List Field Definitions:
AVL
|
| 1.3.1.1. Create POs | ||||||||||||||||||||||||||||||||||||||||
|
| 1.3.1.2. Create WO's |
This portion of the MRP module is not fully completed yet in the current version. It is still a work in progress. While it displays the WO’s for quick reference you will still actually have to go into the WO module to create the WO’s as needed. You can also create WO’s directly in the SO module as well at the time you’re creating the Sales orders. |
| 1.3.2. Item Master Tab |
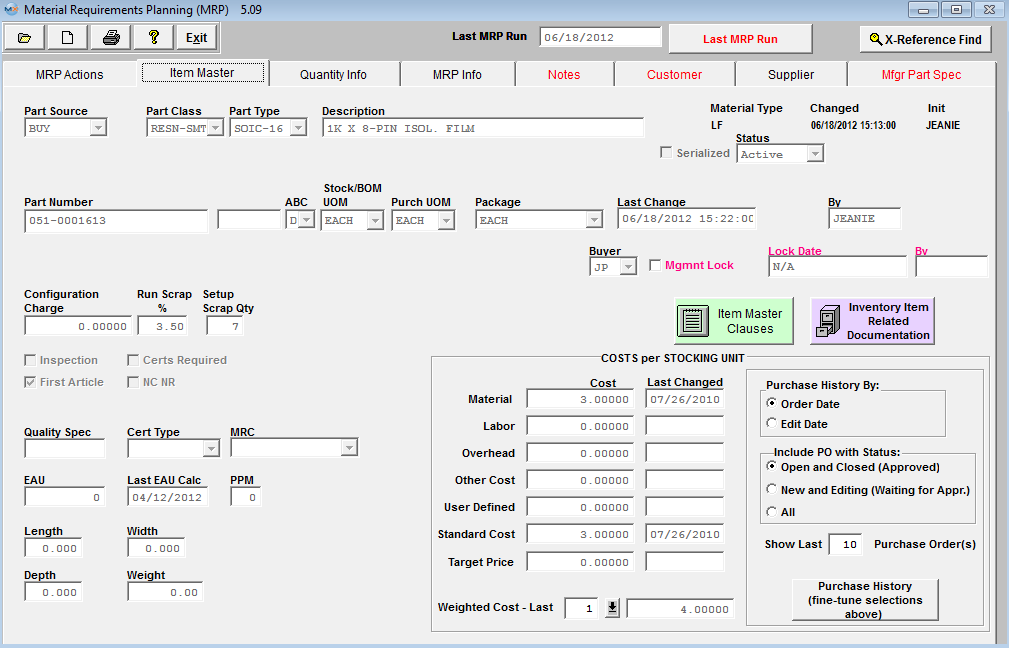
This screen will display details for the item highlighted in the MRP Action tab, which is being defaulted in from the Inventory Control Management module. See Article #4038 for field definitions. These fields may be edited in Inventory Control Management .
|
| 1.3.3. Quantity Info Tab |
|
This screen will display manufacturer, warehouse and inventory quantities for the item highlighted in the MRP Action tab, which is being defaulted in from the Inventory Control Management module. See Article #4039 for field definitions. These fields may be edited in Inventory Control Management .
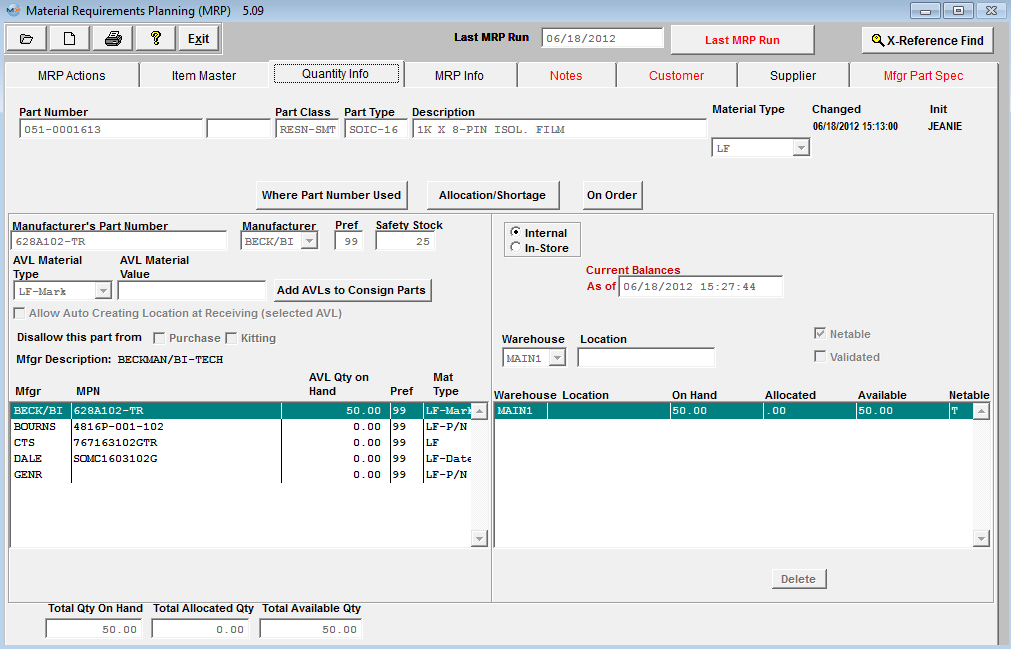
Complete inventory stock, allocation and usage information by Manufacturer is displayed or available at the click of a button. All current inventory information about any selected part can be displayed here. |
| 1.3.4. MRP Info Tab |
|
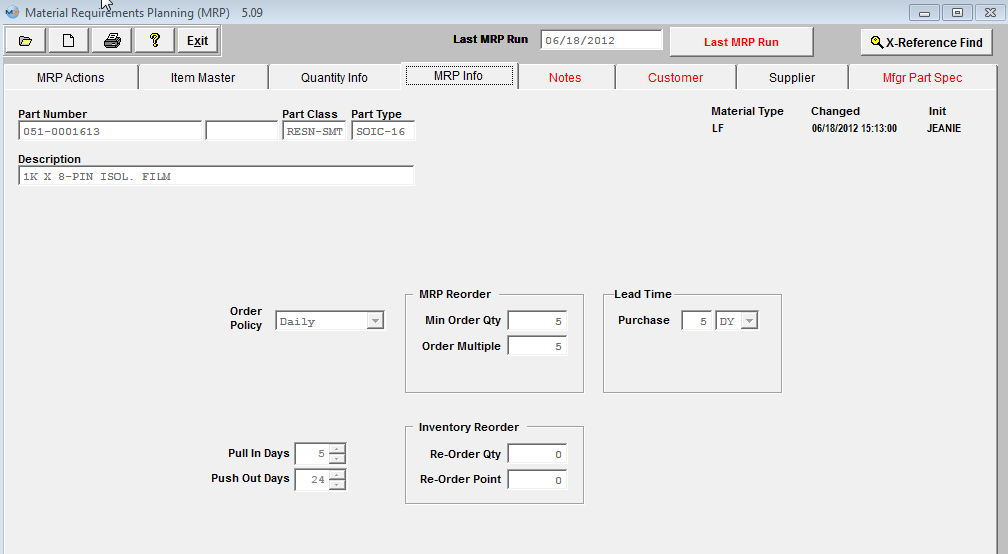
This screen will display MRP parameters for the item highlighted in the MRP Action tab, which is being defaulted in from the Inventory Control Management module. See Article #4040 for field definitions. These fields may be edited in Inventory Control Management .
|
| 1.3.5. Notes Tab |
|
This screen will display Inventory Notes for the item highlighted in the MRP Action tab, which is being defaulted in from the Inventory Control Management module. See Article #4041 for field definitions. These fields may be edited in Inventory Control Management . 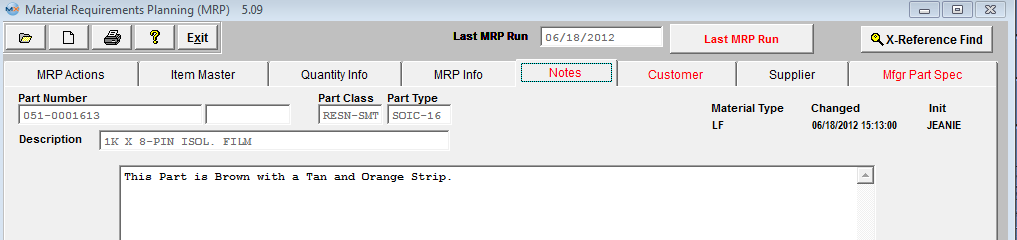 |
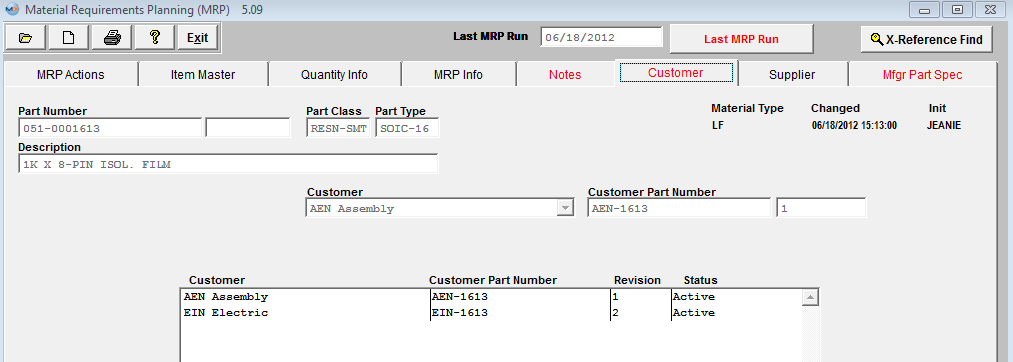
| 1.3.6. Customer Tab |
|
This screen will display customer part number(s) assigned to the internal part number for the item highlighted in the MRP Action tab, which is being defaulted in from the Inventory Control Management module. See Article #4042 for field definitions. These fields may be edited in Inventory Control Management .
|
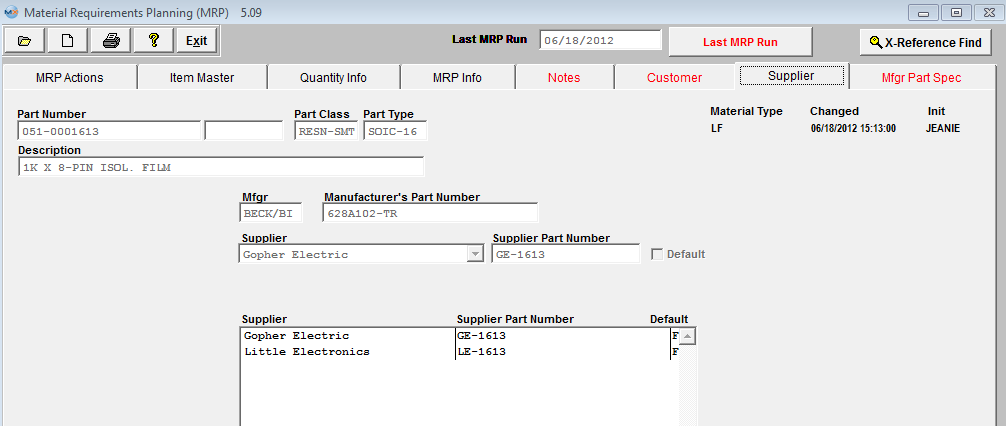
| 1.3.7. Supplier Tab |
|
This screen will display the name of the Supplier and Supplier's Part Number for the item highlighted in the MRP Action tab, which is being defaulted in from the Inventory Control Management module. See Article #4043 for field definitions. These fields may be edited in Inventory Control Management .
|
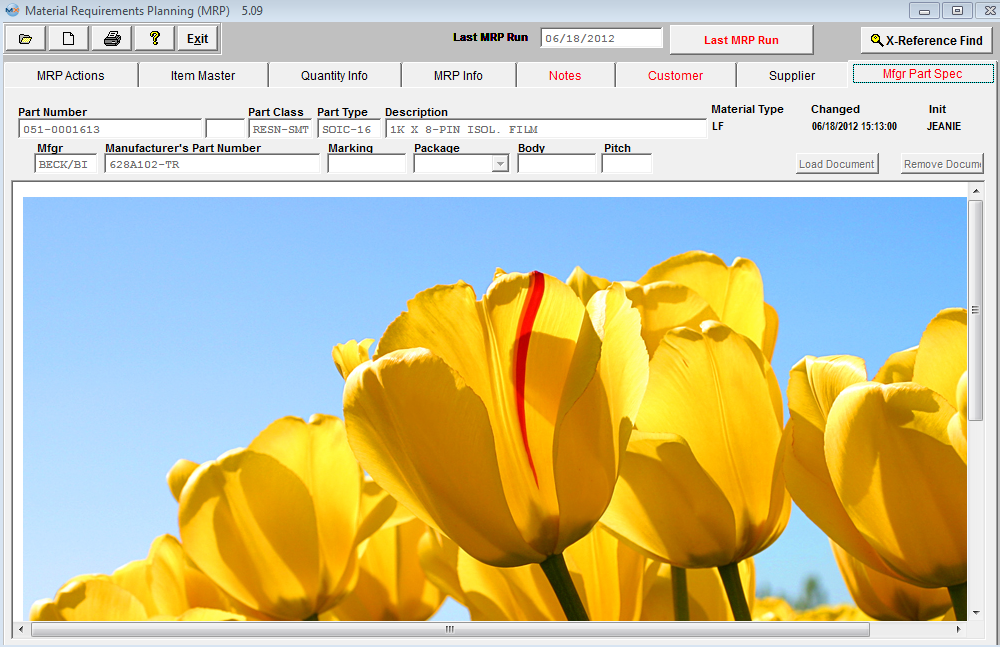
| 1.3.8. Manufacturer Part Spec Tab |
|
This screen will display any drawing, photograph, images, or .pdf files linked to the item highlighted in the MRP Action tab, which is being defaulted in from the Inventory Control Management module. See Article #4044 for field definitions. These fields may be edited in Inventory Control Management .
|
| 1.4. How To ..... for MRP |
| 1.4.1. Find a Material Requirements Planning (MRP) Record | ||||||||||||||||||||||||||
The following screen will be displayed:
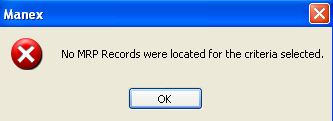
Tips on Using the Material Requirements Planning Find Screen Selection of at least one parameter will reduce the time to retrieve the information. The Find by Parent BOM is specific down to the Revision level. If no information is selected in a Find operation, all part numbers with MRP actions will be displayed.
Pressing the Find action Button displays the following sequences: 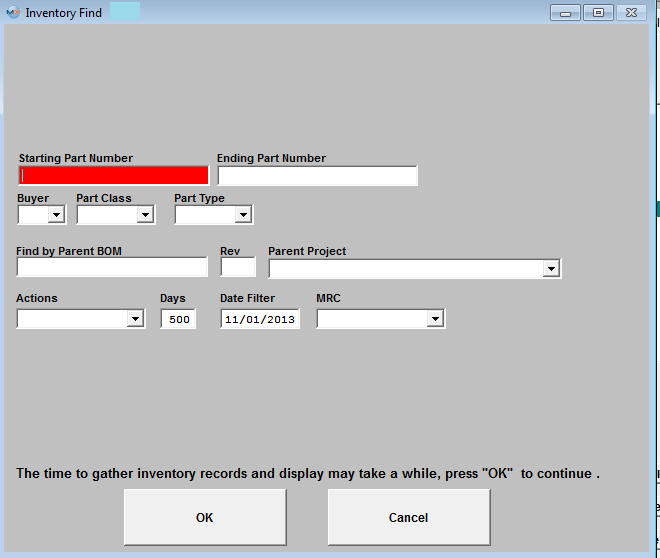 Definition of Material Requirements Planning Find Fields:
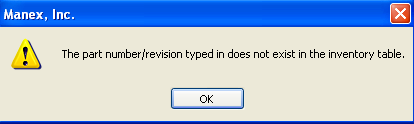
Starting Part Number and an Ending Part Number Select Buyer from the pull down menu. If you want ALL buyers, leave this area blank. Assigned Buyer will bring up all items assigned to that particular Inventory Buyer within the Inventory Control Management module. The Buyer assignment is setup in Part Class and Type System Setup Defaults or in the Inventory Control Management module/Item Master tab. If you selected a Class, depressing on the down arrow will bring up a list of Types within that Class. Select the Part Type within the Class selected. If you want all of the Types within the Class, leave this field blank. Revision of Parent BOM. If applicable this MUST be entered to located the exact Parent BOM. The "Find by Parent BOM" is specific down to the Revision level. If the exact part number and revison of the Parent BOM is not correct user will receive the following message: Select the action from the pull down. There are the various Material Requirements Planning actions, which the user may filter on such as: All Actions, All Purchase Order Actions, All Work Order Actions, Pull-Ins, Push-Outs, Release Purchase Orders, Release Work Orders, Cancel Purchase Orders, and Cancel Work Orders. Type in the number of days (from the current date), changes the Date Filter accordingly. This is a short-cut to the horizon date. The horizon date for the Material Requirements Planning actions. Parts with actions beyond this date are excluded from the report. The filtered information will populate the Material Requirements Planning Actions screen, as displayed below:
|

| 1.4.2. Add (Generate) A Material Requirements Planning (MRP) | ||||
Add (Run) a Material Requirements Planning
MRP runs through a large number of tables and records to compile its calculations, and provides a snapshot of suggested actions at the same time it is ran. If users are changing things during this process it could definitely cause some strange outcome. To prevent this situation we strongly suggest that you use the Nightly MRP trigger. (Refer to Article #416 for more detail on trigger setup).
If you find the need to re-run MRP during the production work day then we suggest that you notify all departments that MRP is going to be ran and ask them to remain out of the system until the MRP run is complete. This will help assure that the most accurate MRP run is possible. Then follow the procedure below:
The following Screen will be displayed:
To run a new Material Requirements Planning (MRP) manually, depress the Add action button (Generate MRP), and enter your password. The run percentage will be displayed on the header as displayed below:
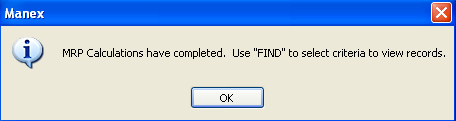
 The time it takes MRP to run is dependent on a number of factors. Here is a list of items that affect the processing time: Once the MRP run is completed and was successful, user will receive the following message:
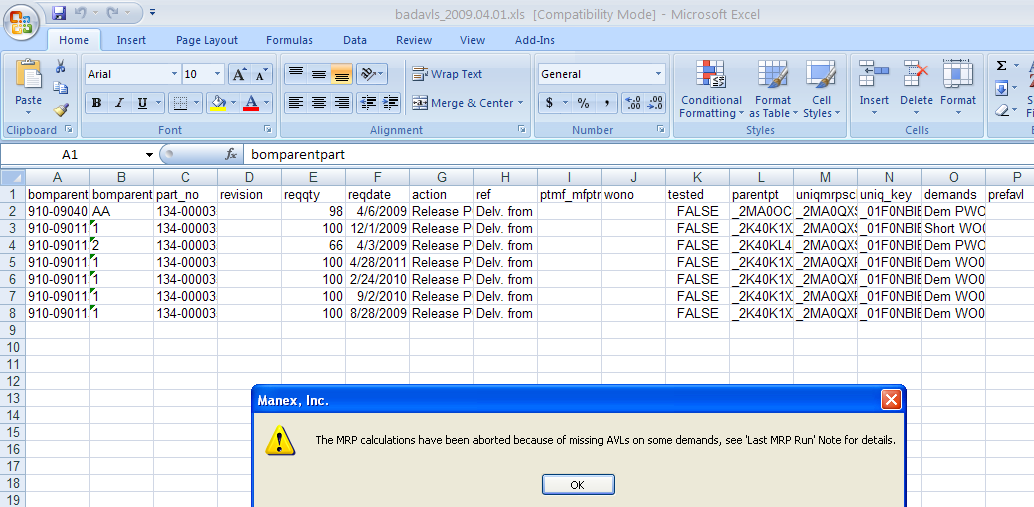
Depress the OK button. The Material Requirements Planning Date at the top right hand side of the screen will change.  If the MRP run was NOT successful due to AVL issues (missing, or exists but is marked as "Do Not Purchase and/or Kit, etc) the following message wil be displayed on screen indicating that MRP will NOT be able to continue until the BOM and/or part records have been correct. Then in addtion to the message an XLS file will be generated and placed in the ManEx Main Directory. This XLS file will contain the records that the user will need to review and address. If an XLS file is generated multiple times a day the system will add "_N" to the name of the XL file, where "N" is the dequence number. For example if MRP is run today three times without fixing a problem or a new problem is generated, the generated files will have names; badavls_2009.03.31_1.xls, badavls_2009.03.31_2.xls, badavls_2009.03.31_3.xls, unless one or all of the files were removed. The user will have the option of viewing the XL file now or later. NOTE: These XL files will need to be manually removed from the ManEx Main Directory.
 If the user selects "No" the user will receive the following message and they may review the XL file placed in the ManEx Main Directory.
 If user selects "Yes" an XL file (similar to the one shown below) will be displayed on screen and also placed in the ManEx Main Directory for later review:
 The date displayed in the "Last Successful MRP Run" will NOT change. The "Last MRP Run" button located in RED at the top of the screen will be displayed in a larger font if MRP run failed due to an AVL issue and there will be brief comment expaining what issues the MRP run encountered. This will allow any user that might not have seen the xls spreadsheet to be aware of what had taken place on the last attempt to run MRP.
 Double click on the "Last MRP Run" button and similar information will be displayed:
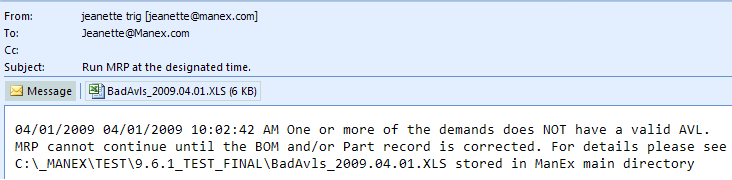
 NOTE: If MRP runs from Trigger, and MRP run was NOT successful due to AVL issues an XLS file will be generated and placed in the ManEx Main Directory for review and also be attached to the e-mail sent, informing user that the MRP run was NOT COMPLETED (similar to the one shown below). Upon opening the MRP screen the "Last MRP Run" button will be displayed in a larger font and will have information about the file as displayed above.
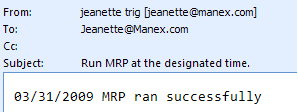
 If MRP runs Successfully from Trigger the e-mail sent will be similar to this:
 |
| 1.4.3. Drilling Down In MRP |
There are several drill downs within the MRP screen. Highlight a Buy or Make Part number of interest on the MRP main screen:
Double click on the highlighted buy part number 051-0001613 and the user can see the assembly of the proposed work order. Highlight the Proposed Work Order Number and the Approved AVL's will be listed per the BOM.
If the User double clicks on the PWO-2-239 (Proposed Work Order) the Sales Order, the assembly, required qty, and Customer will be displayed.: 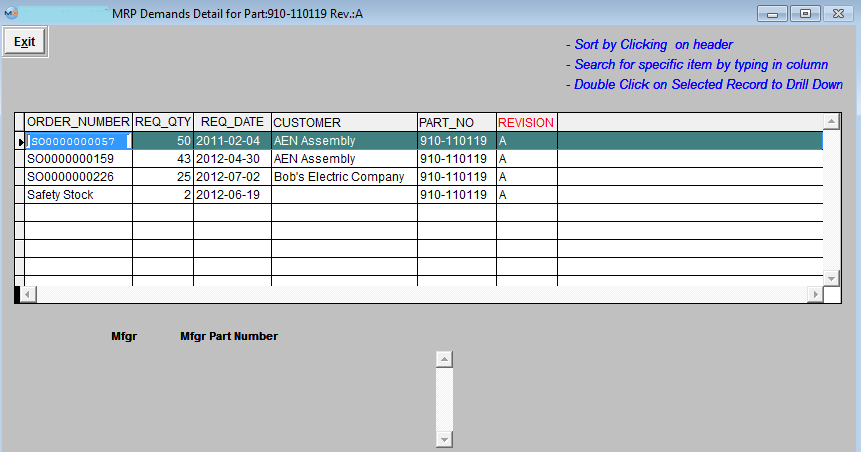 Highlight and double click on the SO0000000057 and the Original Sales Order will display.
Another Drill down located within the MRP Actions screen - is by highlighting one of the actions located in the MRP Action List-in Stk UOM box: 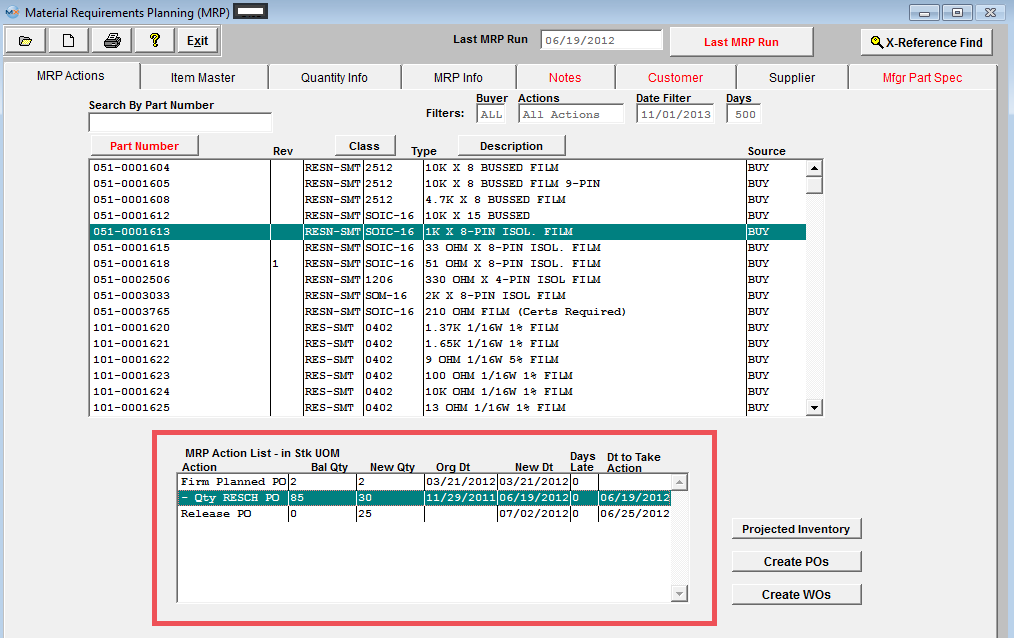 Double Click on the PO, WO, SO, etc of interest and the following screen will be displayed: All the Drill Down screens may be used to Sort, Search, or keep drilling down to actual PO, SO, WO, etc.
 Depress the 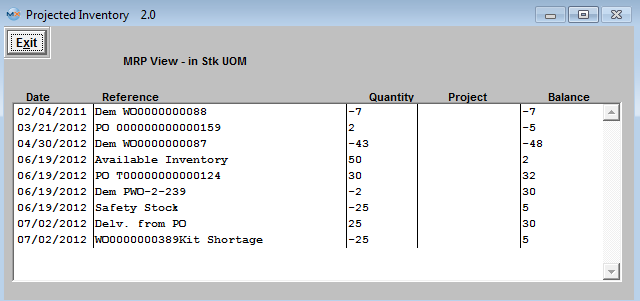 Within this screen you may highlight any of the Reference items and drill down to the original Sales Order, Inventory Level, Purchase Order, etc.
|
| 1.4.4. Create POs from MRP Action List | ||||
The following screen will be displayed:
Note: To start creating POs from the MRP action list, make sure you have run MRP creating a fresh MRP action list, and user must have "ADD" rights to the PO module in Security setup.
Find an MRP record.
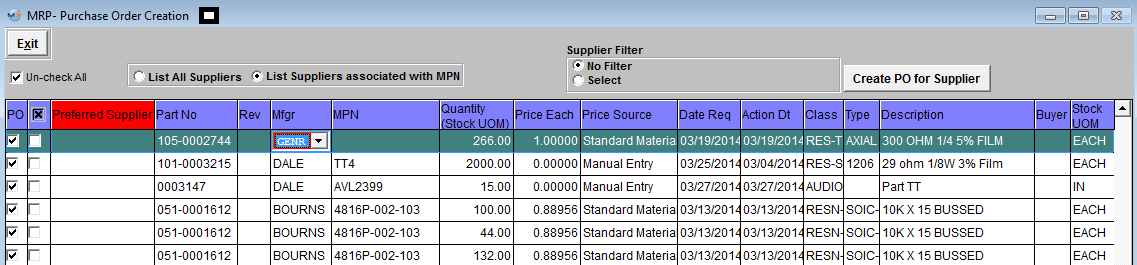
Highlight a part number of interest and depress the Create POs button in the bottom right hand corner, enter user password (user must have "ADD" rights to the PO module), and a list of Release PO suggestions based on the MRP filter that was applied and displayed within the MRP screen will appear. This will allow the buyers to auto created purchase order records based on what MRP is suggesting (mfgr, mfgr pn, etc...)
User may view records by selecting All Suppliers or only Suppliers assigned to the MPN in the ICM module. User may also use the Supplier filter to view records for one supplier at a time.
User may manually select the records to have POs created by placing a check in the box in the PO column. If no supplier is defaulted in the Preferred Supplier column from the ICM module, user may check item in the "x" column, select a supplier from the pull-down and receive the following message:
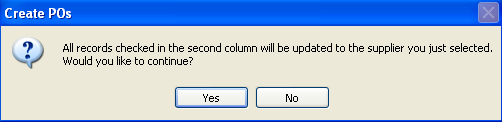 Depress "Yes" to continue and user will receive the following message:
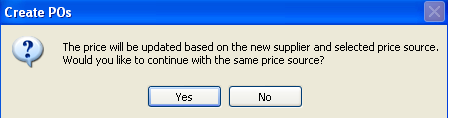 Depress "Yes" and all the records that have the check box to the left of the "Preferred Supplier" column checked will be updated with the selected supplier.
The Cost Each is defaulted in based on the "Price Source" column (which is setup in the Purchase Setup module). The standard Material Price and the Target Price defaults in from the Inventory Control Mgmt module. The Contract Price is defaulted in from the Supplier Contract Mgmt module. The Quote Price is defaulted in from the Quotation & Estimating module. The quote MUST be approved. If the part is on more than one quote the system will use the price from the most recent quote. The Mfgr and Supplier listed on the Auto PO screen must match the Mfgr and Supplier that was selected on the quote. The Last Purchase Price and Last Purchase Price for a Supplier will only be listed if they are within the last 6 months, if not then zero dollars will be displayed. Manual Entry allows user to manually enter in a cost each.
NOTE: The Auto PO screen will only find existing parts entered in the "Material 1" screen. There is no way to identify parts from "Material 2" screen. There is no connection between part entered in the quote module "Material 2" screen and the part before it becomes an Inventory part in ManEx until after the "Transfer".
All coulmns in the grid are sortable. To sort on the specific column click the header of the column. By default the items are sorted by "Preferred Supplier" column (red color of the header indicates that the data sored by the values in the column). Part No and Rev columns are both sorted by Part No and Rev vaules. If the cursor is in Part No, Mfgr,or MPN columns and the user begins to type the information, the interactive search will be performed and the record pointer will be moved to the appropriate record.
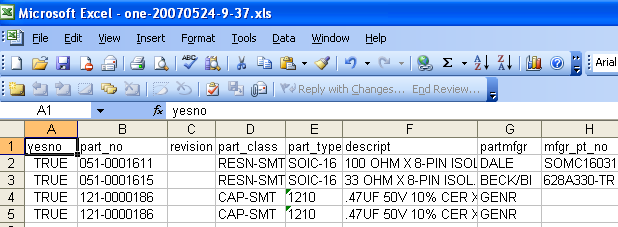
Once user has selected the records, they can depress the "Create PO for Supplier" button and PO's will be created (one for each supplier).
Once the POs have been created an xls report will be generated in the Manex local directory for review. The XL file name is based on the user initials plus the date and time the file is created. For Example if the file created has a name "ONE-20070524-9-37.xls" "ONE" - this is the user's initials; "20070524" - is the date when file was created (YYYYMMDD); "9-37" is the time (Hours-Min) when file was created, so this file was created at 09:37 am.
 User has the option of opening the created excel file by depressing Yes or No.
 |
| 1.5. Reports - MRP | ||||||||||||||
To obtain the MRP Reports within the Web, select the WEB Print button from the ManEx action buttons at the top of the screen. For further detail on How the Reports work within the Web refer to Article #5477.
Note: In order to access the Reports within the Web the Company Root URL must be setup within the System Appearance module and user must be linked to web within the System Security Module
Select the Report Type: MRP - A List of Reports will be displayed that are available on the Web
for MRP
To obtain the MRP Reports within the desktop, select the Print button from the ManEx action buttons at the top of the screen. The following reports screen will display a list of reports that are available on the ManEx Desktop: 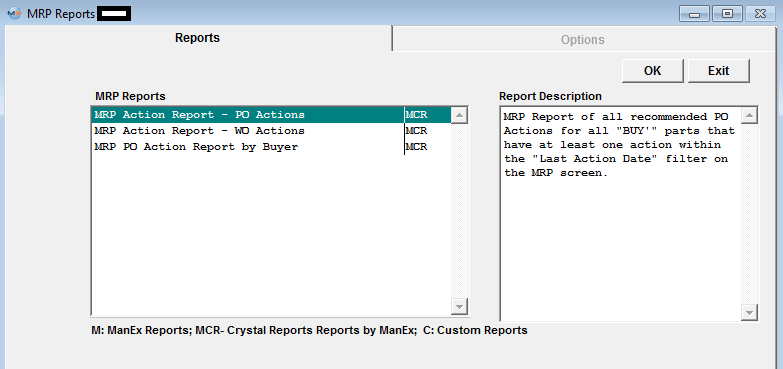 Highlight the report, depress the option tab (if applicable) and depress the OK button.
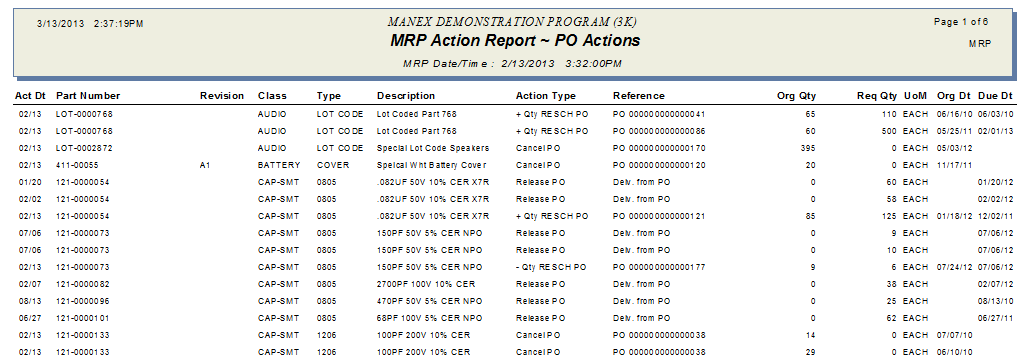
MRP Action Report - PO Actions - MRP Report of all recommended PO Actions for all "BUY'" parts that have at least one action within the "Last Action Date" filter on the MRP screen. The following report is printed:
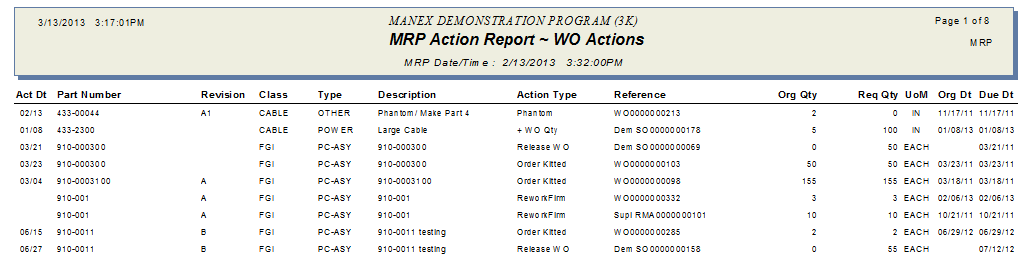
MRP Action Report - WO Actions - MRP Report of all recommended PO Actions for all "BUY'" parts that have at least one action within the "Last Action Date" filter on the MRP screen. The following report is printed:
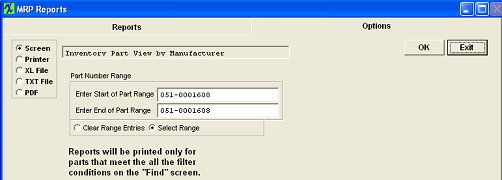
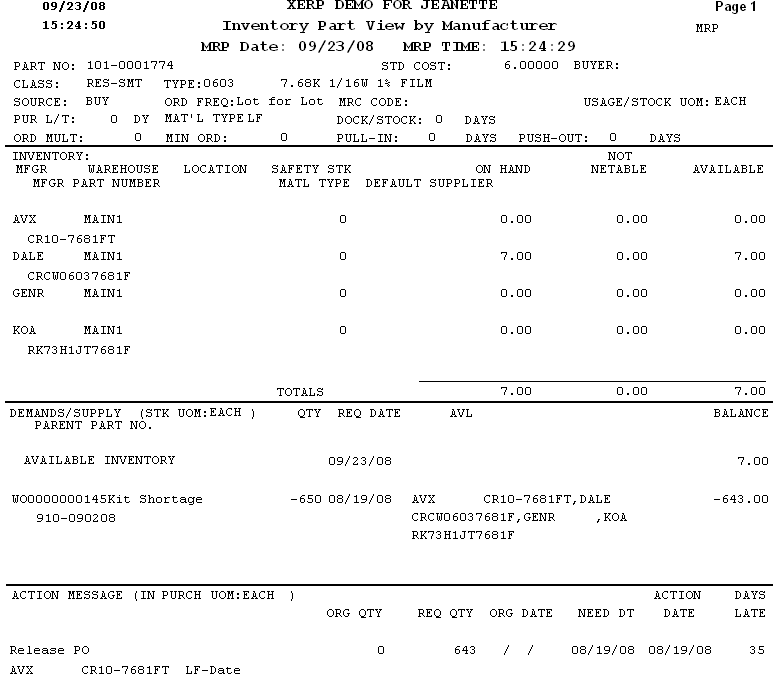
Inventory Part View by Manufacturer - This report displays the inventory information, supply, demands and action messages for a part that are the results of the latest MRP run.
For Inventory Part View By Manufacturer, depress the Options tab: Select the Part Number Range desired. To clear the range entries, click on the "Clear Range Entries" radio. The following report is printed:
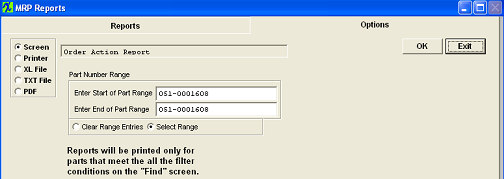
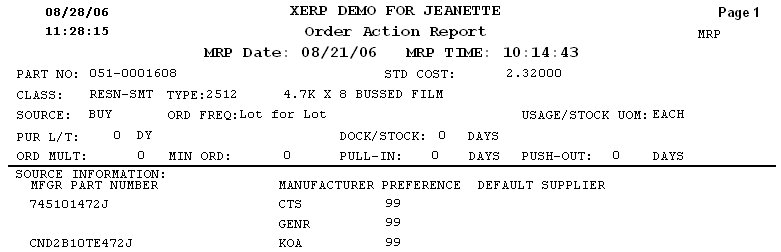
Order Action Report - This report displays the inventory information, purchase history, open PO's and MRP actions for 'BUY' parts that are the results of the latest MRP run.
The following report is printed:
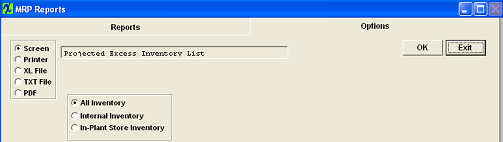
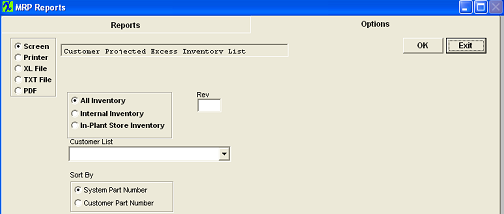
Projected Excess Inventory List - This report list the projected excess inventory that is on hand but not needed after MRP requirements.
The following report will print:
MRP Horizontal Planning Summary - This reports displays the supply and demand for each part on the MRP action list with the quantities in weekly buckets.
Note:This report requires Legal size paper.
The following message will appear:
Depress the OK button and the following report will be printed:
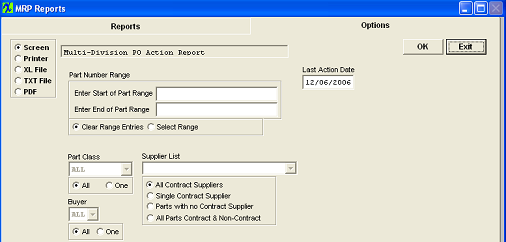
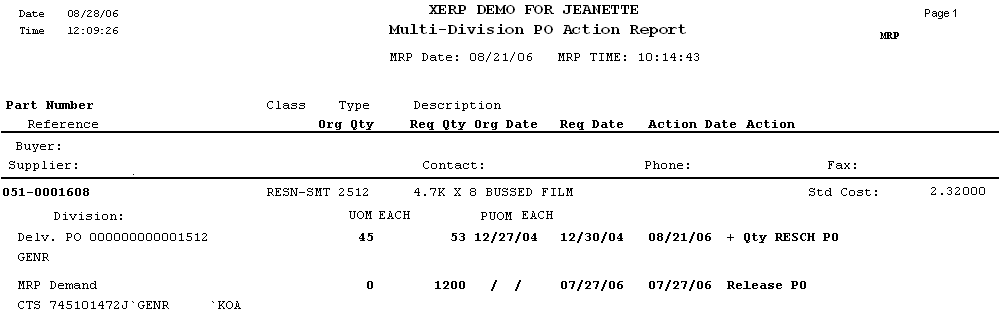
Multi Division Purchase Order Action Report - NOTE: The system does NOT require that you have Multi-Divisions setup to utilize this report.
The following report will be printed: The report is intended to break down the PO actions from the MRP run by Buyer, then part number.
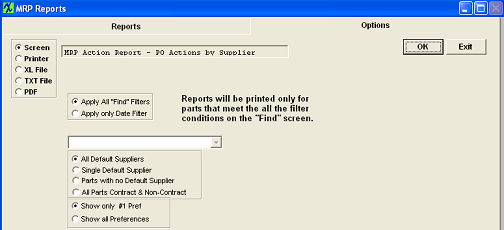
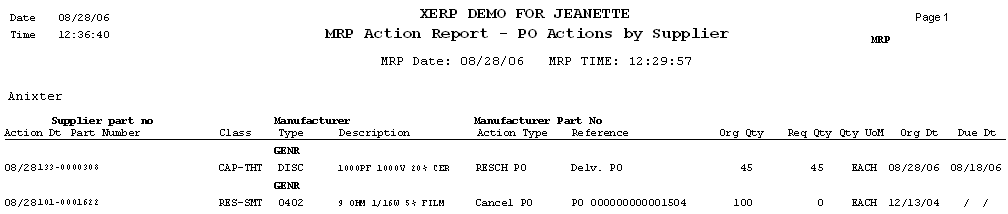
MRP Action Report - PO Actions by Supplier - MRP Report of all recommended PO Actions for all "BUY'" parts that have at least one action within the "Last Action Date" filter on the MRP screen by Supplier
The following report will print:
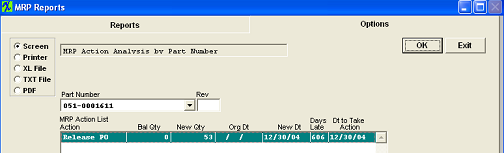
MRP Action Analysis by Part Number
The following report is available:
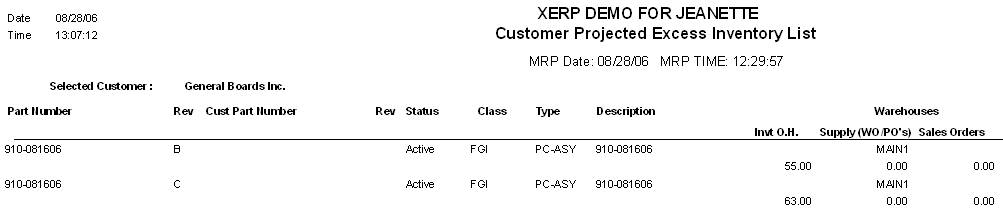
Customer Projected Excess - This report list the projected excess inventory that is on hand but not needed after MRP requirements for a selected customer.
Note: This report requires Legal size paper.
The following report will be printed:
MRP PO Action Report by Buyer - MRP Report of all recommended PO Actions for all "BUY'" parts that have at least one action within the "Last Action Date" filter on the MRP screen.
Note: A default Supplier MUST be linked to the inventory part before it will display on the report. The following report will print:
|


| 1.6. FAQs - MRP |
| Facts & Questions for the MRP Module |
| 1.7. MRP Hot List | ||||||||||||||||
|
After activation, "Material Requirements Planning" (MRP) access for each user must be setup in the ManEx System Security module. Users with “Supervisor Rights” will automatically have access.
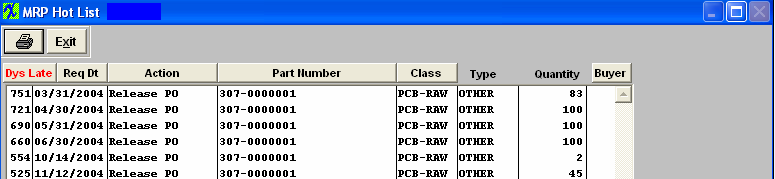 Material Requirements Planning Hot List Field Definition:
|