| 1. Fields and Defintions for the Release and Post Module |
| 1.1. General Ledger Release & Post Screen | 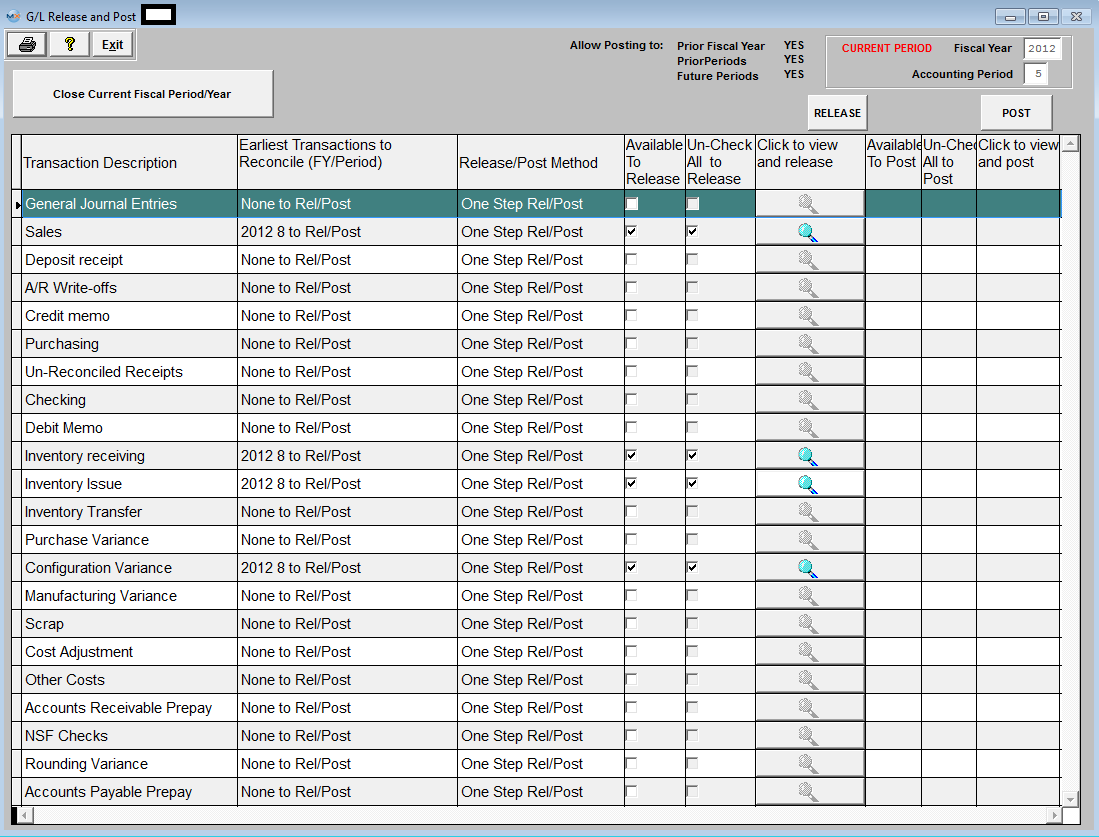
Transaction Types:
| General Journal Entries |
|
| Sales |
The Journal Entry is created once the Customer Invoice is printed. Accounts Receivable is increased by the total amount of the invoice. Sales are increased by the sales price of the items sold. If freight is charged to the customer, that value is recorded. If sales taxes are charged to the customer, the appropriate entry is created. Also, Finished Goods inventory is relieved and the accompanying entry to Cost of Goods Sold is created.
If the user has created a Credit Memo, the entry to record same is created automatically, pro-rata relieving Accounts Receivable, Sales, etc. AND also Reinstating Inventory for any usable inventory returned by their customer. Any Unusable Inventory returned can be directed to the Scrap Account. The system also accepts General Credit Memos, and creates the entry after prompting the user for the appropriate General Ledger Account Number.
|
| Deposit Receipt |
Once any Bank Deposit is recorded in the ManEx Accounts Receivable module, the Underlying Journal Entry is created, increasing the bank balance and offsetting Accounts Receivable. If the Cash Receipt is for a Customer Prepayment or Deposit, the Journal Entry records the information according to the default set up by the user. Also, any Miscellaneous Receipt prompts the user for the General Ledger Account Number at the time of data entry, then the ManEx system creates the entire entry.
|
| A/R Write-Offs |
The user elects to Write Off any portion of the Customer Invoice, the ManEx system creates the appropriate Journal Entry, reversing pro-rata the entry to Accounts Receivable and sets up the offset to Reserve For Bad Debts.
|
| Credit Memos |
If the user has created a Credit Memo, the entry to record same is created automatically, pro-rata relieving Accounts Receivable, Sales, etc. AND also Reinstating Inventory for any usable inventory returned by their customer. Any Unusable Inventory returned can be directed to the Scrap Account. The system also accepts General Credit Memos, and creates the entry after prompting the user for the appropriate General Ledger Account Number. |
| Purchasing |
ManEx handles payables created via the Purchase Order module, any Miscellaneous Payables entered via the Manual A/P Entry, or a Recurring Payable in the same fashion. Once the PAYABLE is recorded in the A/P Aging area, the entries to record the payables are set up. The entry increases inventory, expenses, assets and accounts payable.
|
| Un-Reconciled Receipts |
When an inventory item is received into stock a transaction is created within the un-reconciled receipts (according to its standard cost) (this is the holder to account for received material) until the receipts are reconciled. |
| Checking |
Once Account Payable Checks have been printed, the ManEx system automatically records the appropriate Journal Entry relieving the bank and the Accounts Payable account.ManEx provides the same type of Journal Entry if a Manual Check is recorded.The entry relieves the bank and increases the appropriate General Ledger Account Number entered by the user at the time of recording.
If the user has voided any previously printed or Manual Checks, the ManEx system automatically reverses the original entry
|
| Debit Memos |
If the user has created a Debit Memo against any Active A/P Balances, the entry to reverse the payable is created automatically, pro-rata reversing the original payable.Additionally, when the user creates a Discrepant Material Return from Inventory, a Debit Memo will forward to Accounts Payable. The applicable entry will be created debiting Accounts Payable and crediting Raw Materials Inventory.
|
| Inventory Receiving |
An entry is created at the time the user Records a Receipt via the Inventory handling function. Raw Materials Inventory is increased with the offset as defined by the user.
The other way these entries are created is when the assembled product is moved to the Finished Goods work center in the Shop Floor Tracking module. The entry created by the system is to increase Finished Goods Inventory, with the offset to Work In Process. If there was a Configuration Variance (see below) this entry is also created.
|
| Inventory Issues |
There are four types of inventory issues:
An entry is created at the time the user records an Issue via the Inventory Handling function. Raw Materials Inventory is decreased with the offset as defined by the user.
The other way these entries are created is when the raw material components are pulled for a Work Order. The Entry created by the system is to increase Work In Process Inventory, with the offset to Raw Materials Inventory.
When a Physical Inventory is reconciled, the user may update the Inventory Master for the Inventory On Hand. Note that this action requires a supervisor’s password or specific Post Inventory Adjustments authorization in the Security Utility tab. All of the Reconciled Count Numbers will update the Quantity On Hand in the Inventory Master.Additionally, the requisite Journal Entires for any variances will forward into the accounting module.
Note that Journal Entries will not be created in the following circumstances:
Consigned stock
In Store additions
|
| Inventory Transfers |
If, when a Cycle Count is reconciled with the Inventory Records, the count is different than the record, then the user is prompted whether to accept the difference or to recount and re-enter. Count Adjustments are logged to the GL Adjustment Account, if accounting is used.
|
| Purchase Variance |
When parts are procured, the purchase order may have a price different than the standard cost. To balance the accounts payable values with the increases in inventory, the difference between the standard cost and the purchase price (based on the PO Reconciliation done in Accounting with the actual invoice) is charged to PPV, or Purchase Priced Variance. E.G., if a parts standard cost is $1.00, and the INVOICE is $1.15, then $1.00 is credited to inventory, $0.15 is credited to PPV, and $1.15 is debited to AP. There are FIVE reports available that detail out the source of the transactions.
For more information on the four Variances see Article #3053 |
| Configuration Variance |
When the standard cost of an assembly is different from the sum of the standard costs of its components, the difference must also be addressed in WIP. E.G., if the standard cost of an assembly is $10.00, and the sum of the standard cost of the BOM components is $11.00, then upon moving the assembly from WIP to FGI, WIP is credited with $11.00, Configuration Variance is Debited $1.00 and Inventory is debited $10.00. There are FOUR reports available that detail out the source of the transactions.
For more information on the four Variances see Article #3053 |
| Manufacturing Variance |
When the work order has had material kitted to it in addition to that called out by the BOM, or the kit is finished with missing parts (maybe freebies that didn’t get to inventory), the difference between the total issued to the work order and the total value of the BOM parts becomes the Manufacturing Variance. E.G. one batch of parts got lost even though they were kitted to the work order, and a second batch of parts was issued to the work order, the second batch would be a manufacturing variance, since they were lost in the manufacturing process. There are FOUR reports available that detail out the source of the transactions.
For more information on the four Variances see Article #3053 |
| Scrap |
At the end of the production process, items transferring into the Scrap Work Center create an accounting entry increasing the scrap default account and decreasing WIP for the value of the number of units of the assembly at the assembly’s Standard Cost.
Additionally, when an Engineering Change Order deletes a line item and that line item is defined as “SCRAP”, an entry increasing scrap and decreasing Raw Materials Inventory is generated.
Within Inventory Handling, the Entry created is to record the movement of Inventory from one warehouse location to another increasing or decreasing General Ledger accounts as defined by the user.
|
| Cost Adjustments |
This entry is created in the Standard Cost Adjustment Module. Once the rollup is completed, any adjustments to General Ledger forward to Accounting. The user is allowed to Post Changes to Standard Cost and to generate the General Ledger Entries. Note: This requires a high level accounting password.
|
| Other Costs |
Includes Labor, Overhead, User Defined, and Other Costs |
| Accts Receivable Prepay |
These transactions are for an A/R Offset.
|
| NSF Checks |
If checks previously deposited are returned, the entry to reinstate any Accounts Receivable balance and to lower the appropriate bank account is created automatically when the user records a returned check.
|
| Rounding Variance |
If there is a small percentage assigned to run scrap, and the components are in units of Each, we can't issue fractions of a component to the work order. So we would round up to the next integer. For example, if there is a qty of 1 part per assembly (with a 2% run scrap) @ $1.00/ea and the Work Order is for a quantity of 10 we would issue 11 parts @ a total of $11.00 instead of 10.2 parts @ a total of $10.20. So we would be adding the value $11.00 to WIP, but only taking out the quivalent value of $10.20 based on the BOM standard cost. So the difference between the std cost calculation and the actual kit issuance (in the example, $0.80) would be charged to the Rounding Variance upon kit close. For more information on the four Variances see Article #3053 |
| Accts Payable Prepay |
These transactions are for an A/P Offset. |
|
| 1.2. Release Screen |
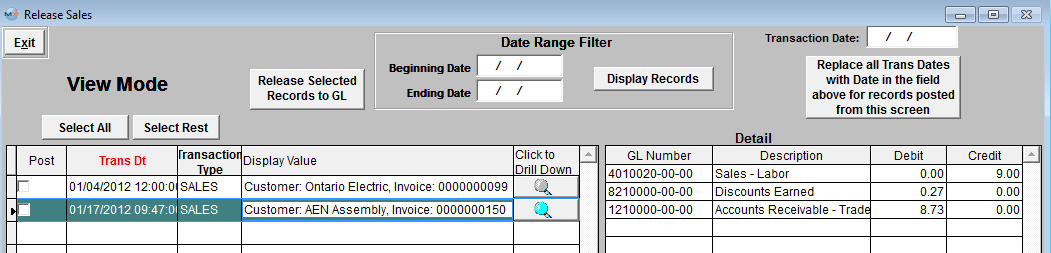
(Note: The screens may vary in appearance by the type of transaction but basically contain the same information). There will be two grids, the grid on the left will display the Transaction information and the grid on the right will display the detail of the transaction. The data can be sorted in various ways by clicking on the column headers that are in bold font. Some types of transactions will allow users to drill back to the source in which the transactions originated from, such as Purchase Order, Sales Order, Work Order, etc.
 |
All transactions are checked to be released by default. Once you have selected the records to be released, Depress the "Release Selected Records to GL". The records selected to be released will be removed from the release screen and the records not selected to be released will stay on screen. This button is only available when this screen is in the "Edit" mode. |
Date Range Filter
| Beginning Date |
The Beginning Date is automatically set to the oldest transaction. Changing these dates filters the selection so that only those transactions within the date range are displayed.
|
| Ending Date |
The Ending Date is automatically set to the current date. Changing these dates filters the selection so that only those transactions within the date range are displayed.
|
 |
User can select a date range filter to display only those transactions within a given period of time, by entering different Beginning Date and/or Ending Date and depressing the "Display Records" button.
|
| Transaction Date |
This field gives you the ability to change the transaction dates for all of the transactions. This field is only available when this screen is in the "Edit" mode.
|
 |
Depress this button to update the records with the new Transaction date. This button is only available when this screen is in the "Edit" mode. |
Transactions
  |
User can select the records to be released by using the toggle button to "Deselect All/Select All" . This button is only available when this screen is in the "Edit" mode. |
  |
User can select the records to be released by using the toggle button to "Deselect Rst/Select Rest" .This button is only available when this screen is in the "Edit" mode. |
| Release |
All transactions are checked to be released by default. User will need to depress the Edit button and uncheck this box to prevent the record from being released. If the box is unchecked the record will remain on screen and not be released at this time. |
| Trans Dt |
This displays the date of the transaction. User may change this date if desired. |
| Transaction Type |
This displays the type of transaction. |
| Display Value |
This field displays the Customer Name and Invoice Number, PO number, Sales Order number, etc (depending on the type of transaction being release) for the record waiting to be released. |
| Click to Drill Down |
Clicking on the magnifying glass next to the transaction will bring you back to original record. |
Detail - This section breaks out the transaction that is going to be created.
| GL Number |
This field displays the GL numbers that the transaction is going to affect. |
| Description |
This field displays the description for the current item selected in the left grid. Depending on the type of transaction being released. |
| Debit |
This field displays the amount that is going to be debited. Depending on the type of transaction being released. |
| Credit |
This field displays the amount that is going to be credited. Depending on the type of transaction being released. |
|
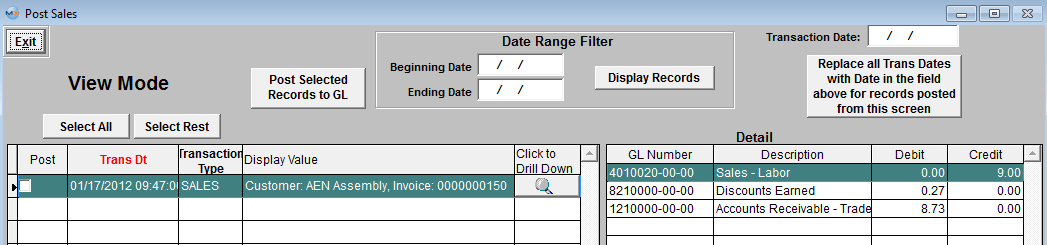
| 1.3. Post Screen |
(Note: The screens may vary in appearance by the type of transaction but basically contain the same information). The transactions that have been released and waiting to be posted will appear in the first (left) grid. The data can be sorted in various ways by clicking on the column headers that are in bold font. Some types of transactions will allow users to drill back to the source in which the transactions originated from, such as Purchase Order, Sales Order, Work Order, etc. The detail of each transaction will be displayed in the second (right) grid with the GL number and the Debits and Credits.
 |
Once you have selected the records to be posted, Depress the "Post Selected Records to GL". The records selected to be posted will be removed from the post screen and the records not selected to be posted will stay on screen. This button is only available when this screen is in the "Edit" mode. |
Date Range Filter
| Beginning Date |
The Beginning Date is automatically set to the oldest transaction. Changing these dates filters the selection so that only those transactions within the date range are displayed |
| Ending Date |
The Ending Date is automatically set to the current date. Changing these dates filters the selection so that only those transactions within the date range are displayed. |
|
User can select a date range filter to display only those transactions within a given period of time, by entering different Beginning Date and/or Ending Date and depressing the "Display Records" button. |
| Transaction Date |
This field gives you the ability to change the transaction dates for all of the transactions. This field is only available when this screen is in the "Edit" mode. |
 |
Depress this button to update the records with the new Transaction date. This button is only available when this screen is in the "Edit" mode. |
Transactions
Detail
| GL Number |
This field display the GL number for the current item selected in the left screen. Depending on the type of transaction being posted. |
| Description |
This field display the GL description for the current item selected in the left screen. Depending on the type of transaction being posted. |
| Debit |
This field display the debit amount for the current item selected in the left screen. Depending on the type of transaction being posted. |
| Credit |
This field display the credit amount for the current item selected in the left screen. Depending on the type of transaction being posted. |
|
|