1. PO Receipt Reconciliation
1.1. Prerequisites for PO Receipt Reconciliation

Users MUST have full rights to the "PO Reconcilliation" in Accounting Security .   Users with “Accounting Security Supervisor” rights will automatically have access.


The Purchase Order line item has been received and inspected.
1.2. Introduction for PO Receipt Reconciliation

The PO Receivable Reconciliation provides on screen and printed reports to assist the tracking and payment of outstanding payables.  Once the Purchase Order line item has been received and inspected, the received information will forward from the Receiving module to the Accounts Payable Purchase Order Reconciliation. 

1.3. Fields & Definitions for PO Receipt Reconciliation
1.3.1. PO Reconciliation Tab


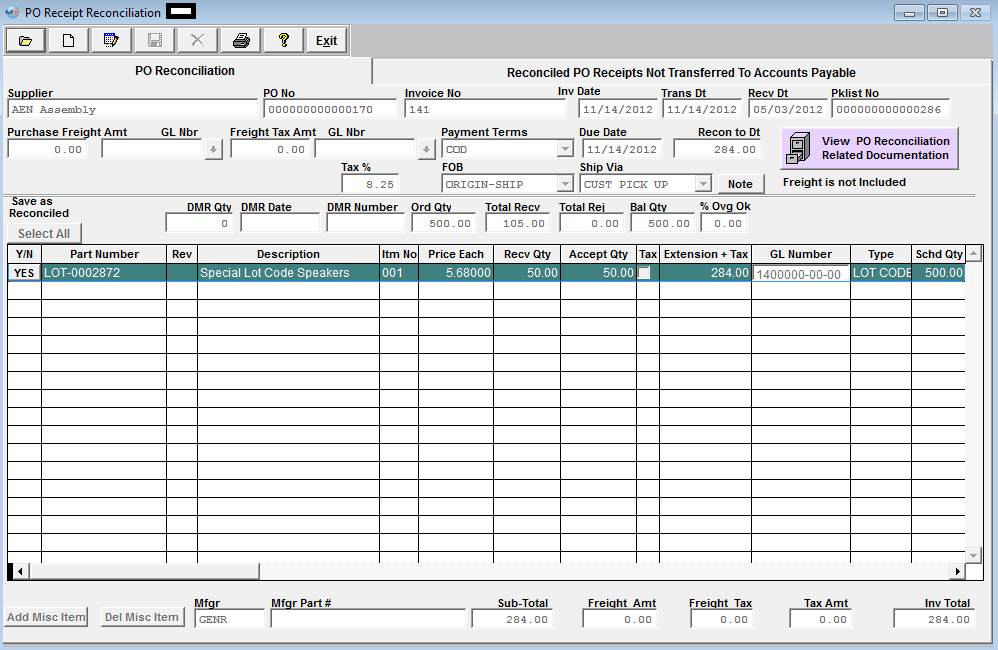
PO Reconciliation Field Definitions

Supplier The name of the supplier for which the PO was created
PO Number

The unique number assigned to the order.

Invoice Number

The number assigned to the suppliers’ invoice.

Inv Date

The date of the supplier’s invoice.  Note:   If a date is entered that is outside of the Production Calendar Setup, a warning will be displayed and the field will clear, the user will at this time have to either re-populate with the correct date or cancel the transaction and update the Production Calendar Setup screen. 

Trans Date

The date of the Journal Entry (this tells General Ledger what period to post into).  Note:   If a date is entered that is outside of the Production Calendar Setup, a warning will be displayed and the field will clear, the user will at this time have to either re-populate with the correct date or cancel the transaction and update the Production Calendar Setup screen. 

Recv Date

Normally each invoice is date stamped upon receipt by the user. This field is so that the user may record that date.

PkList Number

This is the number of the supplier’s packing list.

Purch Freight Amt

If the supplier has charged the user for freight, that amount will appear here.

GL Number

This is the General Ledger Number assigned to the purchase freight amount.

Freight Tax Amount 

Some states have a tax applied to freight.If that was the case, such tax would display in this field.

GL Number 

This is the General Ledger Number assigned to the freight tax amount.

Payment Terms

These are the terms that the supplier has available for the user.

Due Date

This is the date by which the entire invoice must be paid. (Note: if the terms involved a discount such as 2 % 10, net 30, the date which would appear here would be the 30 day date and NOT the discount date).  Note:   If a date is entered that is outside of the Production Calendar Setup, a warning will be displayed and the field will clear, the user will at this time have to either re-populate with the correct date or cancel the transaction and update the Production Calendar Setup screen. 

Recon to Date 

This is the Reconciled Dollar amount to Date for the selected Purchase Order.

  View PO Reconciliation Related Documentation.  This will give the users the ability to scan the packing list, invoice, or any other related document directly into the ManEx system and attached the document directly to the item in the PO Reconciliation Module.  For further detail see Article #2394.
If lit in red, there is a note pertaining to this invoice.
There is a "Freight Included" box within the Purchase Order moduleIf this box is checked, the vendor has agreed to pay the freight and "Freight is Included" will be displayed.  If this box is NOT checked "Freight is not Included" will be displayed. 

For the item number highlighted:

This will allow the users to select all line items per selected receiver if desired.
Tax % If sales tax is to be applied to the purchase, the rate of such tax is displayed here.
FOB The FOB terms display when title of the goods passes, upon shipment, or whatever. 
Ship Via  This is the method of shipment, such as UPS, etc. 
DMR Quantity

If a portion of the shipment was returned to the vendor (DMR), the quantity would display here. 

DMR Date

The date of the return to vendor.

DMR Number 

The unique number assigned to the return to vendor. 

Order Quantity 

This was the quantity ordered per the Purchase Order.

Total Received 

This is the quantity received. 

Total Rejected 

This is the quantity rejected.  Please refer to the Purchase & Receiving Management manual for more information on this process.

Balance Quantity

This is the balance still due to be received on this order. 

% Overage OK If in Purchase Setup, the user indicated a purchase order overage percentage, that amount would display here. 
Save as Reconciled  Y/N Toggle on the Yes/No column. Depress Yes to reconcile the item.  Depress No If you do not want to reconcile this item.   
Part Number  Part number to be reconciled.
Rev  Revision to part number to be reconciled.
Description  Description of Part to be reconciled.
Item Number  The number of the line item per the Purchase Order.
Price Each The pricing for the item per the Purchase Order.
Recv Quantity  The amount of the item received. 
Accept Qty The amount of the item accepted.  For more information on receiving and acceptance, please refer to the Purchase & Receiving Management manual.
Tax  If this box is checked, the item is subject to sales tax.
Extension + Tax This is the purchase price multiplied by the quantity accepted plus the applicable sales tax. 
GL Number

This is the General Ledger account number to which this item will be posted. 

Type

If the Purchase Order was for an Inventory item, the type within the classification would appear here.

Schd Qty

The amount scheduled per the Purchase Order.  For more information on this topic, please refer to the Purchase Order Management manual.

Receiver Number 

The unique number the user assigned to the receipt.

Class

If this was an inventory purchase, the classification of the item would appear here.


Depress this button to add a misc item associated with the invoice which was not included in the PO.

  Depress this button to delete the Misc item  
Mfgr Manufacturer name assigned to the highlighted item 
Mfgr Part # Manufacturer part number assigned to the hightlighted item 
Sub-Total The amount of the invoice before freight or tax added.  
Freight Amt

Total Freight amount.

Freight Tax

Some states have a tax applied to freight.  If that was the case, such tax would display in this field.

Tax Amt  If this item is subject to sales tax the total would display here.
Inv Total Total $ amount of items being reconciled. 


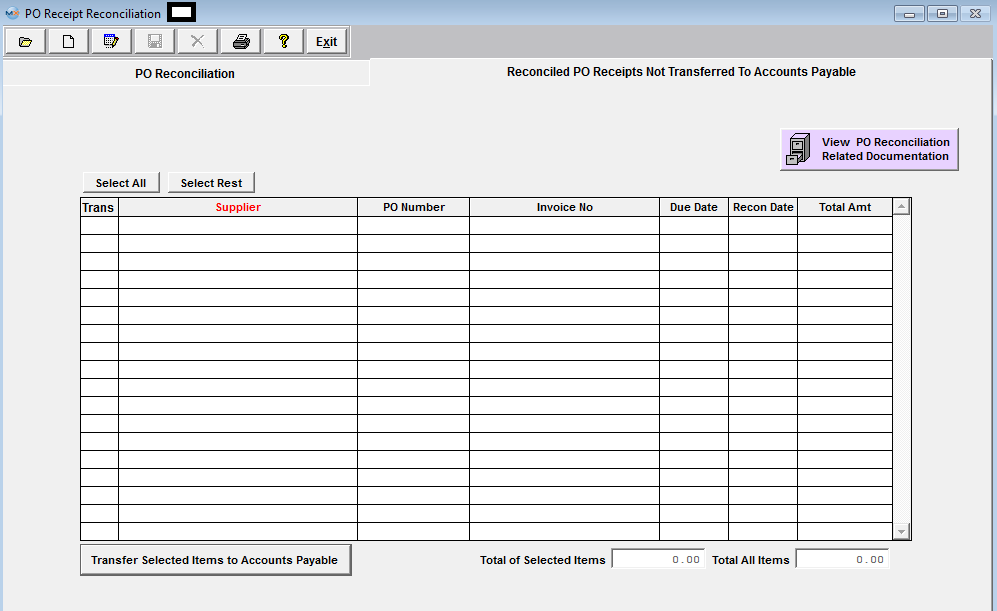
1.3.2. Reconciled PO Receipts not Transferred to A/P Tab

  View PO Reconciliation Related Documentation 
  Toggle on the Select All/Unselect All items to be transfered to Accounts Payable 
  Toggle on the th Select Rest/Unselect Rest items to be transfered to Accounts Payable 
Trans Toggle on the Yes/No column if desired.
Supplier Supplier name.
PO Number Purchase Order number. 
Invoice No Invoice number. 
Due Date

This is the date by which the entire invoice must be paid. (Note: if the terms involved a discount such as 2 % 10, net 30, the date which would appear here would be the 30 day date and NOT the discount date).

Recon Date Date the items were reconciled 
Total Amt Total amount for item 
Depress this button when ready to Transfer selected items to Accounts Payable
Total of Selected Items Total $ amount of only the selected items 
Total of All Items Total $ amount of All items listed 

1.4. How To ..... for PO Receipt Reconciliation
1.4.1. Find a PO Reconciliation Record

Enter the SQLMANEX.EXE (within the ManEx root directory)
This action will then prompt the user for a password

The following screen will be displayed, select Accounting/Accounts Payable/PO Receipt Reconciliation 


The following screen will be displayed:
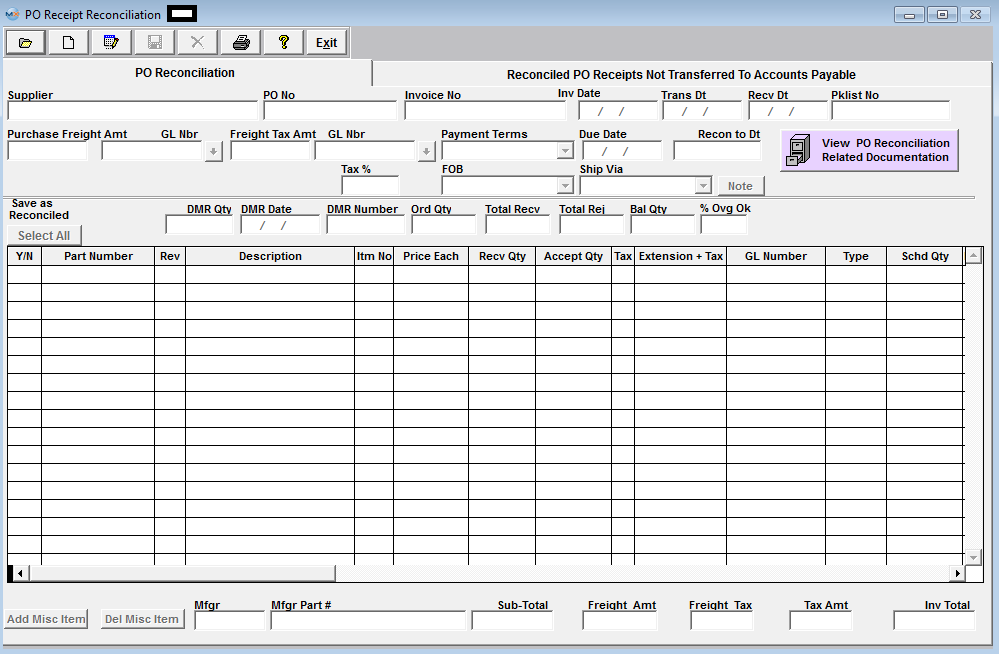
Depress the Find Record action icon.

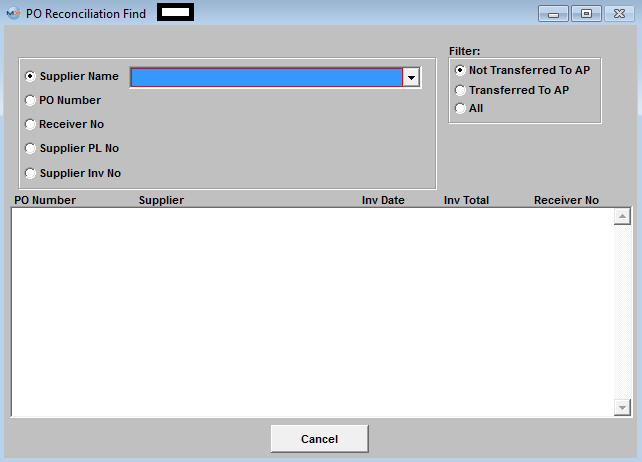
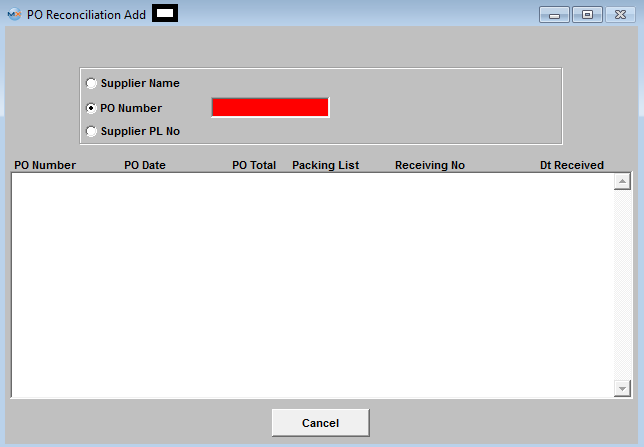
The following Find by screen will be displayed:

Select the appropriate radio button to find by; 

Supplier Name - see below 

PO Number - select that radio button and type the EXACT PO Number into the red box.

Receiver No - select that radio button and type the EXACT Receiver Number into the red box.

Supplier PL No - select that radio button and type the EXACT Supplier PL Number into the red box.

Supplier Inv No - select that radio button and type the EXACT Supplier Inv Number into the red box.


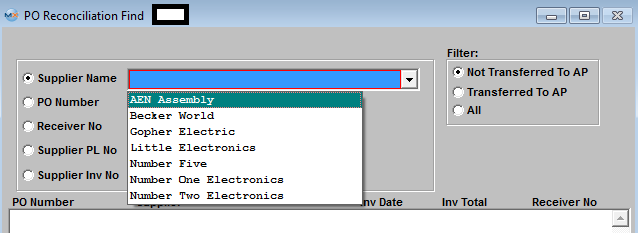
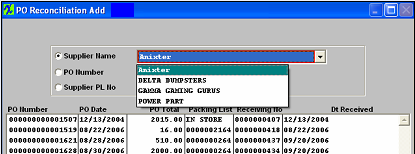
If you select to find by Supplier Name, the following will be displayed:

Click on the desired radio filter:  Not Transferred to AP; Transferred to AP; or All.

Highlight the desired SUPPLIER


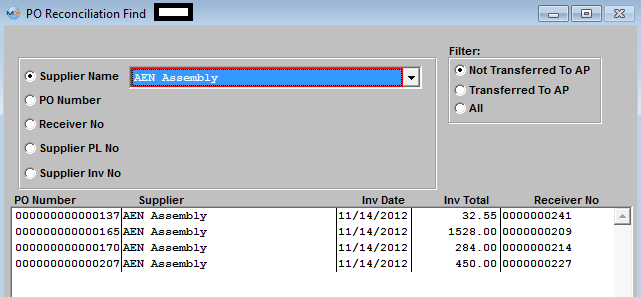
Once the desired Supplier is selected, a further selection screen will be displayed:

Highlight and double click on the desired PO number 


Once the Find Process is completed, the applicable data will be displayed.  NOTE:  The Edit button will only be available if the PO Receipt has NOT been transferred to AP. 


1.4.2. Add a PO Reconciliation Record

Enter the SQLMANEX.EXE (within the ManEx root directory)
This action will then prompt the user for a password

The following screen will be displayed, select Accounting/Accounts Payable/PO Receipt Reconciliation   

The following screen will be displayed:

Depress the Add Record action icon.  The following screen will be displayed: 

Select the Find by radio button; Supplier Name, PO Number or Supplier PL No. 


If you select by Supplier Name, a list of Suppliers will be displayed. 

Once the desired Supplier is selected, a further selection screen will be displayed.

Highlight and double click on the desired Receiving No. 

If you decide to search by PO Number or Supplier PL No., type the PO Number or Supplier PL into the red box.


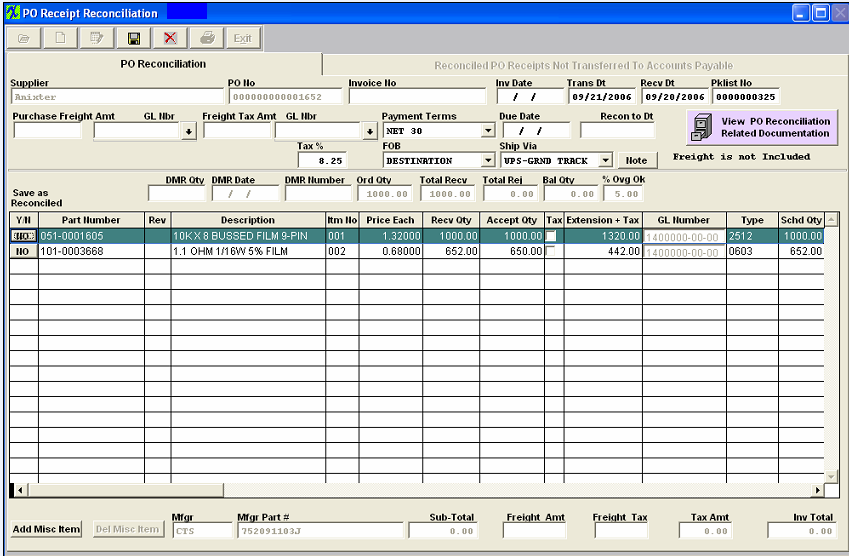
The following screen will be displayed with the PO Receipt data:

Enter in the Invoice Number and Invoice Date.  If desired, a different Transaction Date and/or Received Date may be entered.  

If there is Freight or Freight Tax associated with the invoice, enter the amount into the field.  

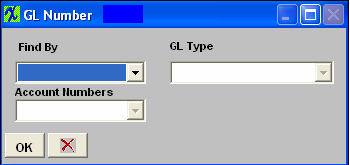
Enter in the GL NUMBER or search by depressing the down arrow next to the field.  The following selection screen will be displayed:

Depress the arrow next to the Find By field.

Select either Find By Account Type or Account Numbers. 


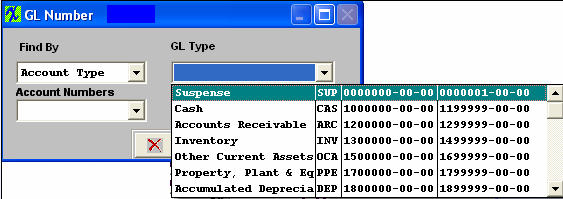
If you selected by Account Type, the following listing will be displayed, once you’ve depressed the down arrow next to the GL Type field: 

Scroll up or down until the appropriate range is found. 


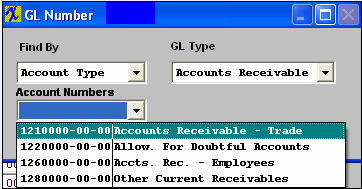
Then depress the down arrow next to the Account Numbers field.  The following selection for the posting account will be displayed:

 Select the account.  Depress the OK button.
 

You may change the payment terms or the due date, as desired.

If you wish to add a note regarding this Supplier Invoice, depress the Note button.  Depress the Edit button.   Enter in the note.  Depress the Save button. Depress the Exit button.

If any portion of the Invoice is subject to tax, enter the tax percentage in the Tax % box.

The user may change the FOB or Ship Via fields by depressing on the applicable down arrow and making a new selection.

  This will give the users the ability to scan the packing list, invoice, or any other related documentation directly into the ManEx system, and attached it directly to the item in the PO reconciliation module.  For more detail see Article #2394. 

Once a line item is highlighted in the lower section, information regarding DMR, Original Order Quantity, etc. will appear, as follows:

All of the line items on the PO which have been accepted will appear in the lower section.  Note:  The user will not be able to overpay an invoice. Only those quantities which have been ACCEPTED in PO Receiving will forward.

The user may toggle on the Yes/No to reconcile.  The user may change the Price Each.  If the line item is subject to tax, check that box.

If there is a miscellaneous item associated with the invoice which was not included in the PO, the user may depress the Add Misc Item button at the bottom of the screen.  Enter in the description of the item, the pricing, whether or not subject to tax, the accepted quantity and type in or select the GL Number.

Entering Negative Amounts

Note:  The user may enter a NEGATIVE amount within this screen.  Say to record a Coupon or something of that nature.  The user should NOT record an early payment discount here as that is handled by the Payment Scheduling module.
 
To enter a negative amount:

Depress the Add Miscellaneous Item button.  Enter in the description.   Enter in the price, as a negative amount.   Enter in the accepted quantity as 1.   Enter in or select the General Ledger account number.

Once all is completed, depress the Save record action button at the top of the screen.
 
1.4.3. Edit a PO Reconciliation Record

Enter the SQLMANEX.EXE (within the ManEx root directory)
This action will then prompt the user for a password

The following screen will be displayed, select Accounting/Accounts Payable/PO Receipt Reconciliation Module


The following screen will be displayed:


Select the record to edit using the Open/Find a record button.  Once the Find Process is completed, the applicable data will appear.  NOTE:  The Edit button will only be available if the PO Receipt has NOT been transferred to AP.  
All editing for Purchase Order Invoices already transferred to the Accounts Payable MUST be edited in the Manual Invoicing module.


1.4.4. Transfer an PO Reconciled PO Receipt to A/P
Transfer Reconciled PO's to Accounts Payable
 
The following screen lists all of the Reconciled PO Receipts, which have NOT been transferred into Accounting Payable. 
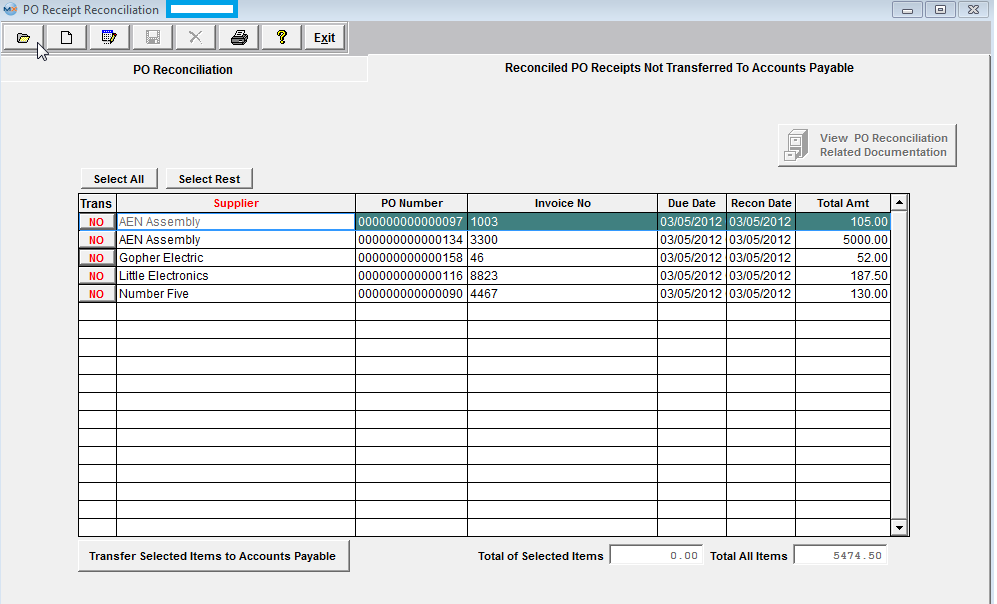


Toggle on the Yes/No column if desired, or depress the Select All button. 
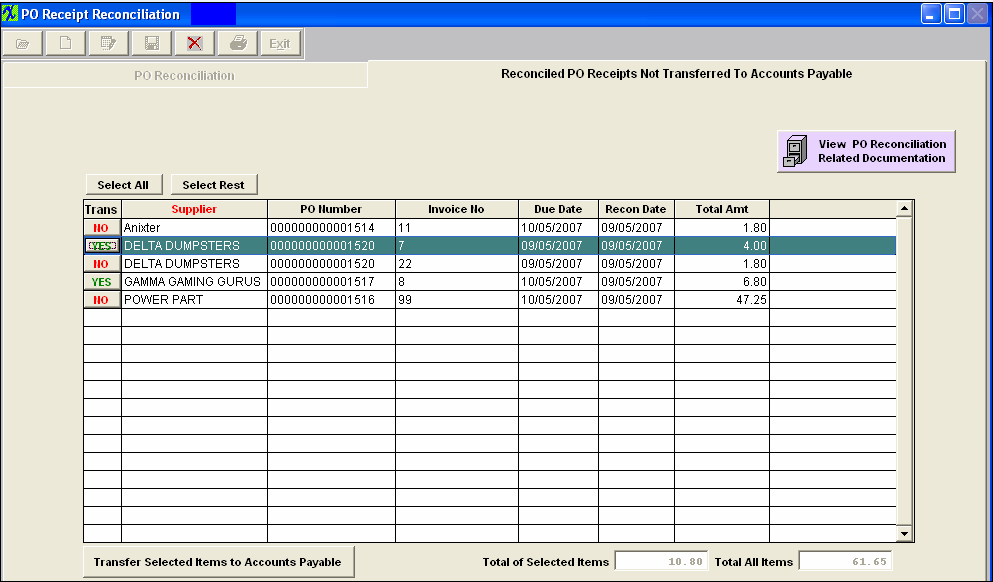


Once all selections are made and you are ready to perform the transfer, depress the "Transfer Selected items to Accounts Payable" button, user will be prompted to enter a password.  The items on the list will be transferred and saved one at a time, if one or more will fail you will receive a prompt asking if you want to continue with the rest.  
Note: The Reconciled Invoices can NOT be scheduled for payment unless they are TRANSFERRED.  


1.4.5. Attach a Related Document

Find an existing PO Reconciliation Record, or Add a new PO Reconciliation record.

Depress the   button, and enter password.

The following screen will appear:

Depress the Add record icon, enter in a Document Number, REV, Doc Description, Doc Date, Doc Note; 


To load a document double click in the PDF File field and the following screen will appear:

Depress the Load Document button and the following screen will appear:  The PDF screen will allow you to load almost any type of document; (Word, Excel, pdf, Images, etc .... )

Locate the document and double click on it and the document will populate screen.

Depress the Save record icon to save or depress the Abandon changes icon to abandon changes.  The following screen will appear:

Depress the Save record icon to save or depress the Abandon changes icon to abandon changes.  

Once documents are saved the "View PO Reconciliation Related Documentation" button will display in Red.


1.5. Reports for PO Receipt Reconcilitation
To obtain the AP Aging Reports within the Web, select the WEB Print button from the ManEx action buttons at the top of the screen. For further detail on How the Reports work within the Web refer to Article #5477.


Note: In order to access the Reports within the Web the Company Root URL must be setup within the System Appearance module and user must be linked to web within the System Security Module.   


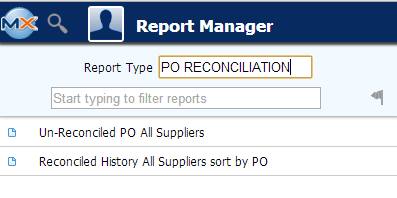
Select the Report Type:  PO RECONCILIATION - A List of Reports will be displayed that are available on the Web for  PO RECONCILIATION


These reports are not available within the desktop, the are only available through the Web.