| 1. Debit Memo |
| 1.1. Prerequisites for Debit Memo | ||
Users MUST have full rights to the "AP Offsets and Debit Memos" in Accounting Security . Users with “Accounting Security Supervisor” rights will automatically have access.
|
| 1.2. Introduction for Debit Memo |
There are two types of Debit Memos: One created via the DMR process and the ones created directly via this entry screen.
Note: That if the Debit Memo concerns a return of inventory, the user should use the DMR process because any Debit Memo affecting the inventory general ledger numbers should be created via the DMR process. Note: A Debit Memo created against an open supplier invoice will automatically net against that invoice in the A/P Aging. In the case of a DMR Debit Memo, if the supplier invoice has already been paid, then a Debit Memo will forward to the A/P Aging. This open Debit Memo may be offset against other open invoices from that same supplier via the A/P offset module.
Additionally, please note that ONLY a "From Inventory DMR" will generate a Debit Memo (Only if the PO has been reconciled and transfered to AP). If a DMR was created "From a Purchase Order" then there will be no Debit Memo created – this is adjusted automatically within the ManEx system prior to the PO Reconciliation. Only what has been ACCEPTED will forward to the PO Reconciliation module. |
| 1.3. Fields & Definitions for Debit Memo | ||||||||||||||||||||||||||||||||||||||||||||||||||||||||||||||||||
Debit Memo field Definitions
|
Supplier Name
|
The name of the supplier for which the DM was created.
|
Date
|
The date of the DM.
|
Debit Memo Number
|
The unique number assigned to the DM.
|
Status
|
The Status of the Debit Memo - "ADD" "Pending" "Posted to AP" "Released to GL" or "Cancelled"
|
Supplier Number
|
The number assigned to the Supplier in the Supplier Information master.
|
Account Number
|
The number by which the supplier identifies the user.
|
Account Status
|
The status of the supplier, approved, pending, etc., per the Supplier Information master.
|
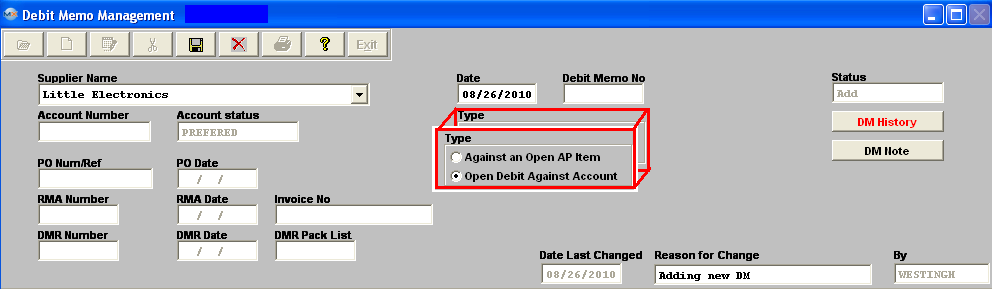
Type
|
The radio denotes the type of DM, either against an open A/P invoice or created as a general DM, just against the account without regard as to whether there was any open invoice.
|
|
If displayed in Red, depressing this button will bring up the History information. This field will display all the information entered into the reason for change field when debit memo was created and/or changed.
|
|
Depress this button to add any notes pertinent to this DM. If displayed in Red, depressing this button will display any pertinent notes re this DM. Depress this button to approve the Debit Memo and post to the AP. The DM status will then change from Pending to Posted to AP. |
|
PO Num/Ref
|
The Purchase Order number that the original Invoice was applied against.
|
PO Date
|
The Order Date pulled forward from when the Purchase Order was originally created.
|
RMA Number
|
This would be the RMA number information that was entered within the DMR module. RMA Date |
|
This is the RMA Date information that was entered within the DMR Module. Invoice No |
|
The Original Invoice that the Debit Memo is being applied against. DMR Number |
|
The DMR number that was assigned within the DMR module. DMR Date |
The date that the associated DMR was processed |
DMR Pack List |
|
The Packing List Number that was assigned to the DMR within the DMR module. Date Last Changed |
|
This is the date of any changes made to the original DM. By |
|
The initials of the user who made the last change. Reason for Change |
|
The description of the reason for the last change. DEBIT MEMO DETAIL INFORMATION section:
This is the item number of the detail. The description pertaining to this specific line item. The quantity for the line item. The price each for this line item. The sales tax percentage applicable to this line item. The sum of the (quantity X price each) + tax % (quantity X price each) = Total. The general ledger number for this line item. The total of the DM, after discount and including any applicable sales tax. Depressing this button will display any notes pertaining to the line item highlighted. |
| 1.4. How To ..... for Debit Memo |
| 1.4.1. Find a Debit Memo | ||||||||
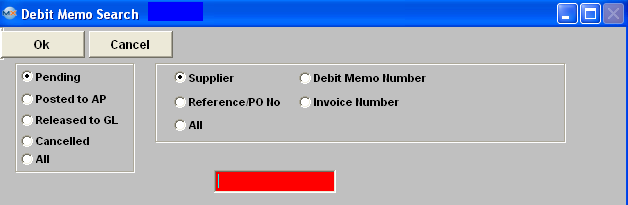
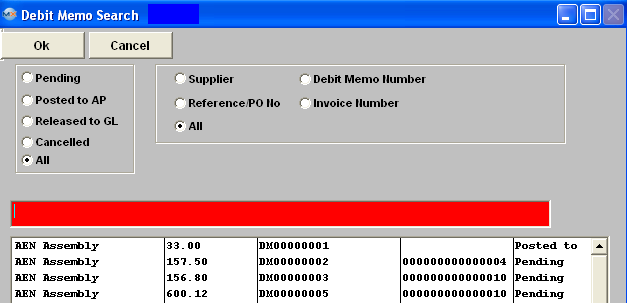
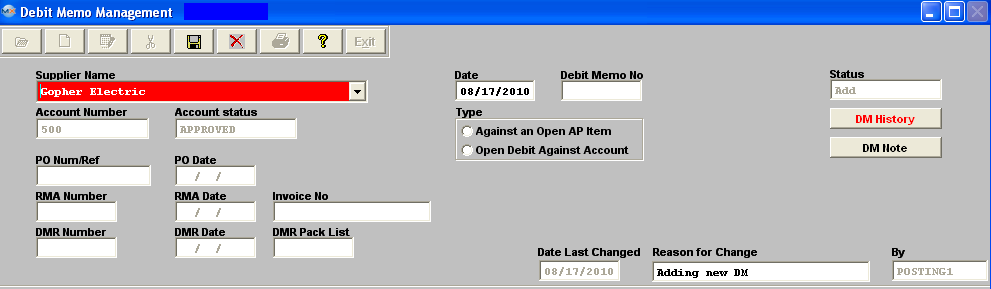
The following screen will be displayed:
Depress the Find Record button.
Once the selection is made, depress the "OK" button. The screen will update with data from the selection: 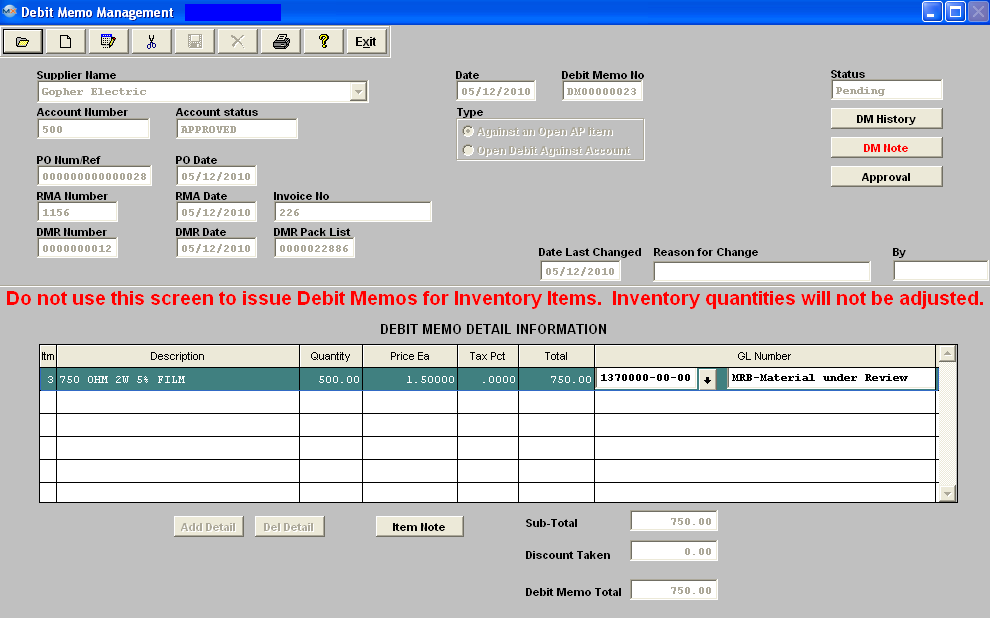
|
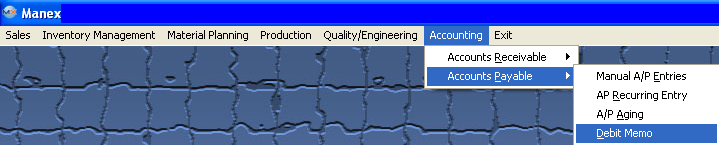
| 1.4.2. Add a Debit Memo | ||||||
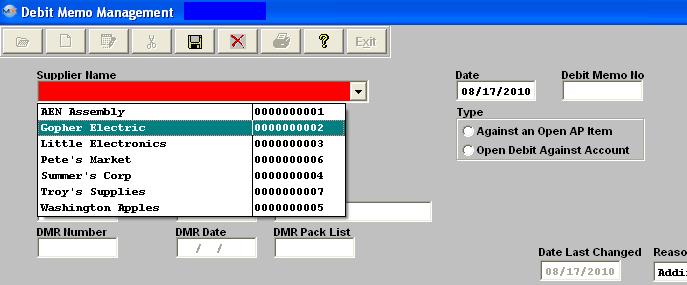
The following screen will be displayed: Against an Open AP Item To add a Debit memo against an open A/P invoice, depress the Add button. Type in your accounting password.
Once the supplier is selected, pertinent information will appear in the screen:
Depress the Ok button.
If you want to add a DM Note, depress the DM Note button, depress the Edit button, type in your note, and depress the Save button. Depress the Exit button when complete. Enter the EXACT invoice number. The PO Number or Reference will update automatically. 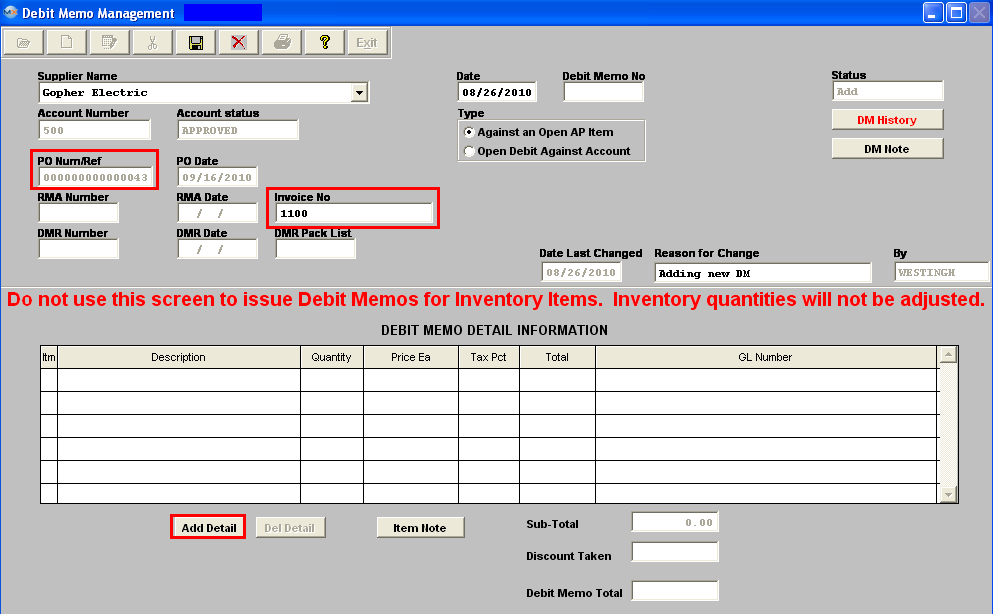 Depress the Add Detail Button. If there is more than one item on the Invoice and/or Freight and/or freight tax the following screen will appear listing all the Invoice Detail Lines:
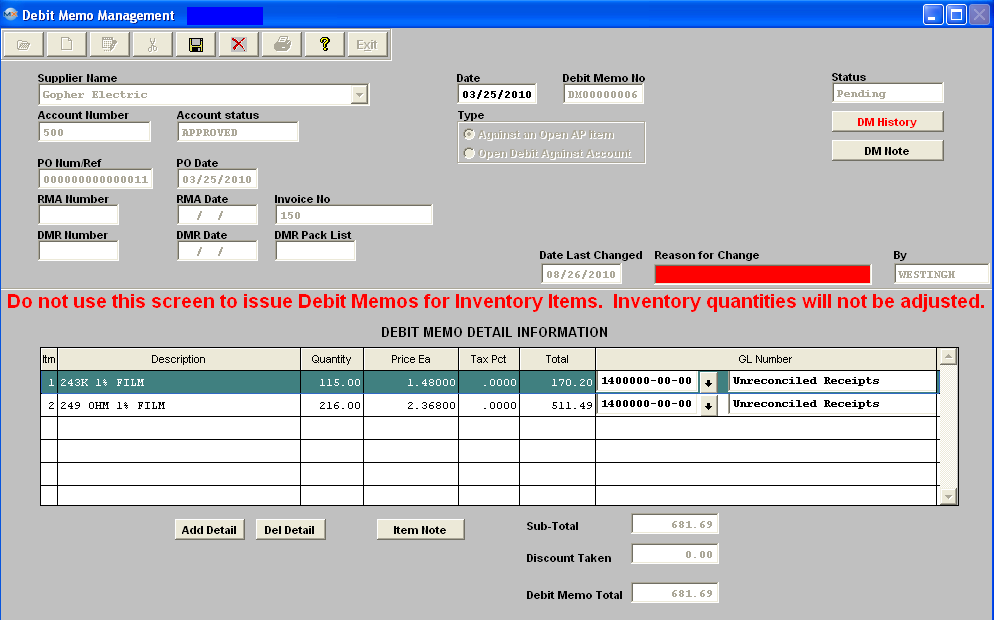
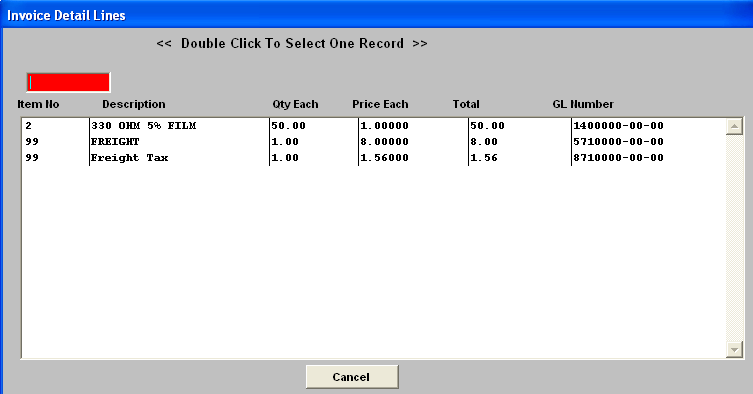 Highlight and double click on the item to be included on the Debit Memo. Note: System will only allow user to select one item at a time, so you will have to continue to depress the "Add Detail" button to add more items to the Debit Memo from the Invoice Detail Lines screen. If there is only one line item on the invoice selected the detail information will default in upon depressing the "Add Detail" button. The extension for the Total will update. (If you want to add an Item Note, depress the Item Note button, depress the Edit button, type in the note, and depress the Save button, depress the Exit button when finished). The Item Note button will then be displayed in Red. When the DM is completed, depress the Save button to save changes, depress the Abandon Changes button to abandon changes.
Upon Save the date, time, and User id information will default into the DM History. Then any changes to the DM before Approval will be documented within this screen also.  Once the DM is saved, the Approval button will appear. 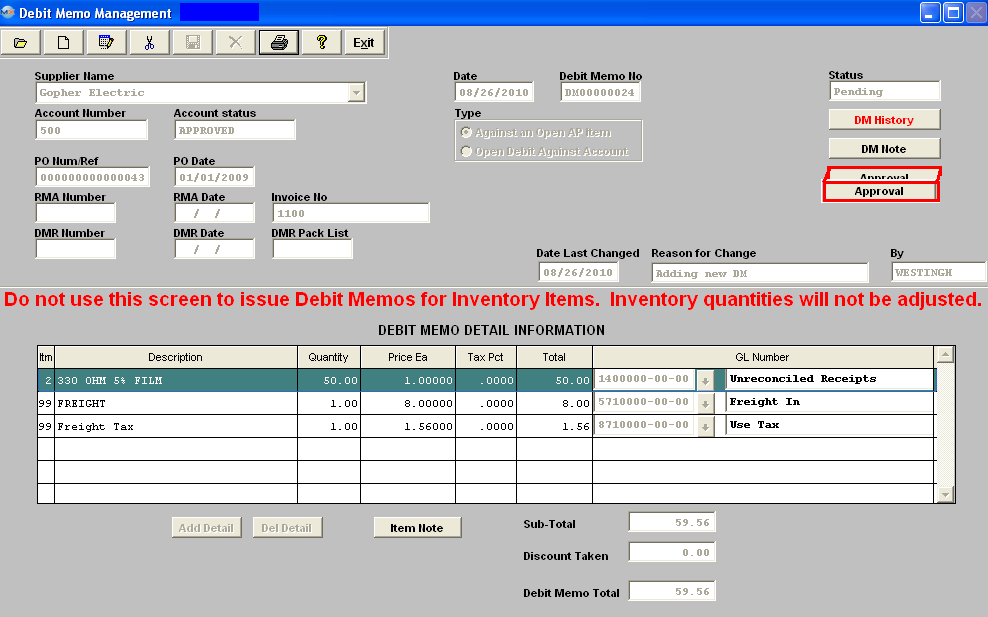 Depress the Approval button. The following Message will appear:  Depress the Yes button. Enter in your password. The invoice amount in the A/P Aging will be adjusted downward by the amount of the DM.
The Debit Memo will be marked as "Not Editable", the Status of the Debit Memo will be updated to “Posted to AP”, and the appropriate journal entry will be created for posting into the General Ledger. 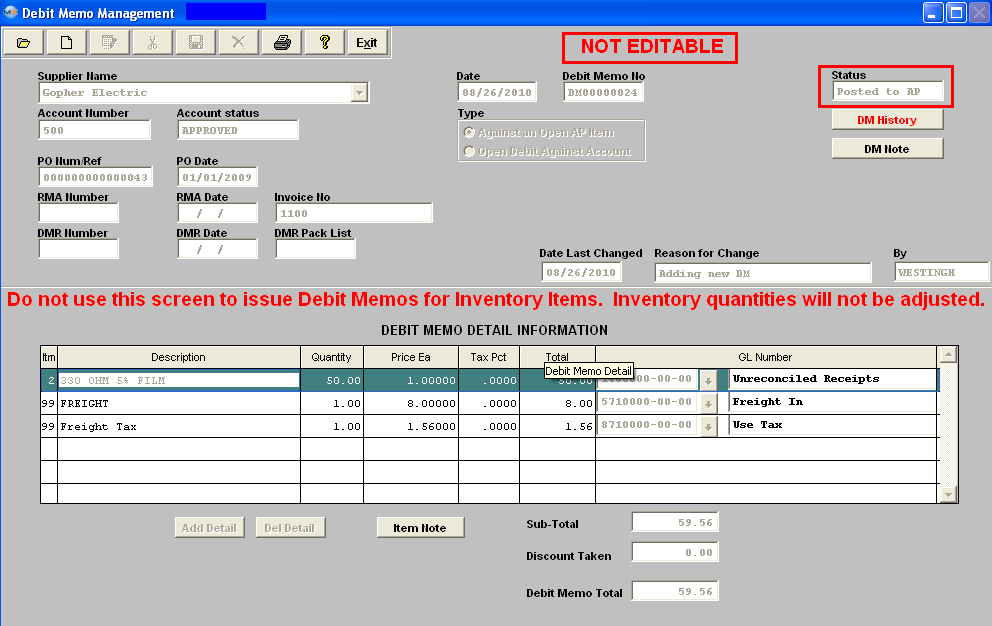 Add an Open Debit Against Account
Follow the steps above, with the following exceptions: For Type, click the radio for Open Debit Against Account.
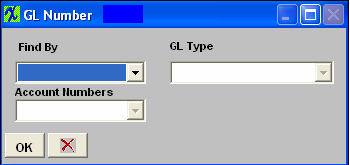
 In the Debit Memo Detail Information section, depress the Add Item Button. Type in Item number, Description, Total and the General Ledger Number. Note: if you don’t know the G/L number, place the cursor in the G/L field and hit the Enter key twice. This will bring up the following:
Depress the arrow next to the Find By field. Select either Find By Account Type or Account Numbers. If you selected by Account Type, the following listing will appear, once you’ve depressed the down arrow next to the GL Type field: 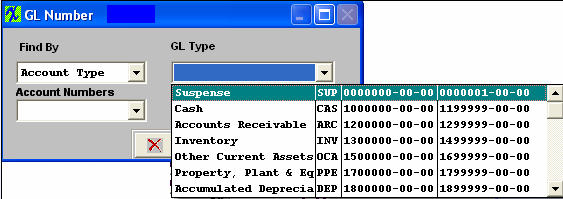 Scroll up or down until the appropriate G/L range is found.Then depress the down arrow next to the Account Numbers field. The following selection for the posting account will appear: 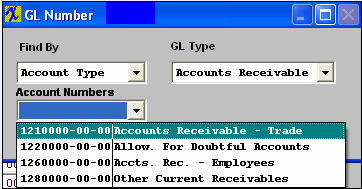 Select the account. Depress the OK button. The completed screen will look like this before Approval. 
|

| 1.4.3. Edit a Debit Memo |
The user may edit a Debit Memo up to the time it’s approved and transferred to General Ledger. After Approval (status = “Posted to AP”) the DM can’t be changed. To Edit, find the DM using the procedures in Article #4315 Depress the Edit button and enter your password, the Date, and detail information is editable.
 Make the desired changes, enter the Reason for the Change, depress the Save button to save the changes, depress the Abandon Changes button to abandon the changes. If ready to approve depress the Approval Button to Post the Debit memo to the AP. |
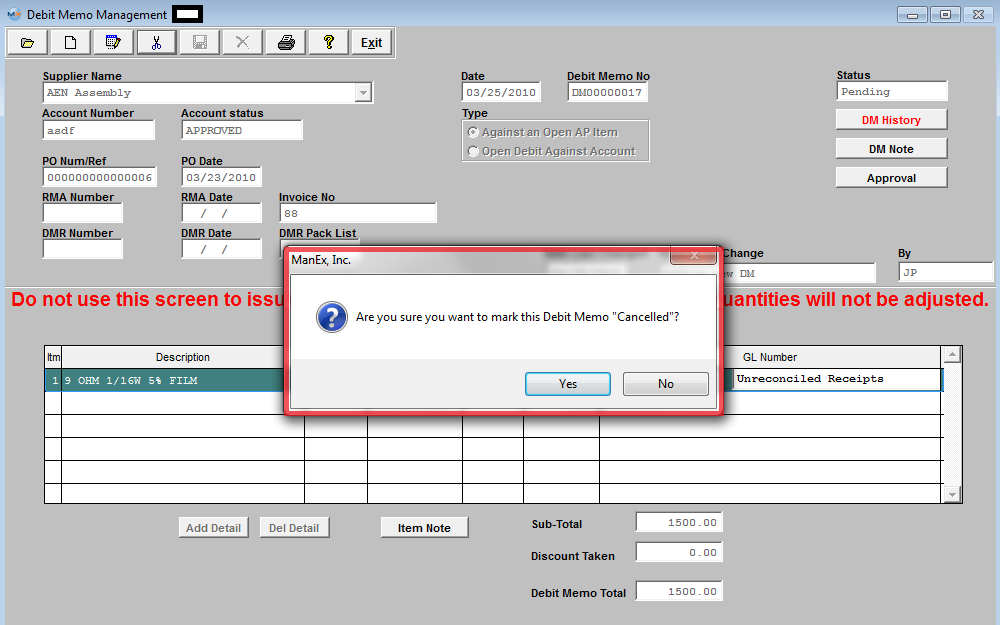
| 1.4.4. Cancel a Debit Memo |
Cancel a Debit Memo The user may cancel a Debit Memo up to the time it’s approved and transferred to General Ledger. After Approval and Transfer, the DM can NOT be cancelled. To delete, find the Pending DM using the procedures in Article #4315 . Depress the Cancel button. Enter your password. The following Message will be displayed: Depress the Yes button. Enter your password. The status will then be changed to “Cancelled.” 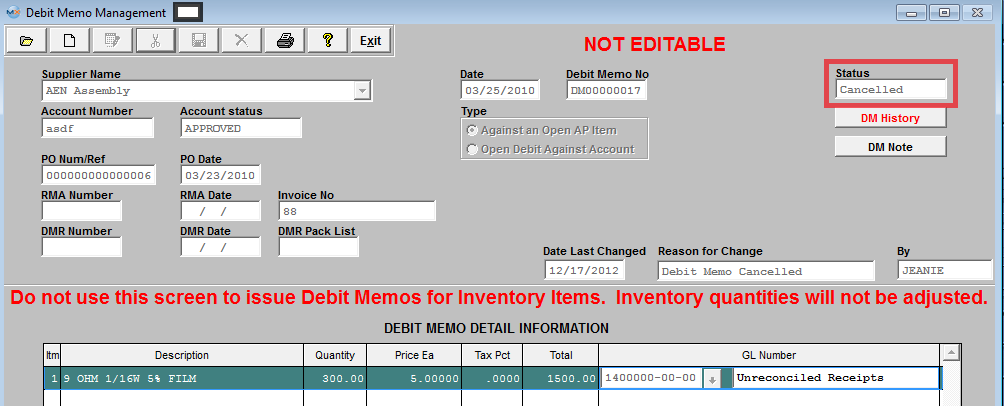
|
| 1.5. Reports for Debit Memo | ||||
To obtain the Debit MemoReports within the Web, select the WEB Print button from the ManEx action buttons at the top
of the screen. For further detail on How the Reports work within the Web refer
to Article #5477.
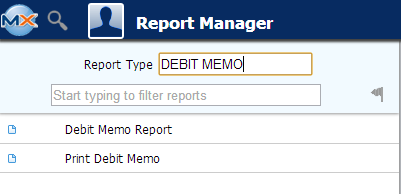
Note: In order to access the Reports within the Web the Company Root URL must be setup within the System Appearance module and user must be linked to web within the System Security Module. Select the Report Type: DEBIT MEMO - A List of Reports will be displayed that are available on the Web
for DEBIT MEMO.
To obtain the Debit Memo Reports within the desktop, select the Print button from the ManEx action buttons at the top of the screen.
The following reports screen
will display a list of reports that are available on the ManEx Desktop:
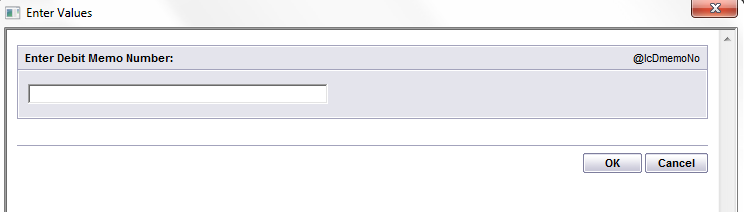
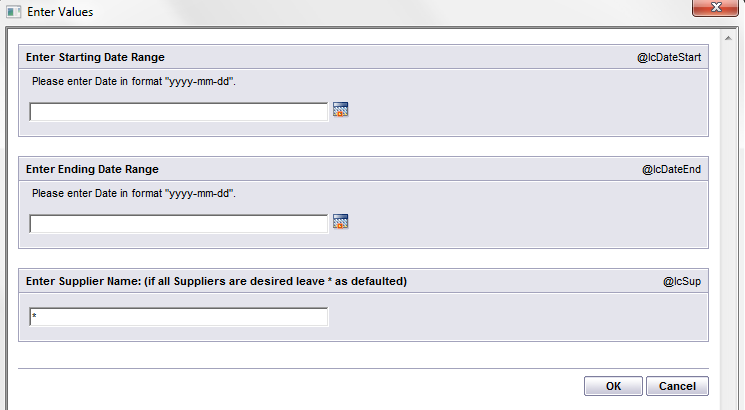
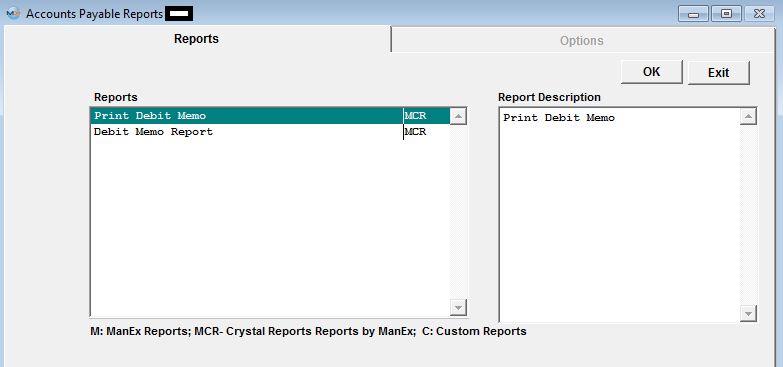 Highlight the Report of Interest and depress the OK button:
The following report will print:
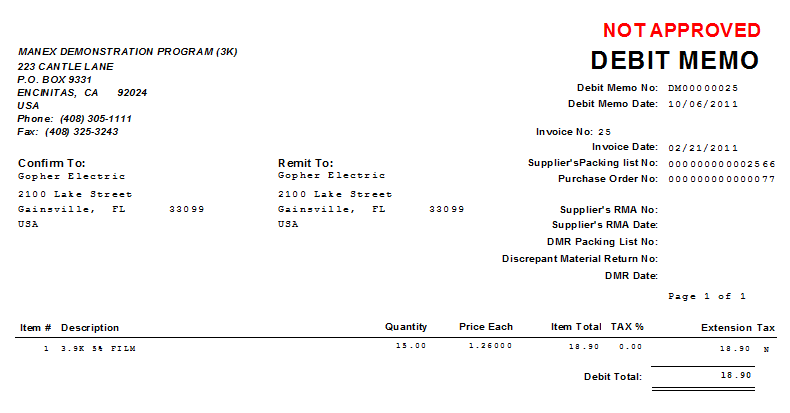
Debit Memo Report
The following report will print: 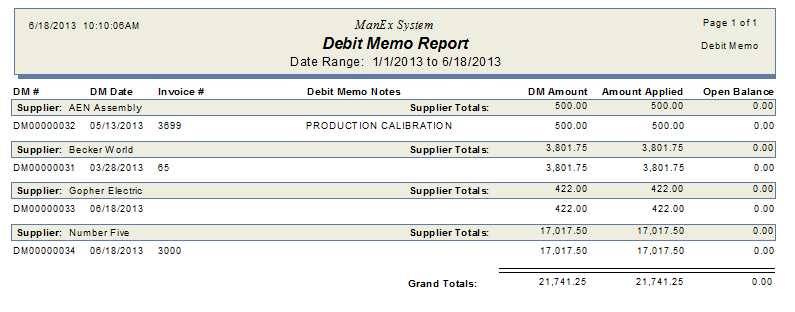
|