| 1. Accounts Receivable (AR) |
| 1.1. Accounts Receivable Aging |
| 1.1.1. Prerequisites for the AR Aging Module |
Users MUST have full rights to the "AR Aging, Reports" in Accounting Security . Users with “Accounting Security Supervisor” rights will automatically have access. The Ranges for the Aging screens must be setup within the Sales A/R Setup module.
|
| 1.1.2. Introduction for the AR Aging Module |
The process of printing an invoice produces an entry into the Accounts Receivable Aging module of the ManEx System. This dynamic nature of the process ensures that the aging reports always display the current receivables status regardless of whether an item has been posted into the General Ledger.
In order for the aging report to match the balances as shown in the balance sheet and account inquiry screens the user must first release the Sales (Invoice) and receipt information. This creates the underlying Journal Entry which then may be posted into the General Ledger system. The accounts receivable aging selection provides on screen and printed reports to assist the tracking and collection of outstanding invoices. Further, it provides a way to edit the credit status and payment terms of a customer. |
| 1.1.3. Fields and Definitions for the AR Aging Module |
| 1.1.3.1. A/R Summary Current - 60 | ||||||||||||||
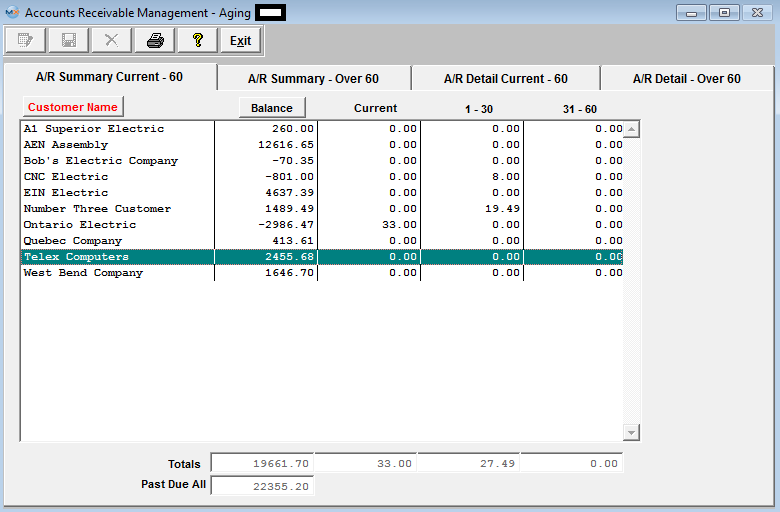 The summary screen will display each customer along with the outstanding balances for the customer. The screen may be sorted by customer or by balance by pressing on the appropriate button. This summary screen will show the total amounts due for each customer, the current open invoice amount, invoice one to thirty days past due, and thirty-one to sixty days (depending on what range is setup with the Sales A/R Setup) past due At the bottom of the screen, the total aged invoice amounts are displayed for each of these categories, as well as the total amount of aged invoice beyond sixty days (depending on what range is setup with the Sales A/R Setup) A/R Summary Current - 60 Tab Field Definitions
The name of the customer who owes the Account Receivable to the user.Note that the user may sort alphabetically by depressing the Customer Name button. The 1-30 column lists amounts to be received which are 1 to 30 days past the scheduled due date. (These ranges are setup within the Sales A/R Setup module). The 31-60 column lists amounts to be received which are 31 to 60 days past the scheduled due date. (These ranges are setup within the Sales A/R Setup module). The totals displayed are the totals of each column – Balance, Current, 1-30 and 31-60. Past Due is for all balances which are one day or more past the scheduled receipt date. |
| 1.1.3.2. A/R Summary Over 60 | ||||||||||||||
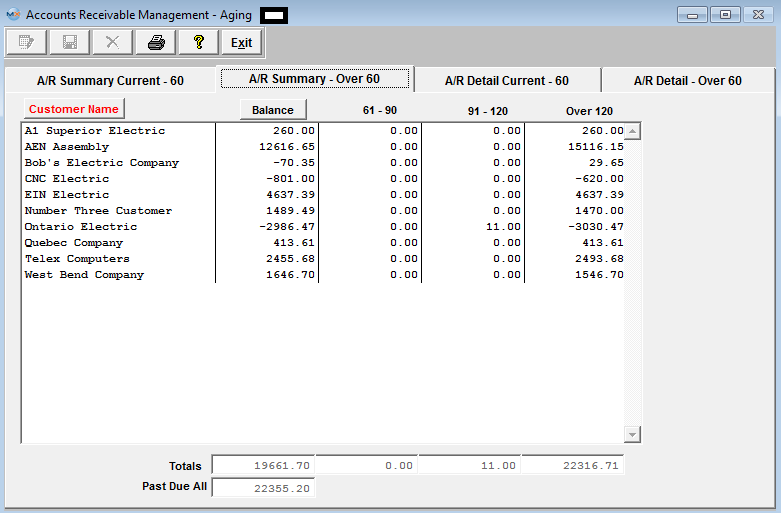
This summary screen will show the total amounts due for each customer, the current open invoice amount, invoice sixty-one to ninety days past due, ninety-one to 120 days past due, and over 120 days past due. (depending on what range is setup within the Sales A/R Setup module). At the bottom of the screen, the total aged invoice amounts are displayed for each of these categories, as well as the total amount of aged invoice less than sixty days. (depending on what range is setup within the Sales A/R Setup module). A/R Summary Over 60 Tab Field Definitions
|
Customer Name
|
The name of the customer who owes the Account Receivable to the user.Note that the user may sort alphabetically by depressing the Customer Name button.
|
Balance
|
The total balance of receivables for that customer.Note that the user may sort the balance in descending order by depressing the Balance button.
|
61 – 90
|
The 61-90 column lists amounts to be received which are 61 to 90 days past the scheduled due date. (These ranges are setup within the Sales A/R Setup module).
|
91 – 120
|
The 91-120 column lists amounts to be received which are 91 to 120 days past the scheduled due date. (These ranges are setup within the Sales A/R Setup module).
|
Over 120
|
The Over 120 column lists amounts to be received which are over 120 days past the scheduled due date. (These ranges are setup within the Sales A/R Setup module). Totals |
|
The totals displayed are the totals of each column – Balance, 61-90, 91-120 and Over 120. Past Due All |
|
Past Due is for all balances which are one day or more past the scheduled receipt date. |
| 1.1.3.3. A/R Detail Current - 60 | ||||||||||||||||||||||||||||||||||||||||||||||||
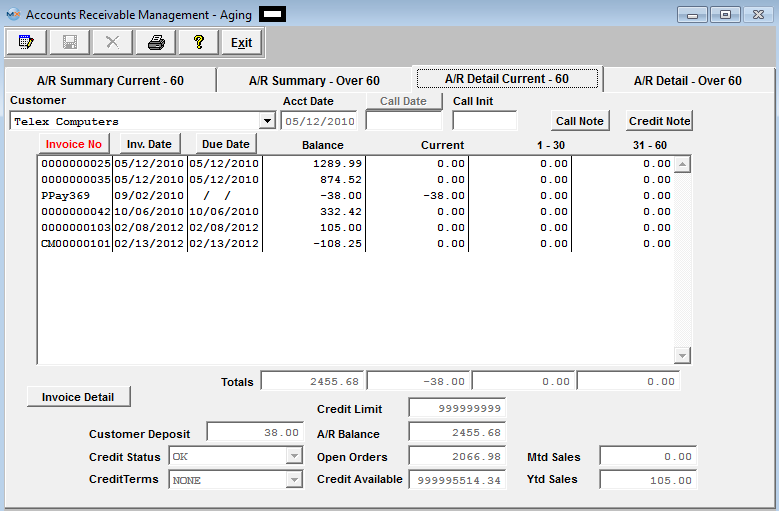 After selecting a customer by highlighting the customer in one of the summary screens, clicking on the detail tab will display the detailed aging for that customer. This screen displays the details of the invoice AGING. Displayed will be the Invoice Number, Invoice Date, Due Date, amount of the invoice, and the Aging of the amount. This screen displays current, one to thirty days past due, and thirty-one to sixty days past due. These data may be sorted by Invoice Number, Invoice Date or by Due Date by depressing on the desired button.At the bottom of the detail listing is a total of the balances in each category. Also in this screen, the user may edit limited fields: the Call Note may be viewed and edited, the Credit Note may be viewed and edited, The Credit Status, the Credit Terms and the Credit Limit may be changed. The Invoice Footnote for the highlighted invoice may be viewed, as well as the Customer Deposit, A/R Balance, Open Order Amount, Credit Available, Month To Date Sales Revenue and Year To Date Sales Revenues. A/R Detail Current 60 Tab Field Definitions
|
| 1.1.3.4. A/R Detail Over 60 | ||||||||||||||||||||||||||||
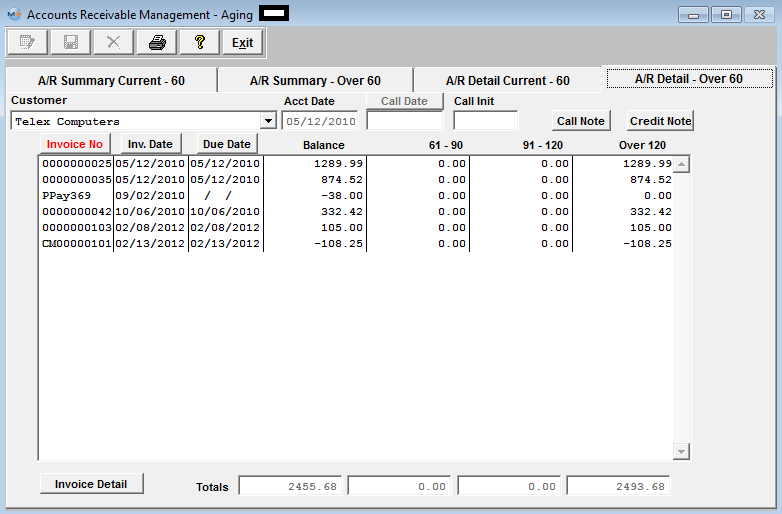
This detail screen will show the detailed Invoice Amounts due for each Customer, the current open Invoice Amount, invoice sixty-one to ninety days past due, ninety-one to 120 days past due, and over 120 days past due. (depending on what is setup within the Sales A/R Setup module). At the bottom of the screen, the total aged Invoice Amounts are displayed for each of these categories, as well as the total amount of aged invoice less than sixty days. (depending on what is setup within the Sales A/R Setup module). A/R Detail Over 60 Tab Field Defintions
Customer |
|
The name of the customer who owes the Account Receivable to the user. Acct Date |
|
This date represents the first date of activity for this customer. 
|
This date is the last time the user entered a call with the customer. (Initials) |
|
The initials of the user who made the call. 
|
If this button is lit up in red, there are notes recorded regarding the call. The call notes is per customer with open invoices. This note field is for active outstanding invoices. It allows you to quickly see notes on AR information that is being currently worked on. To add additional information, depress the Call Note button, depress the Edit button. Type in the note. Depress the Save button. 
|
If this button is lit up in red, there are notes recorded regarding the customer’s credit. To add additional information, depress the Credit Note button, depress the Edit button.Type in the note.Depress the Save button. Invoice Number |
|
The invoice number assigned by the system in the Packing List module.Note:The user may sort on this field in ascending order by depressing the Invoice No. button. Invoice Date |
|
The date of the invoice.Note:The user may sort on this field in ascending order by depressing the Invoice Date button. Due Date |
|
This column displays the scheduled date of payment to be received from the customer.Note:The user may sort this column in ascending order by depressing the Due Date button. Invoice Amount |
|
This is the total remaining balance on the invoice displayed on this line. 61 – 90 |
|
The 61-90 column lists amounts to be received which are 61 to 90 days past the scheduled due date. (These ranges are setup within the Sales A/R Setup module). 91 – 120 |
|
The 91-120 column lists amounts to be received which are 91 to 120 days past the scheduled due date. (These ranges are setup within the Sales A/R Setup module). Over 120 |
|
The over 120 column lists amounts to be received which are 121 days or more past the scheduled due date. (These ranges are setup within the Sales A/R Setup module). Totals |
|
The totals displayed are the totals of each column – Balance, Current, 1-30 and 31-60. |
| 1.1.4. Reports for the AR Aging Module | ||||||||||||||||||||
|
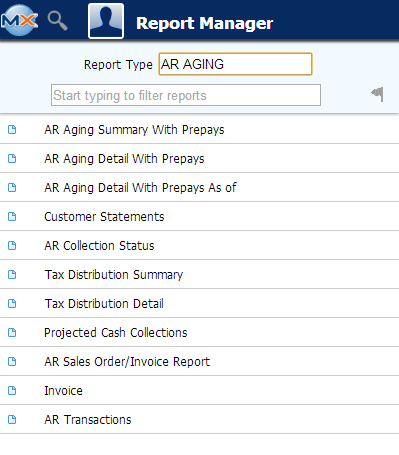
To obtain the AR Aging Reports within the Web, select the WEB Print button from the ManEx action buttons at the top of the screen. For further detail on How the Reports work within the Web refer to Article #5477. Note: In order to access the Reports within the Web the Company Root URL must be setup within the System Appearance module and user must be linked to web within the System Security Module.
Select the Report Type: AR AGING - A List of Reports will be displayed that are available on the Web for AR AGING
To obtain the AR Aging Reports within the desktop, select the Print button from the ManEx action buttons at the top of the screen. The
following reports screen will display a list of reports that are available on
the ManEx Desktop:
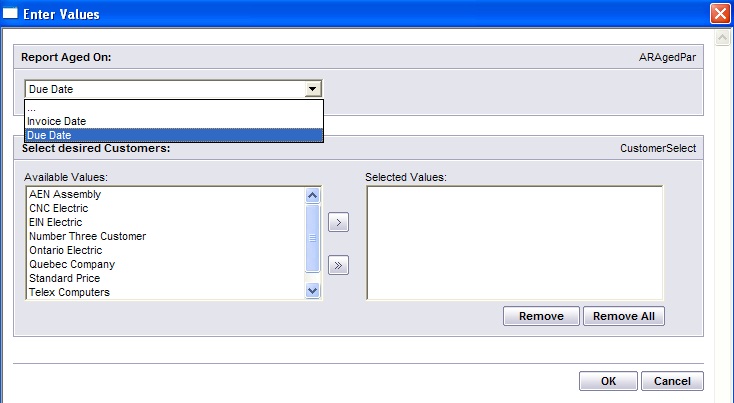
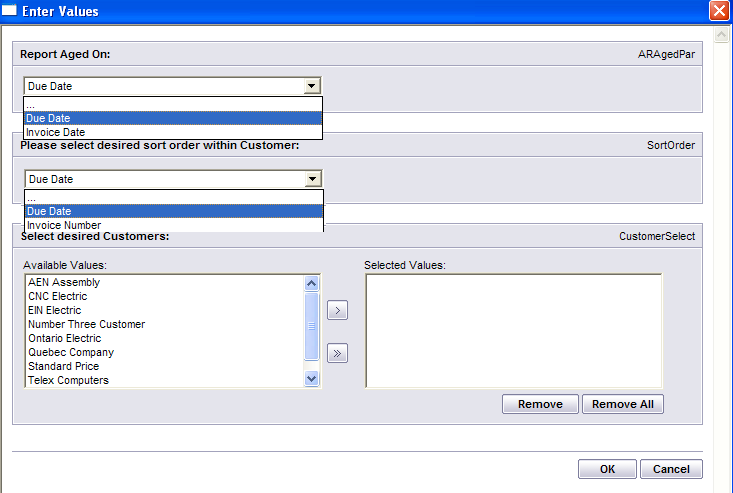
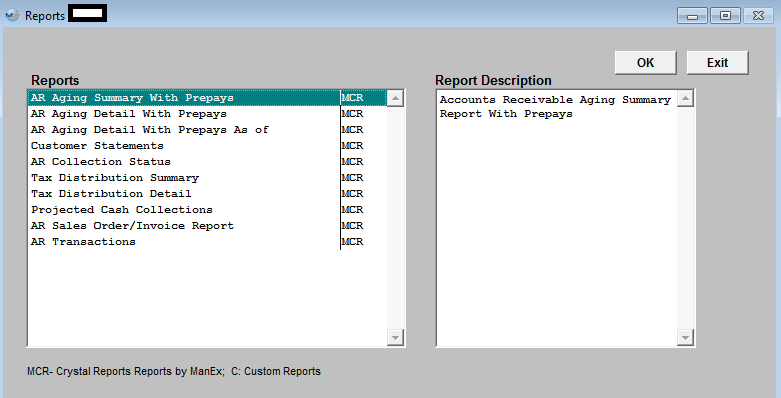 Highlight the report. Depress the OK button AR Aging Summary With Prepays
The following Report is printed:  AR Aging Detail with Prepays
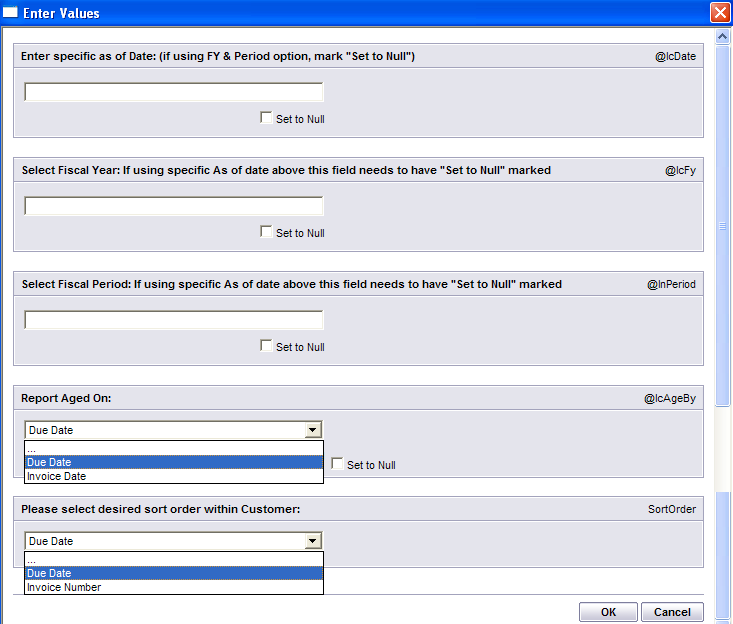
The following report will appear: 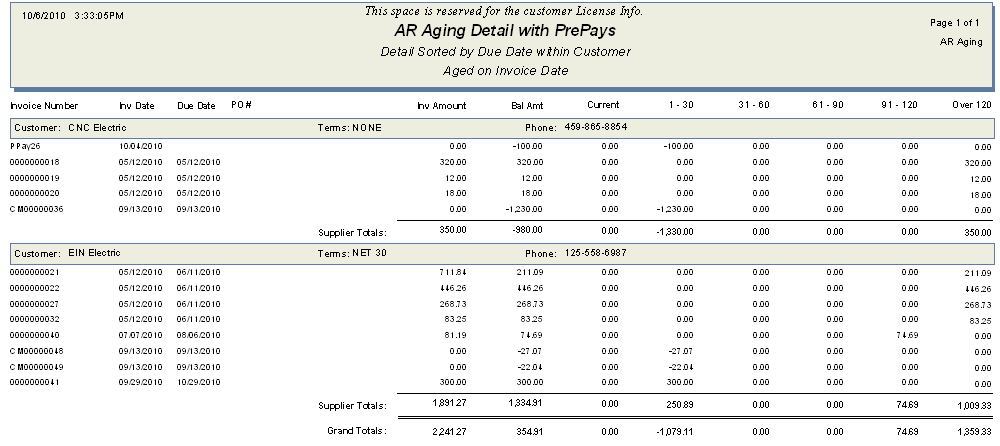 AR Aging Detail with Prepays as of
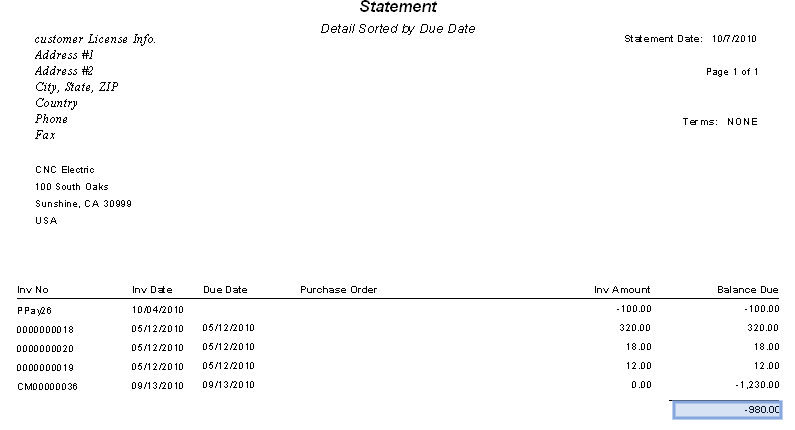
The following report will appear:  Customer Statements
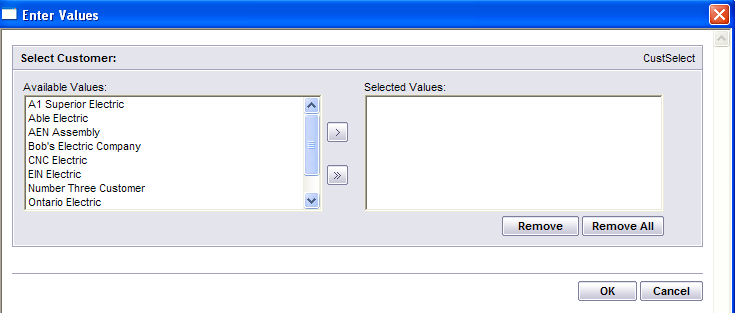
The following report will appear: AR Collection Status
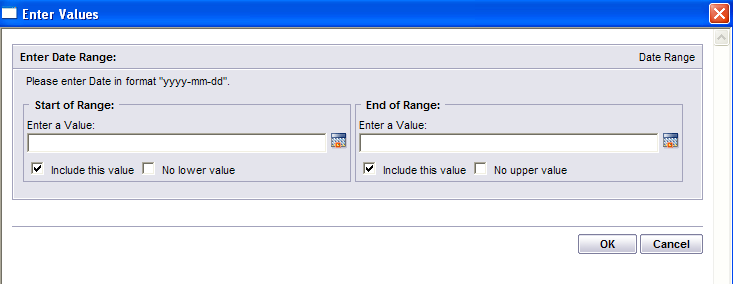
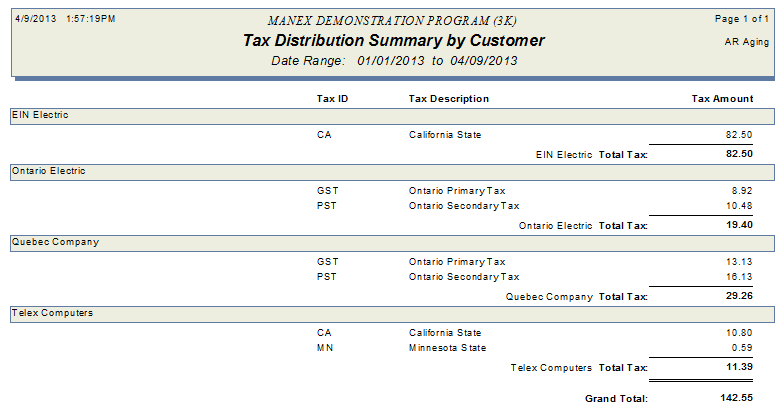
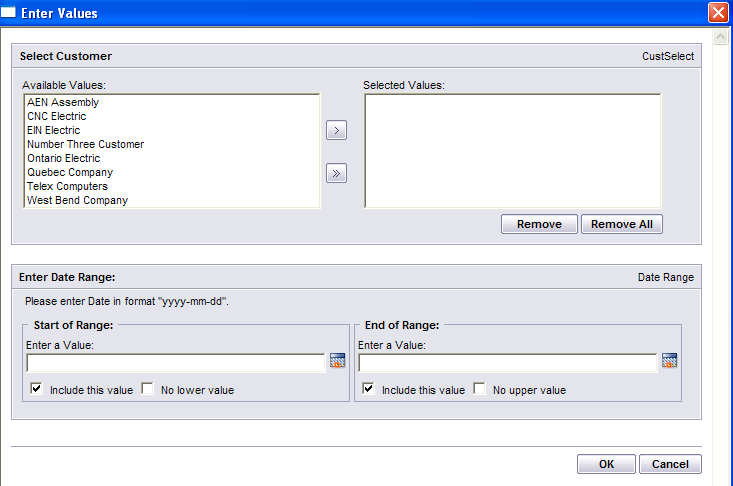
The following report will appear:  Tax Distribution Summary
The following report will appear:
Tax Distribution Detail
The following report will appear:
Projected Cash Collections
The following report will appear:
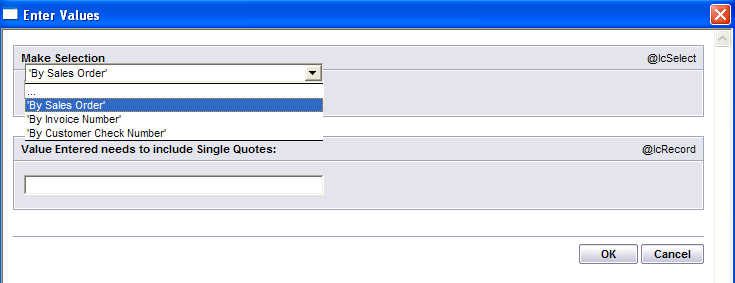
AR Sales Order/Invoice Report
The following report will appear: AR Transactions
The following report will appear:
|
| 1.2. Accounts Receivable Bank Deposit |
| 1.2.1. Prerequisites for the A/R Bank Deposit | ||||
Users MUST have full rights to the "Cash Receipts" in Accounting Security . Users with “Accounting Security Supervisor” rights will automatically have access.
|
| 1.2.2. Introduction for the A/R Bank Deposits |
The accounts receivable Bank Deposits section provides the ability to receive payments against outstanding invoice, Prepayments for orders and miscellaneous receipts that may be applied to a selected general ledger account.
To receive Cash Receipts that do not apply to a specific Customer account we suggest creating an "Other" Bank Deposit, within the system. This will allow user to select the desired GL account number and upon saving the "Other" Bank Deposit that amount is not populated to the AR Aging at all but will still increase your Bank Balance amount. For example: if it is a vendor refund, they can either credit AP, or Inventory (or Misc Receipts). If it is payment by an employee to reimburse for a purchase, they can credit the original account used for the purchase. To record a Bank Transfer see Article #3190 . The system does NOT allow the user to enter in a positive amount against an existing Prepayment or Credit Memo. |
| 1.2.3. Fields & Definitions for the A/R Bank Deposits |
| 1.2.3.1. A/R Receipt Summary Tab | ||||||||||||||||||||||||||
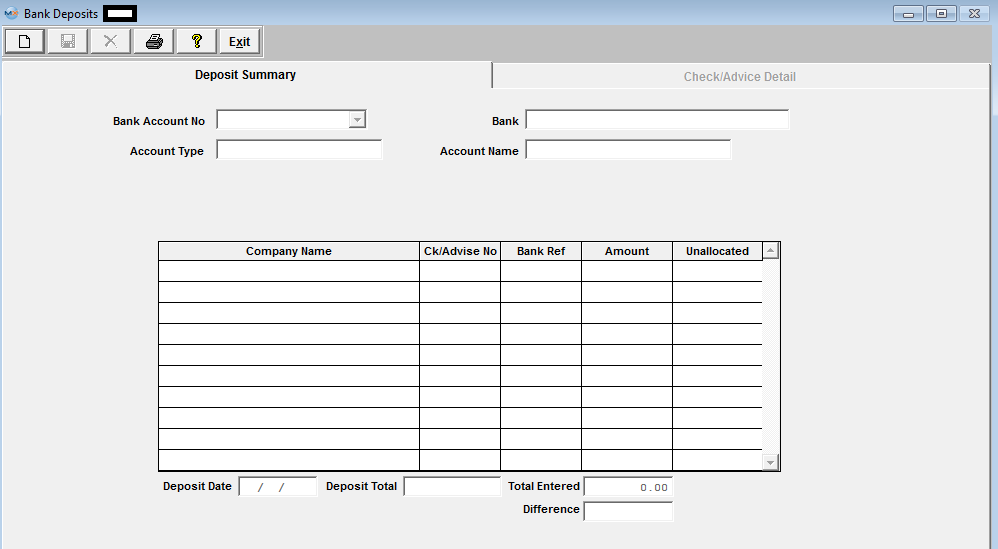 A/R Receipt Summary Tab Field Definitions
|
| 1.2.3.2. Check/Advice Detail Tab | ||||||||||||||||||||||||||||||||||
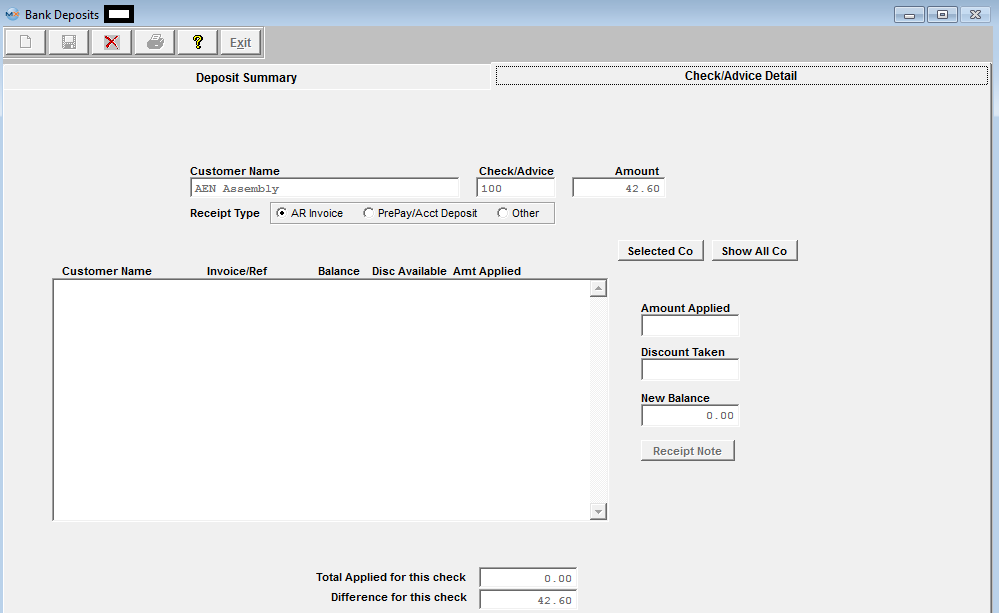 Check/Advice Detail Field Definitions
|
| 1.2.4. How To ...... for the A/R Bank Deposits |
| 1.2.4.1. Add an AR Bank Deposit | ||||
The following screen will be displayed:  Depress the Add record icon. The prompt will activate the account number field, and the user enters the Bank Account to which the deposit is being made. Clicking on the down-arrow displays all Bank Accounts entered in the Bank Accounts Setup, and the user selects one by moving the cursor to the correct account and pressing the enter key.

Once the account is selected, the Account Type, the Bank, and the Account Name information will be displayed for the selected account.
The Deposit Date will default to the current date, but may be edited as required.
The user enters the total amount of the deposit at the bottom of the screen, and ManEx will track the total of the Deposits as they are entered and the difference from the total amount.
The Add Line button will then be displayed allowing the user to enter information about the Deposit.
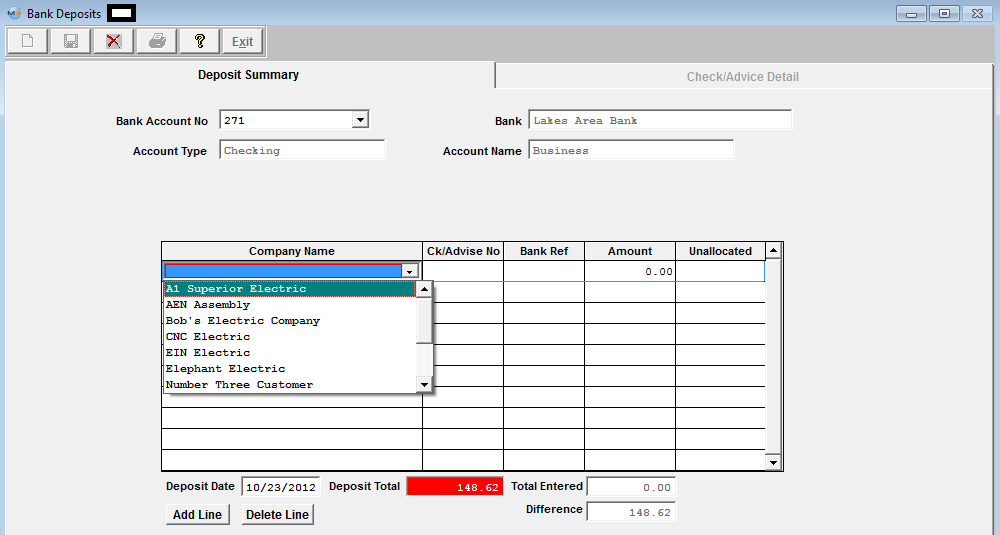
After pressing the Add Line button, the prompt is placed on the Company Name and the Delete Line button is enabled. Clicking on the down-arrow next to the Company name field lists the names of all of the companies from which the deposit might be received.
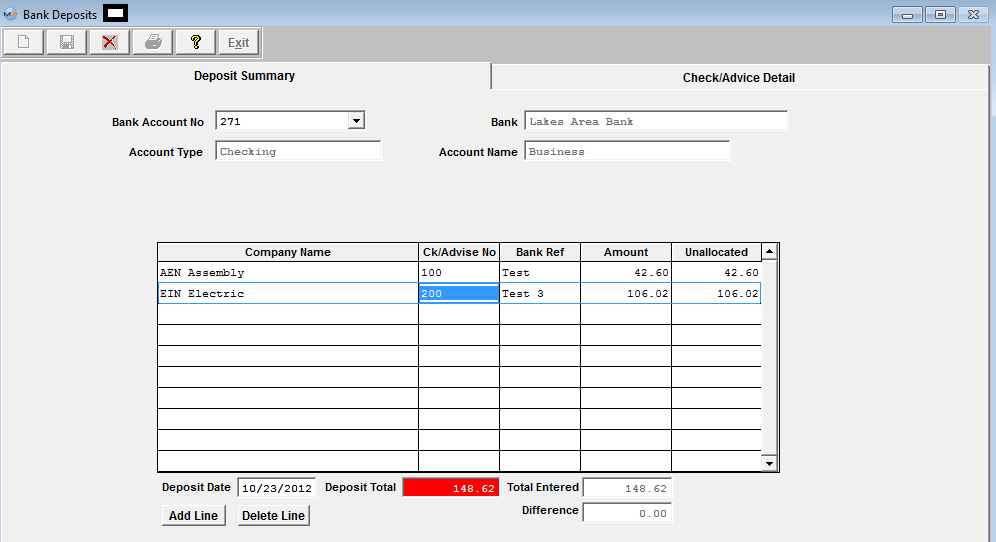
After entering the Company Name, the user enters the Check/Advise Number, the Bank Reference Number and the amount of the Check. The unallocated amount will be automatically entered, and the Check/Advice Detail screen tab becomes enabled.
CHECK/ADVICE DETAIL Selecting a line by highlighting on the initial screen and pressing the Check/Advice Detail tab displays the screen on which the cash is to be applied for the Check selected.  The system does NOT allow the user to enter in a positive amount against an existing Prepayment or Credit Memo.
To Add "AR Invoice" refer to Article #4437
To Add "PrePay/Acct Deposit" refer to Article #4438
To Add "Other" AR Cash Receipts refer to Article #4439 |
| 1.2.4.2. Add an AR Inv Payments |
AR Invoice payments For AR Invoice Payments, follow the process for the AR Bank Deposits, then within the Check/Advice Detail screen, Select the AR Invoice radio button, the user may elect to show open invoices for the selected Customer by depressing the "Selected Co" button, or elect to show all open invoices by depressing the "Show All Co" button. 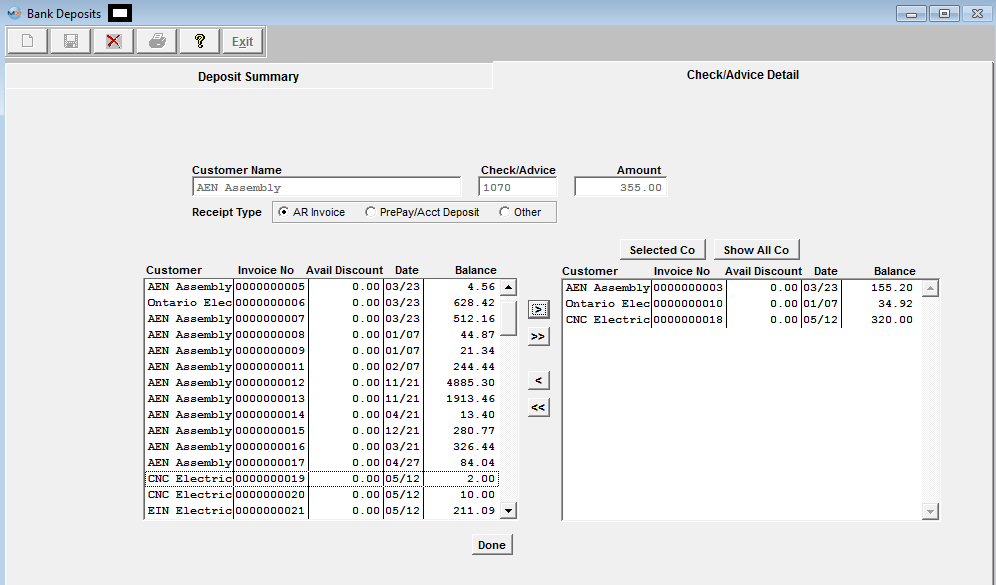 Once the open invoices are displayed, the Deposit may be applied to an open invoice by selecting an invoice and pressing the left arrow key (>) to move the invoice to the applied area. Pressing the double left arrow (>>) will move all invoices to the application area. After selecting invoice(s) to which the payment is to be applied, pressing the DONE button returns the user to a screen in which the amounts may be applied to each invoice. 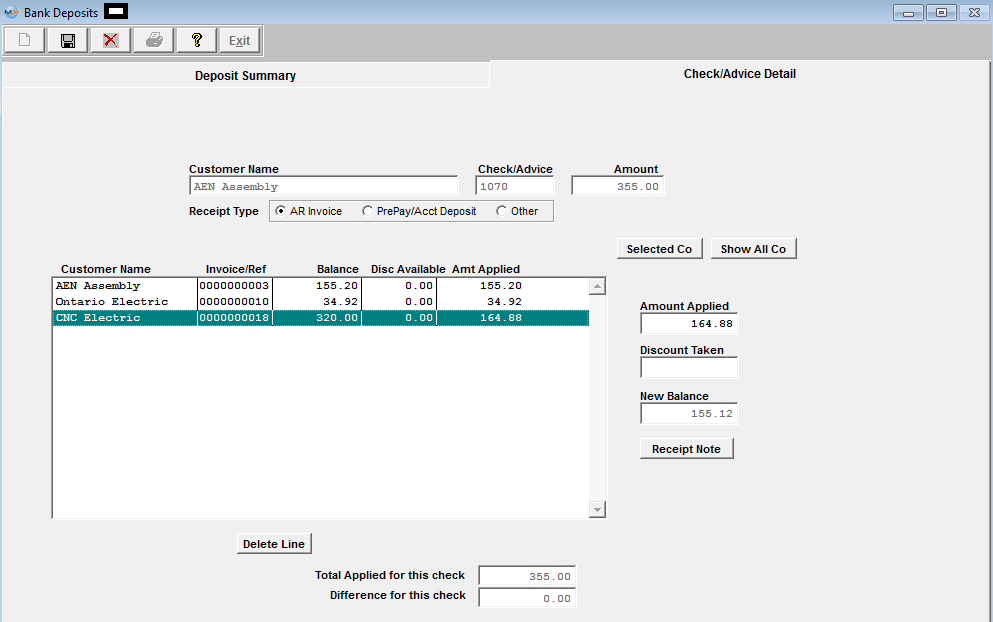 The user selects the invoice to be applied and enters the amount of the deposit to be applied to the invoice. Important Note: At this point, the user MUST depress the Enter key. When the invoice is selected to which the payment is applied, the user must continue to apply the Check to open invoice until the entire check is totally applied. If the Customer has taken an allowed discount, the amount of the discount may be entered by placing the cursor in the discount field and entering that amount. When exiting the Discount field, the amount applied will be reduced by the amount of the Discount automatically. The user may continue entering Deposits until the total of the entries matches the total deposit entered, and the Difference field displays 0.00. If the customer issued a check creating an overpayment see Article #4443 to account for the overpayment.
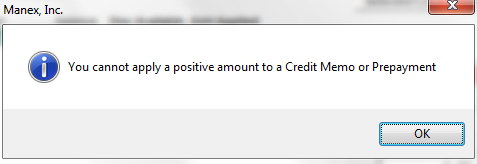
The system does NOT allow the user to enter in a positive amount against an existing Prepayment or Credit Memo.
If user attempts to add an AR Bank Deposit to a Credit Memo or Prepayment they will receive the following message:
 |
| 1.2.4.3. Add a PrePay/Account Deposit |
Prepay/Account Deposit If a Customer has prepaid an invoice, follow the process for the AR Bank Deposits, then within the Check/Advice Detail screen, Select the Prepay/Acct Deposit to make the allocation. After selecting the PrePay/Acct Deposit radio button, a Reference Number field is displayed, and a Reference Number must be entered. The name of the Customer selected appears in the application area, and the user enters the amount received as Prepayment in the Amount Received field.
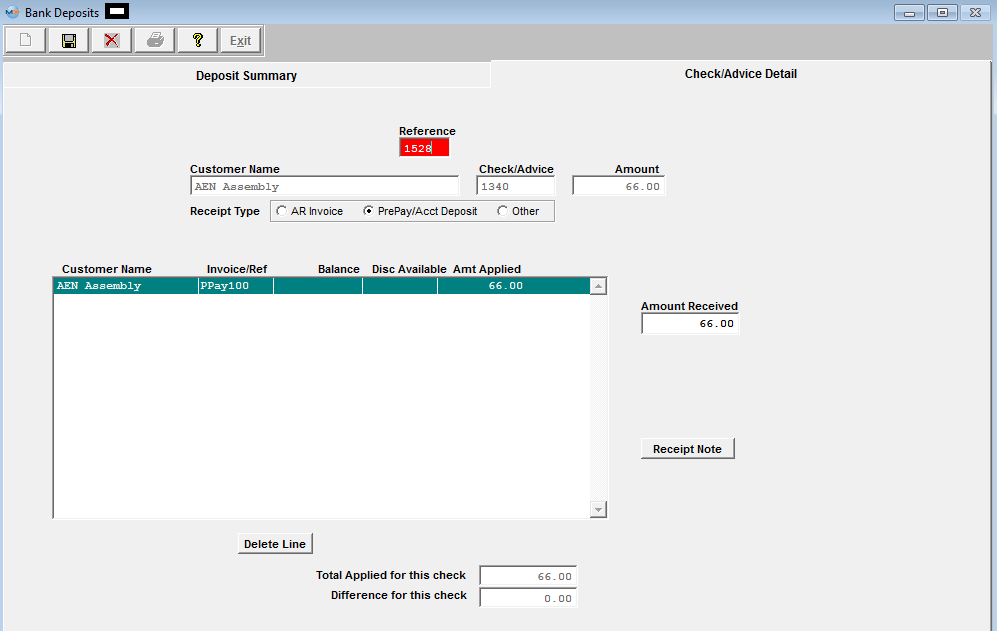 The Invoice/Ref field will be completed with the Reference Number, prefixed with “PPay” for future reference. The Pre-Pay amount will credit the G/L account default as set up in Accounting Setup. This is normally A/R Trade Receivables since the Prepayment will appear as a credit on the A/R Aging. To offset this payment against another open invoice, you will need to create an A/R Offset . NOTE: The system will NOT allow the user to enter in a positive amount against an existing Prepayment. |
| 1.2.4.4. Add Other A/R Bank Deposits |
Other
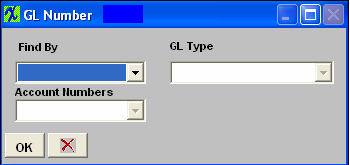
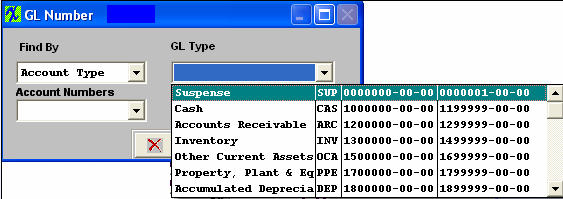
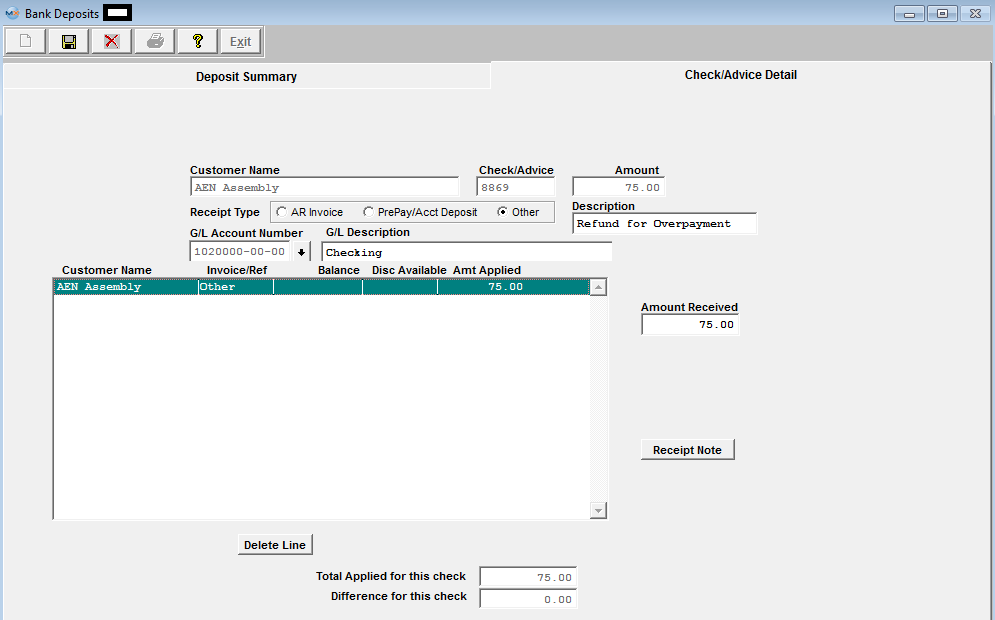 The user must then enter a General Ledger Number against which to apply the receipts, and finally, the amount of the receipt to be applied to the category. The GL number may be entered directly into the field or through the process of looking up by category. To look up by category, place the cursor in the G/L Account Number box and depress the enter key. The following selection will display: Depress the Find By down arrow and the following selection will appear: Select to find by Account Type or Account Numbers. If you select Account Type, the following will display:
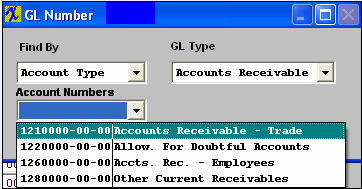
Use the down arrow to find the General Ledger Type. Once the GL Type is selected, all of the General Ledger accounts within that type will display:
Select the General Ledger Account of interest. Type in the Amount Received. If desired, a Receipt Note may be attached to the receipt for later reference by pressing the Receipt Note button. Depress the Edit button. Type in the message. Depress the Save Button. Depress the Exit button. At the bottom of the screen, the total applied and remainder to be applied will be calculated as deposits are applied to one or more invoice. The user may continue entering Checks and then applying them until the total of the entries matches the total deposit entered, and the Difference field displays 0.00. When the total applied matches the total amount of the Deposit for each Customer, and the total Check Receipts match the total Deposit Amount, then the save button becomes activated, and the user may save or cancel the transaction.
|
| 1.2.4.5. Account for Overpayment from Customer |
Customer (Number Three Customer) has two invoices due: Inv #100 for the amount of $1470.00 and Inv #120 for the amount of $19.49 being displayed in AR Aging
 Customer issues a check for $50.00, apply $19.49 against Invoice #120, which leaves a difference of $30.51. 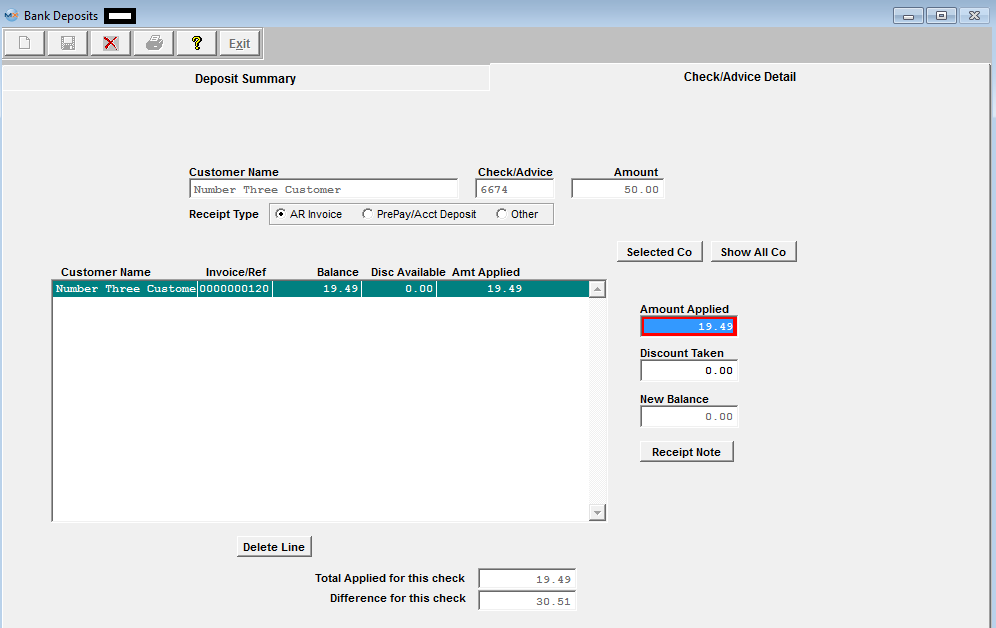 Depress the PrePay/Acct Deposit enter a Reference and apply the difference of $30.51 against the Prepay. 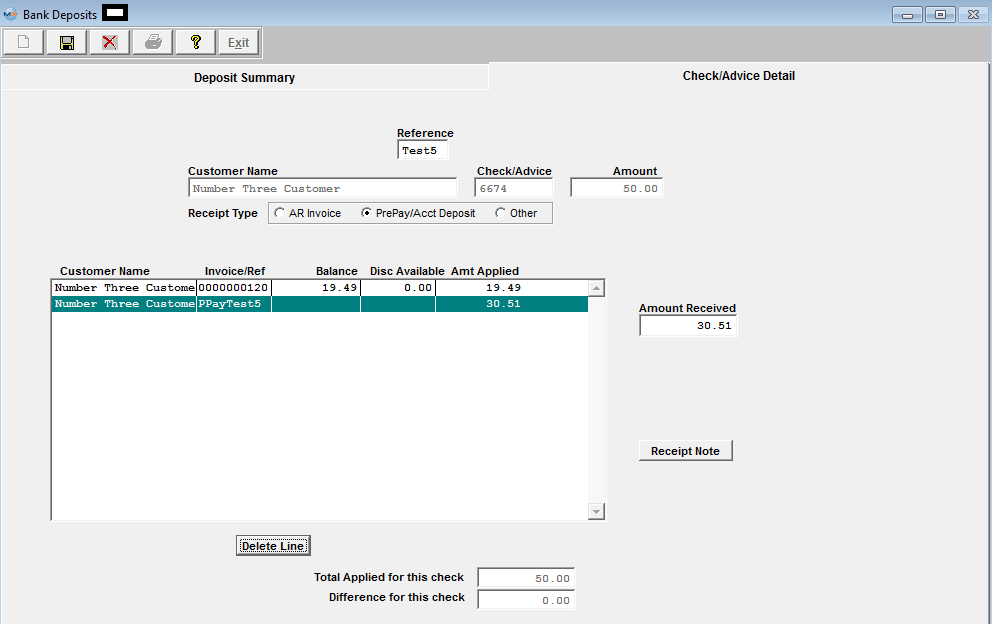 View the AR Receipt Detail Information and the overPayment is being properly displayed  AR Aging updated correctly  The customer later issues another check for the amt of $400.00 to be applied to Invoice #100 and they also want to apply the OverPayment of $30.51 to Invoice #100. Below shows that the system also allows me to apply the overPayment to Invoice #100 (you simply have to double-click on the PrepayTest5 record first and then double-click on the invoice to get the values to apply properly) 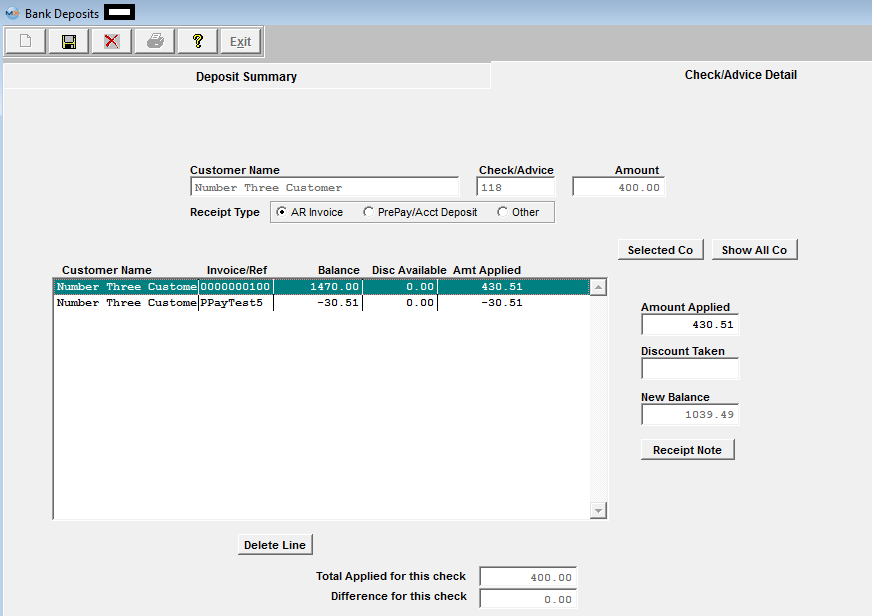 View the AR Receipt Detail Information and the PPayTest5 of $30.51 is applied to Inv #100 properly along with the Check for the amount of $400.00 for a total applied of $430.51. 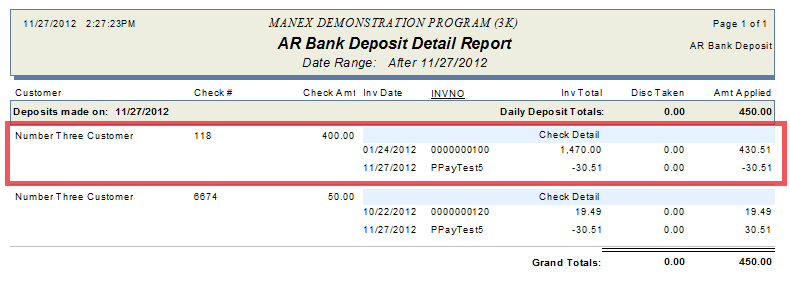 AR Aging updated correctly with Invoice #100 having a balance due of $1039.49.  |
| 1.2.4.6. Apply a Prepayment or Credit Memo against an Invoice |
If the customer issues a check for the amt of $400.00 to be applied to Invoice #100 and they also want to apply the OverPayment of $30.51 to Invoice #100. Below shows that the system allows me to apply the overPayment to Invoice #100 (you simply have to double-click on the PrepayTest5 record first and then double-click on the invoice to get the values to apply properly)  View the AR Receipt Detail Information and the PPayTest5 of $30.51 is applied to Inv #100 properly along with the Check for the amount of $400.00 for a total applied of $430.51.  AR Aging updated correctly with Invoice #100 having a balance due of $1039.49.  The system works the same when applying a Credit Memo to an Invoice. AR Aging displaying a Credit Memo # CM0000115 and Invoice #0000000103. 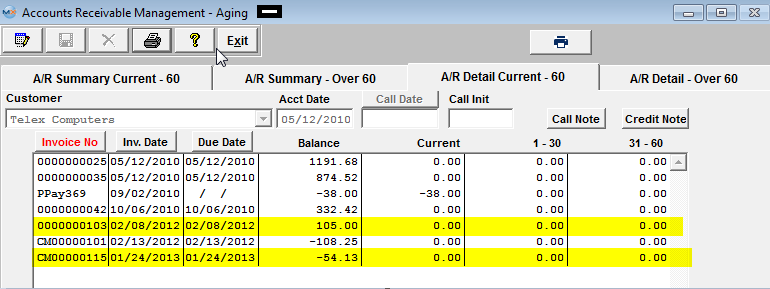 Customer wants to apply the Credit of $54.13 against Invoice #103, so they only send a check for the amount of $50.87. 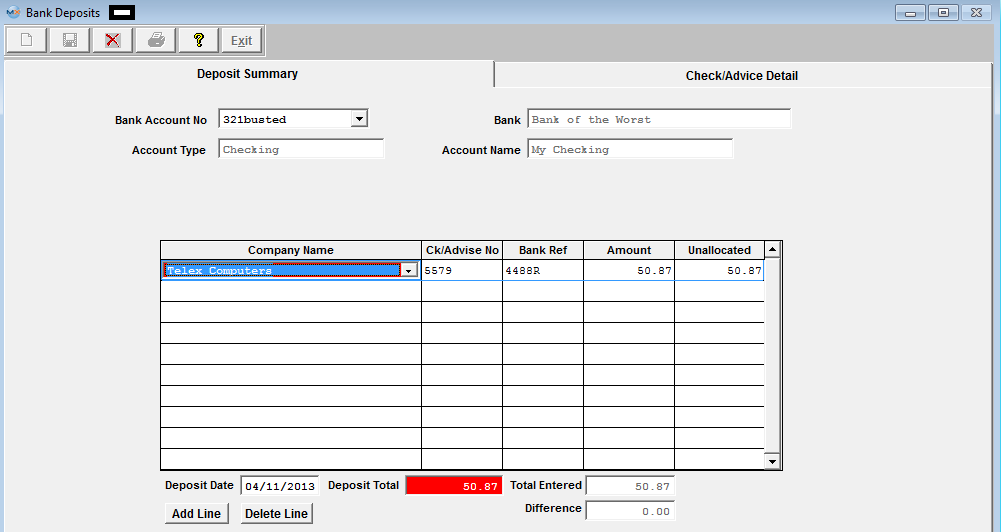 Select the Credit Memo and the Invoice from the Check/Advice Detail 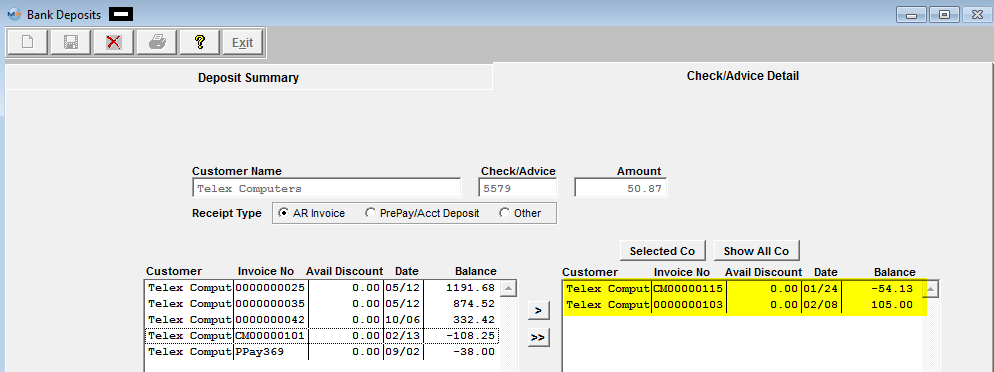 Depress "Done" takes you to the next screen. Here user may double click on the CM0000115 to apply the amount to the Invoice 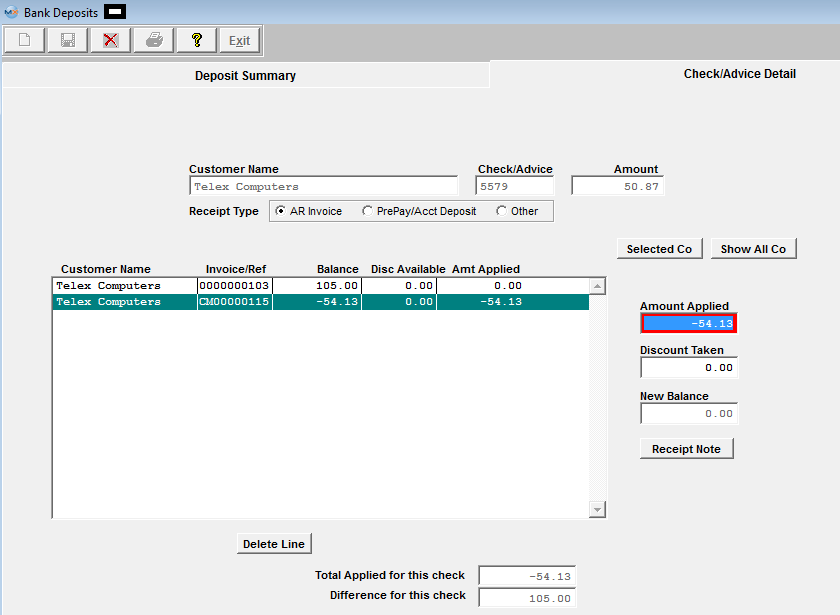 Then enter the amount Applied to Invoice 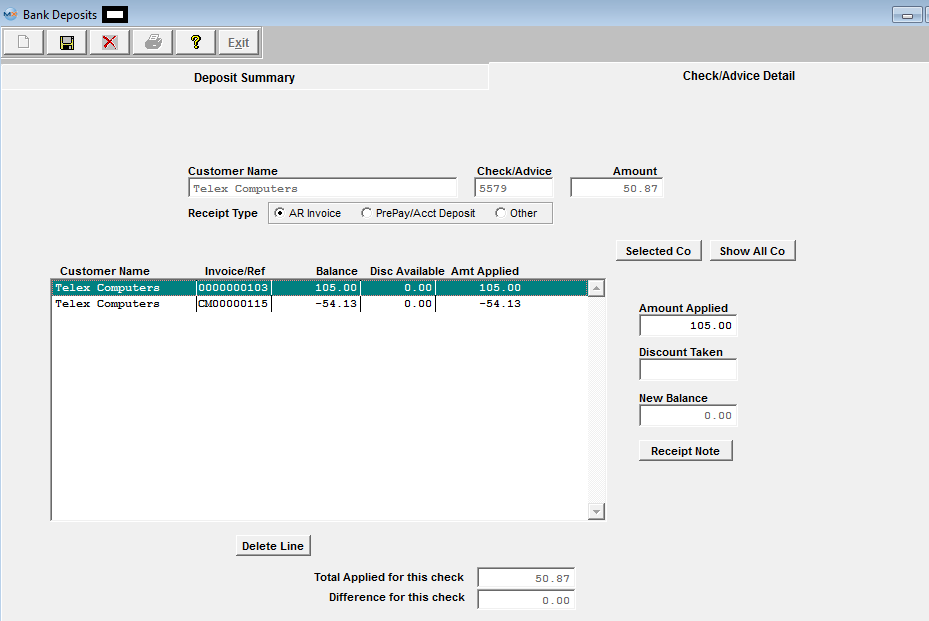 Save Record and both the Credit Memo #CM0000115 and Invoice #0000000103 have been cleared from the AR Aging 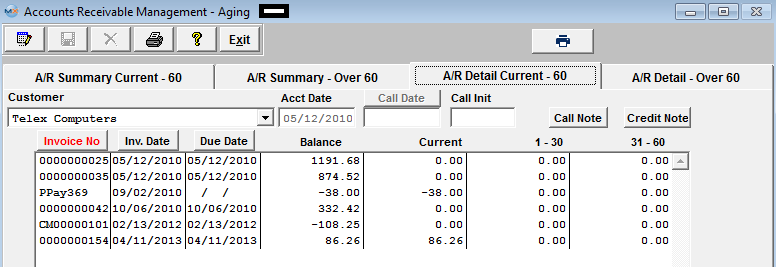 If user attempts to apply a deposit to a Credit Memo or Prepayment they will receive the following message:  |
| 1.2.5. Reports for the A/R Bank Deposits | ||||||||
To obtain the AR Cash Receipt Reports within the Web, select the WEB Print button from the ManEx action buttons at the top
of the screen. For further detail on How the Reports work
within the Web refer to Article #5477. Note: In order to access the Reports within the Web the Company Root URL must be setup within the System Appearance module and user must be linked to web within the System Security Module.
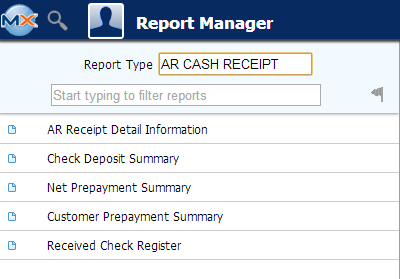
Select
the Report Type: AR CASH RECEIPT - A List of Reports will be displayed that are
available on the Web for AR CASH RECEIPT
To obtain the AR Cash Receipts Reports, select the Print button from the ManEx action buttons at the top of the screen.
The following reports screen will display a list of reports that are available on the ManEx Desktop: 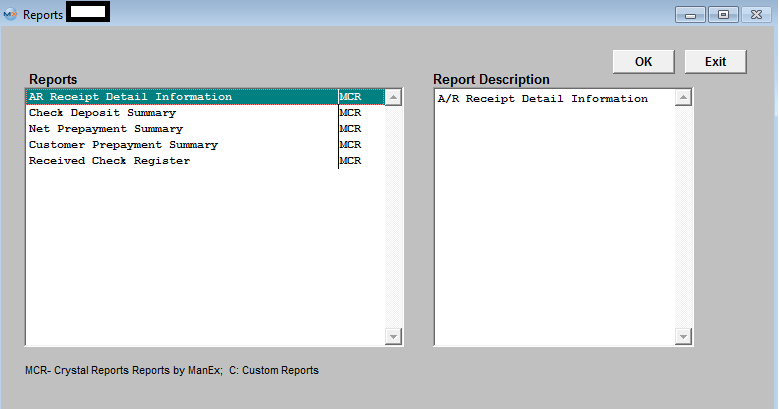 Highlight the report. Depress the OK button. A/R Receipt Detail Information
The following report will be displayed:  Check Deposit Summary
The following report will be displayed:  Net Prepayment Summary Highlight the Net Prepayment Summary Report. Depress the OK button. The following report will be displayed:
Customer Prepayment Summary
The following report will be displayed:  Received Check Register:
The following report will be displayed:
|
| 1.3. Accounts Receivable Check Returns |
| 1.3.1. Prerequisites for A/R Check Returns |
|
Users MUST have full rights to the "Returned Checks" in Accounting Security . Users with “Accounting Security Supervisor” rights will automatically have access. Existing A/R Cash Receipt |
| 1.3.2. Introduction for A/R Check Returns |
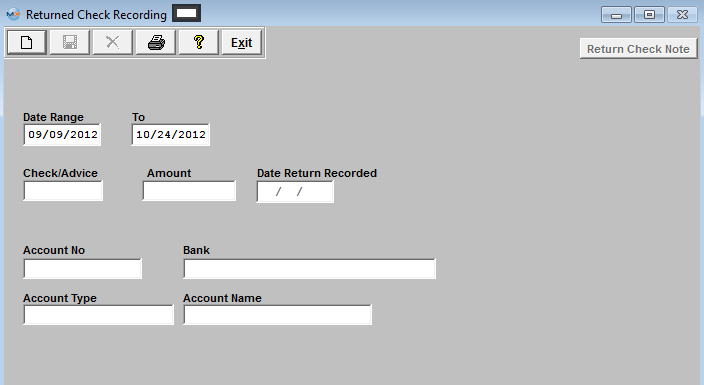
| If the bank returns a check, the user may record the Check Return in this module. Completing the transaction will credit the Bank Account in which the check was deposited, and reverse the application of the funds made in the Bank Deposits module. Additionally, the A/R Aging will update, if applicable |
| 1.3.3. Fields & Definitions for A/R Check Returns | ||||||||||||||||||
A/R Check Returned Recording - Field Defintions
|
| 1.3.4. How To ...... for Check Returns |
| 1.3.4.1. Add Check Returns | ||||
|
The following Screen will be displayed:
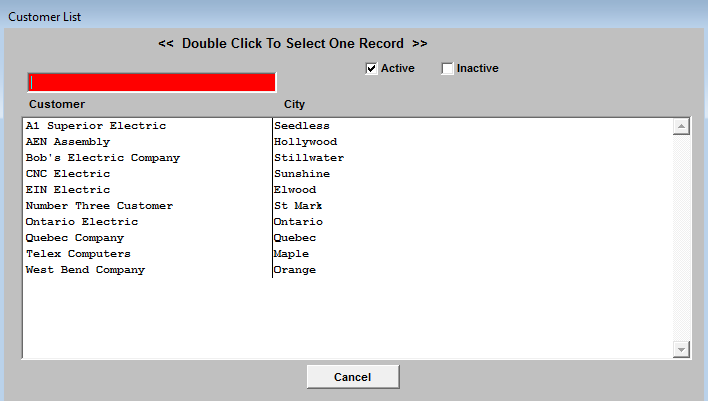
Depress the Add Record icon will then prompt the user to enter a Customer Name. The user may enter the Customer Name in the red search box, or move the cursor to the selected Customer and double click on the line. By default, only active Customers are shown, but if the user wishes to see inactive Customers, then clicking on the Inactive box will display both types of Customers.
Selecting a Customer will then cause a list of checks in the date range from that Customer to be displayed.
The user should then select the Check being returned by double clicking on the line. After the appropriate Check is selected, the original screen is populated with the data. The user may then enter a note about the Returned Check, if desired. Depress the Return Check Note. Depress the Edit button. Type in the note. Depress the Save button. Depress the Exit button.
Upon validating that the information is accurate, the user may Save the Returned Check record or the user may Abandon the operation. Saving the record credits the Bank Account and reverses any Cash Receipt transactions associated with the Returned Check.
|
| 1.3.5. Reports for Check Returns | ||
|
To obtain the AR Check Returned Reports within the Web, select the WEB Print button from the ManEx action buttons at the top
of the screen. For further detail on How the Reports work
within the Web refer to Article #5477. Note: In order to access the Reports within the Web the Company Root URL must be setup within the System Appearance module and user must be linked to web within the System Security Module.
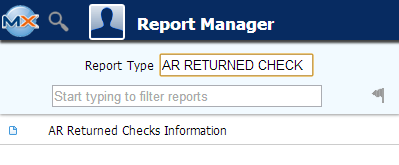
Select
the Report Type: AR RETURNED CHECK - A List of Reports will be displayed that are
available on the Web for AR RETURNED CHECK
To obtain the AR Check Returned Reports, select the Print button from the ManEx action buttons at the top of the screen.
The following reports screen will display a list of reports that are available on the ManEx Desktop: 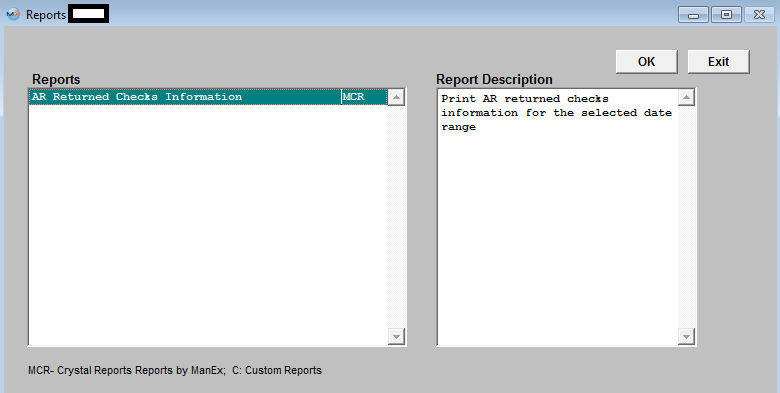
Highlight the report and depress the OK button.
A/R Returned Checks Information
The following report will print:
 |
| 1.4. Accounts Receivable Offsets |
| 1.4.1. Prerequisites for A/R Offsets |
Users MUST have full rights to the "AR Offsets, Write-offs & CM" in Accounting Security . Users with “Accounting Security Supervisor” rights will automatically have access. |
| 1.4.2. Introduction for A/R Offsets |
The accounts receivable offsets section provides for application of outstanding CREDITS and PREPAYMENTS against open invoices.
An A/R offset will NOT create a transaction in the GL. The offset itself has NO impact on the general ledger. It shifts the funds according to the way that the Credit memo and Receivable were established. See attached spreadsheet, each transaction involved from shipping and invoicing through credit memo and offset to check deposit are tracked.
|
| 1.4.3. Fields & Definitions for the A/R Offsets | ||||||||||||||||||||||
Accounts Receivable Offsets - Field Definitions
|
| 1.4.4. How To ...... for A/R Offsets |
| 1.4.4.1. Add A/R Offsets | ||||
|
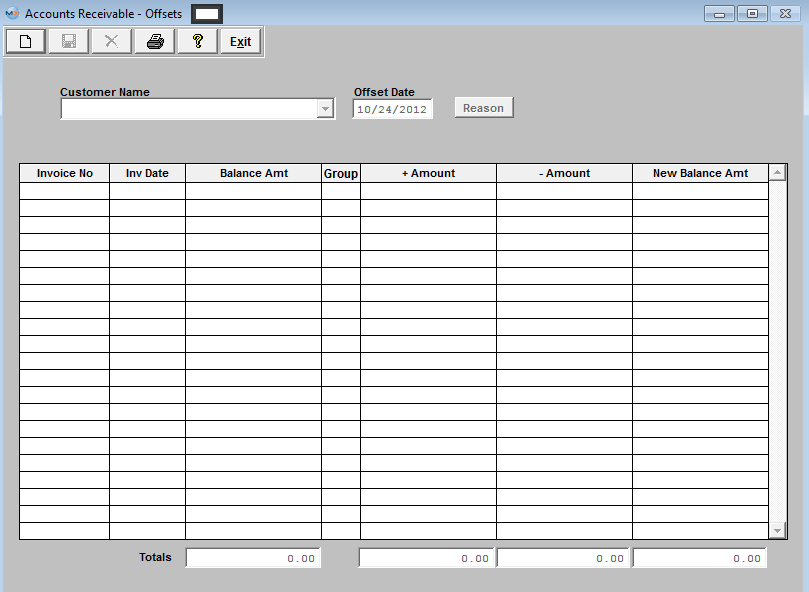
The following screen will be displayed:
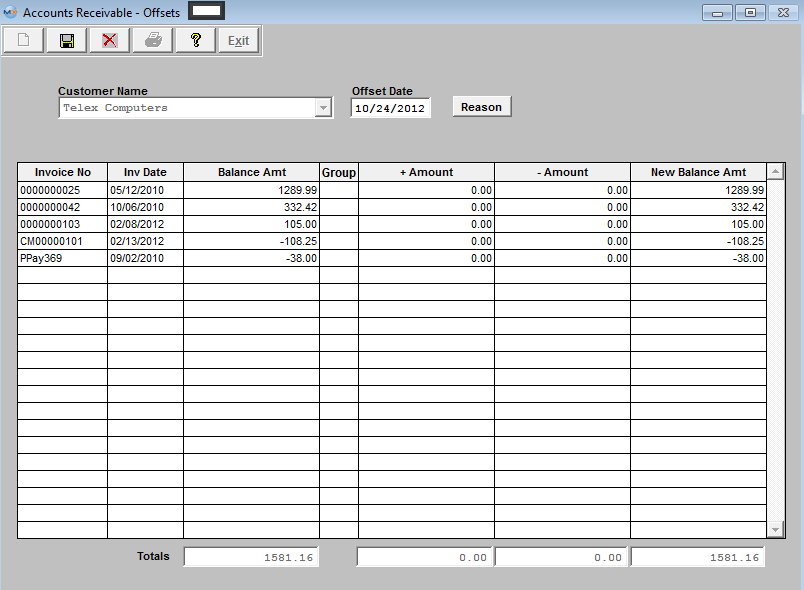
Depress the Add record action icon, user will be prompt for a password, after entering their password, the module will become editable. 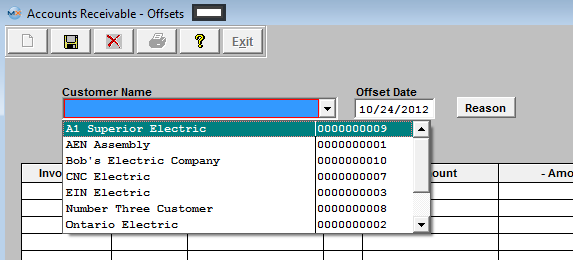 Select a Customer from the pull down list. Once the desired Customer to Offset is selected, the receivable records are displayed.
The user may then use the +Amount and -Amount columns to Offset payments against invoice, as illustrated. 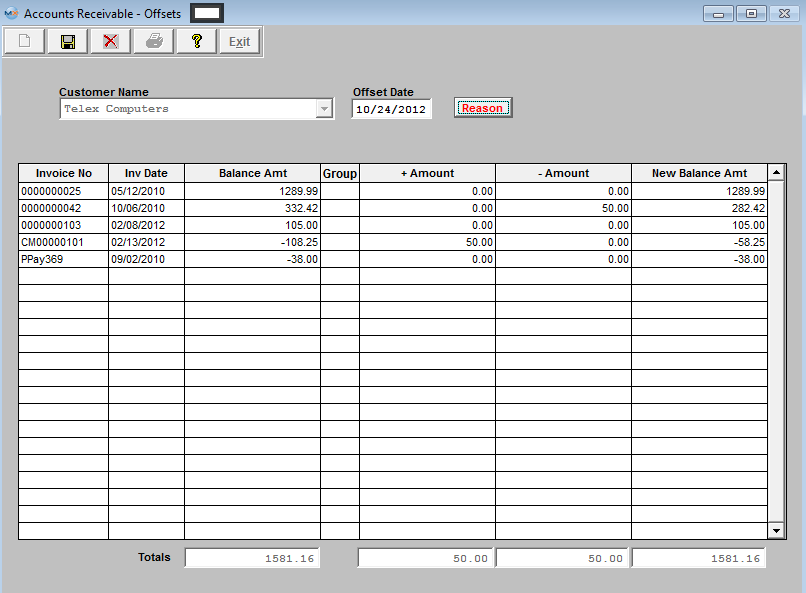 Only when the total amounts of the additions and subtractions are equal does the save button become enabled. After verifying the correct application of offsets, the user may save the information. On saving the information, the user will be prompted to enter a reason note for the Offset.
Depress the Reason button on screen. Then depress the Edit button, enter the reason, depress the Save button. Depress the Exit button. You’ll be returned to the prior Offset screen. Depress the Save record action button or the Abandon changes action button. |
| 1.5. Accounts Receivable Write-Offs |
| 1.5.1. Prerequisites for A/R Write-Offs |
Users MUST have full rights to the "AR Offsets, Write-offs, & CM" in Accounting Security . Users with “Accounting Security Supervisor” rights will automatically have access. |
| 1.5.2. Introduction for A/R Write-Offs |
The accounts receivable Write-Off section provides the ability to expense uncollectable invoice and to Write Off small amounts unworthy of collection efforts. |
| 1.5.3. Fields & Definitions for A/R Write-Offs | ||||||||||||||||
Accounts Receivable - Write-offs Field Definitions
|
| 1.5.4. How To ..... for A/R Write-Offs |
| 1.5.4.1. Find an A/R Write-Off | ||||
|
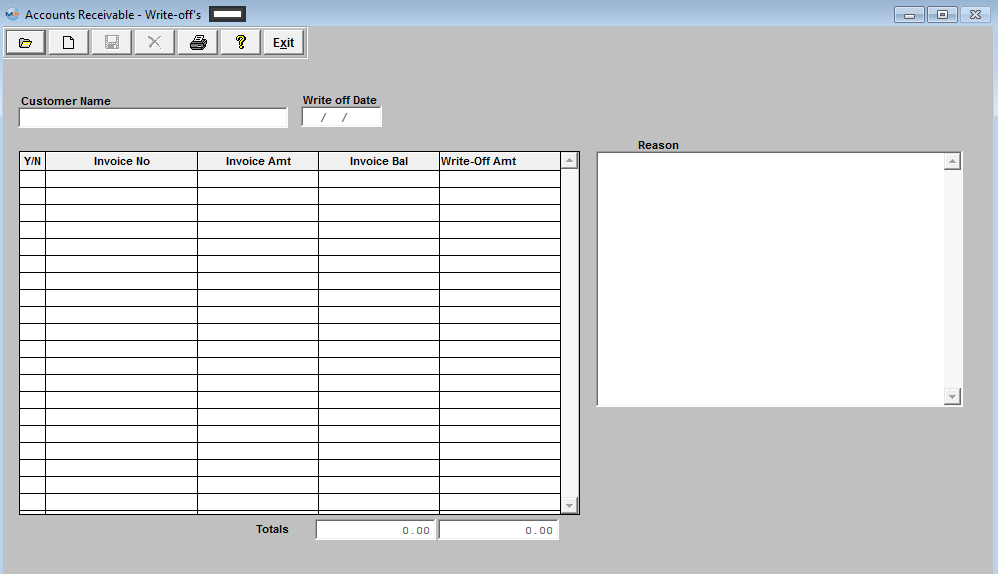
The following screen will be displayed:
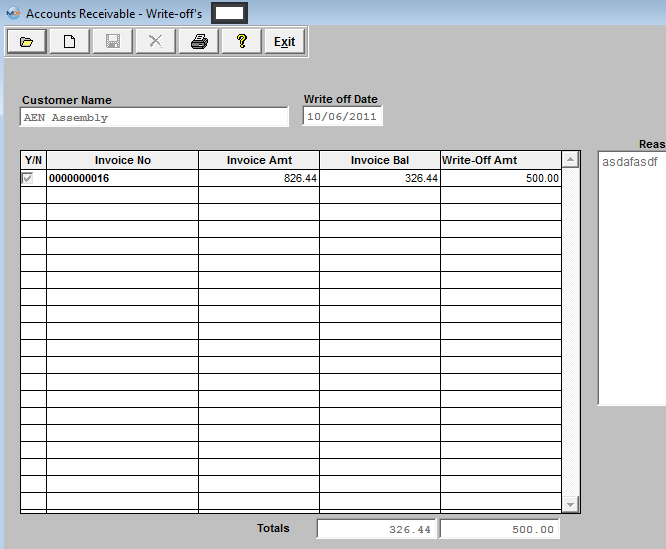
Depress the Find record action icon will display a list of prior Write-Offs created through the Accounts Receivable Write-Offs module.  To select a previous Write-Off, enter the invoice No. into the red box or highlight your selection and double click. Once an existing Write-Off has been selected, the detail screen for that Write-Off will be displayed similar to that shown, below.
|
| 1.5.4.2. Add an A/R Write-Offset | ||||
|
The following screen will be displayed:
Depress the Add record action icon will begin the process of adding a Write-Off to the system. The user will be prompted for his/her password. The following screen will display showing those Customers with open invoice. 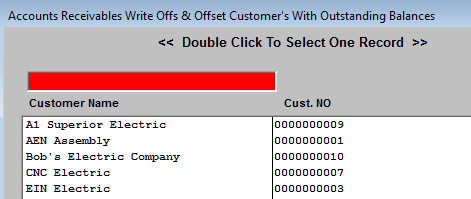 To select a Customer, enter the Customer Name into the red box or highlight your selection and double click. Once a Customer is selected, a list of open invoice for that Customer will be displayed for selection.
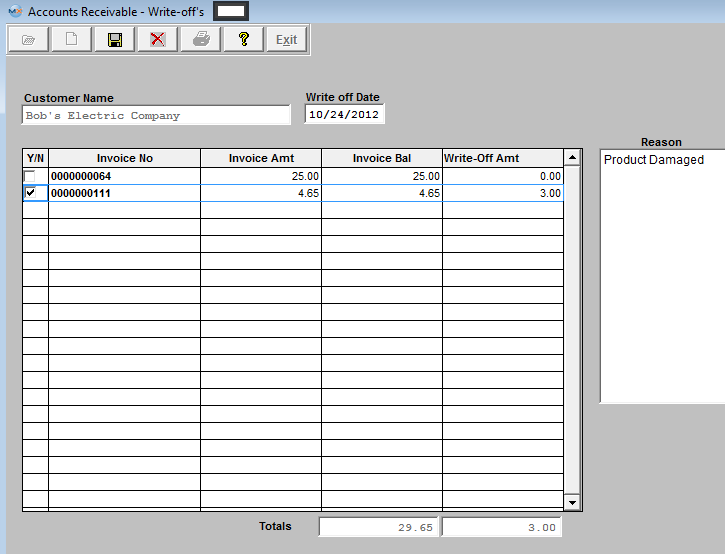
After checking the invoice to Write Off in the Y/N box and entering the Write Off amount, the user should enter a reason for each Write-Off selected:
When the batch process has been completed, the user may select the Save record action icon to Save the Write-Off batch or Abandon record action button to abort the entire process. Saving will cause the Accounts Receivable Aging to automatically update. The Write Off default account number is as selected in the Accounting Setup – normally Reserve for Bad debts.The A/R Trade Account will be credited.
|
| 1.6. Accounts Receivable Credit Memo |
| 1.6.1. Prerequisites for A/R Credit Memos |
Users MUST have full rights to the "AR Offsets, Write-offs & CM" in Accounting Security . Users with “Accounting Security Supervisor” rights will automatically have access. |
| 1.6.2. Introduction for A/R Credit Memos |
A Credit Memo can be created from two modules: the Accounts Receivable Credit Memo module or the RMA (Return Material Authorization) module.
The Accounts Receivable Credit Memo section provides the ability to issue Credit memos against specific Invoice (Invoice CM) or create a General CM. An Invoice Credit Memo will debit SCRAP and credit COGS. If a partial credit is required without returned goods, create a General Credit Memo. For returned goods, create an RMA . The RMA (Return Material Authorization) module notifies receiving to expect a return from a Customer. The authorization also allows for reworking/replacing the order so that the user doesn’t have to go to another screen to create a Sales Order. Once the RMA is received, a Credit Memo automatically forwards to the Accounting Accounts Receivable Credit Memo module where it can be viewed and printed. Rather than issuing an invoice Credit memo, the user may wish to use the RMA module instead. Please refer to the RMA (Return Material Authorization) Management manual. Note: DO NOT use this module to create a Credit Memo if it involves return of inventory from a Customer, use the RMA process. If the RMA is created from an Invoice the CM type will be "Invoice", if the RMA is a stand-alone the CM type will be "General".
See the attached word document <<How_CM_Affect_GL_Accts_090106.docx>> for further detail on how the different types of Credit Memo's affect the GL Accounts.
|
| 1.6.3. Fields & Definitions for A/R Credit Memo | ||||||||||||||||||||||||||||||||||||||||||||||||||||||||||||||||||||||||||||||||||||||||||
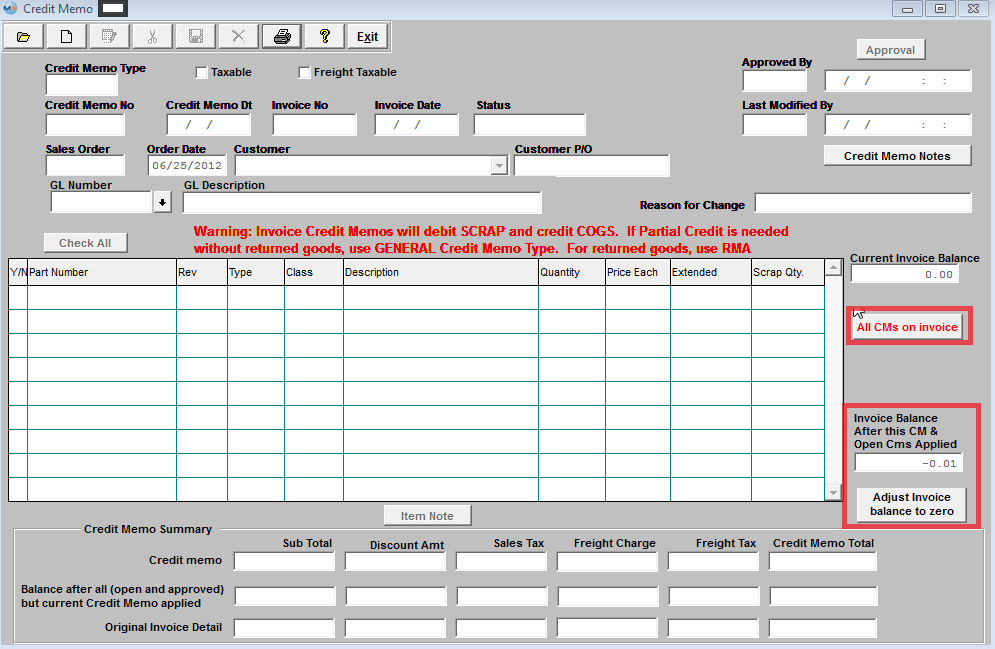 Credit Memo Field Definitions:
Credit Memo Summary/Credit Memo Line:
Credit Memo Summary/Invoice Detail Line:
The GST (Primary) tax and PST (Secondary) tax is divided into the Sales tax and Freight tax on the Credit Memo Summary/Invoice Detail Line: For Example: Primary Tax (GST): 144*10% (sales tax) + 0 (no freight tax is calculated) =$14.40 Secondary Tax (PST): 144*8% (sales tax) + 12*8% (Freight tax) = $12.48 Divided into sales tax and freight tax: Sales Tax: 144*10% (sales tax) + 144*8% (sales tax) = $25.92
|
| 1.6.4. How To ...... for A/R Credit Memos |
| 1.6.4.1. Find an A/R Credit Memo | ||||||||
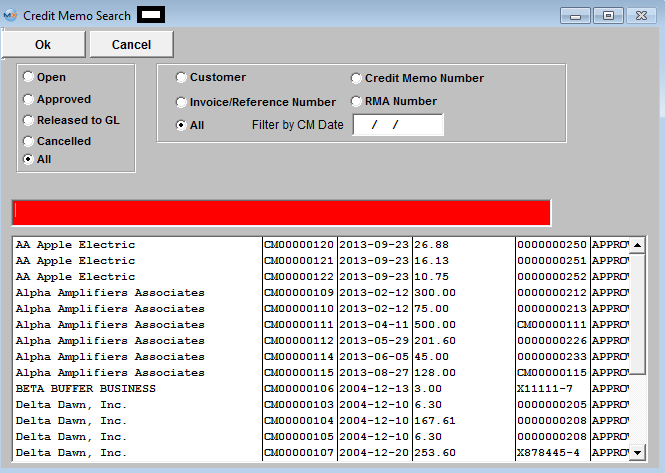
The following screen will be displayed:
Once an existing Credit Memo has been selected, the detail screen for that CM will be displayed:
|
| 1.6.4.2. Add an A/R Credit Memo |
| 1.6.4.2.1. Invoice Credit Memo | ||||||||
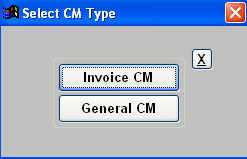
Enter the SQLMANEX.EXE (within the ManEx root directory) The following screen will be displayed, select Accounting/Accounts Receivable/A/R Credit Memo
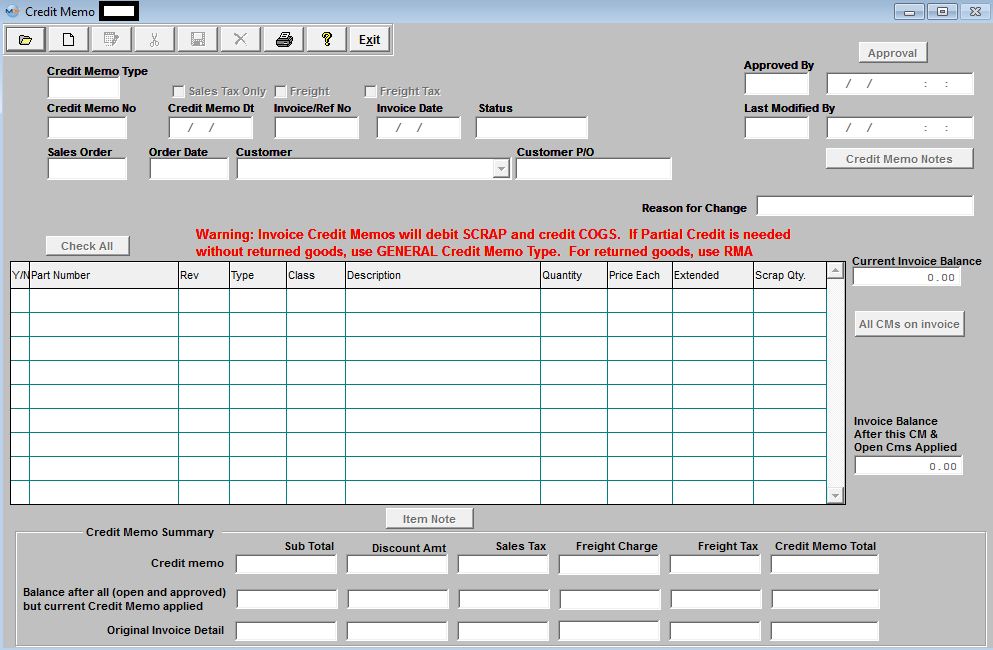
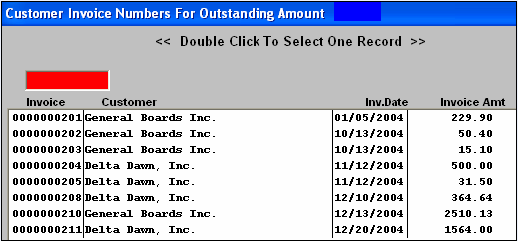
The following screen will be displayed:
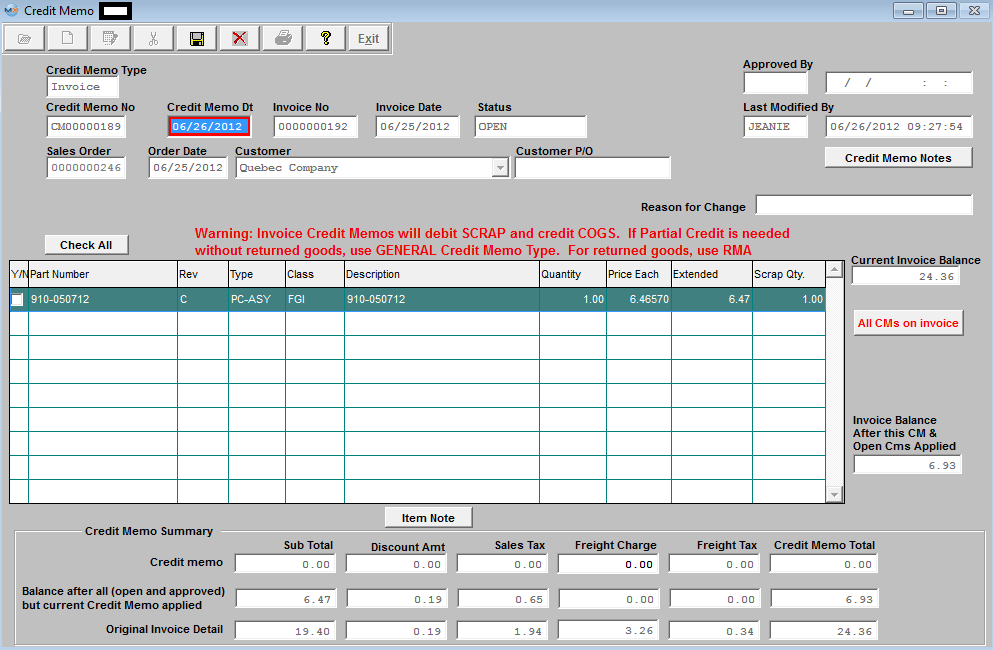
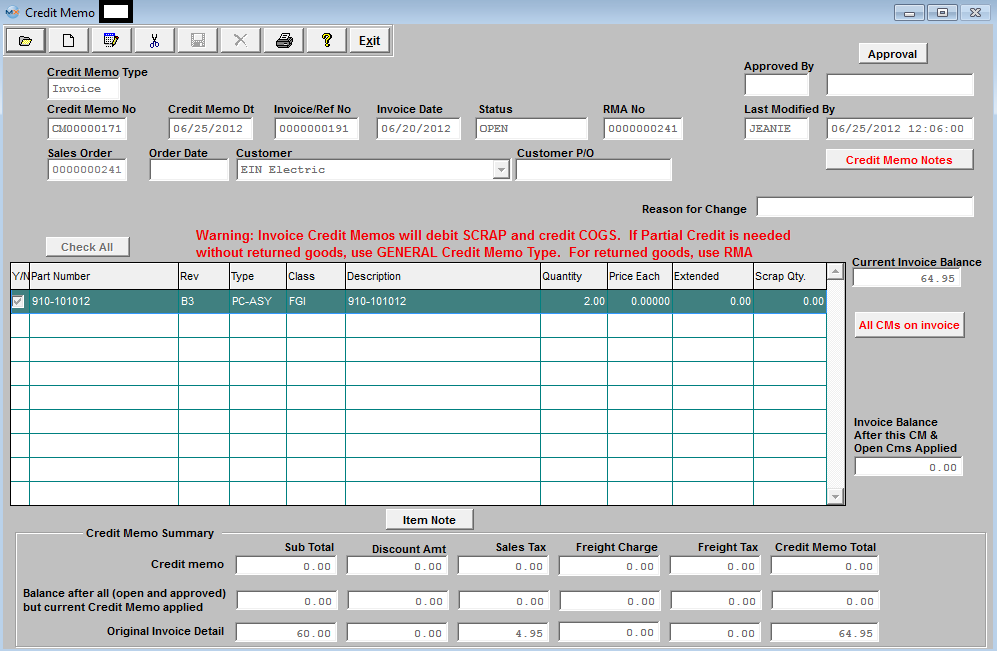
The CM fields are populated with the data from the invoice selected. The qty will default into the Scrap Qty field (this field is read only). This is the qty that will hit the scrap account.
The following information will default into the fields to the right:
"Current Invoice Balance" is pulled from the AR record and reflects any Cash Payments, AR Offsets & "Approved" Credit Memos, but will NOT include "Open" Credit Memos.
"All CMs on invoice" - this button will display in Red, if there are any prior credit memos (open or approved) for the same invoice. "Invoice Balance after this CM & Open CMs Applied" is pulled from the AR record and reflects any Cash Payments, AR Offsets, "Approved" and "Open" Credit Memos, including the current one being added/edited. NOTE: If the amount in this field is within 1% of the Invoice, a button will appear "Adjust Invoice Balance to 0" (If user is creating a Credit Memo for a price adjustment to a Customer Invoice and is not returning the goods and does not want the amount to hit the scrap account then we suggest that user creates a General Credit Memo).
User can choose to issue a Credit Memo for the Sales Tax only or Freight only, by selecting the boxes at the top of the screen. The Sales Tax, Freight and Freight Tax to be credited will appear in the Credit Memo Summary section. NOTE: Users will only be allowed to use these three “only” check boxes at the time when the 1st CM for an invoice is created or if the prior credit memo did not use any amount of the tax/freight yet.
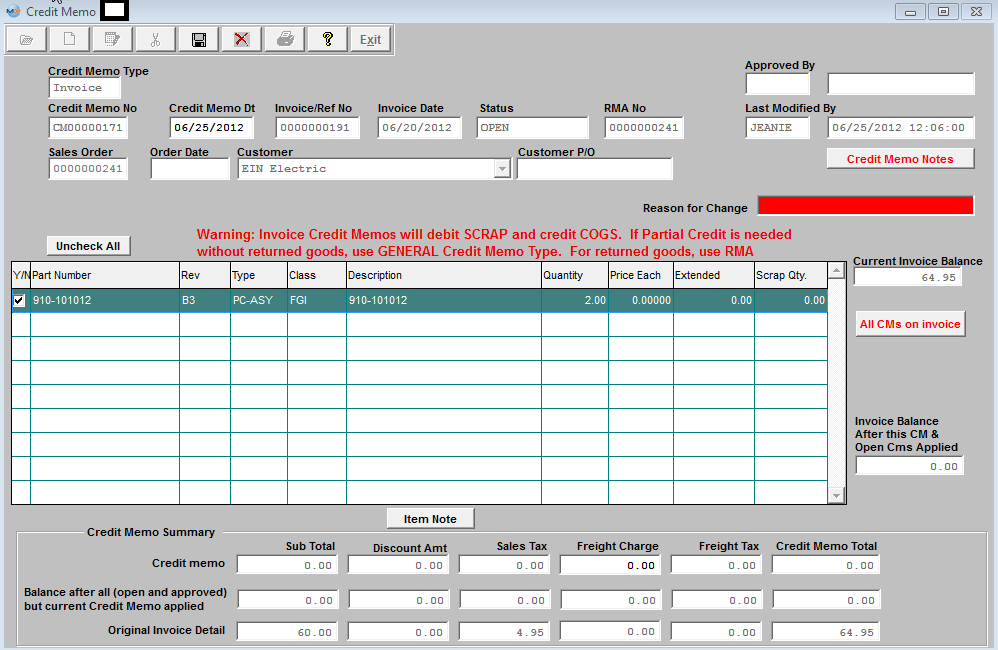
The user may select one or more lines from the invoice against which the credit is to be taken. The selection is accomplished by clicking on the left box on the desired line. As the boxes are checked, the amount of the Credit Memo at the bottom of the screen in the Credit Memo Summary is changed to reflect the lines selected. After selecting the lines to be credited, the user may edit both the quantity and the price of each line. Changing either of these changes the totals for the Credit Memo at the bottom of the screen in the Credit Memo Summary. In addition to selecting and\or modifying the line items, the sales tax, freight charges and freight taxes will also be modified pro-rata by the system. The values will be calculated pro-rata based on the credit being issued for each line. For the line items checked at the left, the qty entered in the Quantity field will default into the Scrap Qty column. The system will automatically debit SCRAP and credit COGS. (If you do not want the GL Transaction to hit the scrap account the user should create a General Credit Memo).
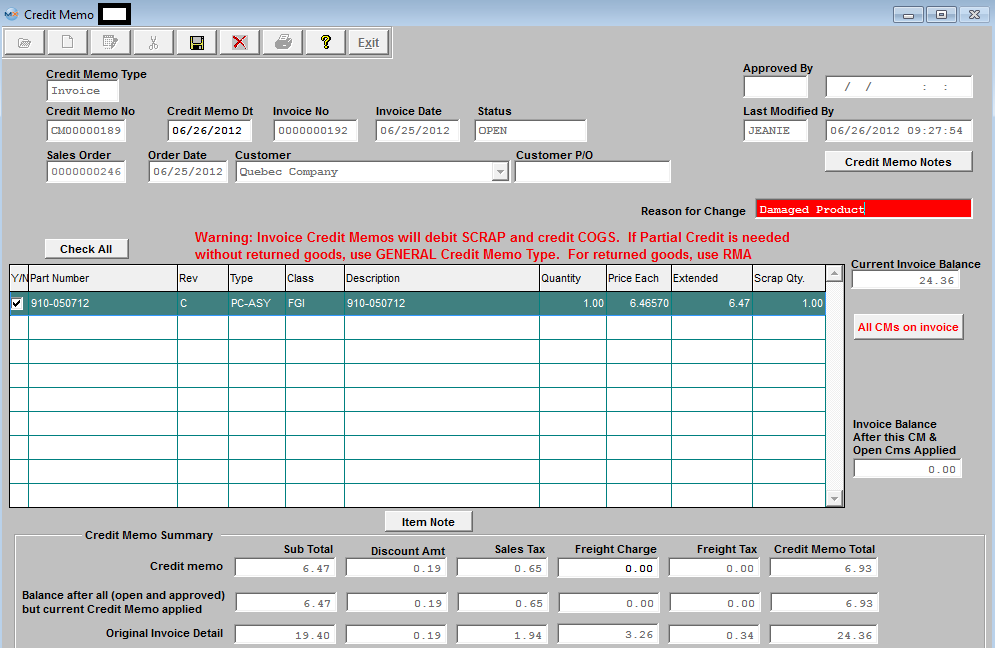 Note: An invoice Credit Memo created in this module or one created in the RMA process against an OPEN invoice will offset the open A/R Trade invoice in the A/R Aging, and the amount displaying in A/R Trade Aging will be the NET. There will be a credit appearing in the A/R Aging only if the Customer invoice had already been paid down.
User MUST enter a reason for the Credit memo before saving. If the reason field is blank user will receive the folowing message:
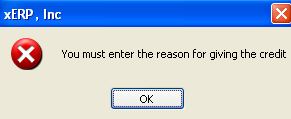 Once a reason has been entered user may Approve the Credit Memo. When user depresses the Approval button the following message will appear:  Once the Credit Memo has been approved the Status will change from Open to Approved and the CM will be forwarded to the AR Aging Module. If desired it may be Offset using the AR Offset module.
|
| 1.6.4.2.2. General Credit Memo | ||||||||||||
|
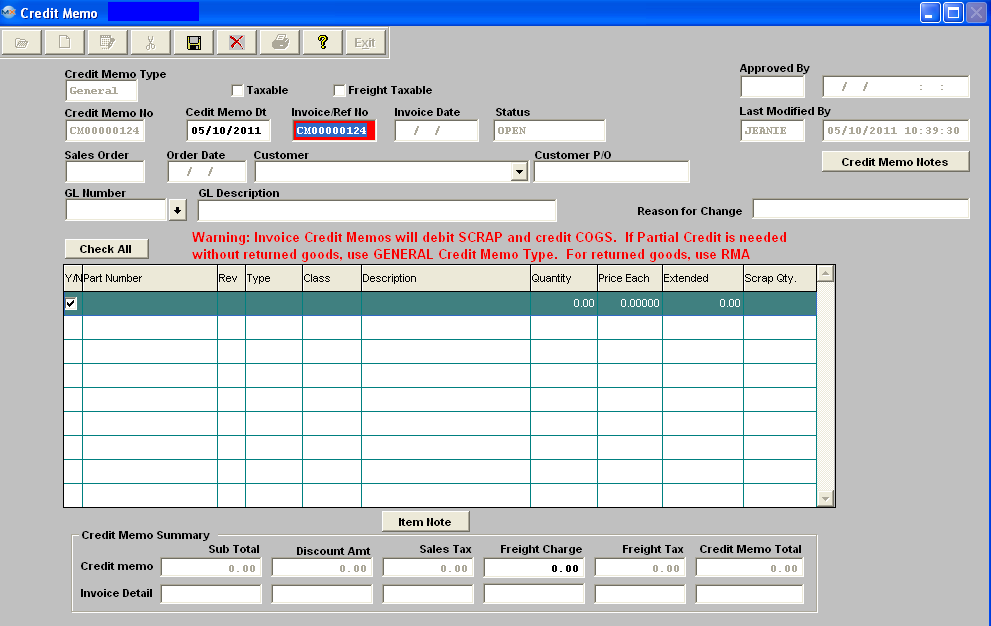
The following screen will be displayed:
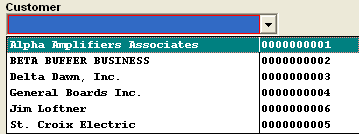
The following screen will appear:
The Invoice Number field changes to a reference number, and the user enters a Reference Number for the Credit Memo.
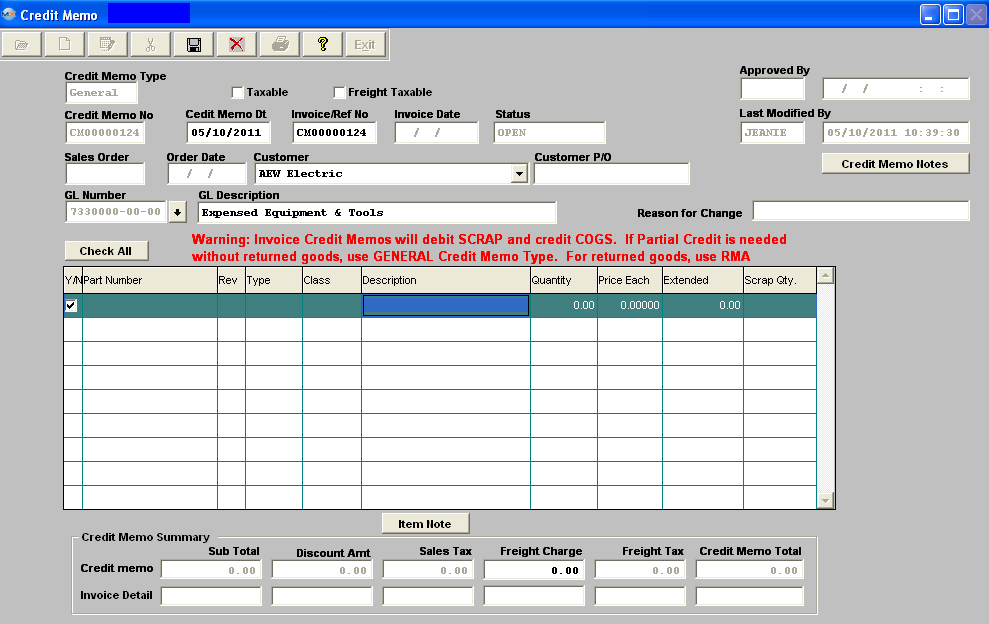
A General Ledger Account number must be supplied for a general Credit Memo. Note: When creating a General Credit Memo users should not select the same GL account number that is entered in the Actsetup for the Account Receivables. If you do, then the resulting transaction will debit and credit both the sane GL account number. The following GL screen will appear:
Select the method of finding the General Ledger Account number, by Account Type or Account Numbers. If you select Find By Account Type, depress the down arrow on the right hand side of the screen.
Select the desired Account Type, then select the Account Number.
Depress the OK button. If you select by account number, depress the down arrow next to the Account Numbers box and the accounts will appear. Highlight the Account Number you wish to use.
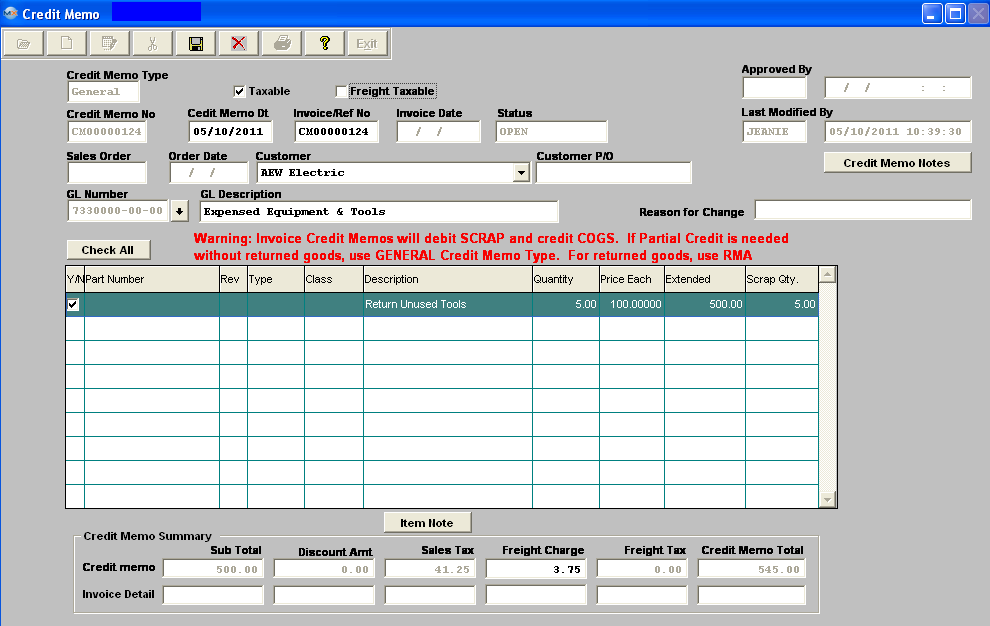
Then the user enters the description, quantity and price each to be credited. If the Taxable box is checked the Sales Tax will default in. If the Freight Taxable box is checked user must enter in the Freight Charge to be Credited as displayed below. The Credit Memo Total will calculate automatically.
User MUST enter a reason for the Credit Memo before saving. If Credit Memo Reason is blank user will receive the following message.
 To enter the reason for the General Credit memo. Depress the Credit Memo Reason button. Depress the Edit button. Enter the Credit Memo Reason. Depress the Save button. Depress the Exit button. Then the Credit Memo may be saved and recorded by depressing the Save record action icon, or deleted by depressing the Abandon changes action icon. 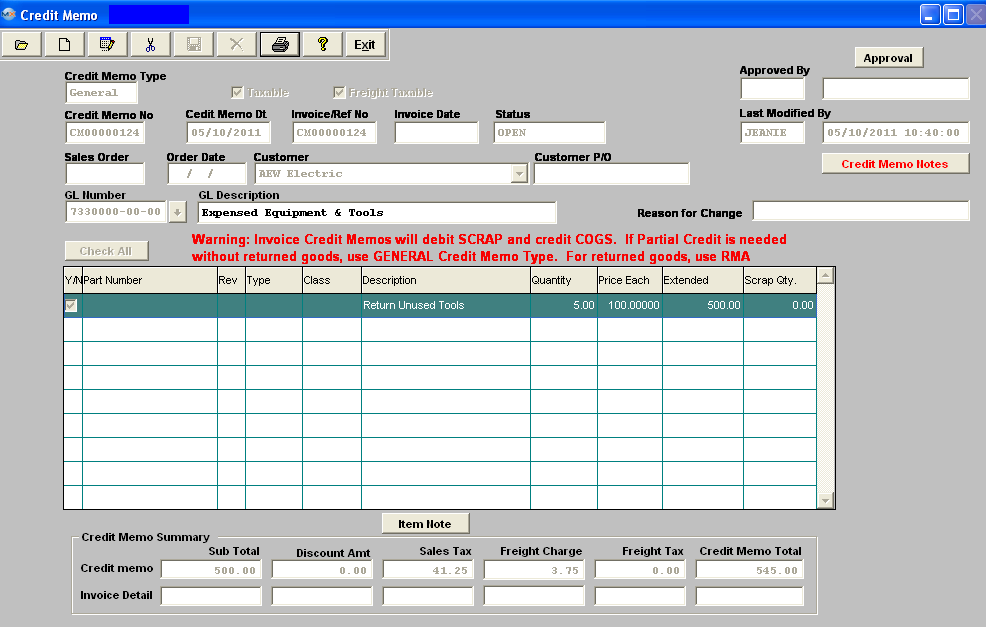 Depress the Approval button, and receive the following message.
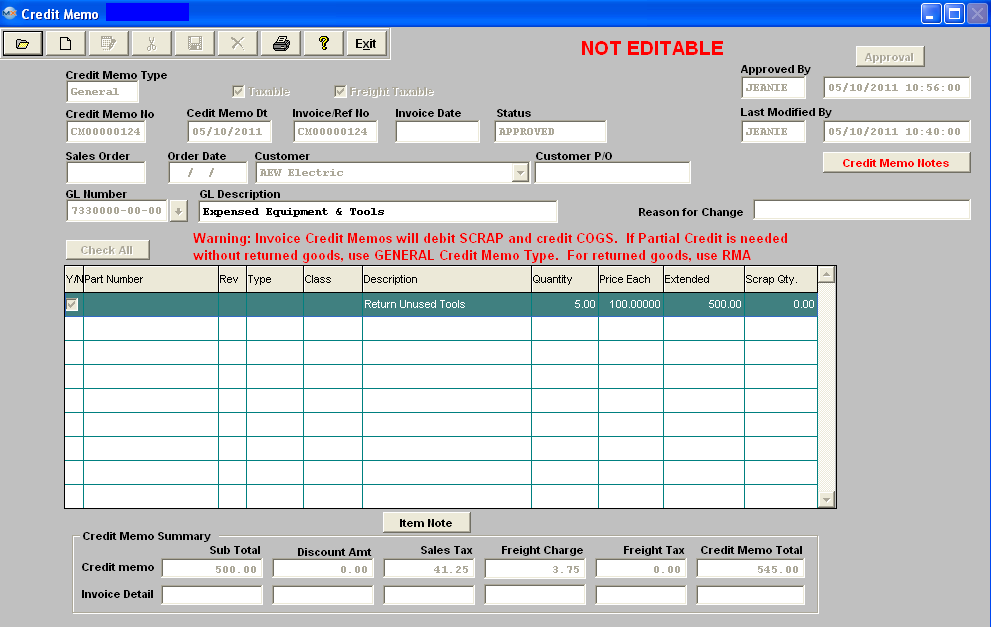
Once Credit Memo has been approved the CM Status will change from Pending to Approved, and the CM will forward to the A/R Aging module. If desired, it may be Offset via the A/R Offset module.
 |
| 1.6.4.3. Edit an A/R Credit Memo |
Find an Exising Credit Memo with an "OPEN" status.
Depress the Edit record action icon. When in the edit mode the Credit Memo Date is editable, the quantity is editable, and the user may check or uncheck the line items to be credited.
NOTE: Any changes that affect the Credit Memo Total will also affect the totals on the right of the screen and they will be adjusted automatically with changes.
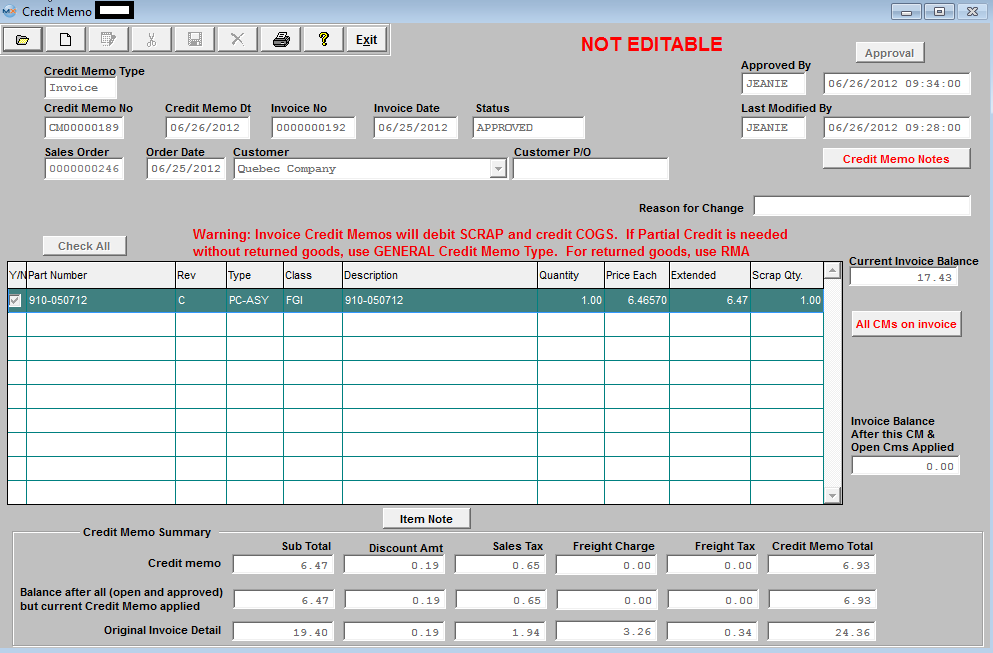
Once the Status changes from OPEN to APPROVED the Credit Memo is no longer editable. And "NOT EDITABLE" will be displayed at the top of the screen (as shown below).
|
| 1.6.5. Reports for A/R Credit Memos | ||||||||
The Return Material Authorization module notifies receiving to expect a return from a Customer. The authorization also allows for reworking/replacing the order so that the user doesn’t have to go to another screen to create a Sales Order. Once the RMA is received, a Credit Memo automatically forwards to the Accounting Accounts Receivable Credit Memo module where it can be viewed and printed. To obtain the Credit Memo Reports within the Web, select the WEB Print button from the ManEx action buttons at the top of the screen. For further detail on How the Reports work within the Web refer to Article #5477. Note: In order to access the Reports within the Web the Company Root URL must be setup within the System Appearance module and user must be linked to web within the System Security Module.
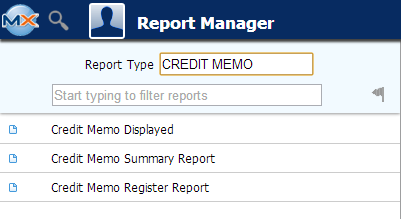
Select the Report Type: CREDIT MEMO - A List of Reports will be displayed that are available on the Web for Credit Memo
To view the Credit Memo created in the Return Material Authorization module, use the Find procedure.
To obtain the Credit Memo reports, select the Print button from the ManEx action buttons at the top of the screen
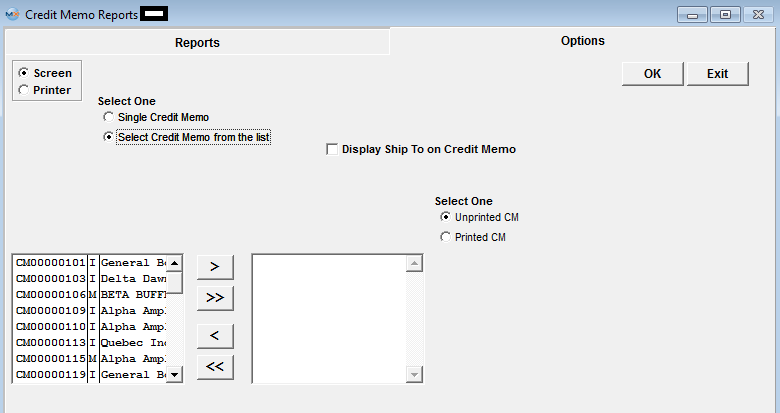
The following reports screen
will display a list of reports that are available on the ManEx Desktop:
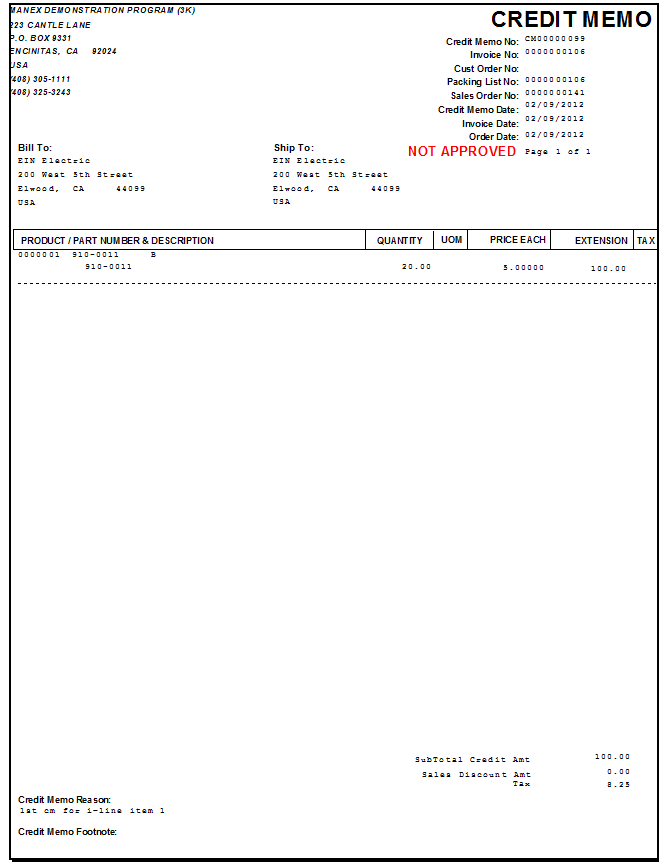
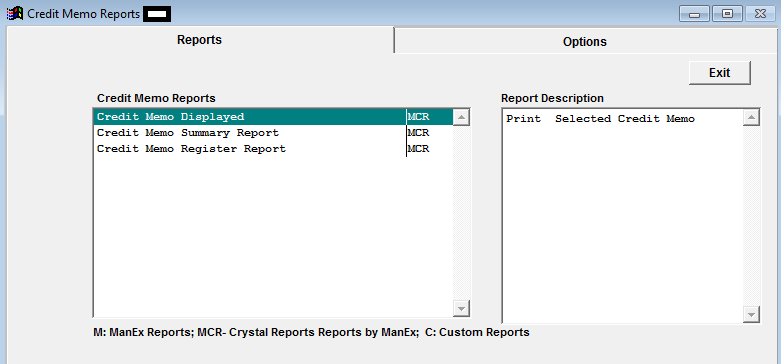 Highlight the report and depress the option tab. Credit Memo Displayed
The following report will be displayed:
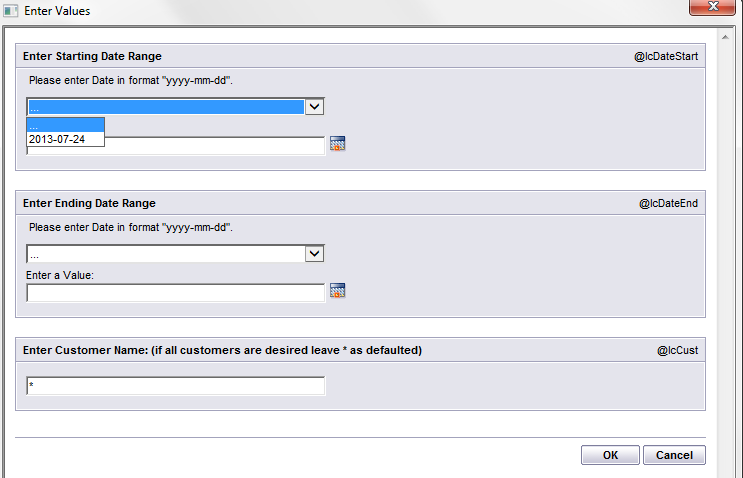
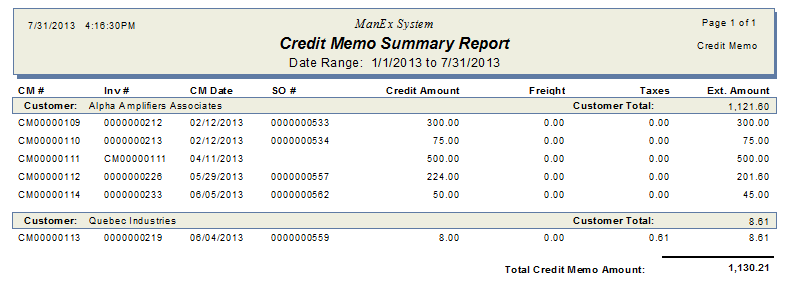
 Credit Memo Summary Report:
The following report will be displayed:
Credit Memo Register Report:
The following report will be displayed:
|
