1. Fields and Definitions for WO Traveler Setup
1.1. Header
Work Center and Activities Routing Setup Header Field Definitions
 

Class

This is the classification for the product.

Type This is the type within the classification.
Part Number Rev This is the internal part number and revision for the product.
Per Pnl/Sht

If the user wishes to move material by the panel, sheet or roll, they may select “Default to PANEL” as the method of tracking quantities in the Shop Floor Tracking Defaults setup. This requires the user to define in the product definition the number of products contained in a panel/sheet/roll. Then, if this method is chosen, the user moves panels and ManEx keeps track of the number of units .If this is the case, the field will contain the number of panels associated with the product. 

Serialize

If this box is checked, the product will be subject to serialization.

Description

This is the description of the product. 

Status

The status of the product, either Active or Inactive.

Current Work Center

The name of the Work Center highlighted.

Traveler Released  Check this box when ready to release Traveler/WO and  the date, time and users initials will be recorded at that time.   Note: Users MUST have special rights within the Security module to modify this field.  Users with “supervisor’s rights” will automatically have access.  


1.2. Work Center Tab


Fields and Definitions

ID

The ID established for the work center.

Work Center

The name of the work center.

In/Out

The indication if the work center is to be processed Inside or Outside the company.

This button allows the user to "Add" or "Delete" a Work Center to the routing for this product.

Work Center Decimal Format
If this box is checked the setup time and run time is set to decimal format (1.575 hours).  If this box is unchecked the 1.575 hours is converted to 1:34:30.000.  So with the decimal field unchecked you can put in hours, minutes, and seconds. Note:  To add Times in Routing, the run and set up times must be selected in Production Scheduling Method module.
Setup Time The set up time for the work center selected.  If there are activities present and the user adds or edits the setup time on the activity level the WC setup time will be re-calculated from the activity level. 
Run Time The unit run time for the work center selected.  If there are activities present and the user adds or edits the run time on the activity level the WC run time will be re-calculated from the activity level. 
PPM This is the number of defect opportunities that exist for an assembly in a Work Center. For more detail see Article #674
Setup Time (Total) setup time for all work centers and/or activities.
Run Time (Total) run time for all work centers and/or activities.
Depressing this button will allow the user to reorder the routing for this product.
Once the routing is set, the user may use this button to update any Work Orders which were created before the routing was entered or changed.
Starting Work Center for Tracking Serial No This field will display the name of the Work Center where Serial Number Tracking will begin, if the Serialize box is checked at the top of the screen.  NOTE:   If the starting work center is removed, when user clicks “Update WO” button, all the WC qty and SN (if any) except for FGI, RWRK, RWQC, and SCRP work centers will be moved back to STAG work center because the system will treat the STAG as the starting tracking SN work center.   
1.3. Activities Tab

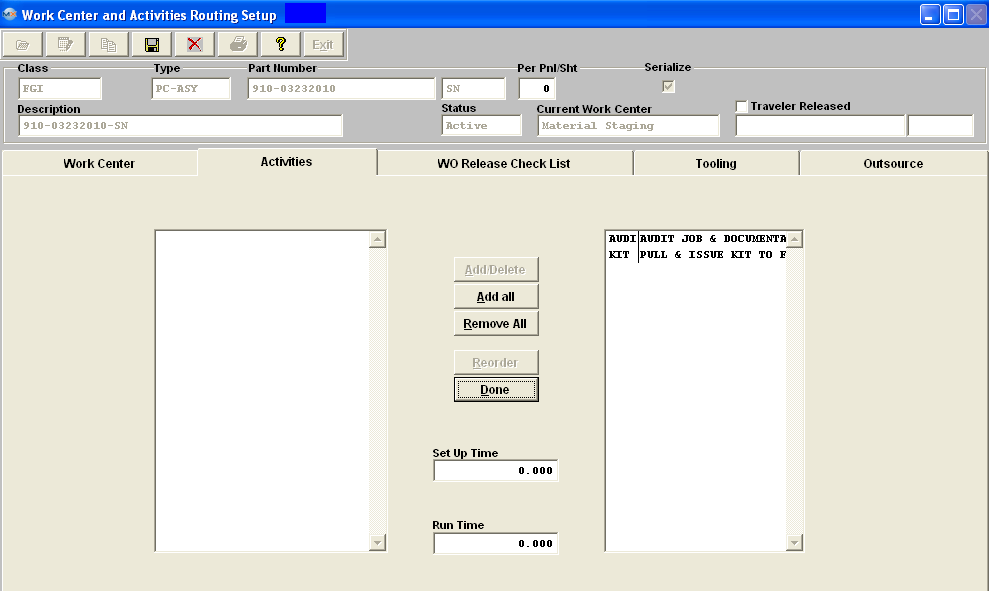
The activities tab is used to add specific activities that take place within a Work Center.  For the Work Center which is highlighted within the Current Work Center field, the Activities Tab will change to RED text if activities have been assigned to that work center.  Within the window, the 1st column is the abbreviation used for the activity and the 2nd column is the full activity for the Work Center listed. The list of activities are set up in System setup – Production Work Centers & Activities.


Fields & Definitions

Add/Delete

This button is used to add or delete activities for the Work Center listed.

Reorder

This button is used to reorder the list.

Setup Time

For the activity highlighted, this field is for the set up times.   If user enters setup time at activity level the system will accumulate the times for all the activities (for that specific work center) and assign it to the WC level and overwrite whatever number if any entered there.

Run Time For the activity highlighted, this field is for the run times.  If user enters run time at activity level the system will accumulate the times for all the activities (for that specific work center) and assign it to the WC level and overwrite whatever number if any entered there.

1.4. WO Release Check List Tab

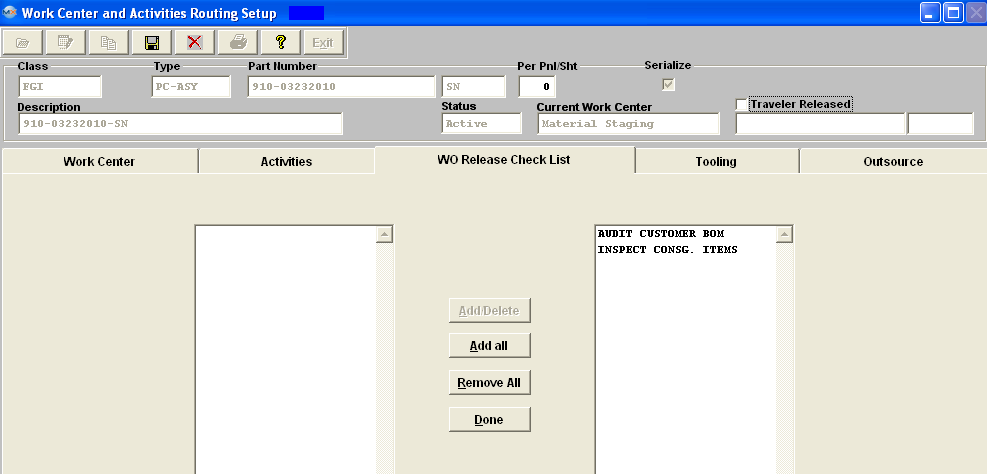
The Work Order Release Check List tab is for the user to select check list items for the Work Center listed in the Current Work Center field.  The Work Order Release Check List is set up in the Shop Floor Tracking Default set up screen.  In this module, the Check List items are selected, as detailed. Then when the user reaches the Work Order Shop Floor Tracking module, the items added in this module will be available.


Fields &  Definitions 

Add/Delete

This button allows the user to add or delete the check list items to or from the Work Center being displayed above.

Add all This button allows user to add all check list items (displayed on the right) to the current work center being displayed above. 
Remove All This button allows user  to remove all check list items (displayed on the left) from the current work center being displayed above.
Done Depress this button when you are done making changes. 

1.5. Tooling Tab

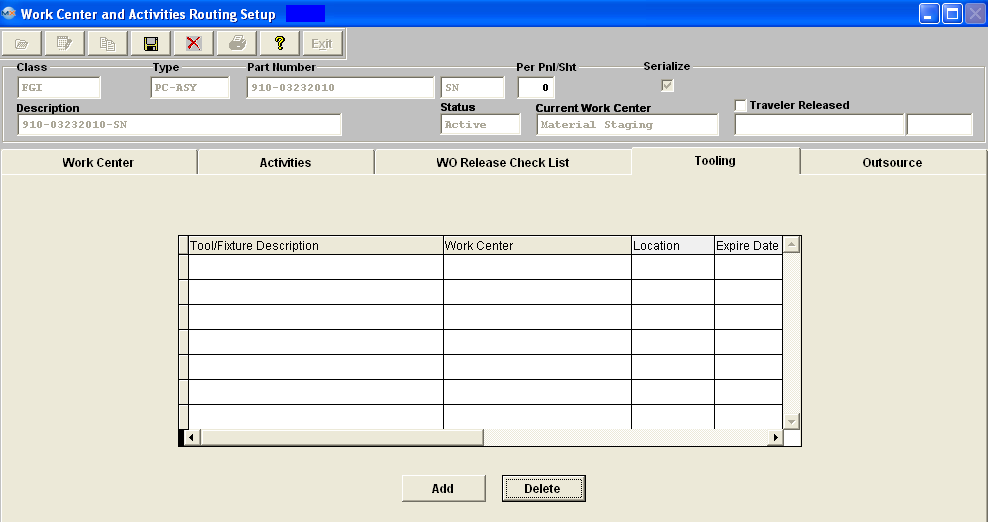
The Tooling tab is used to describe the tooling requirements for the Work Center. It also provides for a location notation and an Expire Date. An example of a Check List item as discussed above might be to perform the Work Center tooling, as detailed in this tab.


Fields & Definitions

Tool/Fixture Description 

This is the description of the Tooling item.

Work Center

This is the name of the Work Center where the tooling will take place.

Location

This is the location within the Work Center where the tooling will take place.

Expire Date

This is the date of expiration of the tooling.

add more

Checking this box allows the user to add additional tooling lines.

Add

These buttons allow the user to add, edit or delete tooling items.

Edit

The Tool/Fixture description pulldown information is setup within the System Setup/Tools Setup .  The Tooling/Fixture information can also be added, edited, or deleted from the PDM  (Product Data Management) module

Delete

To delete a line item from the Tooling Tab.  Highlight the line item.  Depress the Delete button.  Click on the second column (which is NOT labeled), the field will change to Black. Depress the Done button.

1.6. Outsource Tab

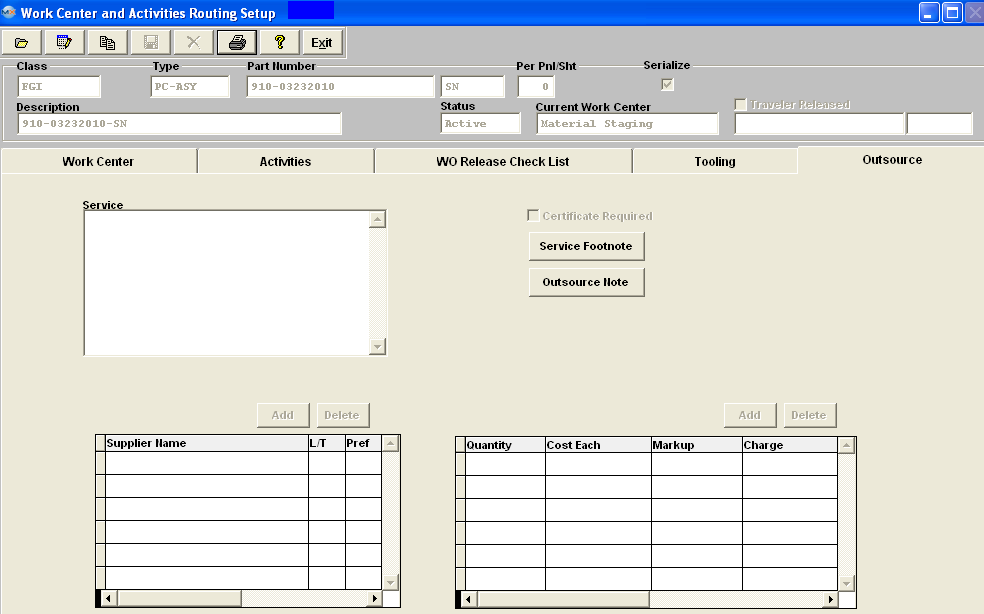
The Outsource tab shows the services to be performed outside of the user’s shop. These services are indicated with an “O” in the work center tab.

 Within the window, the 1st column is the abbreviation used for the activity and the 2nd column is the full activity for the Work Center listed. The list of activities are set up in System setup – Production Work Centers & Activities Setup.

Certificate Required This box is checked if the outsource supplier is required to provide a certificate of completion.
Service Footnote This button is for notes regarding Service. 
Outsource Note This button is for notes regarding Outsource.