| 1. Production |
| 1.1. Shop Floor Tracking by Work Order |
| 1.1.1. Prerequisties for SFT by WO | ||||||||||||
Prerequisites Required for Shop Floor Tracking:
After activation, "Work Order Shop Tracking" access for each user must be setup in the ManEx System Security module. Users with “Supervisor Rights” will automatically have access.
The SHOP FLOOR TRACKING must refer to a Work Order, which includes the part numbers and description of the product being built. Note: If the "Status" field in the Work Order is set to Manufacturing Hold, the user will NOT be able to transfer product for that Work Oder. If the “Status” field in Sales Order or RMA is set to Administrative Hold, the user may finish transfering the product, but a Packing List can not be issued. The Routing must exist for the product, which includes the work centers and activities for the product being built. Optional Prerequisites for Shop Floor Tracking:
Required if Inspection data is to be entered. Work Instructions should be established if the user wishes to utilize setup and work instructions. The System Setup must define whether or not serialization is required for the part type. User Work Shift information and Time & Attendance features must be installed before you will be able to use the “Time Log” button within the Shop Floor Tracking module. |
| 1.1.2. Introduction for SFT by WO | ||||||||||||||||||||||||||||||||||||||||||||
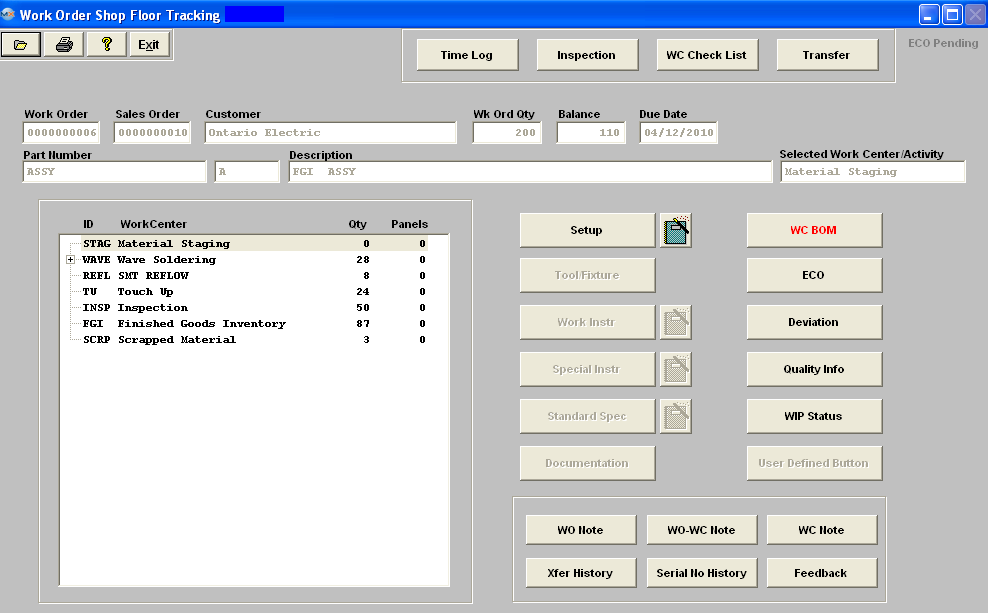
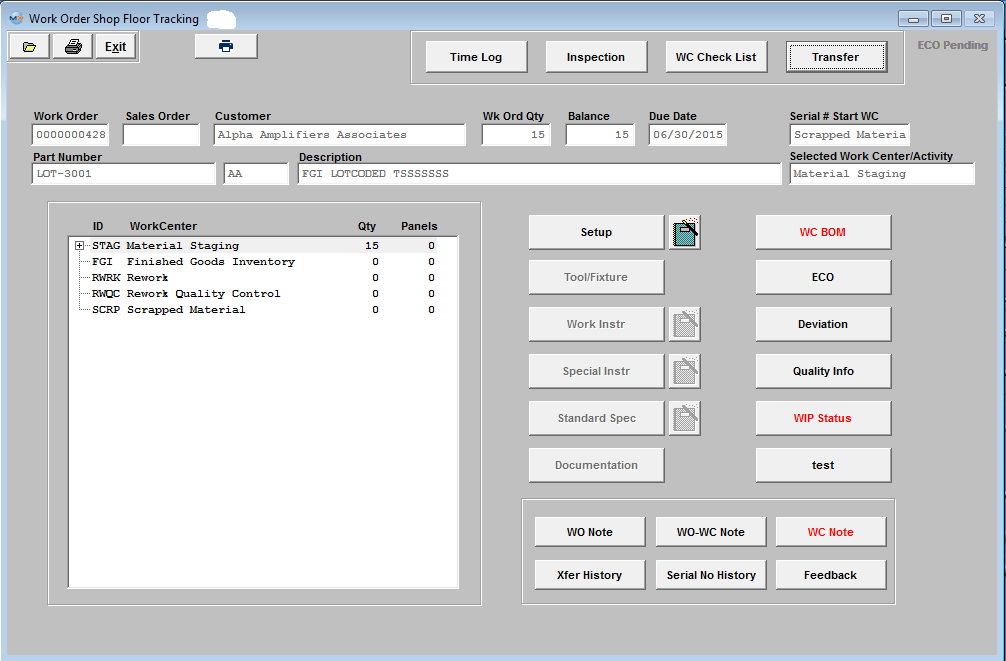
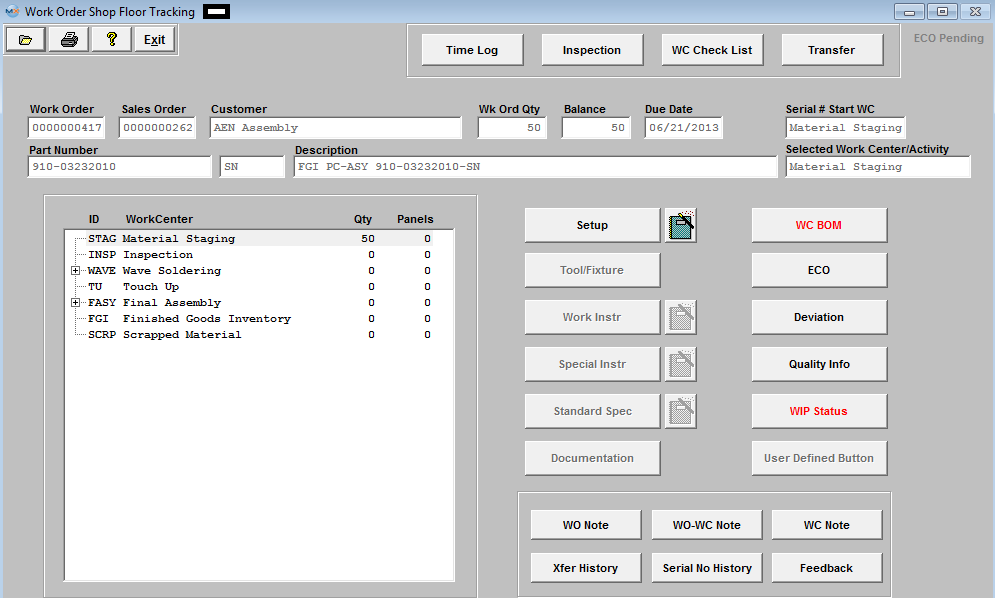
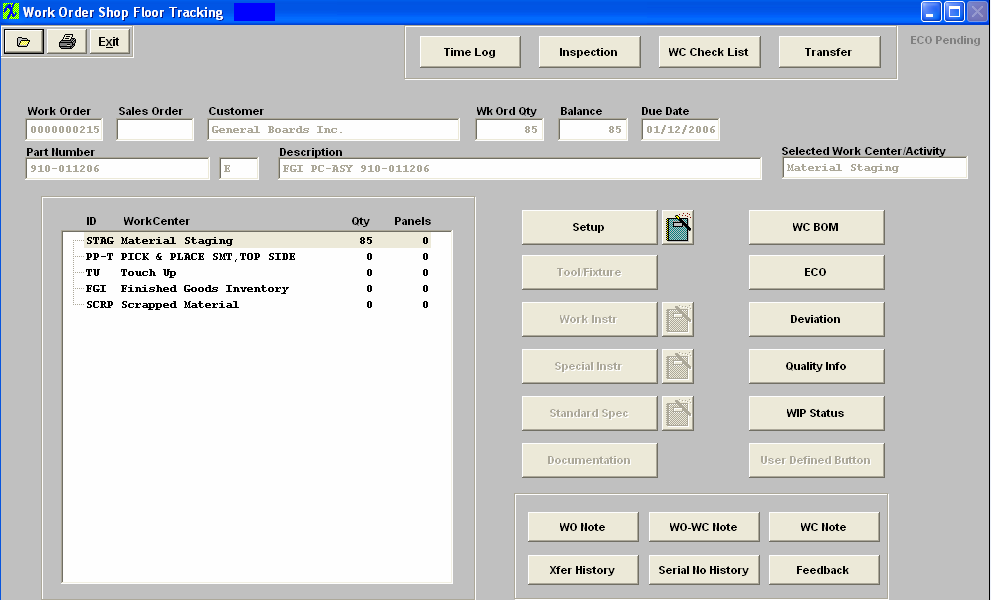
The Shop Floor Tracking Module is used to record detailed transactions of all of the user’s Work In Process (WIP) activity. This screen is a critical piece in the communication process. This allows production to update the system as products move through the shop floor. Production can add notes and indicators to identify current issues and delays. This information is readily available for program managers and others so they have important information when it is needed and without chasing it down in production. From within this module, the following functions are available, depending on the user’s configuration:
For further detail of these functions see Article #3107 . |
| 1.1.3. Fields & Definitions for SFT by WO |
| 1.1.3.1. Work Order Shop Floor Tracking | ||||||||||||||||||||||||||||
Work Order Shop Floor Tracking Fields and Definitions
See Article #3107 for the Directive Buttons fields and definitons
|
| 1.1.3.1.1. Directive Buttons | ||||||||||||||||||||||||||||||||||||||||||||
SFT by WO Directive Buttons
|


| 1.1.3.2. Transfer Screen | ||||||||||||||||||
|

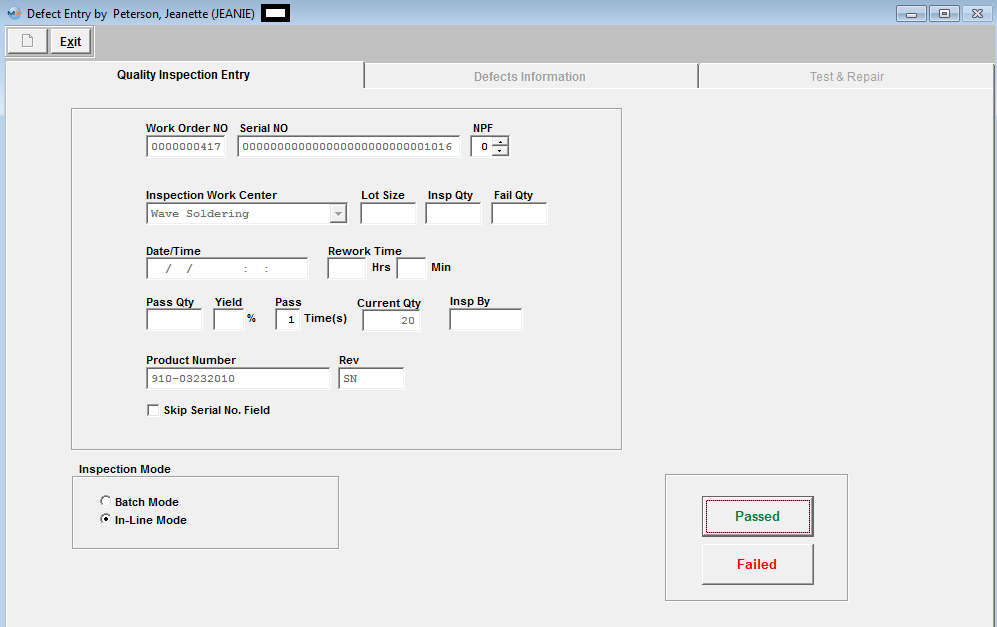
| 1.1.3.3. Quality Inspection Entry Tab | ||||||||||||||||||||||||||||||||||||||||||
Quality Inspection Entry Screen Field Definitions
|
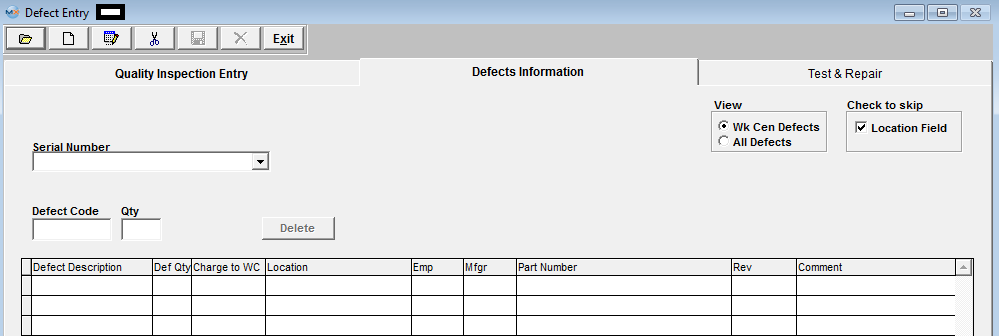
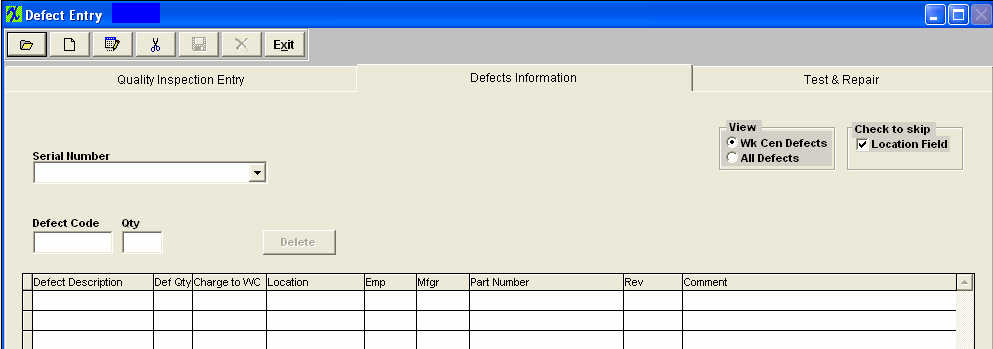
| 1.1.3.4. Defect Information Tab | ||||||||||||||||||||||||||
Defect Information Screen Field Defintions
|
| 1.1.4. How To ..... for SFT by WO |
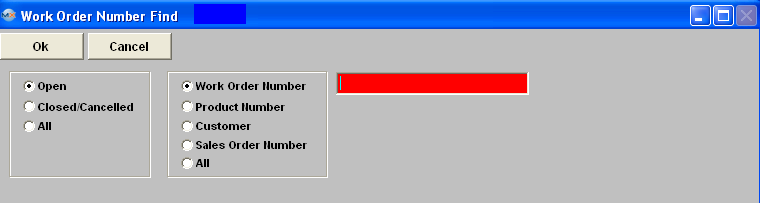
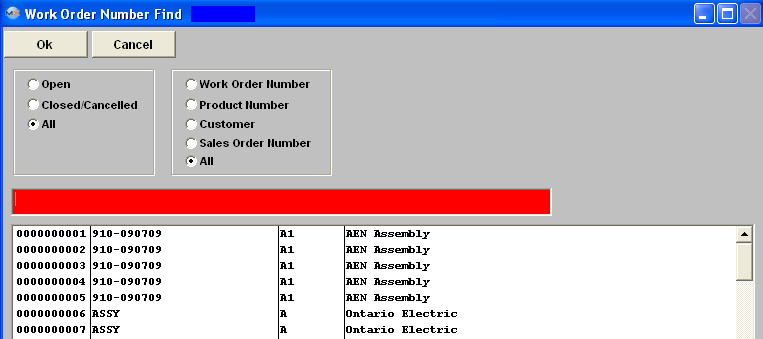
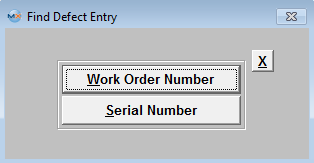
| 1.1.4.1. Finding A Work Order | ||||||||
The Main Screen will be displayed:
The Shop Floor Tracking screen is then populated with the appropriate data.
|

| 1.1.4.2. Shop Floor Tracking - Transfer | ||||||||
Find the desired Work Order record within the system. Highlight the current Work Center where quantity is displayed, as illustrated:
Depressing the Footnote button will bring up a note screen.
Depress the Edit button, Type in the footnote. Depress the Save button. Depress the Exit button.
Transferring Serialized product
If the work station being used to transfer serialized material is assigned to use a default work center in Production Work Center/Activity Setup module, when the user first opens the module, the module will use the default work center assigned for this workstation, if the transfer is "FROM" a different work center other than the default and user is NOT a supervisor or has the option "Allow Changing Default Work Center for Serial Number Transfer" box checked within the Security module, they will receive the following message:  When user depresses "OK" a supervisor approval is required to continue. After supervisor’s password is entered, the default work center will be changed to the one that the supervisor entered password for. For example: the workstation is assigned to use “TU” as default work center, now if user chooses to use “AI” to transfer, the system will ask for supervisor’s password, if user cancels the password, the default work center will still be “TU”, but if the supervisor enters his/her password on this machine, the default work center will be changed to “AI”. If now the user tried to transfer from “TU” again, the system will ask for supervisor’s password again. If user exits the module and come back, the default work center will be “TU” again.
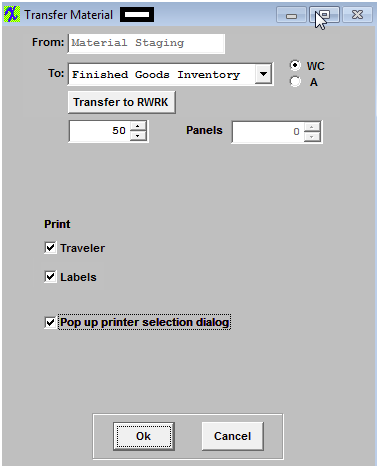
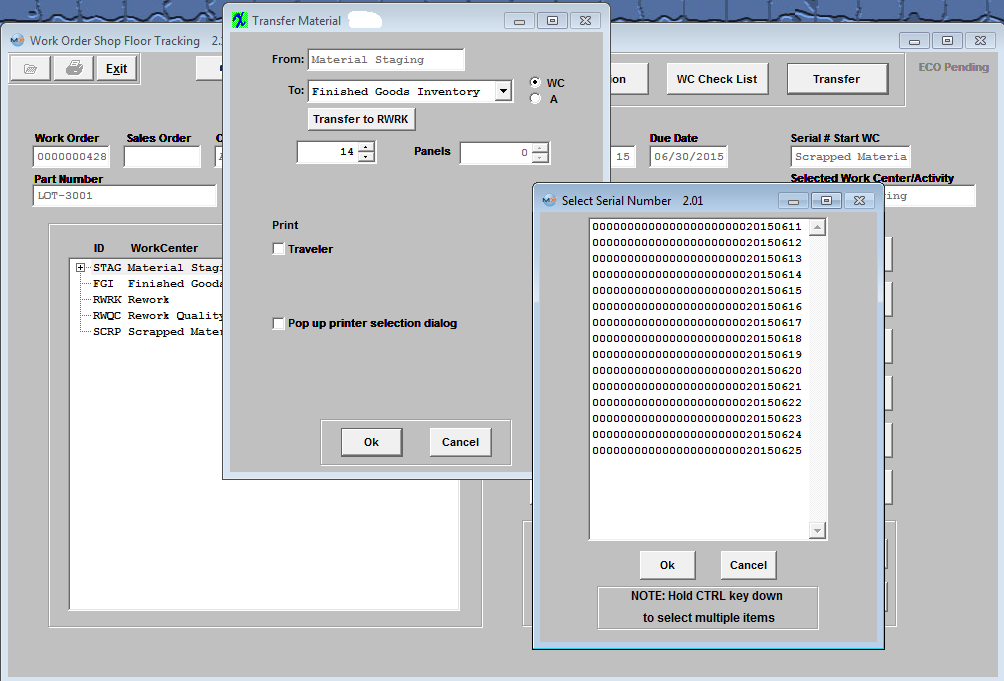
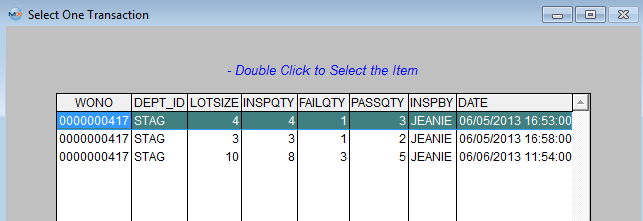
If the user is using tracking by serial numbers, and if the user is transferring a lesser quantity than displayed, ManEx will display a screen from which to select the serial number(s) to be moved in the transaction. The user may select one or more serial numbers to match the quantity being transferred, and then press the OK button. The user must select the proper number of serial numbers or the transaction will be cancelled.
Depress the OK button. The material will transfer and the Traveler will go directly to the default printer. (This report requires that the user have the bar code font available).
If the product is included in an active Cycle count, or Physical Inventory count, the following message will appear after depressing the OK button on the transfer screen anud user will not be allowed to transfer product until the count has been completed and posted.  Discussion on the Accounting Entries If the user also has accounting installed, then the appropriate journal entries will forward to the Accounting “Release to General Ledger” screen. Briefly, assuming that the user has the material cost set up in the Inventory Control Item master, then when the product reaches the Work Center “Finished Goods Inventory”, the entry will be to debit Finished Goods Inventory (or the warehouse home general ledger number of the product) and to credit WIP .If the product ended up in the Work Station “Scrap”, then the debit would be to the default scrap general ledger account, as set up in the Accounting Set Up. Configuration Variance If the Material Cost per the product was not equal to the sum of the standard costs per the BOM components, then a configuration variance will be created. Please refer to the “Wip Value" Article #913 for further explanation. |

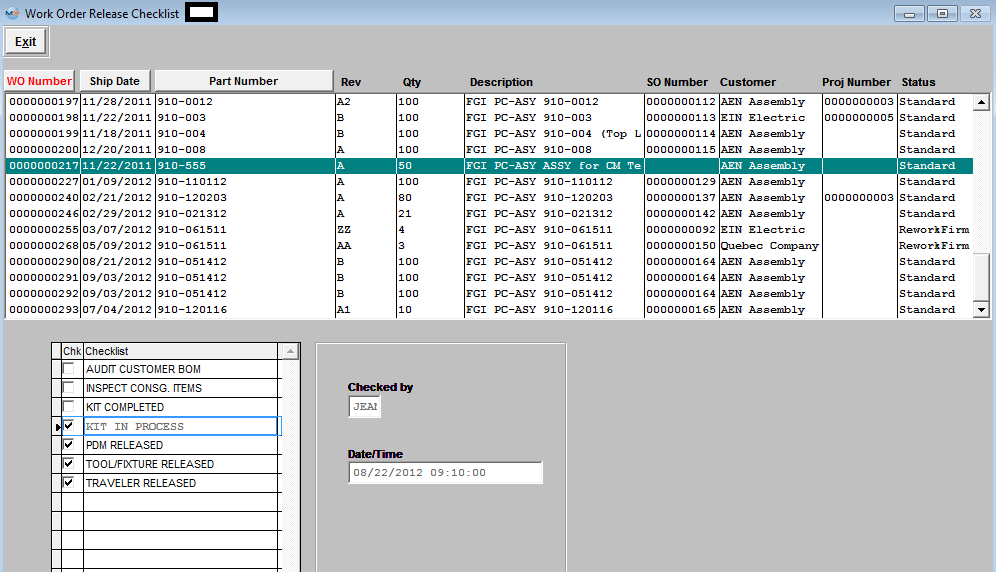
| 1.1.4.3. Use Work Center CheckList within SFT Module |
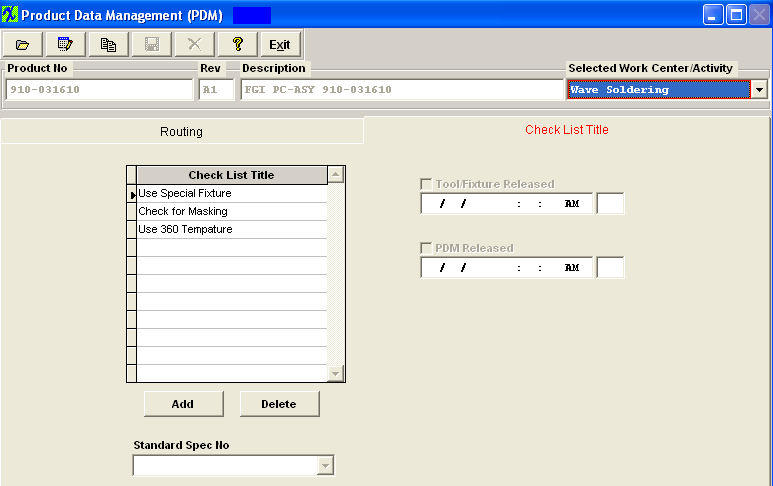
Create a Routing within the Work Order Traveler Setup module for Product. For further detail see Article #4246  Create a Checklist for a Specific WC within the PDM module. For further detail see Article #4584 .
 Create a Work Order for the product within the Work Order module. For further detail see Article #4236.
 The Traveler Released box within the WO Traveler Setup MUST be checked.
The Tool/Fixture Released box and the PDM Released box within the PDM module MUST be checked.
The kit must be Released and the Kit Complete box within the Kitting module MUST be checked.
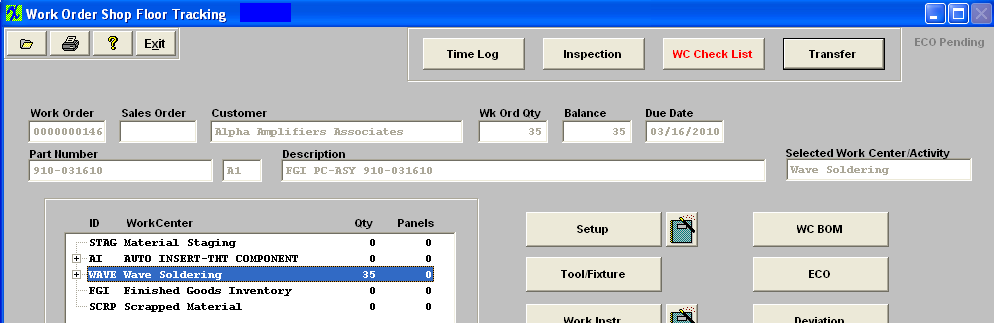
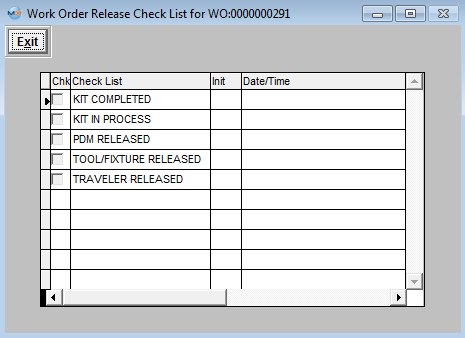
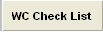
Transfer product through SFT when product reaches the Work Center with the checklist the "WC Check List" button will be displayed in Red (as displayed below).
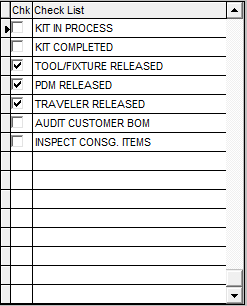
 Click on the "WC Check List" button and the check list will appear (as displayed below):
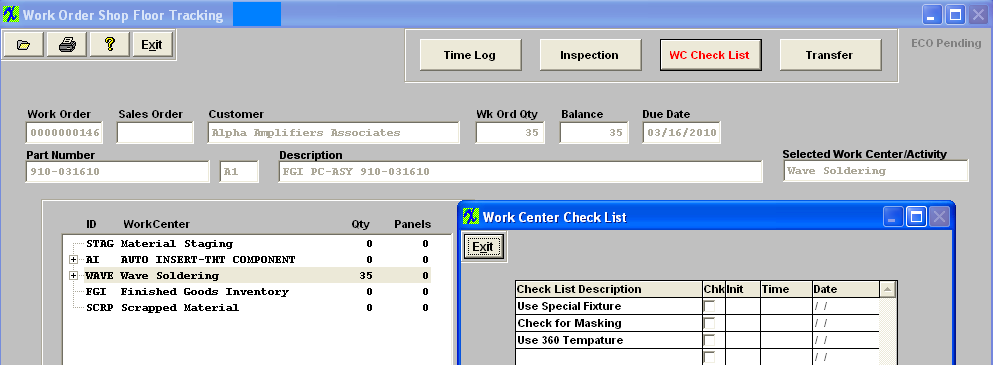 User must then review the list and check the box when task has been completed and their initials, time and date will default in (as displayed below): Note: This check List is for reference only and WILL allow the users to transfer product to the next Work Center if not all items have been checked off.
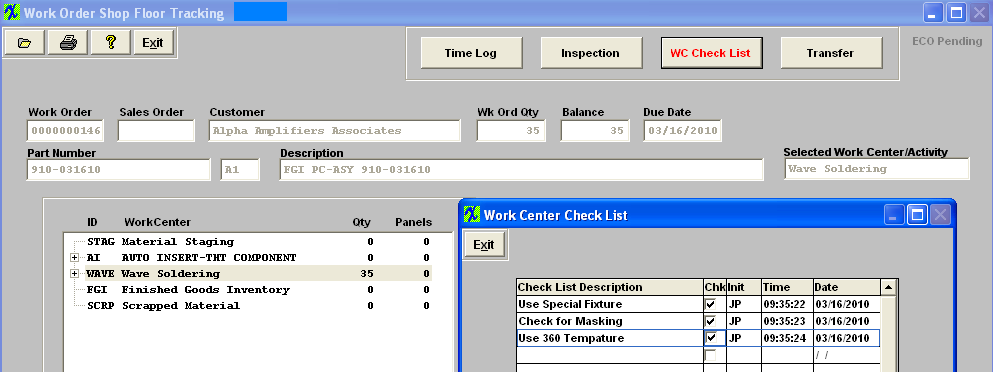 Once all the boxes have been checked within the Work Center CheckList user may complete the transfers. Note: This checklist is for users to check if they do all the necessary task, but it does NOT enforce the user to check all items before the user can transfter to next WC.
|
| 1.1.4.4. Enter the Defect Data Information | ||||
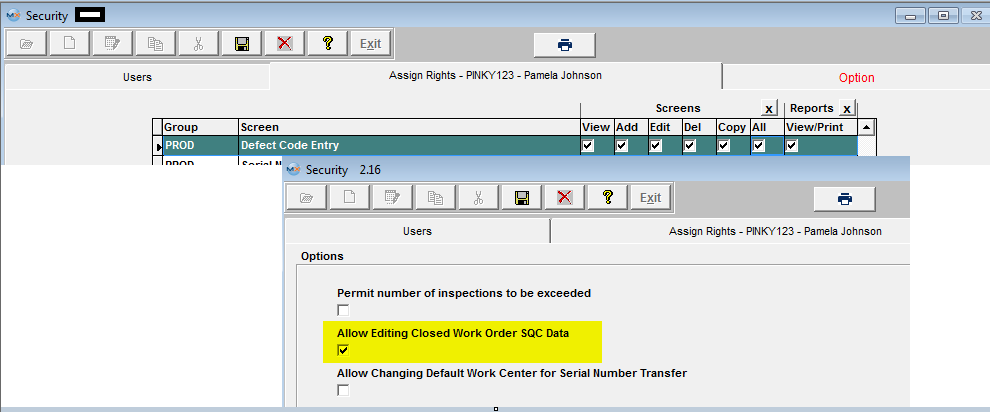
Entering a Defect Code Entry to a Work Order For closed Work Orders: In the Security module, there is an option which must be checked per user for the “Defect Code Entry”. Once the Security right has been entered, the user may edit a “closed” Work Order.
The following screen will be displayed:
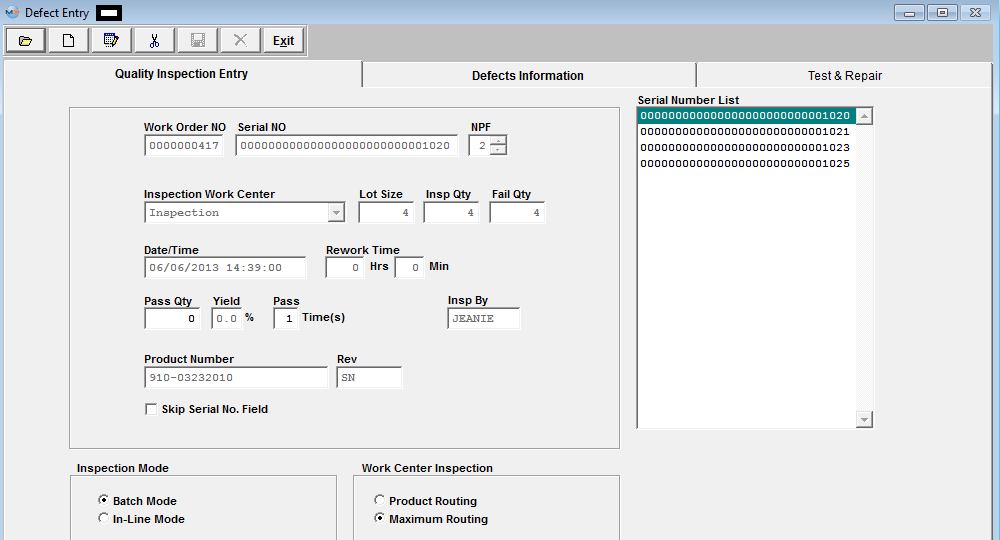
Depress the "Inspection" button located at the top of the screen. The screen below will be displayed: The first screen presented to the user will display all the defaults that are selected in the system setup/Quality Defect Codes, for Inspection Mode - the user has selected to enter defect information in BATCH or IN-LINE mode, for the Work Center Inspection the user has selected to display either Product or Maximum Routing . The user may change these selection if they choose to do so. Batch mode is used for entering data previously recorded during inspection of the product. When the user chooses to enter defect data in “In-Line” mode with the serial number, the user won’t be able to enter “lot quantity”, “inspection quantity” or “failed quantity”. These fields are all defaulted in when the user goes into the “Defects Information” tab. However, if the user enters defect data in “batch” mode without the serial number, then the user will be able to enter “lot quantity”, “inspection quantity” and “failed quantity”. If the user wishes to 100% inspect material, and directly move the passed material to the next routing work center, then the In-Line Inspection mode may be used. The user has the ability to limit some workstations (specific PCs) (which is defined in the Security Module) to be able to only transfer material “FROM” a certain Work Center. When the user transfers material from a Work Center (A Serialized part Number Only) in the Defect Code Entry In-Line Mode, the system will check to see if the serial number is currently in the Work Center. If not, a special supervisor’s password is required to transfer the serial number FROM a different Work Center. After the supervisor’s password is entered, the system will use the new Work Center to be the default FROM Work Center until the user closes the screen. The next time the user opens the screen, the default FROM Work Center will be changed back to the one defined in the Security Module.
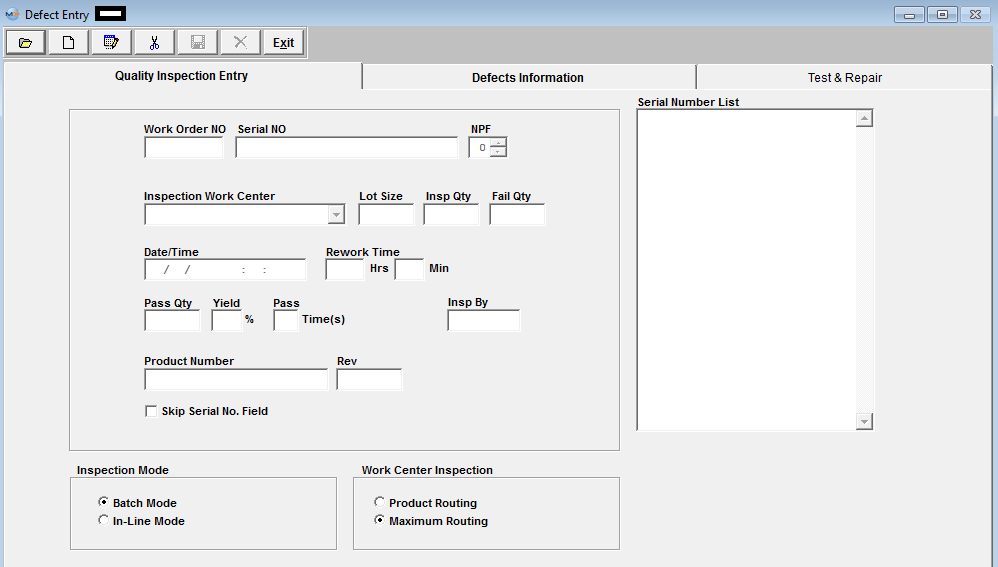
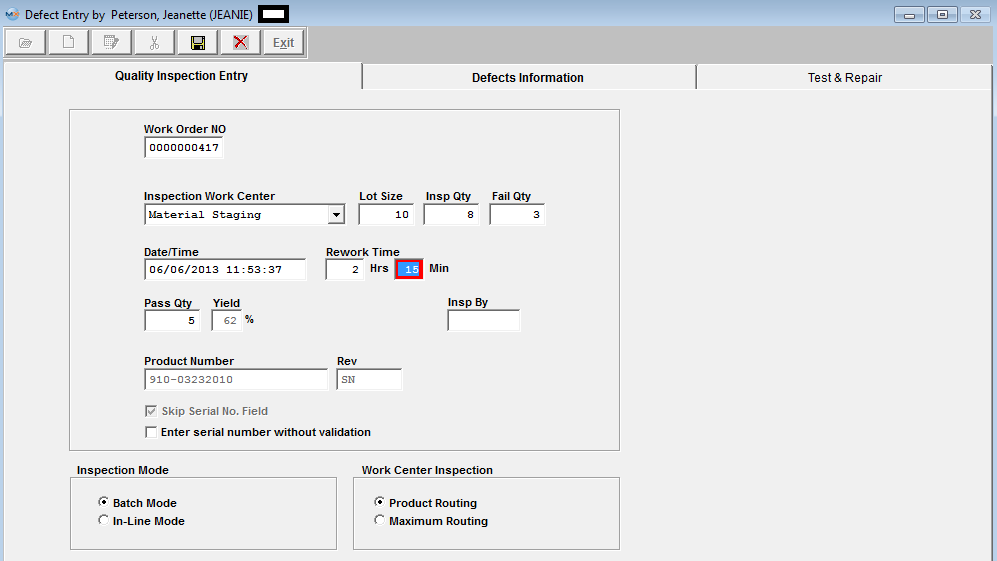
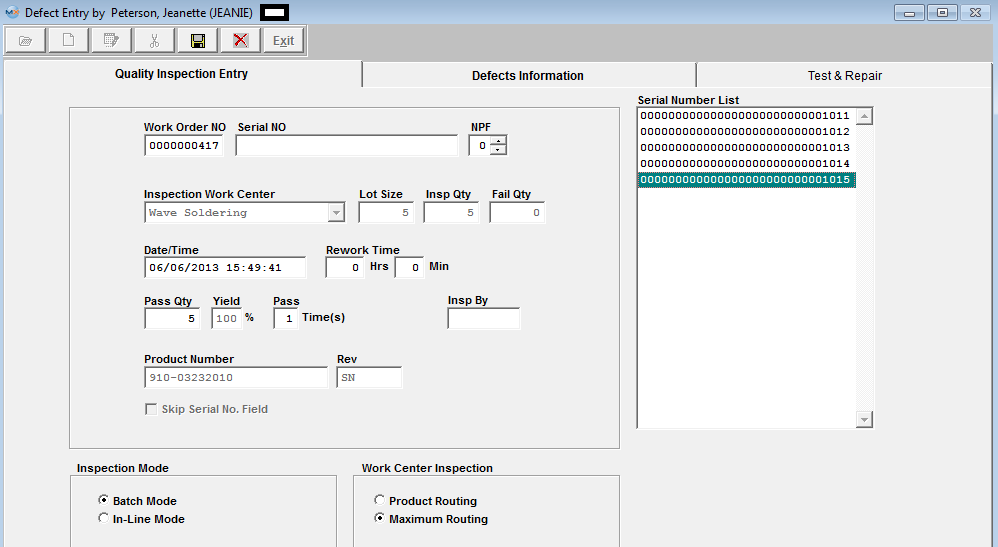
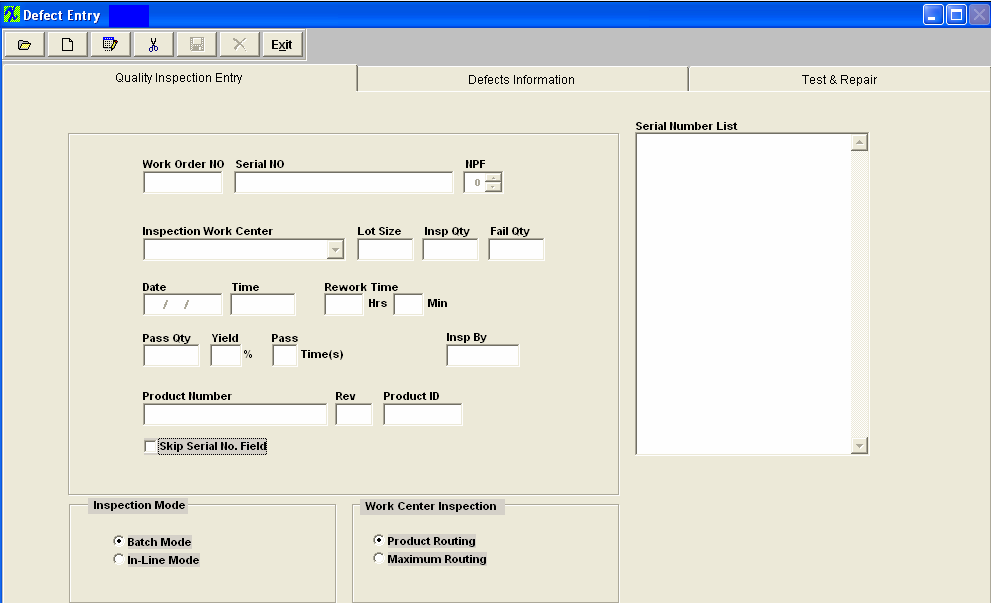
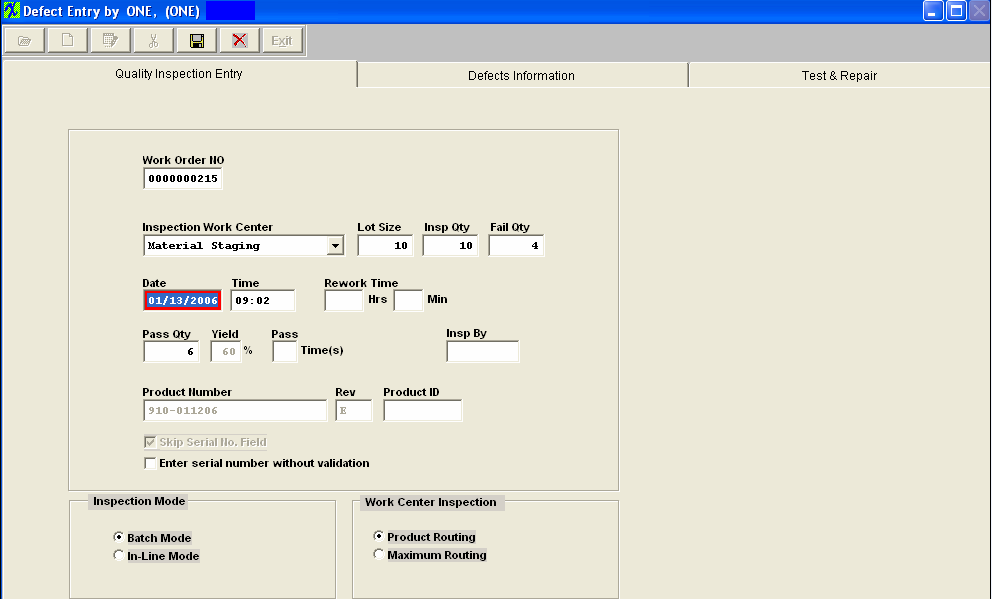
Entering Quality Inspection Data There are two different ways to enter the Inspection Data: Batch Mode or In-Line Mode Batch Mode The first information tab records information about the work order. This includes lot size, failures, inspection quality, date, etc. Depress the Add action button. Enter the password of the Employee that has inspected the product. When the user first brings up the Defect Entry program, and before entering or editing data, they have the option to check or uncheck the “Skip Serial No. Field”. Once the data entry process is begun, the option is cleared until the user exits the defect entry form and re-enters it. Adding Work Order Defect Information Without Serial Number Tracking Enter the Work Order number, select the Inspection Work Center from the pull down, enter Lot Size inspected, Inspected Qty, and Failed Qty. The Date, Time, Pass Qty, and Yeild % will default in. The date and time may be changed if needed. The user may enter estimated rework time, if desired.
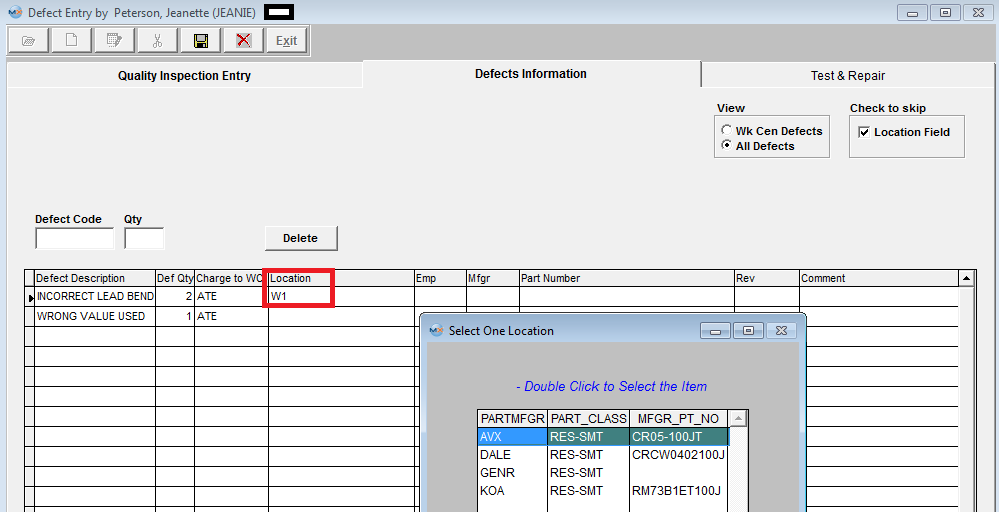
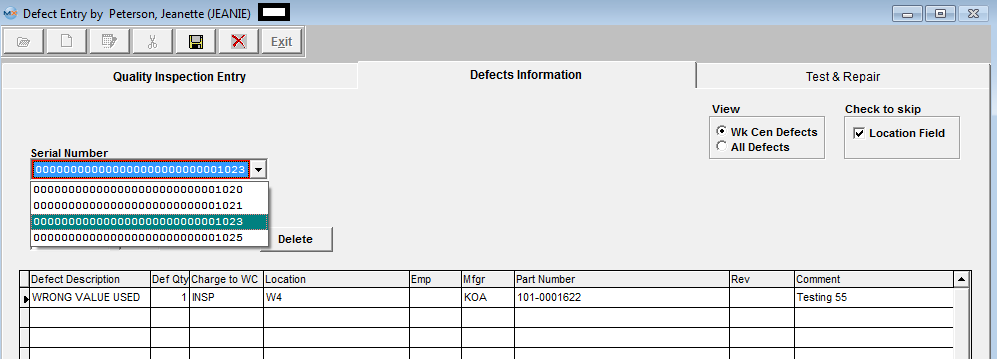
Depress the Defects Information tab and the following screen will appear:
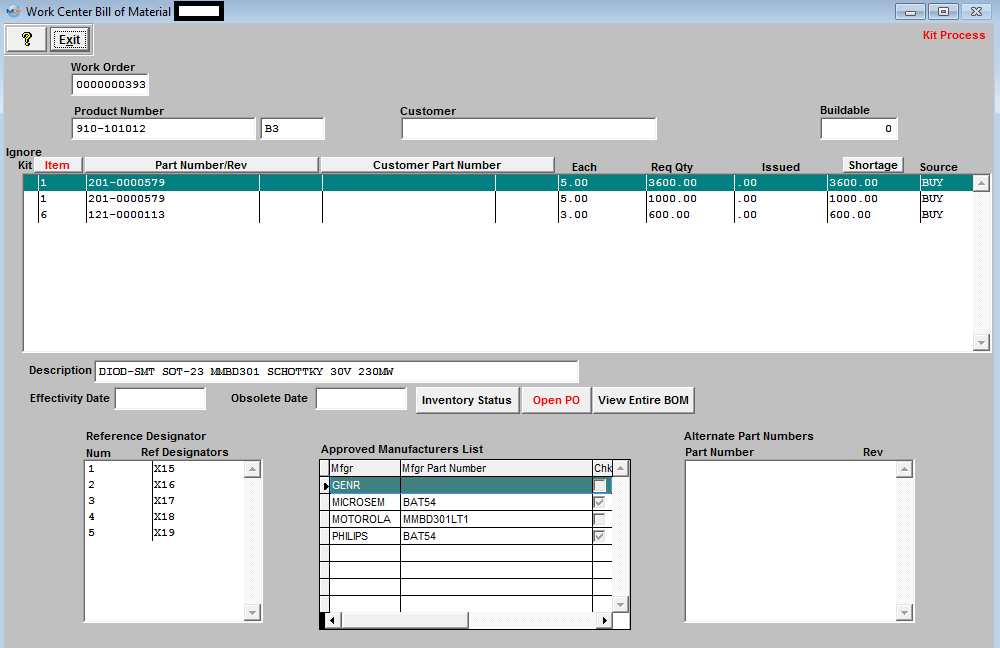
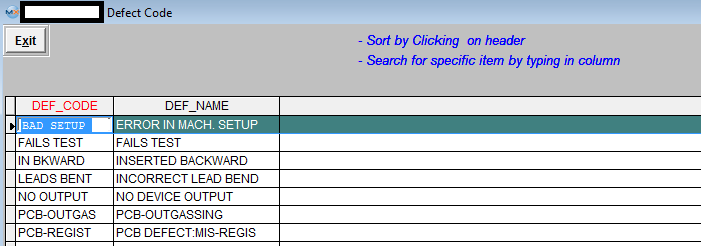
The user may then enter a defect code by manually typing in the code, or by scanning a bar-code menu, or by double clicking on the field to review a list of defect codes. ManEx defaults the number of defects to one item, but the user may overwrite the quantity with an observed quantity greater than one. The list displayed will depend on which view is selected (in upper right hand corner of screen). If Work Center Defects is chosen, only those defects associated with the work center (as established in the system setup/Quality Defect Codes) will be displayed. If All Defects is chosen, then every defect entered in the system setup/Quality Defect Codes will be displayed. The user may select one or more defects from the list by holding down the Control Key while clicking on the defects to be selected. After completing the selection of the defects involved with the current inspection, clicking on the OK button loads the selected defects into the defect information screen. Although ManEx will enter a Charge To Work Center code based on the work center entered or the location of the part, the user may modify the originating work center by clicking on the field and selecting another work center from the list. The user may (optionally) then enter in the location (reference designator) where the defect was observed. The system will check the BOM to be sure that the location entered here matches locations entered on the Bill of Materials. When a valid location is entered, then system searches the Bill of Material to find manufacturers approved for the product, and displays a list of the approved manufacturers for the user to identify which manufacturer was associated with the defect observed. The user double-clicks on the manufacturer's name for the defective part, and the manufacturers name is placed in the defect information screen. (Note: the location field MUST be populated if using the Test and repair module)
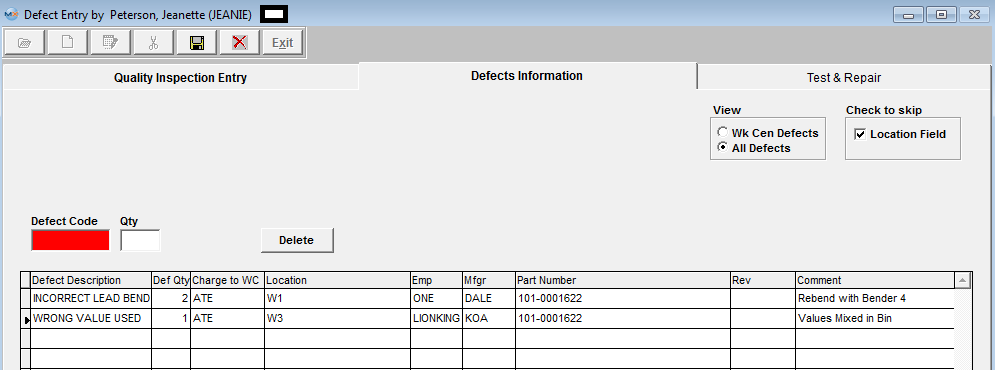
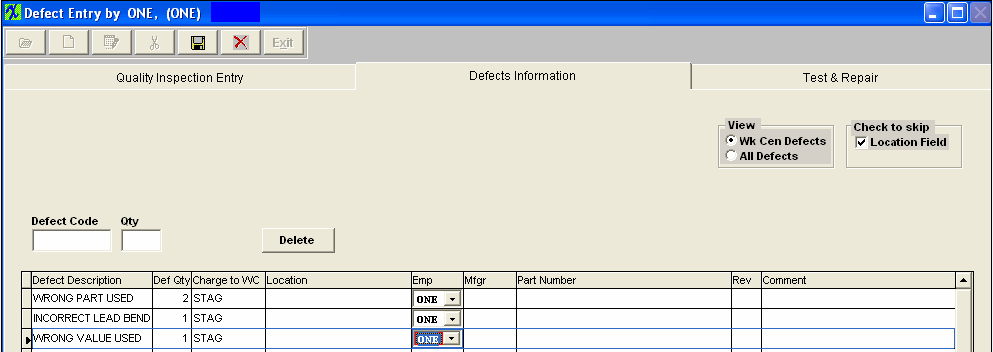
The user then must select an Employee from the pull down. The employee's being displayed in the pull down are only the employee's that are assigned to work centers (in the Security module) that are the same work centers listed in the Shop Floor Tracking by Work Order module and is sorted by the Employee User ID Number.
 The user may also enter a brief comment about the defect, for future reference.
The completed screen should appear as follows:
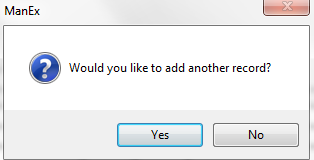
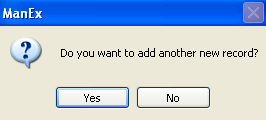
Depress the Save record action button to save changes or the Abandon changes action button to abandon changes. If you depress the Save record action button, the following message will be displayed:
If you want to add another defect record for the same user "ONE" then depress YES, if you want to add a defect record for a different user (Example user "TWO"), then you must depress NO. Depress the Add record action button and enter user "TWO"s password and continue to enter the defect information. When the user has completed the defect information, they may click on the Test & Repair tab, to enter more information about the part.
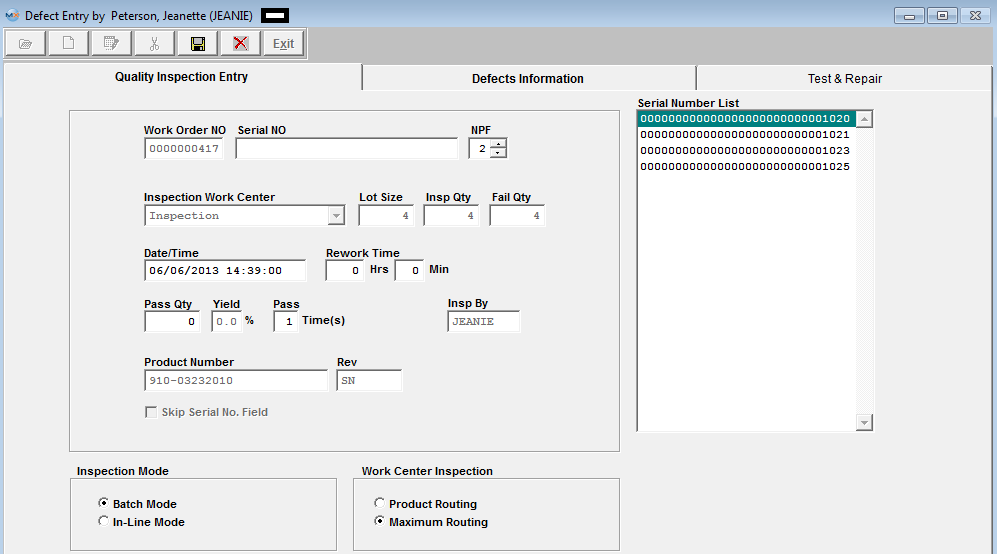
NOTE: The Test & Repair is actually a separate OPTIONAL module, but has been included into the Defect Entry screen for ease of use for the operators. For further detail about this module see Article #4211.. Adding Work Order Defect Information With Serial Number Tracking Enter the Defect Entry screen. Depress the Add Record action button. Un-check the "Skip Serial No Field" If the user is tracking serial numbers, then the first field to be entered (or bar-code scanned) is the serial number of the product being inspected. (Not the Work Order number).
Enter in a serial number. When the serial number has been entered, ManEx will complete the work order and product information. ManEx will also enter the current work center location of the serial number supplied. The user now has the option of continuing to scan (or type) serial numbers, and log the defect information for each one later, or enter a serial number then the defects for that serial number, enter the next serial number, then the defects for the second serial number, etc. When multiple serial numbers have been entered, the data will refer to the serial number that is highlighted in the Serial Number list. ManEx will enter in the lot size according to the quantity of serial numbers showing in the serial number list.
Go to the Defects Information Tab to enter in the Defect info for each SN entered:
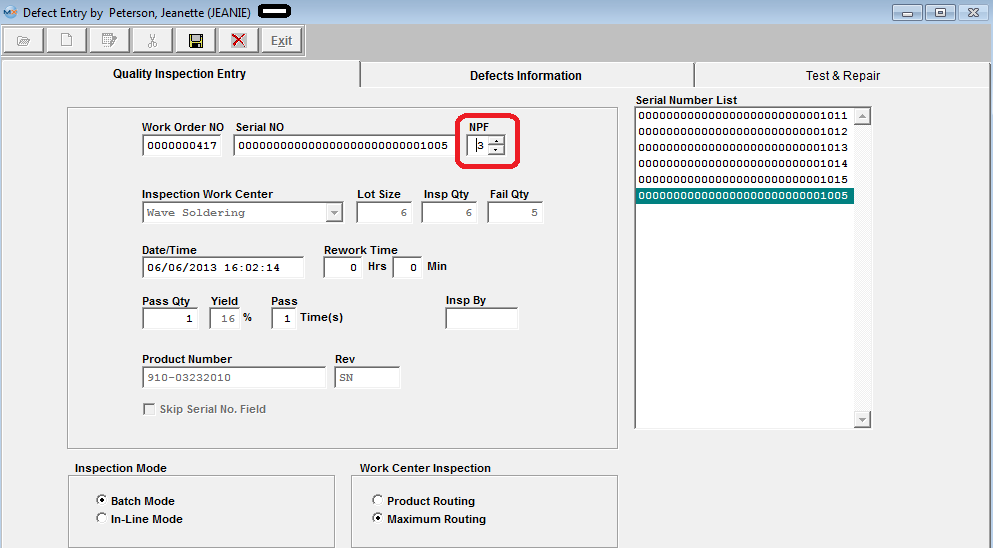
The next field, “NPF” is provided for the user to record when observing the product and finding that there is “No Problem Found”. If the serial number had previously been rejected, and analysis of the product yield no further problem, either with cosmetics or function, then the user may change this number to 1, meaning the first time it was inspected or tested, no problem was found. If the product serial number is subsequently rejected again, and a second inspection finds no problem, the number may be incremented to a “2”. This will alert users to repeated rejections of a product serial number, one or more times with no discernable defects.
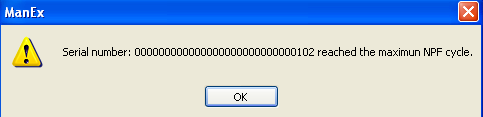
If the number of times that a part has experienced an NPF exceeds that established in the system setup/Quality Defect Codes the user will receive the displayed warning message and will allow you to proceed on with the Inspection. This is just a notification that the board has passed the maximum NPF cycle.
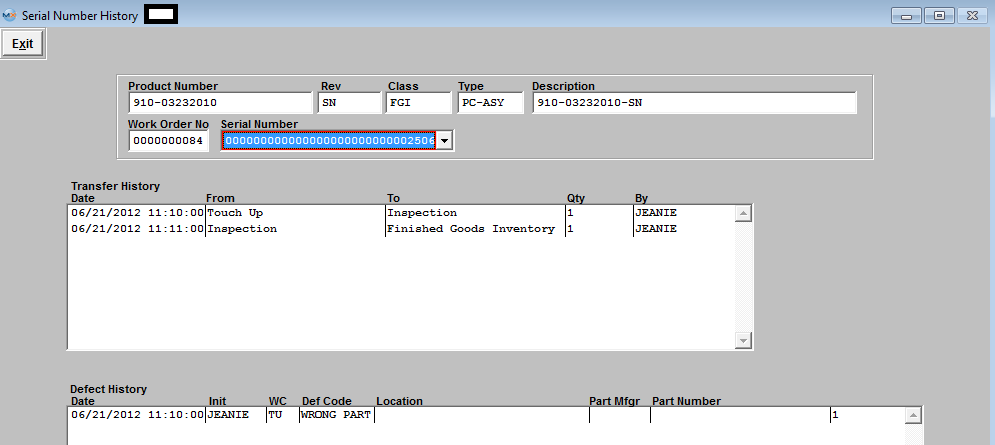
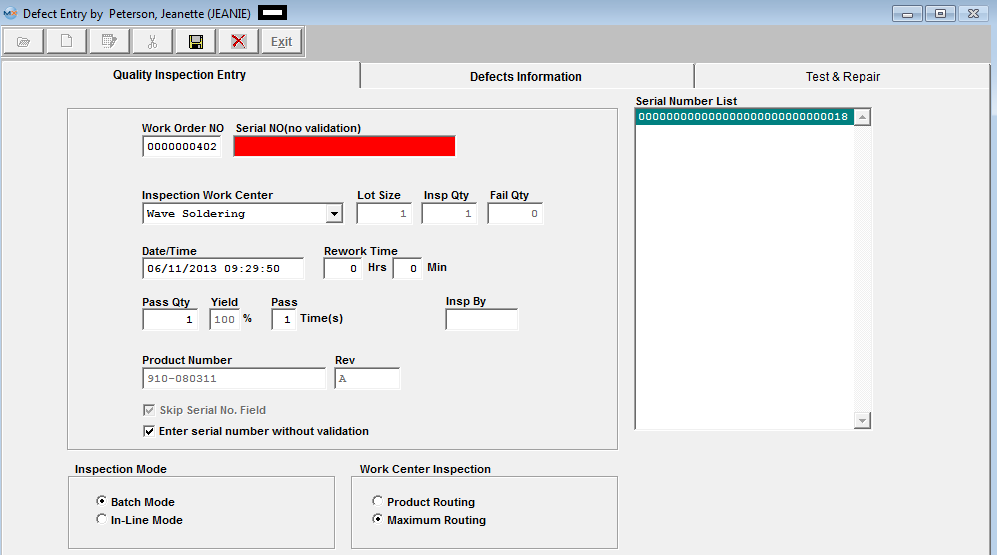
Entering Defect Information This screen operates as described under Entering Defect Information without serial numbers, except that the user must enter data for each serial number recorded. The serial number may be chosen by highlighting the serial number in the serial number box on the first screen, or in the defects information screen, by pressing the down arrow button next to the serial number field and selecting a serial number. Defect information is entered in the same fashion as described above, except that the user should remember that the data being entered is for one part at a time, by serial number of the part. The other difference in using serial number defect tracking is that on the Test & Repair screen, the user may view the Serial Number History tab. This view will display both the transfer history of the serial number through the work centers, and the history of defects associated with the serial number of the product. (Note: if you are entering Defect information and not using the Serial No, then this screen will remain blank) The user completes the defect entry for the first defect code (The location, quantity of defects observed, etc.). The process is repeated for each defect observed, storing the location and serial number to be analyzed at a later time. At the conclusion of defect entries for the lot, the Save action button is pressed to retain the data. If the user elects to ignore all data entered in this session, the Abandon changes action button may be clicked to void any entries. Notice that ManEx computes the total number of defects observed for the defect code and displays the number next to the defect code. Entering Defect Information Without Serial Number Validation The “Enter Serial Number without Vailidation” option will only be enabled if the user skips the regular Serial number entry, and if the Work Order Product has not been serialized within the ManEx system. This feature has been added to allow the users the ability to inspect Serial Numbers that do not actually exist within the ManEx system. (for example serial number created outside of ManEx, by customer or other software, etc. . .) If the user checks the “Enter serial number without validation” then ManEx does not validate when the users enters the Serial Number. The system just records the entry for later SQC analysis purpose. Enter the Defect Entry screen. Depress the Add Record action button. Select “Enter Serial Number without Validation. ” Enter the Work Order number, and the desired Custom Serial Number(s).
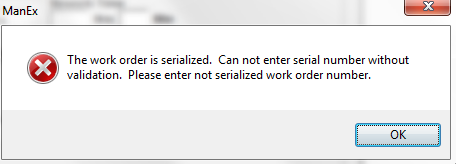
If the Work Order Product is serialized user will receive the following message:
  The remaining process will then be the same as listed above.
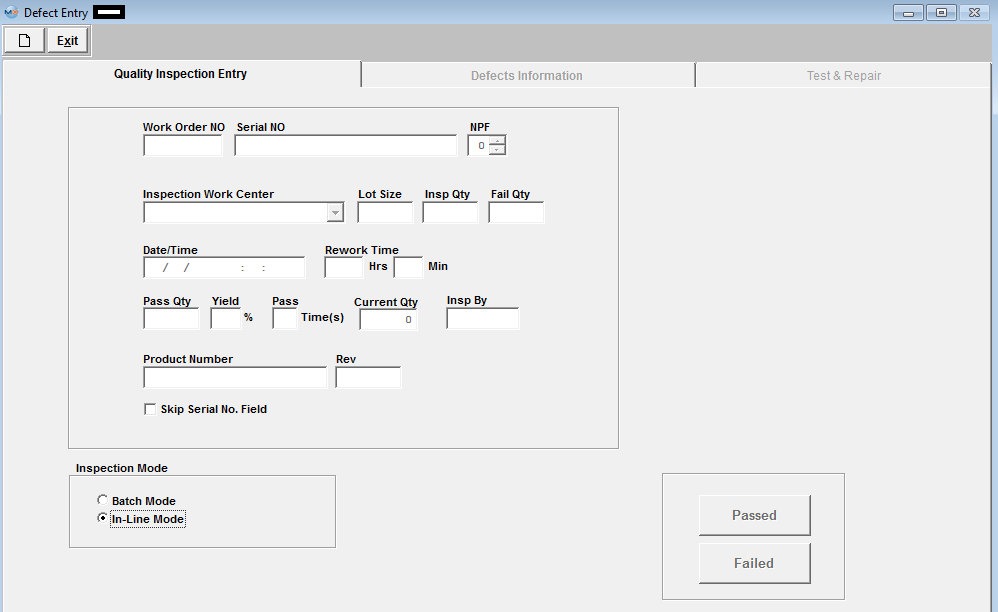
In-Line Mode When the user chooses In-Line inspection, either by setting it as the default in the Quality Defect Setup, or by selecting In-Line on the initial Quality Inspection Entry screen. The first information tab records information about the work order. This includes lot size, failures, inspection quantity, date, etc.
Depress the Add action button. Enter the password of the Employee that has inspected the product. Check the Skip Serial No. Field (if not applicable). Enter the Work Order number, select the Inspection Work Center from the pull down. The Product Number, Revision and Current Qty will default in. Then the Passed and Failed buttons are active. The user then clicks on either of these two buttons to proceed with the inspection.
Clicking on the Passed button transfers the serial number to the next work center (based on the product routing), and increments the lot inspection information by one and records the date time and inspector. Clicking on the Failed button activates the Defect Information Entry screen for the user to record his/her observations. Defect information is entered in the same fashion as described above, based on with or without serial numbers. When the user has completed the defect information, may click on the Test & Repair page, to enter more information about the part. The Test & Repair is actually a separate OPTIONAL module, but has been included into the Defect Entry screen for ease of use for the operators. Please see the Test & Repair article for further detail.
Edit Work Order Defect Information After a work order has been found or entered, it may be edited by selecting the Edit record action button. After selecting the transaction, the user may edit fields as described above in entering data.
|


| 1.1.4.5. Enter the Defect Data Information for the DPMO by Employee Report | ||||
In order to have the "DPMO by Employee" report create valid data, the user must be sure to enter the opportunities for defects (PPM) in the Work Order Traveler Setup and the employee must inspect the board and be assigned to the defects. The "DPMO by Employee" report only gathers data if BOTH "Inspected By" and "Emp" are the same user, and the PPM is setup. See Article #3156 for further detail on DPMO. The following steps need to be followed to collect and track defects per employee. All data must be Entered in the Quality Inspection Entry and Defect Information screens, with in the Shop Floor Tracking Module. Entering a Defect Code Entry to a Work Order for the "DPMO by Employee" report
Depress the "Inspection" button located at the top of the screen. The following screen will appear:
Entering Quality Inspection Data The first information tab records information about the work order. This includes lot size, failures, inspection quality, date, etc. Depress the Add action button. Enter the password of the Employee that has inspected the product and will be assigned to the defects. Example: If user "ONE" is going to be assigned to the defect(s) then you must enter user "ONE"'s password. Check the Skip Serial No. Field (if not applicable). Enter the Work Order number, choose the Inspection Work Center from the pulldown, enter Lot Size inspected, Inspected Qty, and Failed Qty. The Date, Time, Pass Qty, and Yeild % will default in.
Depress the Defects Information tab and the following screen will appear:
The user may then enter a defect code by manually typing in the code, or by scanning a bar-code menu, or by double clicking on the field to review a list of defect codes. The list displayed will depend on which view is selected. If Work Center Defects is chosen, only those defects associated with the work center (as established in the Quality Defect Codes setup) will be displayed. If All Defects is chosen, then every defect entered in the Quality Defect Codes setup will be displayed. The user may select one or more defects from the list by holding down the Control Key while clicking on the defects to be selected. After completing the selection of the defects involved with the current inspection, clicking on the OK button loads the selected defects into the defect information screen. Although Manex will enter a Charge To Work Center code based on the work center entered or the location of the part, the user may modify the originating work center by clicking on the field and selecting another work center from the list. The user may (optionally) then enter in the location (reference designator) where the defect was observed. The user then must choose the Emp from the pull down, which would be "ONE", because it needs to be the same user that has been entered in the "Inspected By". The user is allowed to enter other user's name on Defect detail page in the "Emp" column. But when the "DPMO by Employee" report is run, it will not display the records assigned to the different users. The system will check the BOM to be sure that the location entered here matches locations entered on the Bill of Materials. When a valid location is entered, then system searches the Bill of Material to find manufacturers approved for the product, and displays a list of the approved manufacturers for the user to identify which manufacturer was associated with the defect observed. The user double-clicks on the manufacturer's name for the defective part, and the manufacturers name is placed in the defect information screen. Manex defaults the number of defects to one item, but the user may overwrite the quantity with an observed quantity greater than one. The user may also enter a brief comment about the defect, for future reference. The completed screen should appear as follows:
Depress the Save record action button to save changes or the Abandon changes action button to abandon changes. If you depress the Save record action button, the following message will appear:
If you want to add another defect record for the same user "ONE" then depress YES, if you want to add a defect record for a different user (Example user "TWO"), then you must depress NO. Depress the Add record action button and enter user "TWO"s password and continue to enter the defect information. When the user has completed the defect information, he/she may review the "DPMO by Employee" report Article #815, or may click on the Test & Repair page, to enter more information about the part. The Test & Repair is actually a separate OPTIONAL module, but has been included into the Defect Entry screen for ease of use for the operators. Please see the Test & Repair Management (T&R) article for more information.
|
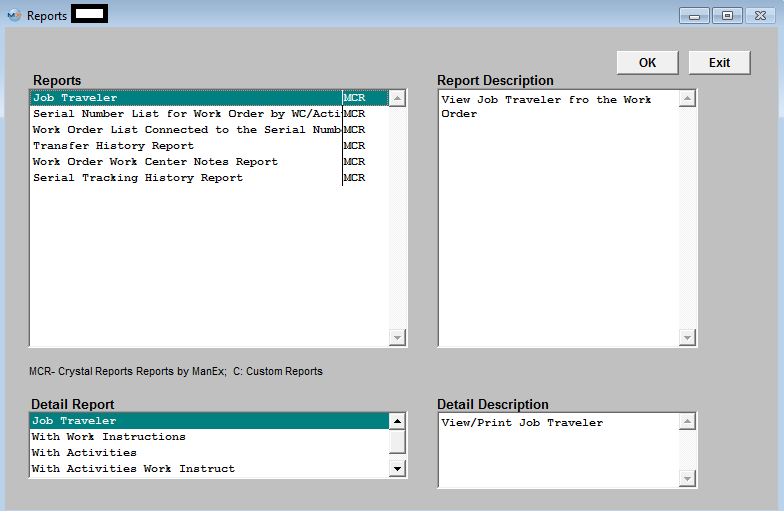
| 1.1.5. Reports - SFT by WO | ||||||||||||||
|
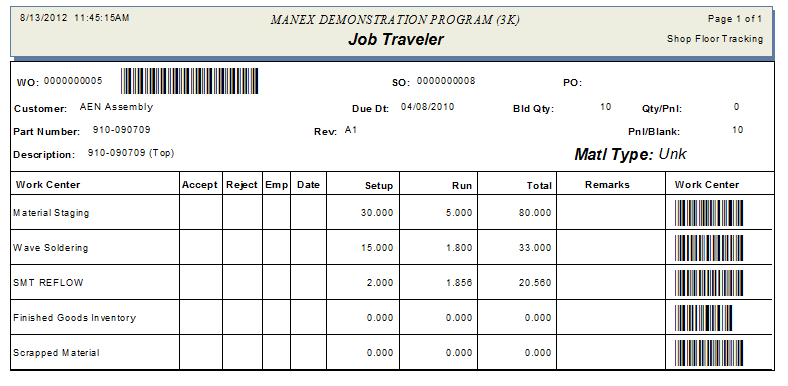
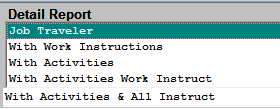
JOB TRAVELER REPORT
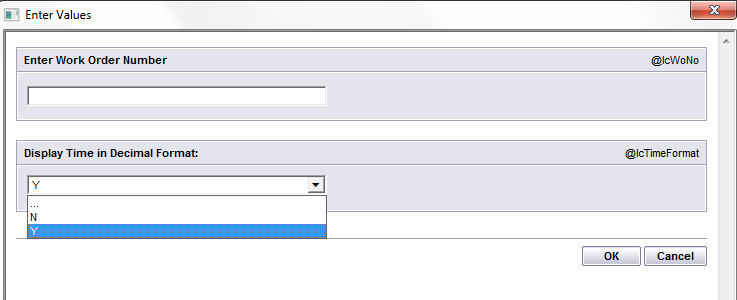
The following report will be displayed:
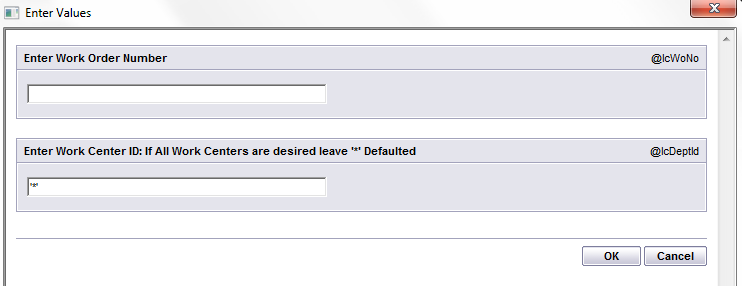
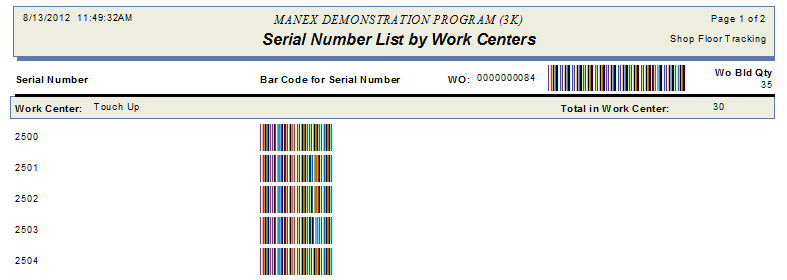
 SERIAL NUMBER LIST FOR WORK ORDER BY WC/ACTIVITY REPORT
Highlight the “Serial Number List for Work Order by WC/Activity” report. Depress the OK button. The following screen will appear:
The following report is available:
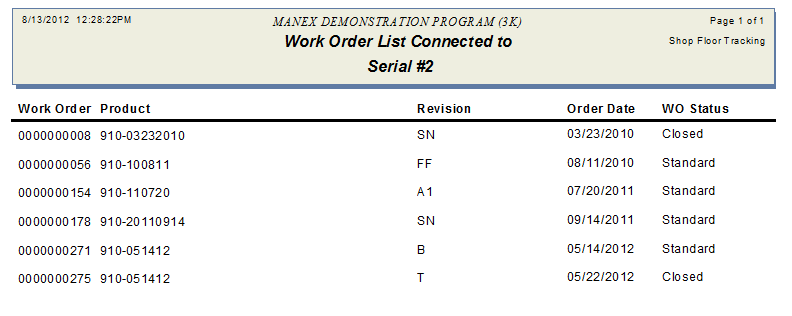
WORK ORDER LIST CONNECTED TO THE SERIAL NUMBER REPORT Highlight the “Work Order List Connected to the Serial Number” Report.
The following Report will be displayed:
 TRANSFER HISTORY REPORT
Highlight the “Transfer History” report. Depress the OK tab. The following screen will appear:
The following Report will be displayed.
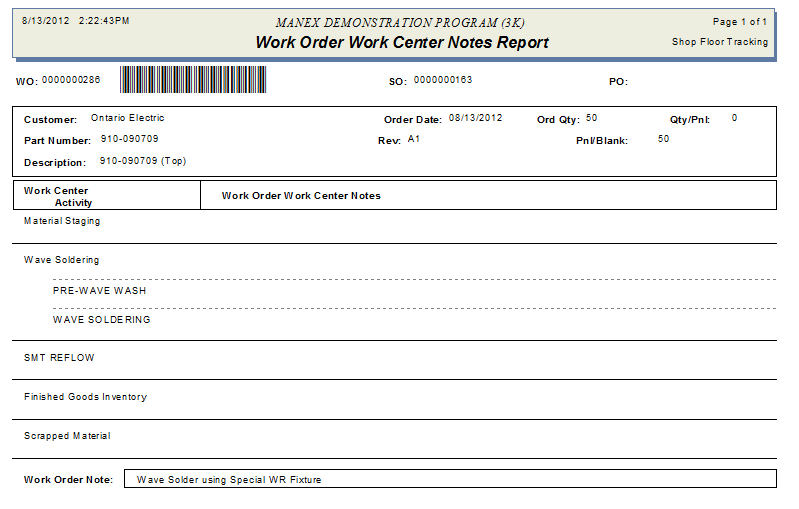
WORK ORDER WORK CENTER NOTES REPORT
Highlight the “Work Order Work Center Notes” report. Depress the OK button. The following screen will appear:
The following report will be displayed:
SERIAL NUMBER TRACKING HISTORY REPORT Highlight the “Serial Number Tracking History” report. Depress the OK button. The following screen will appear:
The following report will be displayed: This report will gather transfer history and defect history for those serial numbers that have been linked to more than one work order and display the transfer history and defect history for all those work orders.
|
| 1.1.6. FAQ's - SFT |
| Facts and Questions for the Shop Floor Tracking Modules |
| 1.2. Test & Repair (T & R) (OPTIONAL Module) |
| 1.2.1. Prerequisites for the T & R Module |
|
The Test & Repair is actually a separate OPTIONAL module, but has been included into the Defect Entry screen for ease of use for the operators. After activation, Work Order Shop Tracking, Defect Code Entry, and Test & Repair access for each user must be setup in the ManEx Security module. Users with “supervisor’s rights” will automatically have access. To use Test & Repair Management module, Serial Numbering is REQUIRED. This information is entered using the Work Order Management Serial Number Control module. |
| 1.2.2. Introduction for the T & R Module |
Test & Repair Management (T&R) has been designed to capture testing results and failure information such as: In-circuit Testing, Sub-Assembly Functional Testing and System Final Assembly Testing. Once this information has been entered this will allow the users the ability to see the Serial Number History and view all of the testing and repair results as well as when it had been shipped to customers. It will also keep track of any associated returns or warranty work that had been done against this particular Serial Number, continuing history as long as the unit is in service.
|
| 1.2.3. Fields & Definitions for the T & R Module |
| 1.2.3.1. Test & Repair Tab | ||||||||||||||||||||||||||||||||||||||||||||||||||||||||||||
Test & Repair Screen Field Definitions
The Test & Repair is actually a separate OPTIONAL module, but has been included into the Defect Entry screen for ease of use for the operators.
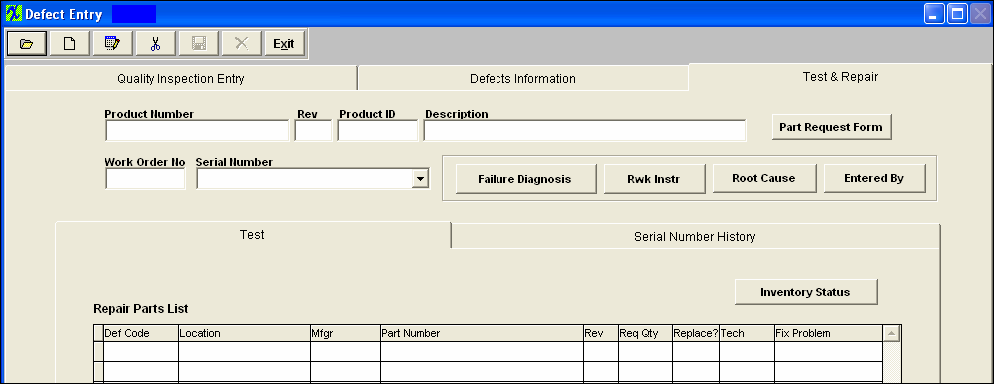
The internal number assigned to the assembly. The revision number associated with the Product Number. This field is no longer used and will be left blank. The description of the Product Number. If the component part is to be replaced, this button will be available to view and print the request for replacement. The number of the work order which was inspected. The serial number of the assembly which failed inspection. Test Tab Field Defintions Repair Parts List
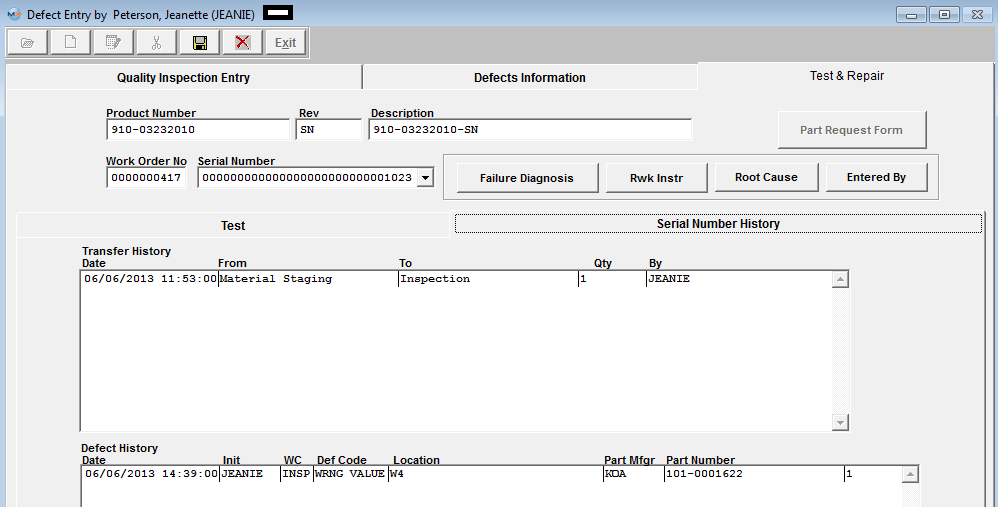
Serial Number History tab 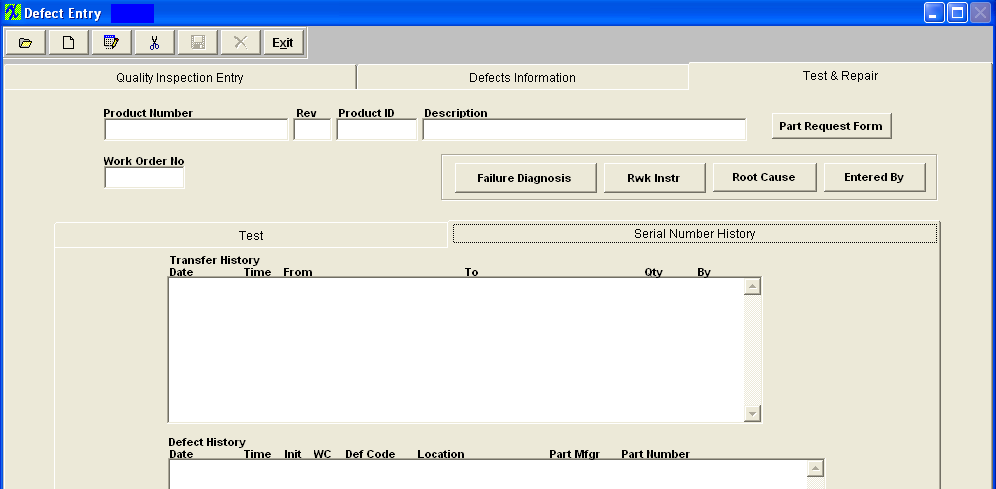 Transfer History Section
Defect History Section
|


| 1.2.4. How To ...... for the T & R Module |
| 1.2.4.1. Add Test and Repair Information | ||||||||
When the user has completed the Defect information, they may enter the Test & Repair tab to enter more information about the part, or may depress the Open/Find record button to find this information at a later time.
Once user has selected a transaction the following screen appears displaying the record you selected:
 Depress the Edit button and enter your password, user may at this time edit the Quality Inspection Entry info, the Defects Information, or the Test & Repair info:
 Depress the Defects Information Tab: Select the record from the pull down to view in the Test and Repair Tab
 Depress the Test & Repair Tab: (System will only display information for one serial number at a time).
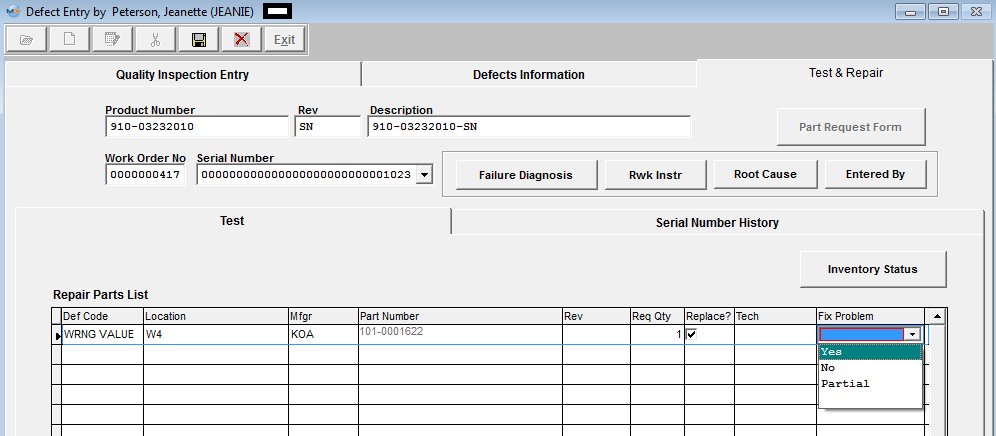
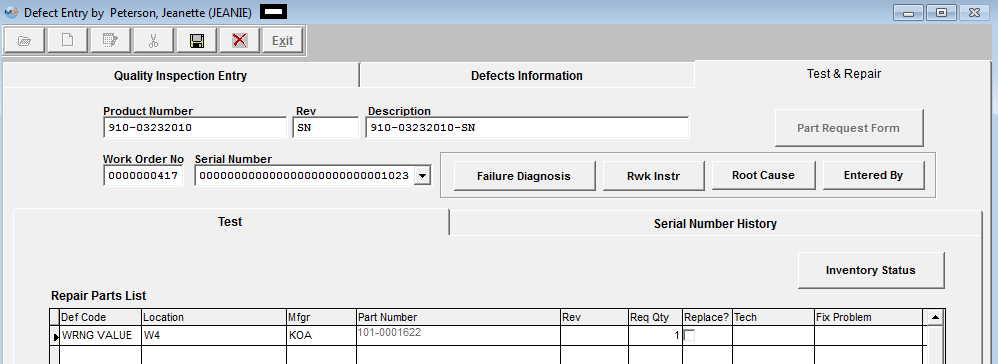 In the edit mode user can edit the required qty, check the Replace? box, and select to Fix Problem from the pull down:
NOTE: To have the USER ID of the technician who fixed the defect displayed, user must double click in the field.
User may enter information in the Failure Diagnosis, Rwk Instructions, and/or Root Cause (these 3 fields are text fields). Within this screen you may also View the "Entered By" or "Inventory Status" of Part Number.
 To View the Serial Number History depress the "Serial Number History" tab.
 Depress the Save button to save changes or Depress the Abandon changes button to abandon changes.
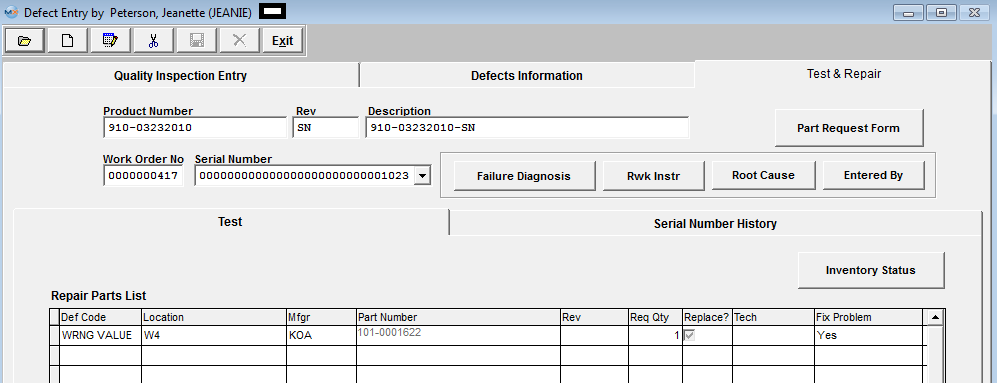 Upon the Save the "Part Request Form" button will become enabled. User may at this time print the "Part Request Form" which will need to be approved and hand delivered to the stockroom, so they may fill the shortage(s) and issue part(s) to the kit.
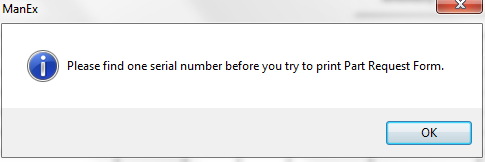
 If a Serial Number is not found for the part being replaced the following message will be displayed.
 |

| 1.3. Shop Floor Tracking by Bar Code (OPTIONAL Module) |
| 1.3.1. Prerequisties - SFT by Bar Code | ||||||||
|
ManEx’s standard module configuration allows most users to accomplish their daily tasks. For those users wanting to get more from ManEx by leveraging the total solutions, this is one of the optional modules available for purchase. This module is designed primarily for transfer of products in shop floor tracking and input of inspection data by serial number and defect code. To place an order or to learn more about this specific module or any of the other optional modules please contact us at http://manex.com"contactus.aspx
After activation, "Shop Floor Bar Code" access for each user must be setup in the ManEx System Security module. Users with “Supervisor Rights” will automatically have access.
|
| 1.3.2. Introduction - SFT by Bar Code |
Overview: Manex Manufacturing System Software has bar code scan and print capability which is designed primarily for transfer of products in shop floor tracking and input of inspection data by serial number and defect code. Installation: Bar Code Shop Floor Tracking is an extra cost option; it is not a part of the Core Manex MES modules. Upon purchase of the module, Manex will send a soft key to activate the module.
Specification:
|
| 1.3.3. Fields & Definitions for SFT by Bar Code |
| 1.3.3.1. Transfer Tab | ||||||||||||||||||
Single Serial No. Mode
Batch Serial No. Mode
Manual Mode
|
| 1.3.3.2. List of Item for Transfer Tab | ||||||||||
|
| 1.3.4. How To ..... for SFT by Bar Code |
| 1.3.4.1. Install Bar Code Font |
|
The following procedures must be followed for each workstation from which the user expects to print barcodes. If the following font is not installed, the barcodes will print very large and will not be usable.
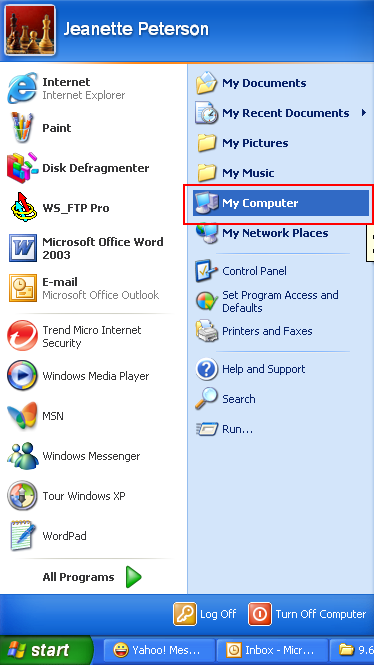
1.Go to Start
2.Select My Computer
 3.Select Control Panel  4.Select Fonts
5.Select File
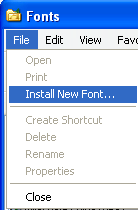 6.Select Install New Font. In the Add Fonts dialog box, go to the system location for fonts in your system.In most cases, it will be in C:"Windows"Fonts.
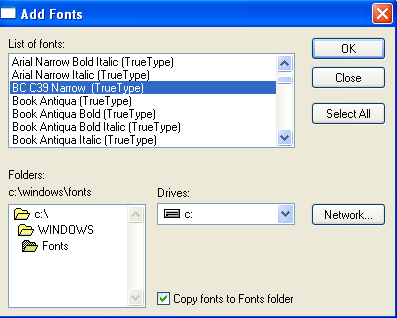
7.The font BC C39 should show up in the List of fonts window. Highlight it. Be sure there is a check mark in the Copy fonts to Fonts folder box and click OK. If this font is NOT listed then you can Download the attached [BarCodeFont_C39N.zip] file and extract it into your C:"WINDOWS"fonts directory.
 8.The new font will appear in the Fonts window. Double clicking on the font will produce the following:

|
| 1.3.4.2. Transfer Product | ||||
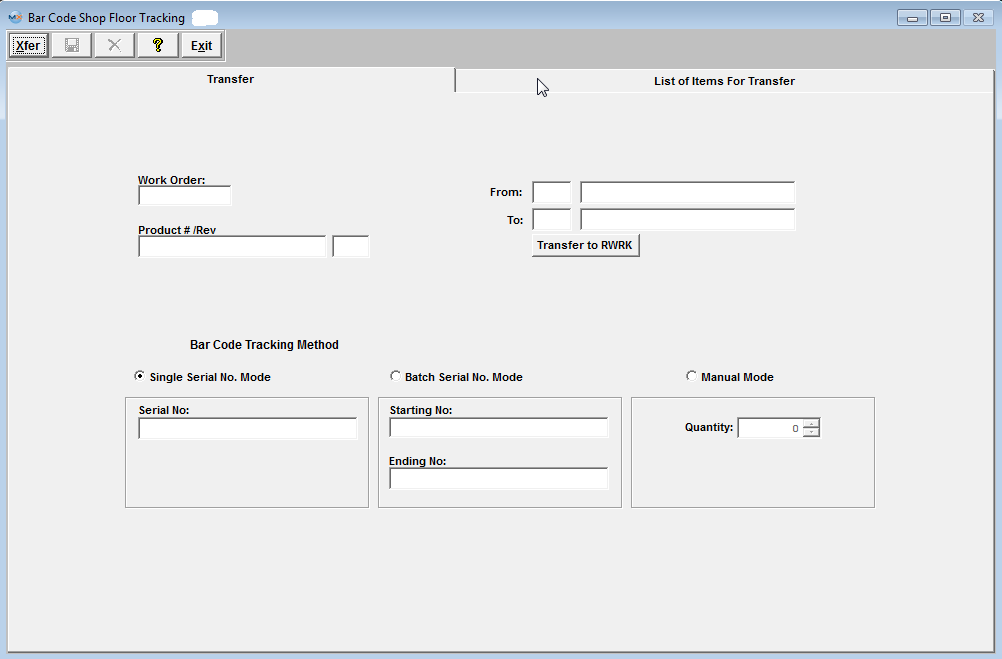
The following screen will be displayed: Depress the Xfer button. Enter in your password or scan employee id . User has the choice of Transfering product by "Single Serial No. Mode", "Batch Serial No. Mode" or "Manual Mode".
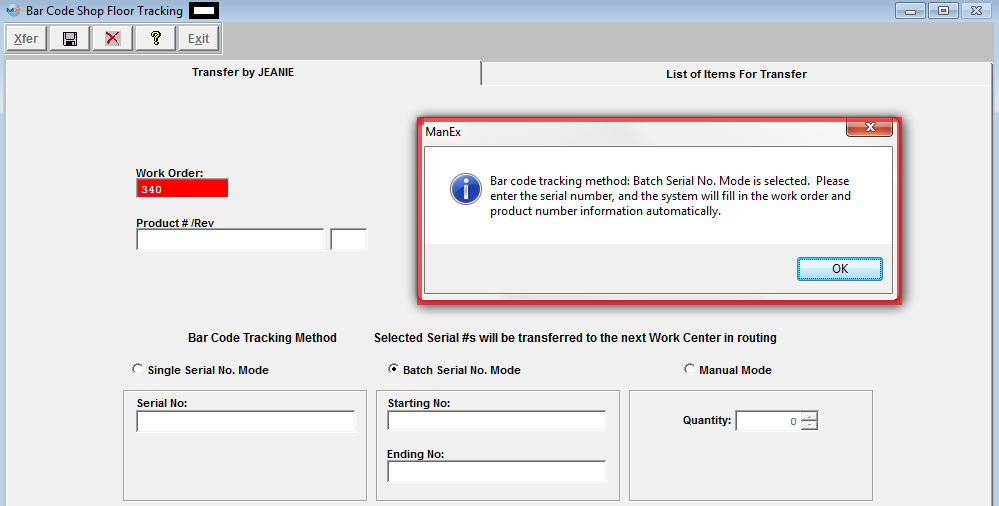
If "Single Serial No. Mode" or "Batch Serial No. Mode" is selected, when user enters a Work Order, they will receive the following message asking them to enter by Serial No., and the system will then populate the Work Order No. and Part Number and Rev. automatically.
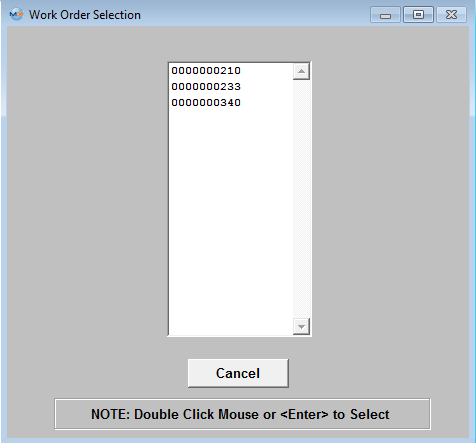
 If the first Serial Number entered has more than one Work Order associated the system will displayed a Work Order Selection screen as displayed below.
 When in "Batch Serial No. Mode" - Once the user selects a Work Order all the SN's entered in that batch will use that Work Order No. to do the validation, instead of asking user to select the WO No. everytime. If the SN entered or scanned is NOT associated with that Work Order No., the system will not find it or add it to the list.
When using "Single Serial No. Mode" Once the user selects a Work Order, then enters the next SN, the system will use that Work Order No. to do the validation, instead of asking user to select the WO No. everytime. If the SN entered or scanned is NOT associated with the previous WO, then the WO Selection box will be presented to the user again.
Once the Serial Numbers have been selected, go to the List of Items for Transfer screen. The Work Order number, Serial No., Quantity, From Work Center and To Work Center or from Work Center to Activity will display, depending on the selection within SFT Defaults to Transfer by WC or Activity.
Depress the Save button. The items will then be properly transferred within the system.
If the product is included in an active Cycle count, or Physical Inventory count, the following message will appear after depressing the OK button on the transfer screen and user will not be allowed to transfer product until the count has been completed and posted.
If the work station being used to transfer serialized material is assigned to use a default work center in Production Work Center/Activity Setup module, when the user first opens the module, the module will use the default work center assigned for this workstation, if the transfer is "FROM" a different work center other than the default and user is NOT a supervisor or has the option "Allow Changing Default Work Center for Serial Number Transfer" box checked within the Security module, they will receive the following message:
When user depresses "OK" a supervisor approval is required to continue. After supervisor’s password is entered, the default work center will be changed to the one that the supervisor entered password for. For example: the workstation is assigned to use “TU” as default work center, now if user chooses to use “AI” to transfer, the system will ask for supervisor’s password, if user cancels the password, the default work center will still be “TU”, but if the supervisor enters his/her password on this machine, the default work center will be changed to “AI”. If now the user tried to transfer from “TU” again, the system will ask for supervisor’s password again. If user exits the module and come back, the default work center will be “TU” again. User also has option in single serial # mode to directly transfer all qty's to the Rework Work center using the directive button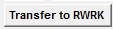
Please note when user transfers several serial numbers in one transaction, the following serial number transfers always take the same "TO'' work center from the previous serial number transfer. Therefore, if user changes the 'TO' work center to 'RWRK', the following transfer will all use -'RWRK' as 'TO' work center until user changes it again. |

| 1.3.5. FAQ's - SFT |
| Facts and Questions for the Shop Floor Tracking Modules |
| 1.4. Work Order Management |
| 1.4.1. Work Order Management |
| 1.4.1.1. Prerequisties for WO Mgmt | ||||||||
Prerequisites for Entering a New Work Order
After activation, "Work Order Management" access for each user must be setup in the ManEx System Security module. Users with “Supervisor Rights” will automatically have access.
A Customer database must be established in the Customer Information module. The Bill of Material must be entered (AVL optional)
|
| 1.4.1.2. Introduction for WO Mgmt |
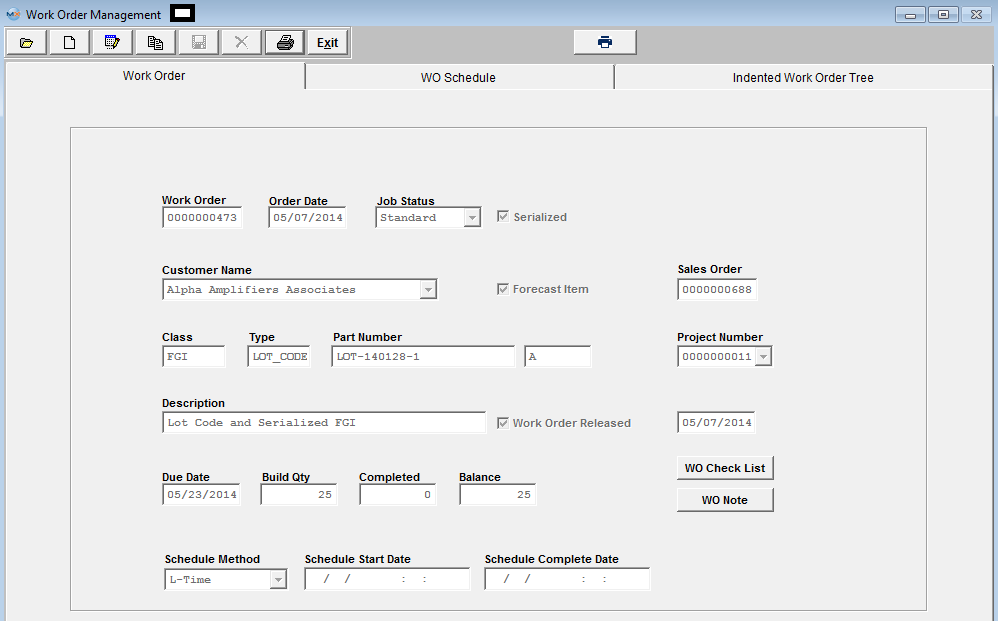
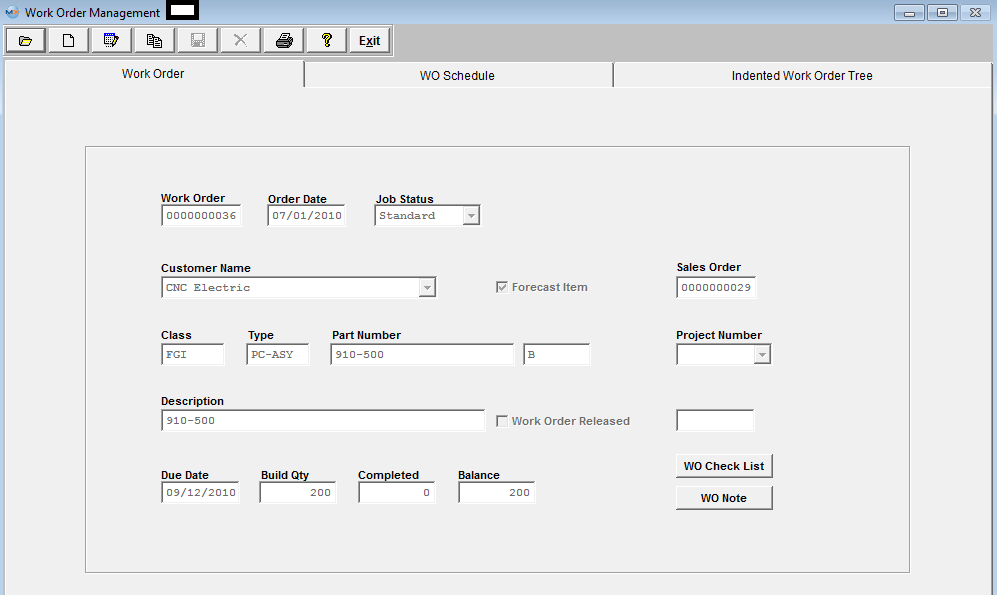
The Work Order Module is used to record the details required for initiating assembly of products. The whole purpose of the WO Release is for various departments to fulfill their part of the task of releasing the WO on-line to avoid doing it manually. This is a very valuable feature and should not be by passed. This is why we do not allow the Work Order to be released within the Sales Order module.
The user initiates the internal flow of work actions by completing the Work Order. This order includes Kitting the material for the order, issuing the material to the production line, tracking the assembly of the order, and completing and evaluation of production performance.
A Sales Order number will be displayed if the Work Order was created within the Sales Order Mgmt module. If you are entering a Work Order through the Work Order module, you can manually link an existing Sales Order to the Work Order, only if the Sales Order and Work Order is for the same customer and same product number. Keep in mind though that even if you have the SO linked to a WO this does NOT mean that the quantities will always be the same. The link is for reference only between the two modules and they are still individual records so when any changes are made to either the SO or the WO the change will not update or be carried forward to the other. A message is displayed to the users that they will have to make the same changes to the WO.
Note: ManEx does not allow a Work Order to be created for a Make/Buy Product, (due to MRP calculating incorrect demand and showing incorrect message with safety stock).
|
| 1.4.1.3. Fields & Definitions for WO Mgmt |
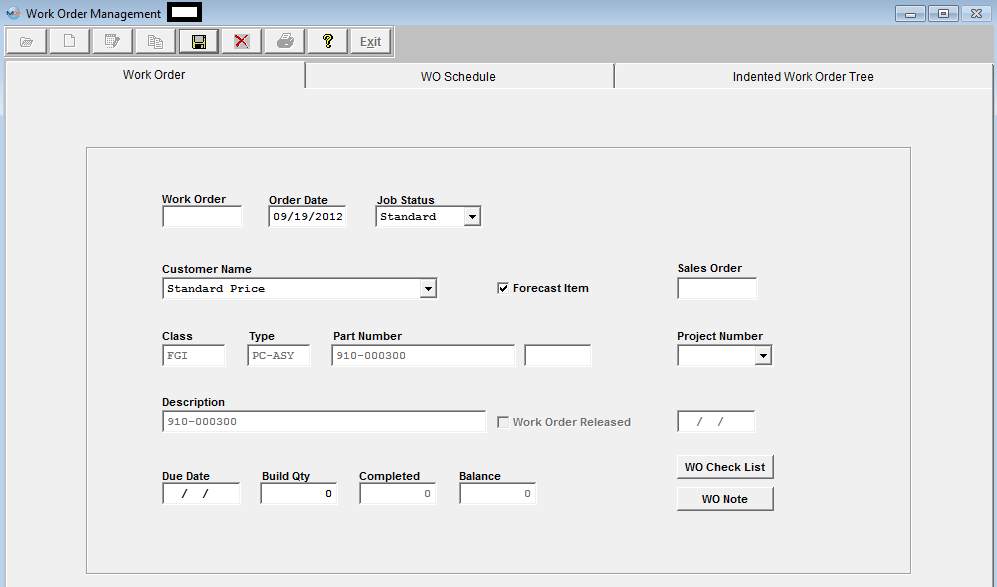
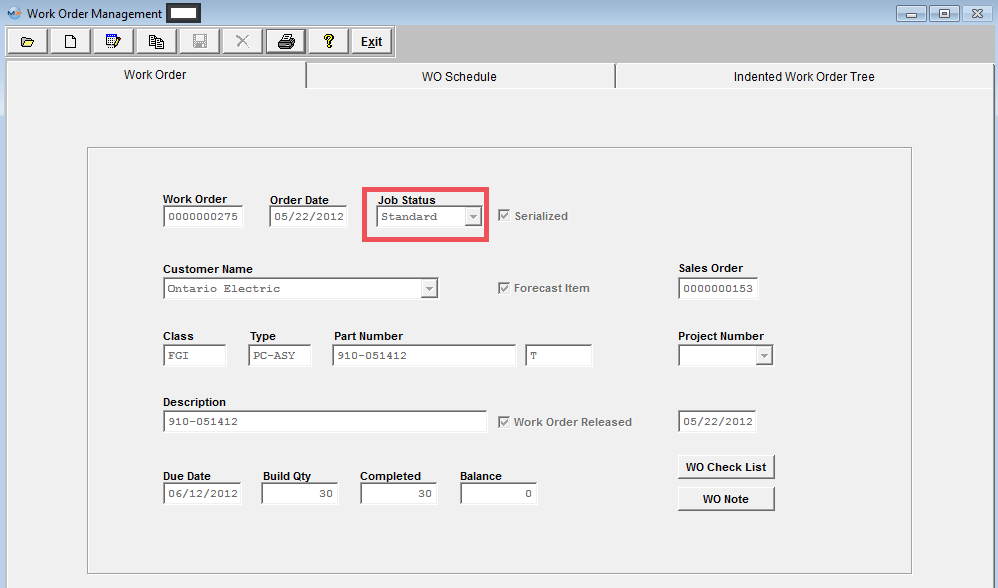
| 1.4.1.3.1. Work Order Tab | ||||||||||||||||||||||||||||||||||||||||||||||||||||||||||
|
Work Order Tab field definitions
WO Check List Screen field definitions:
|

| 1.4.1.3.1.1. Changing Work Order Status, how it affects Kit Status and MRP? |
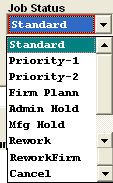
Once a Kit has been flagged as "In Process" the Work Order management module will not allow the users to change the WO status between Standard and Rework.
WO form Modifications: When a user is trying to change the status for the work order from the "REWORK" to any other status we check the KIT data and if the KIT has only line shortages present the KIT status will become empty (instead of "KIT PROCSS"). The reason is that MRP is checking for the KIT status in order to determine whether it needs to explode the BOM to get the demands for this work order or BOM is already exploded. When changing status from anything to "REWORK" check CURVAL () because if someone else pulled the kit for that work order while the user was editing the status the kit status might already be updated to the "KIT PROCSS".
KIT form Modifications:
In the save method when line shortages are added and rework work order is selected replace start date and initials only when they are empty. When re-opening the KIT, check if work order status is rework kit status has to be "REWORK" as well. When saving, after issuing items from the inventory, do not update Kit Status if WO status is not "REWORK". For the regular WO if BOM is already exploded and shortages are created the kit status would be already updated, but if BOM was not exploded and only line shortage are present we do not want to change the kit status because MRP will only use line shortages and miss all the demands from the BOM.
|
| 1.4.1.3.2. Work Order Schedule Tab | ||||||||||||||||||||
Work Order Schedule Field definitions
Note: This is for your reference only - this screen does not affect any other portion of the ManEx system.
Schedule
Automatic Scheduling
|


| 1.4.1.3.3. Indented Work Order Tree | ||||||||||||||
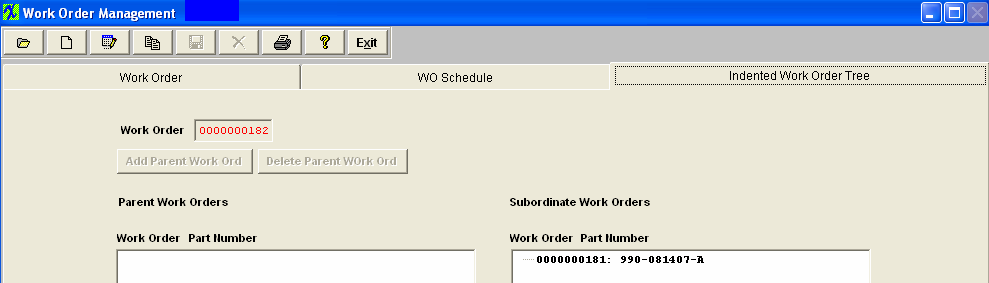
Indented Work Order Tree field definitions
Parent Work Orders
The Work Order number of the parent work order. The number of the part to which the parent work order pertains. (Subordinate) Work Orders
|


| 1.4.1.4. How To ..... for WO Mgmt |
| 1.4.1.4.1. Find a Work Order | ||||||||
|
The following screen will be displayed:
And the information will populate the screen as displayed below:

|

| 1.4.1.4.2. Add a Work Order | ||||||||||||
|
The following screen will be displayed:
To ADD a new work order, depress the Add Action button. The user is first prompted for the appropriate password:
Note: If the Product Number you are looking for does not appear in the Find screens listed above you may want to check the Part Source of the Product number you are looking for. ManEx does NOT allow a Work Order to be created for a Make/Buy Product, due to MRP calculating incorrect demand and showing incorrect message with safety stock. Once a Product Number is selected the screen will be populated with the part information from the Inventory Control Module.
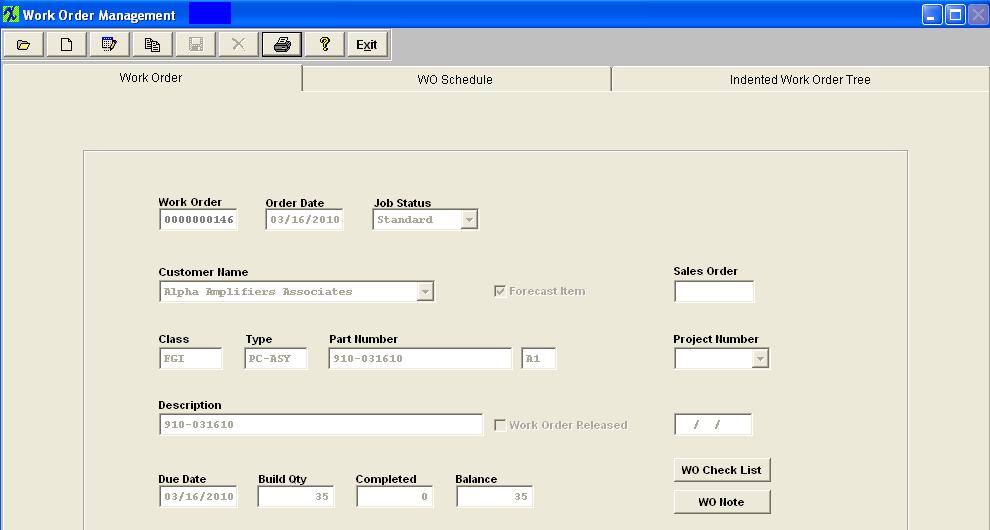
If the work order numbering is set to manual, the first prompt is for the Work Order Number. MANEX will enter the current system date as the Order Date, and the user may revise the date if desired.
Serial Number box. If this box is checked, the units must have a unique serial number assigned. (Note: Serial numbers are assigned in the Work Order Serial Number Control Module). Sales Order Number. A Sales Order number will be displayed if the Work Order was created within the Sales Order Mgmt module. If you are entering a Work Order through the Work Order module, you can manually link an existing Sales Order to the Work Order. Only if the Sales Order and Work Order is for the same customer and same product number. Keep in mind though that even if you have the SO linked to a WO does not mean that the quantities will always be the same. The link is for reference only between the two modules and they are still individual records so when any changes are made to either the SO or the WO the change will not update or be carried forward to the other. A message is displayed to the users that they will have to make the same changes to the WO.
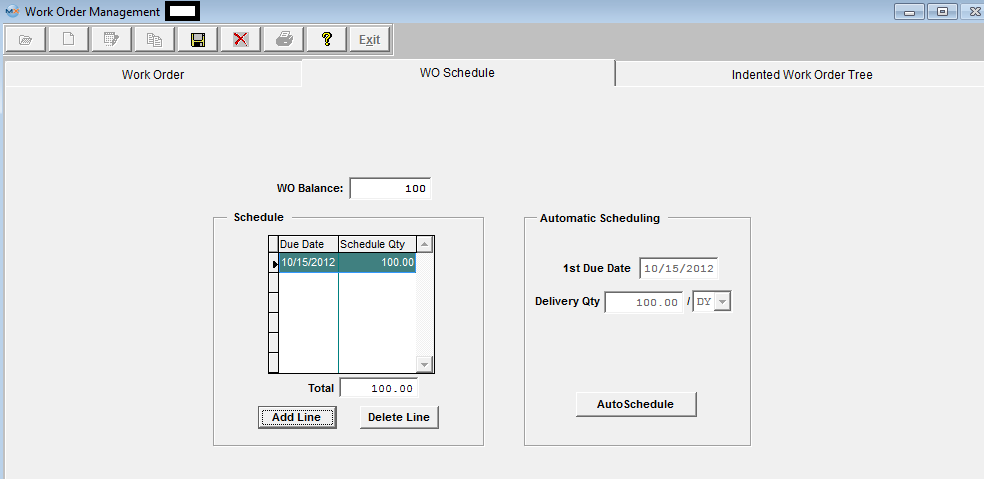
If the work order is ready to start being moved through SFT (material obtained and shortages at a minimum), then the user may check the Work Order Released box, which will allow the material to be moved through Shop Floor Tracking. If MRP is used, the demand for the material will be generated, but the work order cannot begin production. To see a list of unreleased work orders, request Back Log Report by Work Center as discussed in the Reports section. After that, the user enters a Due Date for the order (the date due of finished goods), and the Build Quantity. The shipped quantity will be set to zero, and the balance due to the same as the work order build quantity. Work Order Schedule Tab After all the information has been entered in the Work Order screen, depress the WO Schedule tab. The following screen will appear: Note: Keep in mind that this is for your reference only - this screen does not affect any other portion of the ManEx system.
There are two modes available for completing a scheduled delivery for a product: Automatic and Manual. In the Automatic mode, MANEX will take a beginning date and a quantity to be delivered each period (Days, Weeks or Months) and schedule out the delivery. The following activities are available: Automatic Scheduling. Pressing this button enables the scheduling box and places the default lead time date in the 1st Due Date box. (The user may establish a default number of days in the System Setup.) The user can then use that date, or enter the first (beginning delivery) date the customer expects to receive the order. The WO Schedule tab allows the user to divide the shipment into multiple deliveries of equal parts. For example, if the order is for a total of 100 pieces, and the customer wishes delivery to be at the rate of 10 units each day, then the delivery quantity should be entered as 10. The next box allows the user to select the delivery intervals. The options are by day (DY), week (WK) or month (MO). After selecting the delivery interval, pressing the SAVE button creates a line for each delivery date in the sequence requested. In this WO Schedule tab, the user may further edit, delete or add lines. Manual Scheduling. Pressing the Add Line button enables the delivery schedule box and places the cursor in the Due Date box. The user can then enter the first (beginning delivery) date the customer expects to receive the order. Next, the Ship Date (the date the order is to leave the user’s dock) will be entered by MANEX based on the transit days entered. This date can then be modified by the user if a different date is desired. Then the scheduled quantity is entered. The Shipped quantity will be completed by MANEX when the line has material shipped against it. Additional lines may be added or deleted by pressing the appropriate button. The total number of units scheduled will be displayed at the bottom of the box, so the user can verify all units have been scheduled.
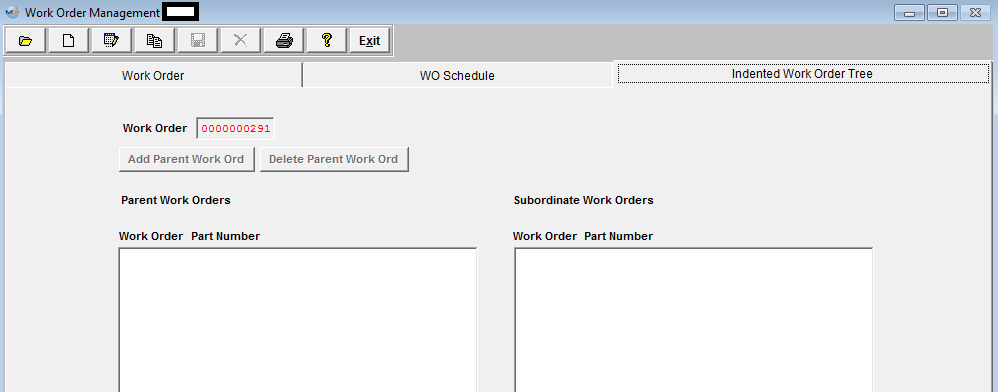
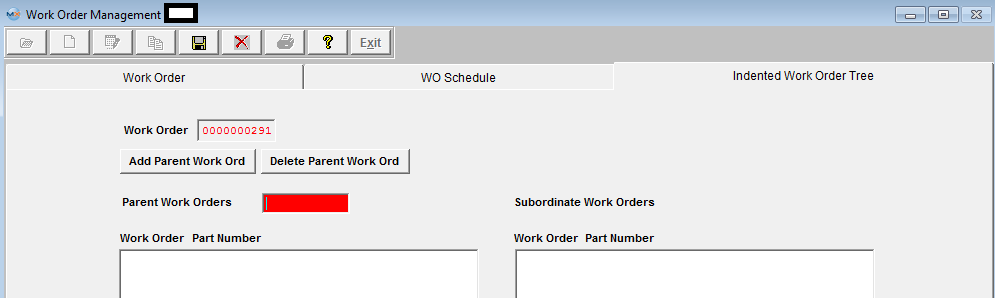
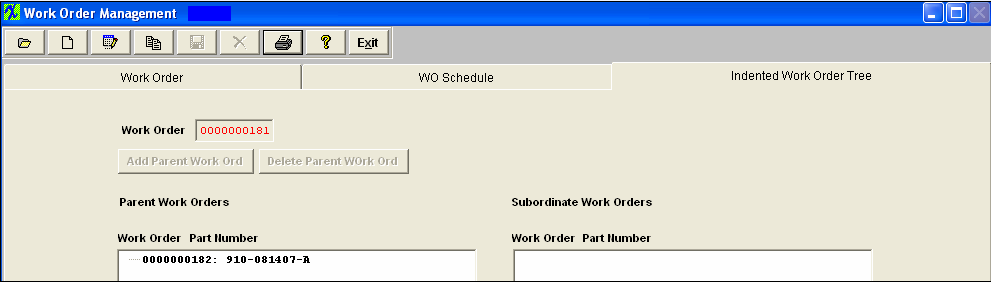
Indented Work Order Tab If the user has multi-level products, and there are other work orders upon which the current work order depends having material, then the Indented Work Order tab will allow the user to establish relationships between those work orders and the current one.
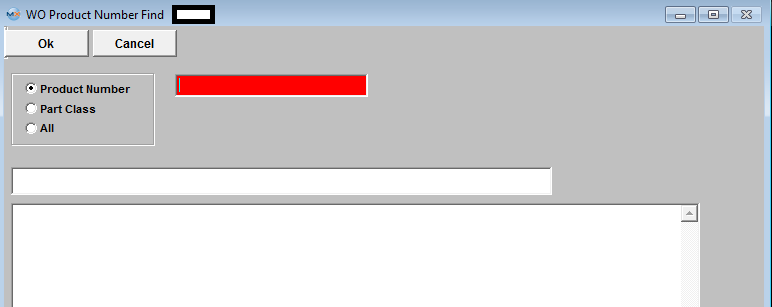
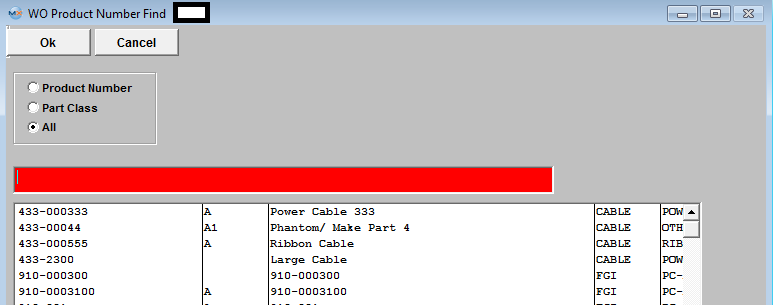
Depress the Add Parent Work Ord button. A red box will appear, as illustrated below:
Type the Parent Work Order number into the box. After entering a valid work order, the user is presented with a screen completed with the work order information, but with a blank work order number (if numbering is manual). After entering the work order, the schedule and quantity, the new work order may be saved. Once all information is entered, the user may either Save by depressing the Save Record action button, or Abandon Changes by depressing the Abandon Changes Action buttons. |
| 1.4.1.4.3. Edit a Work Order |
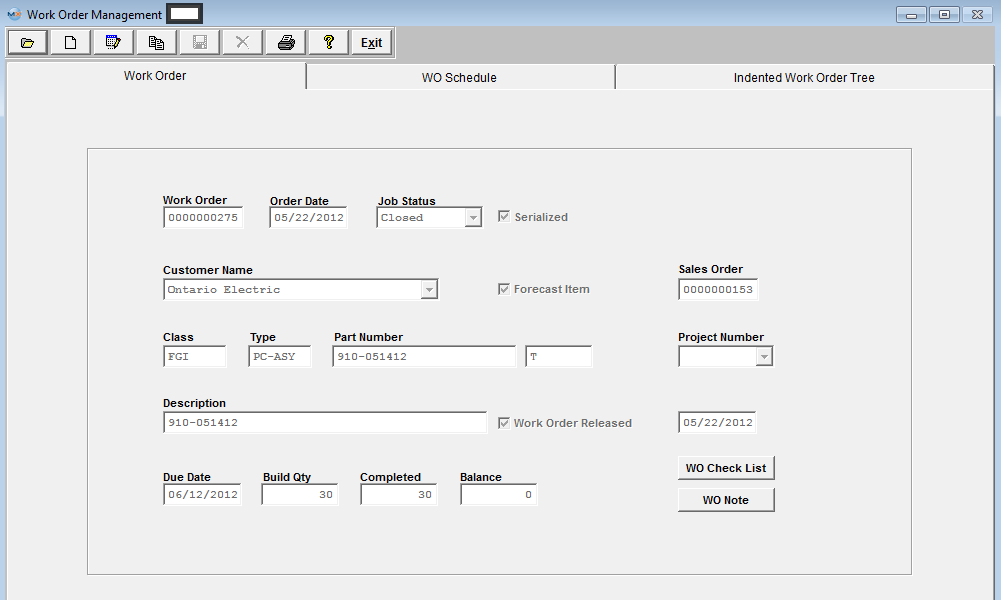
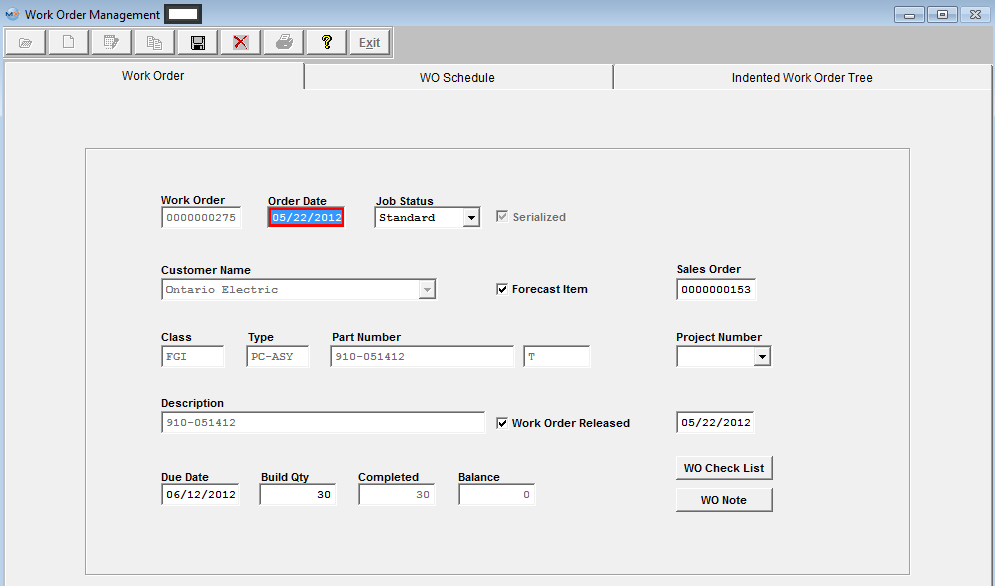
Find an existing Work Order After a Work Order has been found, it may be edited by selecting the Edit Action button.  All fields available for editing will be enabled for modification. The fields which may be edited are: Order Date, Job Status, Work Order Release, Due Date, Build Qty. The user may also add a note, or add or delete a parent work order. Note: Once a Kit has been flagged as "In Process" the Work Order Management module will NOT allow the users to change the Work Order status between Standard and Rework. For further detail see Article #2691 .
If the user wishes to change the Build Qty on a Work Order in process on the Floor the system will provide the users with what work center location they would like to reduce the qty from to match the new Work Order Qty. At this point the Kitting module will still show the original WO qty and what was picked. But if they depress the Update Kit button it will refresh the kit based off of the new WO Qty and now the qty that was adjusted will become WO-WIP. Which means it is available to fulfill any other demand that might be out there. Then upon Closing the kit the user has the option to cost that wo-wip to the kit or return it to stock. If they return it to stock it will have no affect on their Mfgr Variance for that work order.
If the user is going to reduce the Build Qty on a Work Order that will change the WO status to "CLOSED", upon Closing the kit the system will take the original quantity pulled to the kit and automatically cost the different to the kit without giving any option to the user. So, if the user does NOT wish to have the extra parts automatically costed to the kit upon closing they will need to change the WO status from "CLOSED" to "STANDARD", return to the Kitting module and "UPDATE" the kit, then return to the WO and edit/save the record without making any changes – the Status will automatically update to Closed. See attached word document <<PS_961_090427.docx>> for an example.
NOTE: Work Orders originated from an RMA Receiver will have "ReworkFirm" Job Status and users will NOT be allowed to change the Job Status, due to the fact that when the Work Order is created from RMA module all kitting, serial number, .... records are created and if user changes the WO status the system may loose track of these records. User will receive the following message if they try to change the job status on a Work Order that was originated from an RMA Receiver.  Since the material issued to the RMA is likely to be a defective assembly, or requires re-inspection, the work order must be completed by either transferring the material to FGI or to scrap to close the work order. Therefore, an RMA work order cannot be cancelled. Also, users will NOT be allowed to edit or change the Bld qty because when product is brought into the system with an RMA Receiver it is then automatically issued as itself to the kit at that time. At the conclusion of the modification process, the user may either Save the changes by depressing the Save changes action button or Abandon the changes by depressing the Abandon changes action buttons.The following message will be displayed to the user if a SO is linked to a WO:
 NOTE: The link is for reference only between the two modules and they are still individual records so when any changes are made to either the SO or the WO the change will not update or be carried forward to the other. |
| 1.4.1.4.4. Cancel A Work Order |
|
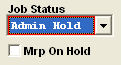
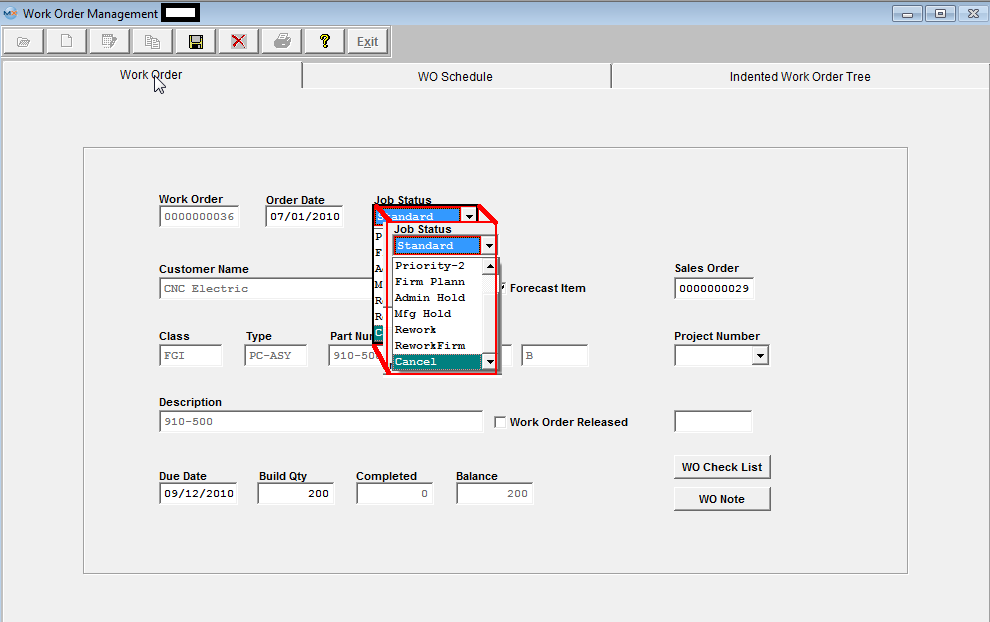
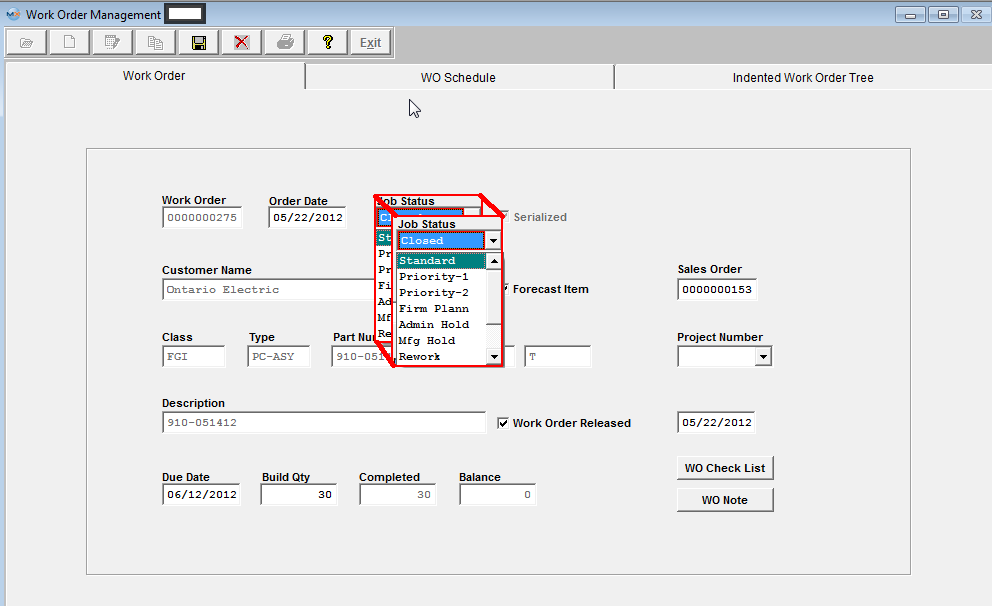
Depress the Edit button and enter your password. Depress the arrow next to the Job Status and change the Job Status to Cancel as displayed below.
 Depress the Save action button.
Note: You can’t Cancel a Work Order that has been kitted. If you must cancel a kitted Work Order, go into the Kitting & Shortage Mgmt module and de-kit the order. NOTE: Work Orders originated from an RMA Receiver will have "ReworkFirm" Job Status and users will NOT be allowed to change the Job Status, due to the fact that when the Work Order is created from RMA module all kitting, serial number, .... records are created and if user changes the WO status the system may loose track of these records. User will receive the following message if they try to change the job status on a Work Order that was originated from an RMA Receiver.
Since the material issued to the RMA is likely to be a defective assembly, or requires re-inspection, the work order must be completed by either transferring the material to FGI or to scrap to close the work order. Therefore, an RMA work order cannot be cancelled or re-opened. |
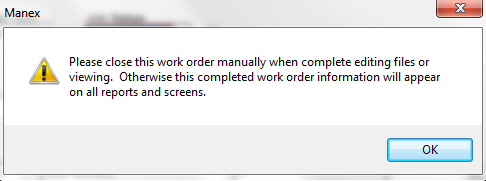
| 1.4.1.4.5. Manually Re-Open or Close a Work Order |
Find a Closed Work Order
Depress the Edit action button and change the Job Status from Closed to Standard
User will receive the following warning
Depress OK then Depress the Save record action button, The following message will be displayed to the user if a SO is linked to a WO: 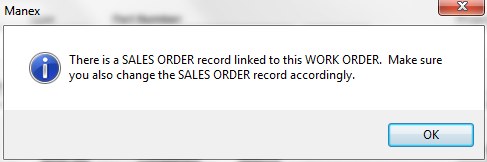 NOTE: The link is for reference only between the two modules and they are still individual records so when any changes are made to either the SO or the WO the change will not update or be carried forward to the other. Depress OK WO status is changed from closed to Open/Standard
To Manually Close Work Order Find Work Order with Job Status anything other than "Closed" Dperss the Edit action button (no need to make any changes)
Depress the Save record Action button. The following message will be displayed to the user if a SO is linked to a WO: NOTE: The link is for reference only between the two modules and they are still individual records so when any changes are made to either the SO or the WO the change will not update or be carried forward to the other.
Depress Ok and Job Status will automatically change to Closed  NOTE: Work Orders originated from an RMA Receiver will have "ReworkFirm" Job Status and users will NOT be allowed to change the Job Status, due to the fact that when the Work Order is created from RMA module all kitting, serial number, .... records are created and if user changes the WO status the system may loose track of these records. User will receive the following message if they try to change the job status on a Work Order that was originated from an RMA Receiver.
Since the material issued to the RMA is likely to be a defective assembly, or requires re-inspection, the work order must be completed by either transferring the material to FGI or to scrap to close the work order. Therefore, an RMA work order cannot be cancelled or Re-opened.
|
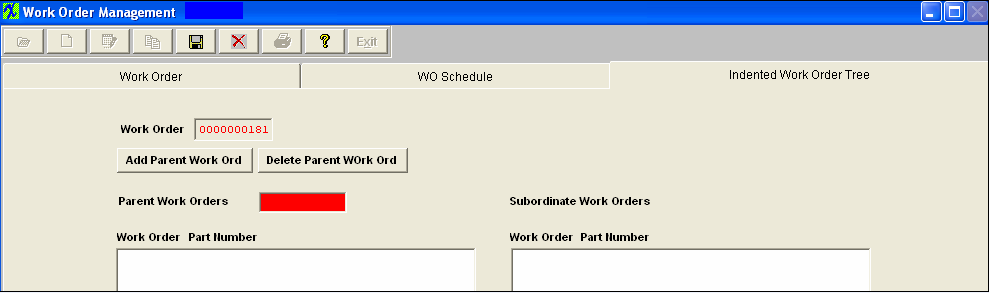
| 1.4.1.4.6. Add a Parent Work Order |
Indented Work Order Tab If the user has multi-level products, and there are other work orders upon which the current work order depends having material, then the Indented Work Order tab will allow the user to establish relationships between those work orders and the current one. Find an existing Child Work Order
 Go to the Indented Work Order Tree tab. Depress the Edit button. Depress the Add Parent Work Ord button. A red box will appear, as illustrated below:
Type the Parent Work Order number into the box. The Parent Work Order number will disappear and will not appear in the Work Order box until the Save record action button is depressed as displayed below. Depress the Abandon changes Action buttons to abandon changes.
 Find the Parent Work Order, go to the Indented Work Order Tree tab and the Child Work Order linked will be displayed:
 |
| 1.4.1.5. Reports for WO Mgmt | ||||||||||||||||
|
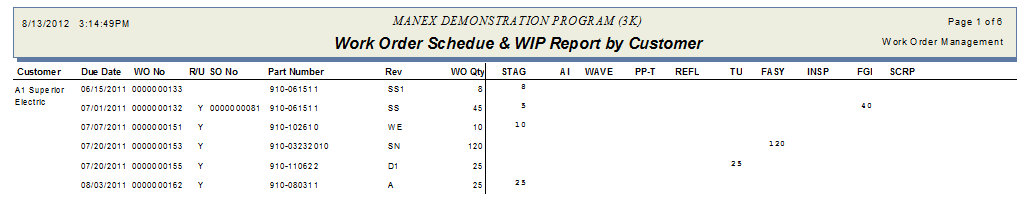
To obtain the Work Order reports, depress the Reports button. The following screen will be displayed: 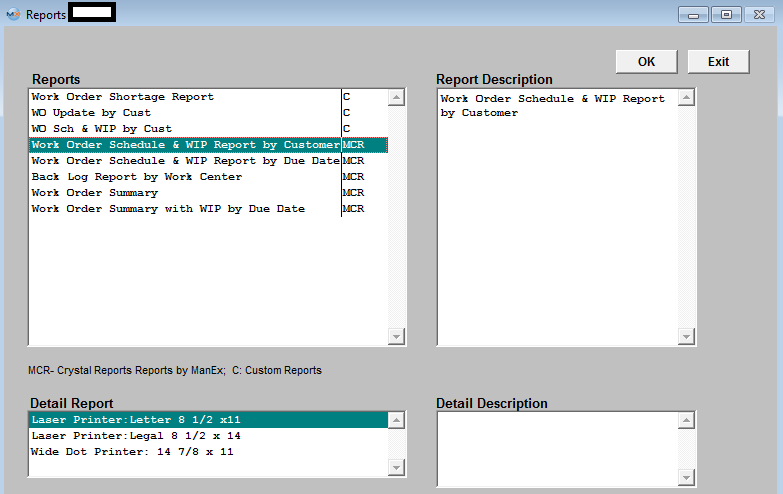 Note: The Work Center Information may not appear in some of the WIP reports within WO Management if the user prints it to an Excel Worksheet file. Some of the reports are quite complex, with multiple relationships and filters. In this instance, the Work Center Information is in a different data base and therefore will not be available. Work Order Schedule & WIP Report by Customer
The following report will print: This report provides a listing of the status of each job on the production floor. With this report, users can see where each board is in production.
 Work Order Schedule & WIP Report by Due Date
The following Report will print: This report provides a listing of the status of each job on the production floor. With this report, users can see where each board is in production by Due Date.
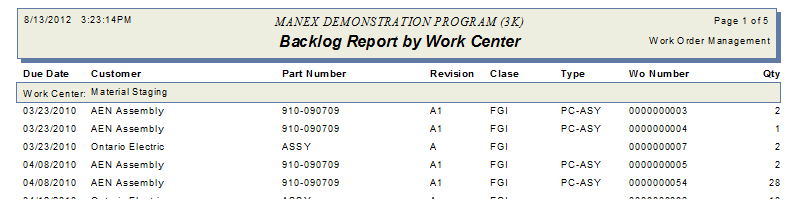
 Back Log Report by Work Center
The following report will print:
 Work Order Summary
The following report will print:
 Work Order Summary with WIP by Due Date
The following Report will print: The report can show up to 11 work center information at one time, if user has more than 11 work centers, the program will generate another set of report with same header information (due date, wono, build qty, part number...), with the rest of work center information (at right side). If you run by Screen, Printer...., it should appear twice too.

|
| 1.4.2. Unreleased Work Order List |
| 1.4.2.1. Prerequisites for Unreleased WO List | ||||||||||||||
Prerequisites for Viewing the Work Order Release Check list:
After activation, "Work Order Management" access for each user must be setup in the ManEx System Security module. Users with “Supervisor Rights” will automatically have access. Note: This screen is only to view the checklist.
|
| 1.4.2.2. Introduction for Unreleased WO List |
The Work Order Release Check List is originally developed in System Setup in the Shop Floor Tracking Defaults set up screen. The Work Order Release Check List displays the following: Work Order Number, Scheduled Ship Date, Part Number of the assembly, Revision Number pertaining to the assembly, Quantity in the Work Order and the Check List Items with information regarding items checked, by whom, the date and time.
The Work Center Check List Module is used to record that a process detailed in a check list established for the work center has been completed. The users must view and acknowledge that a procedure has been performed, and enter their concurrence and time of event. This information is created in the PDM (Product Data Management) module.
The overall purpose of the Work Order Release Check List is to provide better kitting status control and at the same time make the job a little easier for Production Control/Schedulers by automatically checking to see if various affected departments have checked off their part of the list. Then once everything has been checked, the work order can be released so scheduling can be started and material can start moving through SFT.
|
| 1.4.2.3. Fields and Definitions for Unreleased WO List | ||||||||||||||||||||||||||||||
Highlight the line you are interested in viewing. The information at the bottom of the screen will display the check list items associated with the assembly. If the item listed has been performed, there will be a check mark at the left of the item and the user may view the name of the person who performed the checking plus the date and time checked.
|
| 1.4.2.3.1. Check List Items | ||||||||||||||||
|
|
| 1.4.2.4. How To ...... for Unreleased WO List |
| 1.4.2.4.1. View and Approve Work Order Checklist Items | ||||||||||||||||||
The following screen will be displayed:
Highlight the line you are interested in viewing. The information at the bottom of the screen will display the check list items associated with the assembly.
If the item listed has been performed, there will be a check mark at the left of the item and the user may view the name of the person who performed the checking plus the date and time checked. User will NOT be allowed to process material through SFT until the Work Order Release box within the Work Order module has been checked off (Note: this box will NOT be checked until ALL checkpoints including the "Kit Complete" have been checked). This is to prevent moving material in SFT until everything has been approved. NOTE: If a user has the Work Order Checklist feature active and tries to use the PO Receiving shortage and issues feature within the PO Receiving, it will not recognize the shortages until the kit has been flagged as "Kit Complete". It is designed this way because the user will not know if the parts are short until the kit is completed.
You may have parts in the inventory and have not pulled them to the kit yet. If you allow seeing the shortage (which may not be a shortage because parts are not pulled yet) from the PO receiving, the receiver may be trained to automatically issue to the shortages first, but it may not be a shortage because parts have not been pulled from inventory, so how would they know if it is a real shortage or just not pulled from inventory yet.
|

| 1.4.3. Work Order Serial Number Control |
| 1.4.3.1. Prerequisites for WO SN Control | ||||||||||
There must be a Work Order. The part number must exist for a product or part. The Bill of Materials must be entered (AVL optional). The method must have been set up in Shop Floor Tracking Defaults. The option must have been selected in the Inventory Control Management Module |
| 1.4.3.2. Introduction for WO SN Control |
The Work Order Serial Number Control Module is used to set up serial numbering for a particular Work Order. |
| 1.4.3.3. Fields & Definitions for WO SN Control |
| 1.4.3.3.1. Serial Number Setup Tab | ||||||||||||||||
Serial Number Setup Fields & Definitions
|
| 1.4.3.3.2. Detail Tab | ||||||||

|
| 1.4.3.4. How To ..... for WO SN Control |
| 1.4.3.4.1. Find a Work Order for Serial Number Setup | ||||||||
|
The following screen will be displayed:
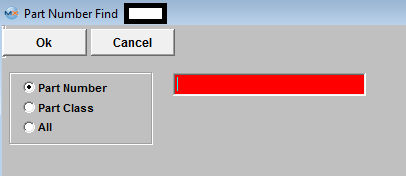
Selecting the Find Action Button displays the following screen: Select the desired Filter: by selecting the appropriate radio button - Open, Closed/Cancelled, or All.
If user selects ANY of the Filters: and Find by All - a screen will appear listing all the Work Orders filtered by the selection, in numerical order, along with the part number, and Customer name.
|

| 1.4.3.4.2. Assigning Serial Numbers to Work Order | ||||||||
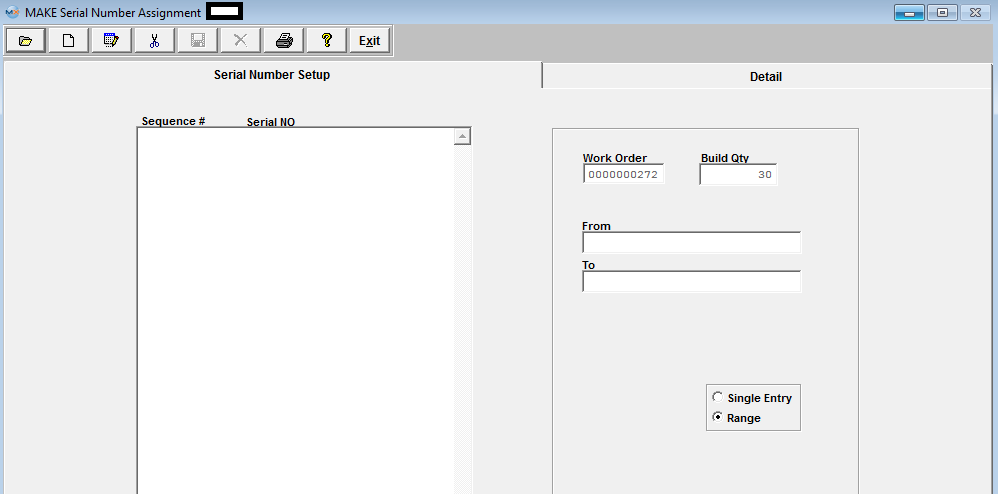
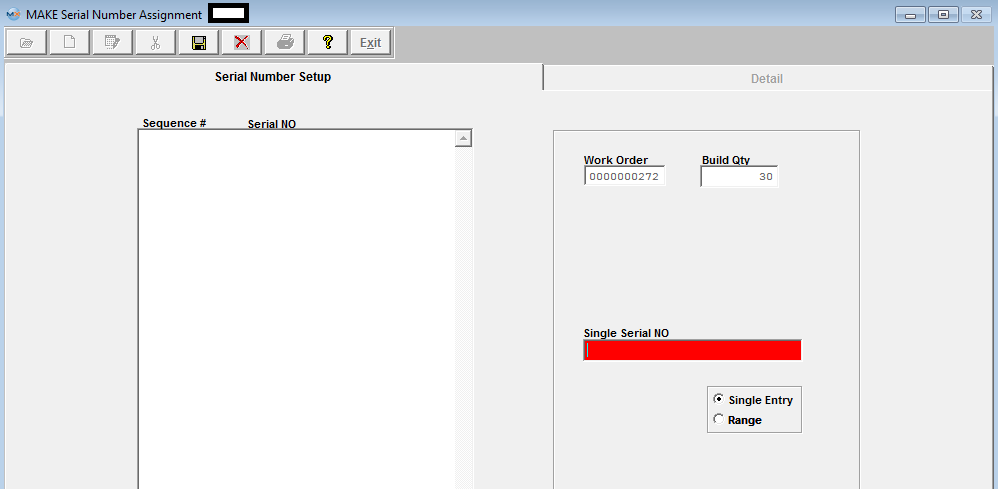
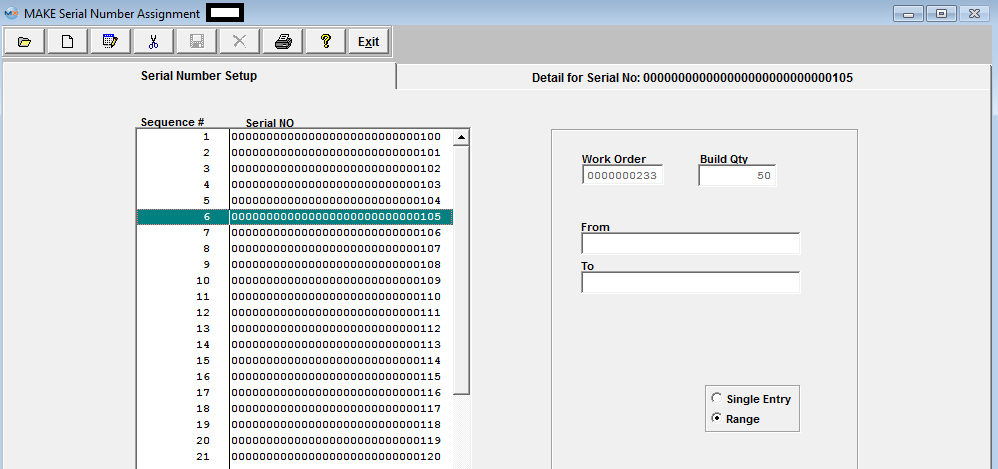
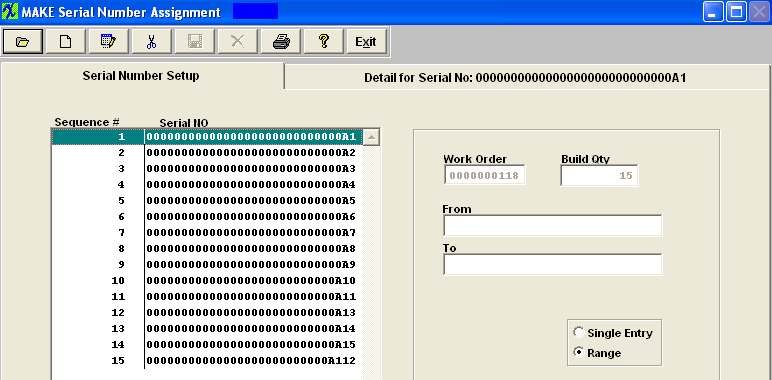
After Finding the Work Order. The following screen will appear, listing the Work Order and Build Qty. The Add record action button also becomes available.
Depress the Add record action button. Enter in the password. Select Single Entry or Range method of assigning serial numbers by choosing the appropriate radio. If you select Single Entry, the following screen will display, only allowing you to type in one Serial number at a time.
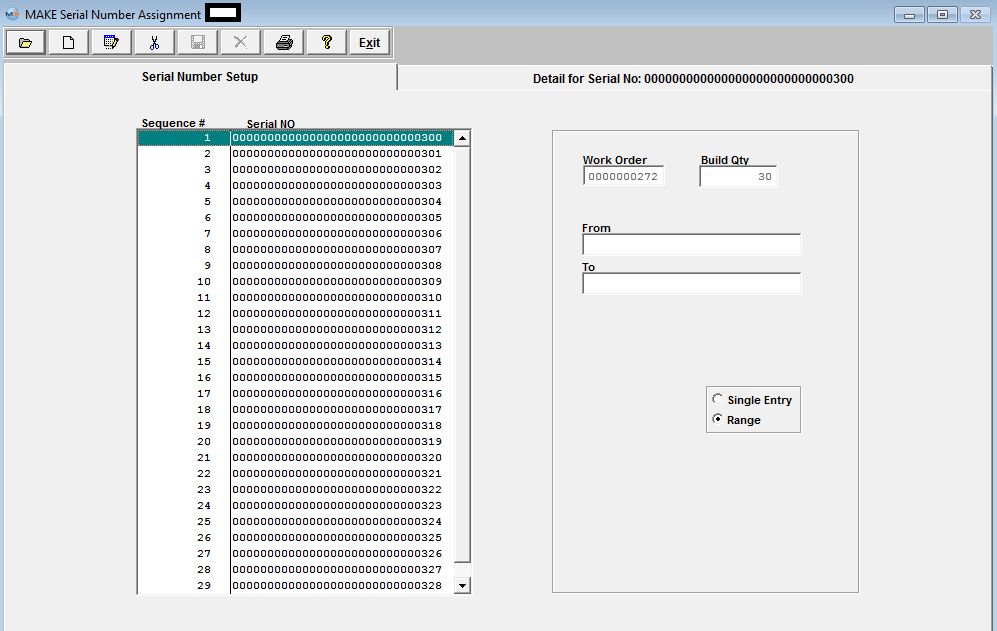
If you select Range, the following screen will display, allowing you to type in From and To Serial numbers. 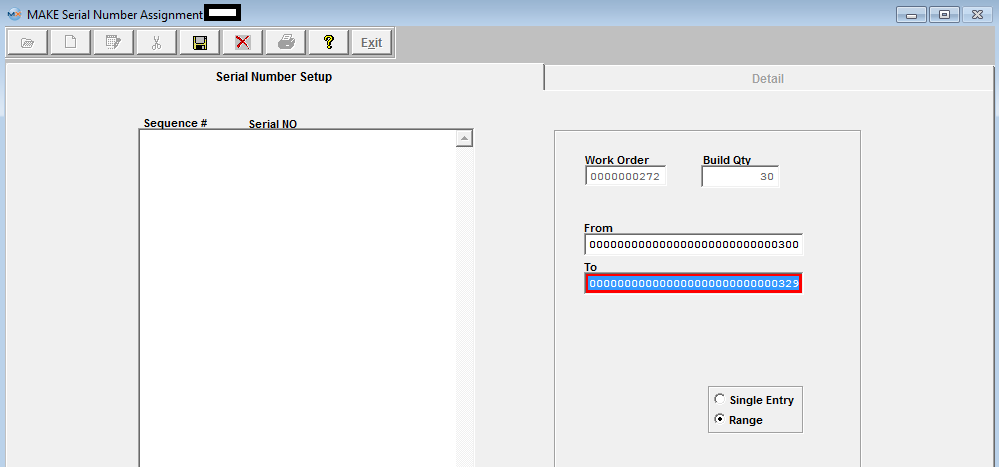
Note: The system will force individual entry for serial numbers with prefixes or characters. If user enters both character and number in one field, then it is hard to know which part (character or number) needs to be increased first. So the system cannot predict how the range is intended to increment: For Example if user enters a SN range of A101 to Z110. The system does not know how the user wants the range setup A101, B101, C101 or A101, B102, C103, etc. (We allow 30 characters for a SN)
Depress the Save record action button and the range of numbers will populate on the left side of the screen. As displayed below: If you depress the Abandon changes action button the screen will abort and the serial numbers will not be saved.
Whether or not the system will allow you to enter duplicate serial numbers will depend on the method for tracking serial numbers chosen in System Setup. At the beginning of a ManEx implementation the company must decide a method for tracking serial numbers. Once this decision has been made and set up in Shop Floor Tracking Defaults it cannot be changed.
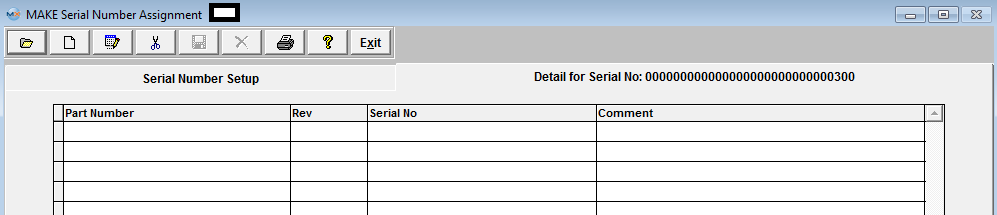
Detail for Serial Numbers To enter detail for serial numbers, highlight the pertinent serial number and then depress the Detail Tab. The following screen will appear:
Enter in Serial No and Comments if applicable.
Depress the Save record action button to save, or depress the Abandon changes action button to abandon changes.
|

| 1.4.3.4.3. Editing Serial Numbers |
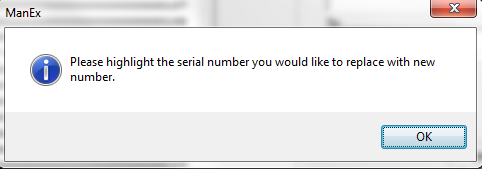
Find an Existing Work Order. Receive the following message:
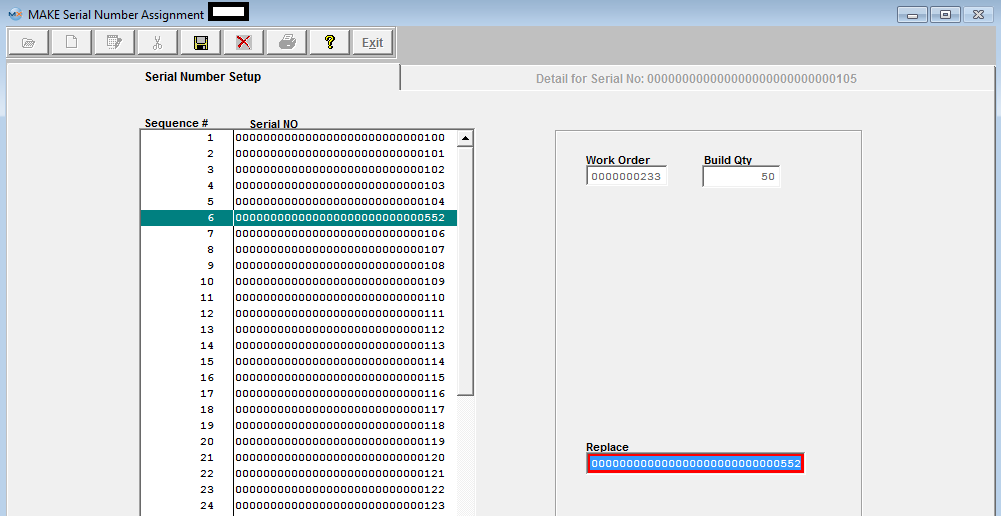
Depress OK and highlight the Serial number you would like to replace.
Type the correction into the Replace box. The Serial NO for that Sequence # will change. Depress the Save changes action button to save changes, or depress the Abandon changes action button to abandon changes. If you want to delete ALL of the Serial Numbers, depress the Delete action button. Then depress the Save changes action button. |
| 1.4.3.4.4. Invoking Serialization after the Work Order is Started |
Invoking Serialization after the Work Order is Started If you already have a Work Order started and then decide to invoke serialization, in order to assign serialization to a product with an open work order, in the Shop Floor Tracking Module, the parts must all be in a Work Center which is PRIOR to the Work Center in which serialization is to be applied.
Then the Work Center can be updated and the product moved BACK to the appropriate Work Centers after the product is serialized. If the Work Order has been completed and the product is in the Finished Goods Work Center, the user may move the product back to a “non-serial Work Center” and then serialize and update the Work Order. Then the user should move the parts back into the Finished Goods Work Center. If the parts in Finished Goods were already shipped, the user can use the Inventory Handling module to temporarily increase the finished goods to the needed quantity. Then they can be backed into the Work Order. After running these parts back down the chain, the user would use Inventory Handling to take the parts back out of inventory. |

| 1.4.3.4.5. Serial Number Turn-On Process |
There is no easy way to have some work orders without serialization and some with for the SAME product. Turning on Serial Numbers on a product with OPEN Work Orders must be done carefully. Here are some processes: 1. Using the same product and the SAME Revision – ship all of the non-serial numbered product PRIOR to turning on serialization OR don’t turn on serialization until you are ready to serialize everything not shipped. To serialize everything not shipped, you will have to move product back to the Work Center where serialization is started, then turn on serialization in Work Order Traveler Setup (for further information see Article #1134) and click on the “Update Open Work Orders”. Be sure to update all of the open work orders. If you don’t, you won’t be able to ship anything that was not updated. (The items will be in a black hole and will need a programmer to get them out.) 2. Using the SAME Revision, but using the special character trick: a. Copy the product number to the new product in the Inventory Control item Master but put "00" in front of the Rev. See Article #1058 for further instructions on copying a product number. b. Then copy the existing product BOM to the new 00 revision product. See Article #1104 for further instructions on copying a BOM. c. Turn on serialization for the new 00 rev product and copy the routing from the old product. Be sure to select which Work Center you want serialization to start. See Article #1106 for further instructions on how to turn on the serialization. d. Enter all new Sales orders using the 00 revision product number. e. When you have shipped all of the old non-serialized product, inactivate the product number in the Inventory Control module. See Article #1058 for further instructions on how to inactivate a product number. 3. Using a different revision number: a. Copy the product number to the new product revision in the Inventory Control Item Master. See Article #1058 for further instructions on copying a product number. b. Then copy the existing product BOM to the new revision product. See Article #1104 for further instructions on copying a BOM. c. Turn on serialization for the new revision product and copy the routing from the old product. Be sure to select which Work Center where you want serialization to start. See Article #1106 for further instructions on how to turn on the serialization. d. Enter all new Sales Orders using the revision product number. 4. You may prefer to create new revisions using the ECO module. It can change the revision of product in Work orders in WIP, but DO NOT turn on the serialization in the ECO module. See Article #1133 for further instructions on the ECO module. a. First change the revision of the product using the ECO module b. Then move the product back to the Work Center where you want serialization to begin in the Shop Floor Tracking module. See Article #1106 for further instructions on how to turn on the serialization. c. Then turn on serialization and select “Update Open Work Orders” in the Work Order Traveler Setup and click on the “Update Open Work Orders”. Be sure to update all of the open work orders. If you don’t, you won’t be able to ship anything that was not updated.(The items will be in a black hole and will need a programmer to get them out.) |
| 1.4.3.4.6. Re-work Work Order Serial Numbers |
If the rework Work Order is created from RMA, then the user doesn’t need to assign the serial number for the Work Order. The system will automatically transfer all serial numbers to the new re-work Work Order when the user creates the RMA Receiver. For a complete discussion of the RMA process, please refer to Article #1610. If the user MANUALLY creates a re-work Work Order, the following conditions for assigning existing serial number to a re-work Work Order will be:
When a Re-work Work Order is established for a serialized product, the user may select existing serial numbers that are in inventory (finished goods) that are to be reworked. Rework Work orders will not accept NEW serial numbers. When a serial number is placed in the rework Work Order, the serial number must exist in finished goods, and the number of serial numbers transferred to the Work order must equal the quantity of assemblies for the Work order. The part number for the serial number that is moved into the rework Work Order does not need to be the SAME part number and revision as the rework Work Order. Thus, if a user wants to upgrade part number 123 rev A to part number 123 rev B, they can transfer the parts to the Work Order and identify the serial numbers transferred. Parts may also be changed to a new part number: Part Number 123 rev A can be placed into a re-work Work Order for part number 234 rev C. The only condition is that the quantity and number of serial numbers must match. Once the record is saved a line shortage for the rework work order will be created and serialized parts will be issued to the "Rework" work order and the old part number will be removed from FGI at the time the new part number is moved into WIP. See example below:
Serialized Inventory Parts (910-9000 Rev. A1) in FGI
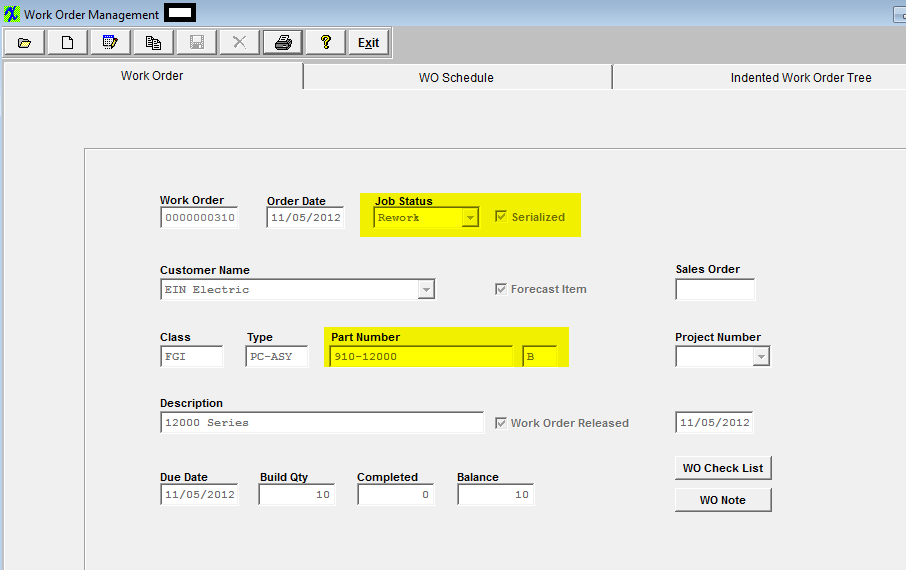
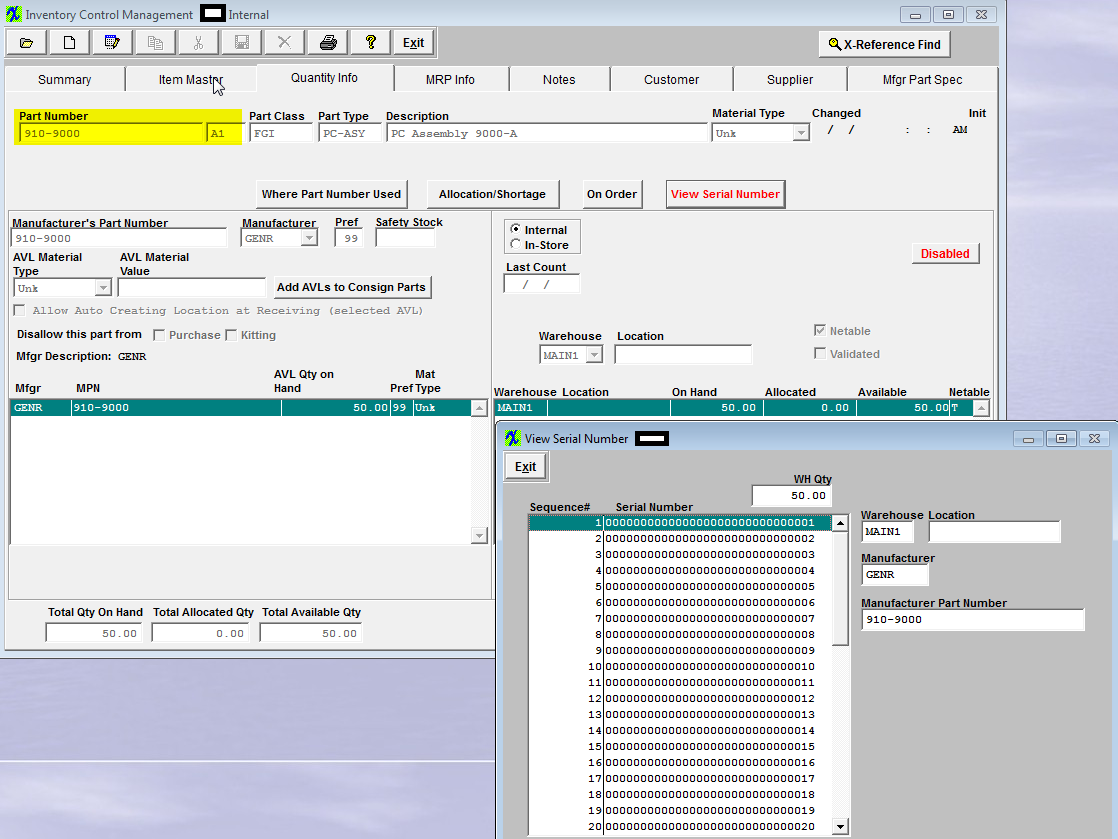 Create a Rework Work Order using a different Part Number (910-12000 Rev. B)
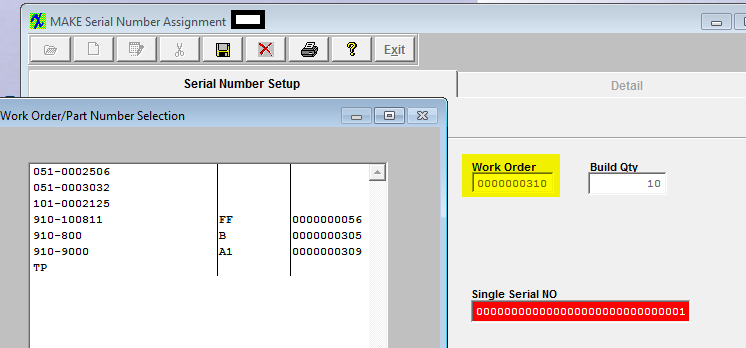
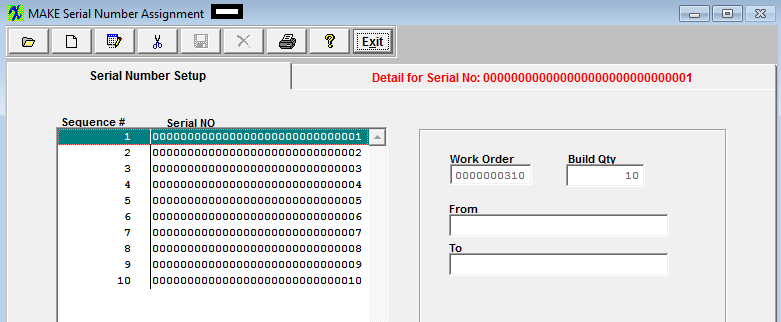
 Enter the Work Order Serial Number Control Module and enter in the SN's you want to rework, if the SN you entered is found in other locations a screen will appear displaying all the PN's that have this SN in FGI and user can select which PN they want to pull this SN from
 Once user has assigned all the SN's to this WO, they should depress the Save button
 Now user can go to the Kitting Module and release the kit. The Make Parts #910-9000 Rev. A1) have already been issued to the Kit.
 And Removed from FGI for the Old PN (#910-9000 Rev. A1)
 |
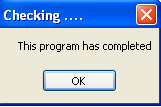
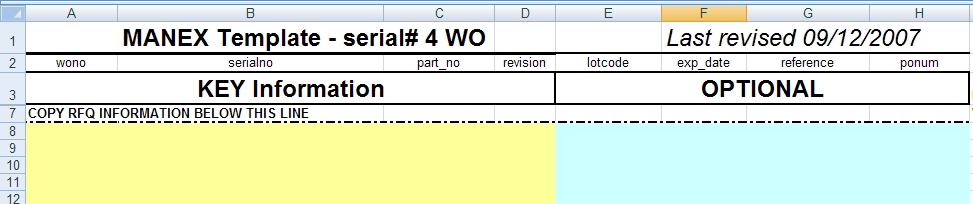
| 1.4.4. Serial Number Import-SQL | ||||
Serial Number Import
The following message will appear:
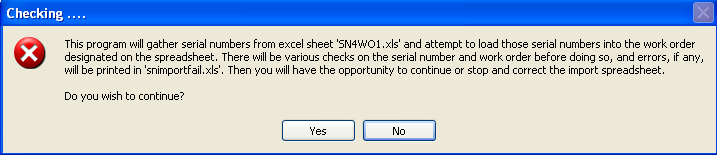 Depress "Yes" to continue user will receive the backup message then the following message:
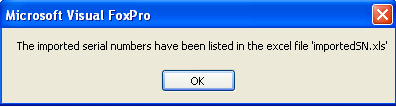 Then the Serial Number Import Complete message will appear:
 A 'importedsn.xls file will be created in the root directory, showing all the information that has been imported.
View the "WO Serial Number Control" and they have been uploaded correctly and complete:
 |
| 1.5. Capacity & Scheduling (OPTIONAL Module) |
| 1.5.1. Production Capacity Setup |
| 1.5.1.1. Prerequisites for Production Capacity Setup |
The following setup is required before the user will be able to use the Production Capacity Schedule.
After activation, "Production Capacity Setup" access for each user must be setup in the ManEx System Security module. Users with “Supervisor Rights” will automatically have access.
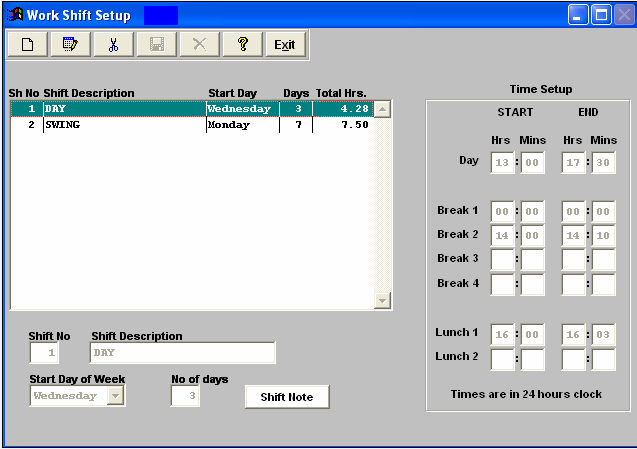
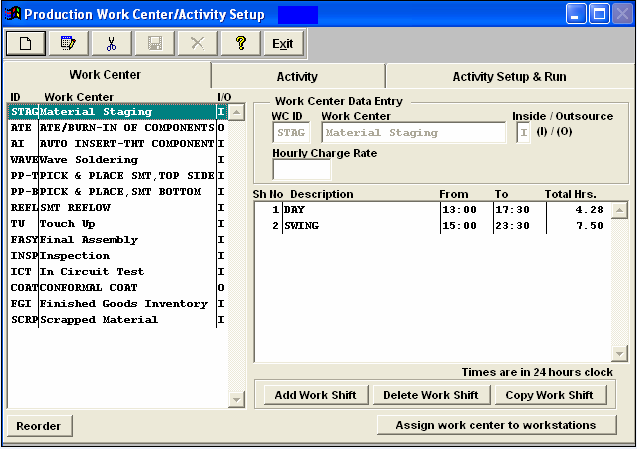
Work Shifts must be setup in the Work Shift setup module. The more work hours you have the higher your capacity.
 In System Setup for Shop Floor Tracking Defaults the system assigns the Average Hrs/Work Day as 24 hours.
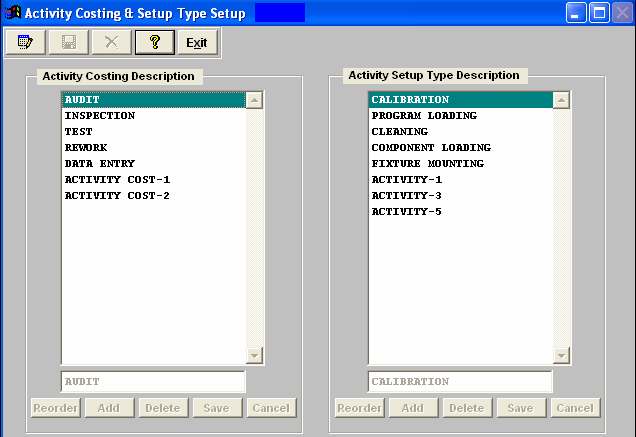
The Activity Costing Description and Activity Setup Type Description must be setup in the Activity Costing & Setup Type Setup module.
 Shifts and activities must be entered to each application Work Center in the Production Work Centers & Activities module.
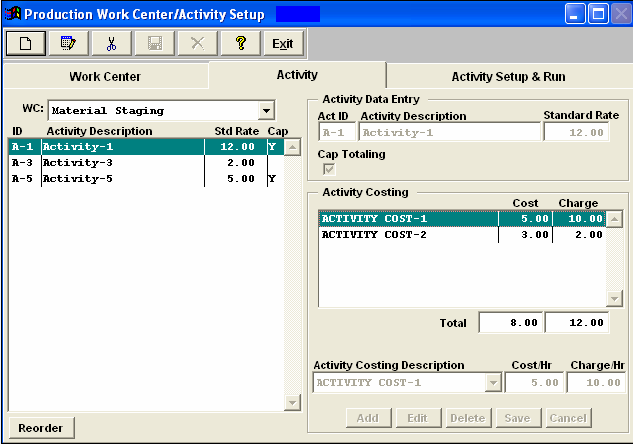
 Within the Activity screen, the user checks the Cap Totaling box and enters the applicable Activity Costing information.
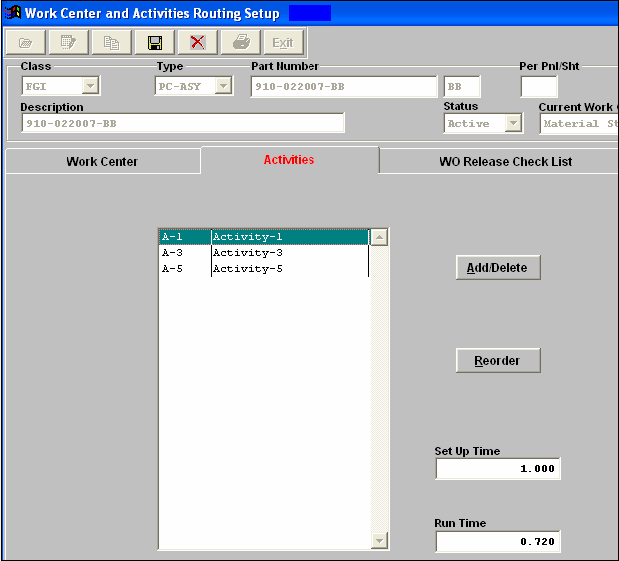
 The Work Center Activity Setup and Run Times must be entered in the Work Order Traveler Setup module for any applicable product.
 Check the status of the Work Order of interest – it can not be on Administrative Hold (for example), to complete the scheduling.
|
| 1.5.1.2. Introduction for Production Capacity Setup |
Capacity is at units/hour/operator-machine. Capacity then depends on the number of resources available, and that includes the number of shifts available. The program determines the duration of the job based on the resources, shifts, and active time during shifts (breaks and meals are excluded). The capacity planning module will stack up the requirements for multiple jobs on the same day and either require the user to add resources, or extend the completion time. Once the extensive setup requirements are met, the user may add a resource assignment. There are two views available in the Production Capacity Setup module. The Capacity Summary screen and the Activity Capacity View screen.From there, the user can enter the Dynamic Production Scheduling module and re-schedule Work Orders. There is also the opportunity to graphically view the Capacity Critical Path. |
| 1.5.1.3. Fields and Definitions for Production Capacity Setup |
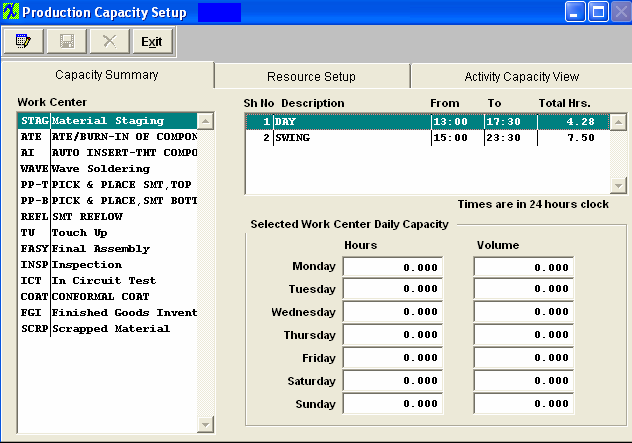
| 1.5.1.3.1. Capacity Summary Screen | ||||||||||||||||

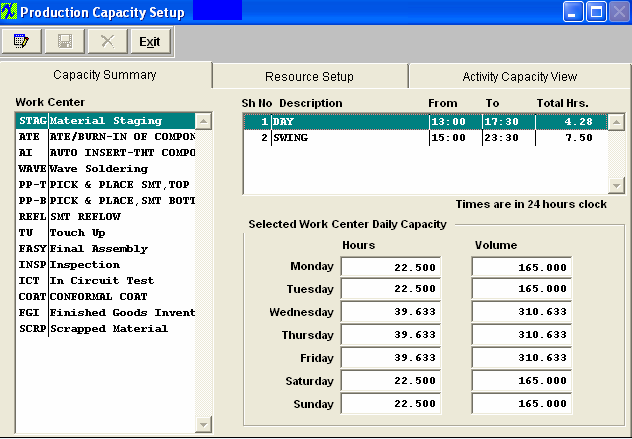
Selected Work Center Daily Capacity
|
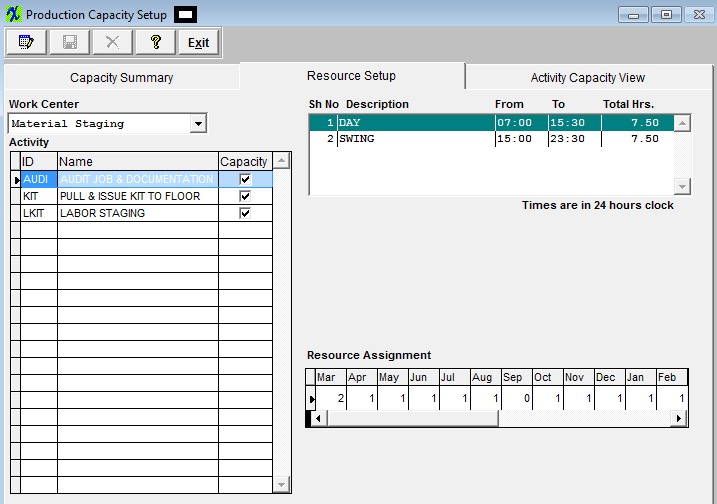
| 1.5.1.3.2. Resource Setup Screen | ||||||||||||||||||
|
| 1.5.1.3.3. Activity Capacity View Screen | ||||||||||||||||||||
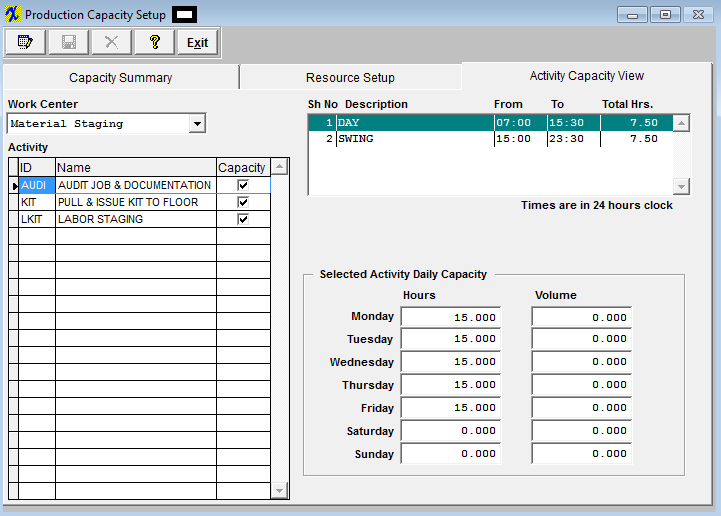
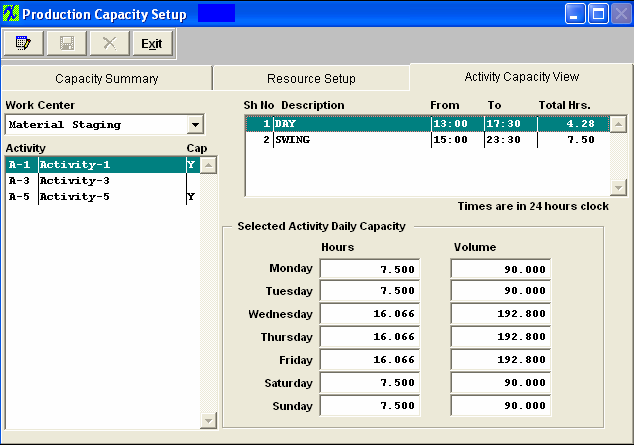
Selected Activity Daily Capacity
|
| 1.5.1.4. How To ....... for Production Capacity Setup |
| 1.5.1.4.1. Production Capacity Setup | ||
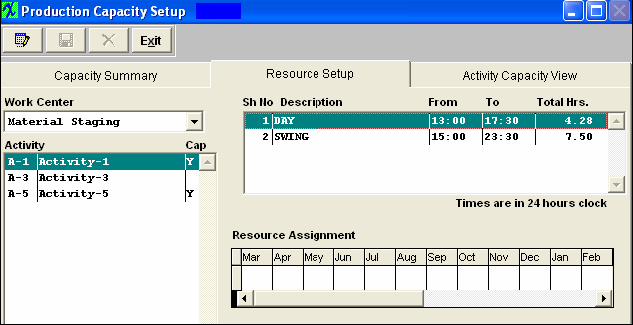
The following screen will appear. Each Work Center can have different shifts associated with it, but it must have at least one
 To setup the Resources and Capacity pertaining to a
 Each time a user enters the Capacity Setup module, the program checks the current date, and updates the month in the "Resource Assigment" grid to show the 12 months from current month. For Example: If the last time a user entered the module was March, so the 12 months are March/2008 to February/2009 (as displayed below). If user re-enters this module in June, the program will change the 12 months to June/2008 to May/2009 and also assign "1" to the 3 new new added months (March, April, and May/2009).
Notice there are three activities listed, but only 2 of them (“Activity-1” and “Activity-5”) will be calculated in the capacity because the “Cap” box has been checked in the Production Work Centers & Activities module.
To add/change a Resource Assignment, depress the Edit button and type in your password. Type in the required Resource Assignment. Depress the Save button to save changes or depress the Abandon Changes button to abandon changes.
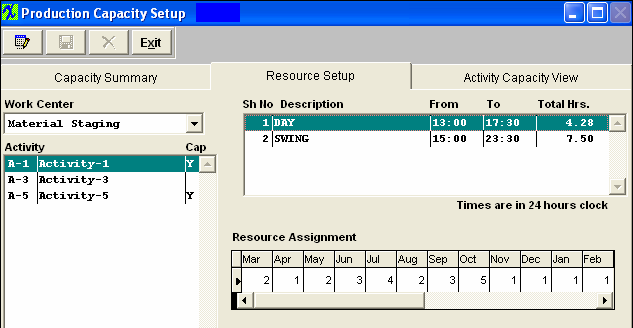 User may enter a different Resource Assignment number in each month for each activity/shift. Example for March: Activity-1 Day Shift is 2 and Swing Shift is 1; Activity-5 Day Shift is 2 and Swing Shift is 2.
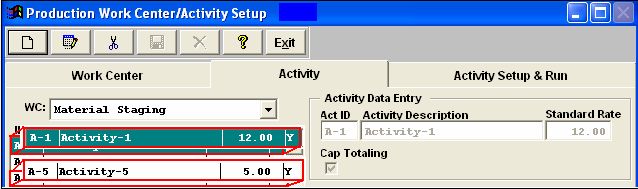
The Activity-1 Standard Rate is 12.00 and the Activity-5 Standard Rate is 5.00 (Setup in the Production Work Centers & Activities module)
 The way the system calculates the hours and volume is: Monday: has only the Swing Shift but is associated with both Activity-1 and Activity-5.
Hours: (7.5*1) + (7.5*2) = 22.50 or (Swing Shift hours x Resource Assignment for Activity-1) (Print Screen 2) plus (Swing Shift hours x Resource Assignment for Activity-5) (Print Screen 4) = 22.50
Volume: (7.5*1*12) + (7.5*2*5) = 165.00 or (Swing Shift hours x Resource Assignment for Activity-1) (Print Screen 2) x Standard Rate for Activity-1 (12.00) = 90.00 plus (Swing Shift hours x Resource Assignment for Activity-5) (Print Screen 4) x Activity-5 Standard Rate (5.00) = 75.00 for a total of 165.00 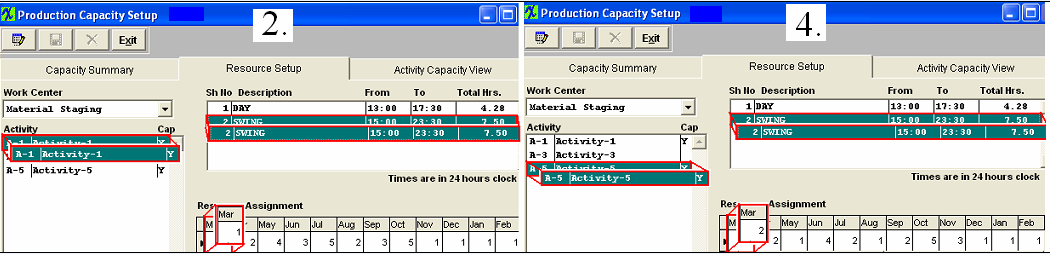 Tuesday: The same as Monday
Wednesday: has both the Day Shift and the Swing Shift and is associated with both Activity-1 and Activity-5. Hours: (4.28*2 + 7.5*1) + (4.28*2 + 7.5*2) = 39.633 or (Day Shift hours x Resource Assignment for Activity-1) (Print Screen 1) plus (Swing Shift hours x Resource Assignment for Activity-1) (Print Screen 2) = 16.06 plus (Day Shift hours x Resource Assignment for Activity-5) (Print Screen 3) plus (Swing Shift hours x Resource Assignment for Activity-5) (Print Screen 4) = 23.56 for a total of 39.633 Volume: (4.28*2 + 7.5*1)*12 + (4.28*2 + 7.5*2)*5 = 310.633 or (Day Shift hours x Resource Assignment for Activity-1) (Print Screen 1) plus (Swing Shift hours x Resource Assignment for Activity-1) (Print Screen 2) x Activity-1 Standard Rate (12.00) = 192.72 plus (Day Shift hours x Resource Assignment for Activity-5) (Print Screen 3) plus (Swing Shift hours x Resource Assignment for Activity-5 (Print Screen 4) x Activity -5 Standard Rate (5.00) = 117.80 for a total of 310.52
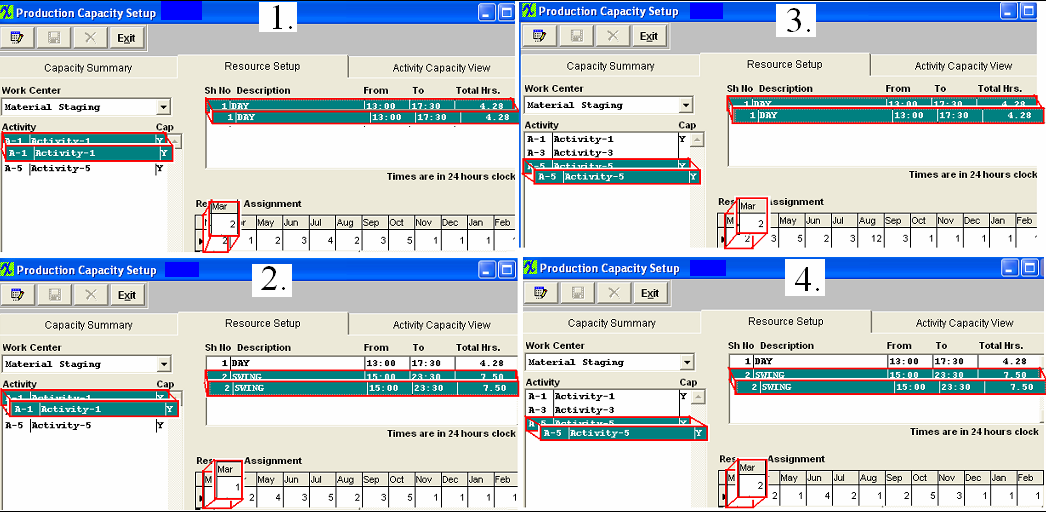 (The screen calculates from minutes, not by hours, so there may be a little bit of a difference.)
Thursday: The same as Wednesday Friday: The same as Wednesday Saturday: The same as Monday Sunday: The same as Monday
 To refresh the view in the Capacity Summary tab, highlight the
 For each
|
| 1.5.2. FAQ - Capacity & Scheduling |
Facts and Questions for the Capacity and Scheduling Modules
|
| 1.6. Time Log Management |
| The Time Log Management module is located in the WebManEx. For further detail see Article #5327 |
| 1.7. Time Log |
| The Time Log module is available in the WebManEx. For further detail see Article #5328 |
| 1.8. Project Setup Module (OPTIONAL Module) |
| 1.8.1. Prerequisites for Project Setup |
ManEx’s standard module configuration allows most users to accomplish their daily tasks. For those users wanting to get more from ManEx by leveraging the total solutions, this is one of the optional modules available for purchase. The Project Setup module gives the user the capability to tie multiple Sales Orders and Work Orders together. To place an order or to learn more about this specific module or any of the other optional modules please contact us at http://manex.com\contactus.aspx You have the option to have the Project # either assigned automatically or manually, within the Number System module.
Note: If you choose to use the Project Management module for separating internal inventory per customer, then you can abbreviate the customer name as an on-going project number. To do this you will have to change the numbering setup to Manual. Customer must be setup in the Customer Information module .
|
| 1.8.2. Introduction for Project Setup |
The Project Setup module gives the user the capability to tie multiple Sales Orders and Work Orders together. Projects can also have sub-projects or Parent projects associated with them. Multiple Projects can be established for a specific sales order. A Project (only one) may be assigned to each line on the sales order. Multiple lower level Projects (“sub-Projects”) can be established within a Project if necessary. These Projects do not have an assembly number, and do not drive MRP requirements. They simply define a structure into which Work Orders (WOs) are assigned and cost information is collected. Once a sales order and related Projects are established, one or more WOs are released at a level equal to or below the Project. These WOs are identified as belonging to the Project, they have an assembly number, and they drive MRP requirements through an indented BOM. Following release of this top level WO(s) and assignment of the WO to the Project, ManEx knows that all lower-level proposed WOs driven by that assembly also belong to the same Project. MRP reports will define all those actions required for the full assembly build, and will clearly indicate the Project number assigned to the top-level WO that is driving MRP demand. MRP will, for Sales Orders and Work orders with Project tags, necessarily revert to a MRP is done without regard to allocations. It runs strictly off of the demand and supply requirements, and the timing for each. Therefore, when MRP runs, if a part is on hand and allocated to another Project, MRP will consider it available for all Projects which have requirements for the part. If there are insufficient parts available to meet the total demand, then MRP will create order actions for the part (and Project) at the point the part becomes unavailable. Parts may be purchased and “pegged” to the Project at purchase by the buyers, using the MRP order action information. Purchases into general inventory and to specific work orders are also allowed. Through the receiving process, parts are automatically allocated to the Project consistent with the For the purposes of allocation to or kitting of lower level WOs that belong to the same Project, ManEx considers any part allocated to the Project to be available (without deallocation/reallocation) for the lower level WO, as long as the work order refers to the project. The Project Management module is designed to operate in two modes and they are:
In the Electronic Contract Manufacturing environment, it is important to be able to identify materials purchased for each customer and provide visibility to the current status of the inventory balances and open purchase orders. The Inventory Control module is able to keep track of all internal material and customer consigned material but it does not track the internal inventory by the customer for which the material was purchased. Keeping track of internal material by customer is important because if a customer’s order for products are cancelled or becomes obsolete, you will need to know the FGI and raw material exposure (quantity in the inventory and open purchase orders) for back billing the customer. Also, some customers request the status of inventory material value purchased specifically for them, including the open purchase orders. There are several possible ways to track open purchase orders and inventory quantity by customer not using the ManEx’s Project Management module but they requires number of manual processes, and the system has to be bent in a creative way to make these work. A couple of those methods are: 1. Assign a warehouse for each customer, with manual provision for tracking the material requirements by customer. Track the inventory requirements through the purchase process and during the kitting and shortage process. Some custom reports are needed to report the material activities by Customer. The option prevents the use of auto-kitting. 2. Use customer’s part number, with customer prefix at the front of each part number, as the internal part number. This will give the users the visibility for the demand, the purchase process and in the kitting and shortage process. The disadvantage with this method is that the company will not be able to aggregate the consolidated requirements for a lower unit cost. Users will need to open and track a lot more purchase orders and increase the volume for receiving and inspecting the parts. This will add manual labor hours to many functions and increased chances for errors at each step. Additionally, each time a customer is added, the users will be increasing the size of the item master file. Users lose the visibility and efficiencies of common parts for use in the inventory if each customer has their part numbers as the internal part number. Finally, the company also has to create some custom reports to get inventory information by customer.
This module tracks purchased material by assigning a sales order/work order product (or even a specific components) by customer to the Project in the Project Management module. The demand is created with traceable customer identification when the Project Management module is active. When issuing a purchase order, the module allows the user to peg the order to one or more projects with the same part, and with multiple quantities and delivery splits for easy control. When the parts are received, they are automatically allocated to the assigned projects and the material received can only be used by work orders associated with the same project. This is accomplished in the various work order kitting and shortage process. For the integrated visibility, all this can be tied to the Sales Order, Work Order, Inventory and to the customer. Customer material can be monitored through the inventory control module or through the Project Management module reports. Through these reports, user will be able to analyze inventory balances by customer, view open sales orders backlog by project and view sales order history by project allowing user to see the amount of business transacted with a specific customer.
Track Various Sales Orders and/or Work Orders by Project
Customers requiring the ability to track Project or a Manufacturing Program Management that has multiple sub-projects and/or multiple products can use this module until the end of the product life cycle. This module allows user to track all associated project sales orders, work orders and purchased materials. Use of the material tracking by project method is described above.
|
| 1.8.3. Fields and Definitions for Project Setup |
| 1.8.3.1. Project List Tab | ||||||||||||||||||||
|
| 1.8.3.2. Project Details | ||||||||||||||||||||
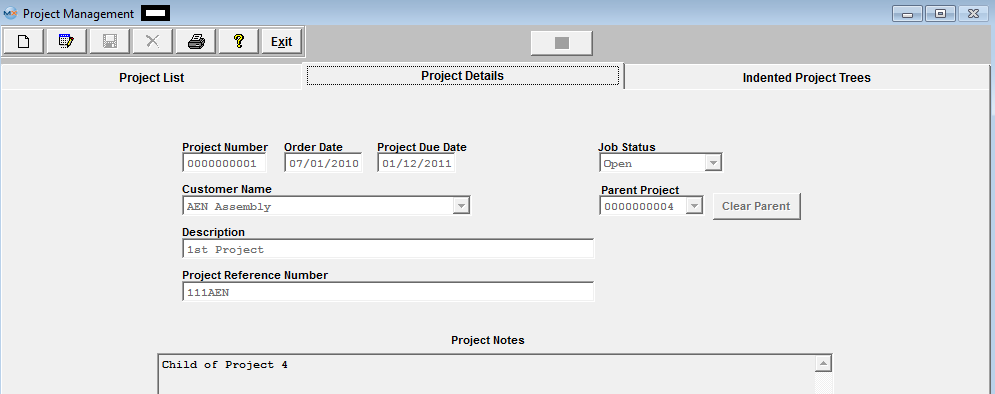
|
| 1.8.3.3. Indented Project Trees | ||||||||||||||||||||||||
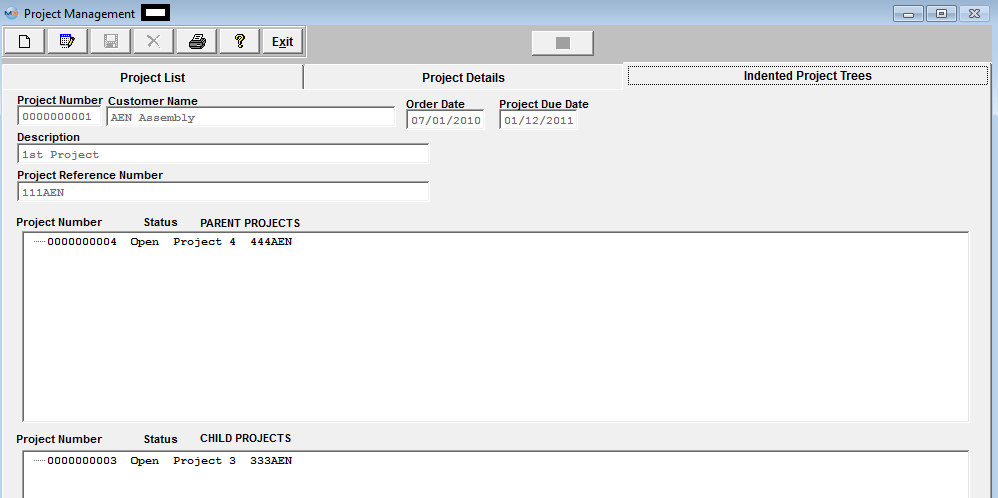
|
| 1.8.4. How To ......... for Project Setup |
| 1.8.4.1. Find a Project | ||||
The following screen will be displayed: This will list summary information regarding ALL OPEN projects.User may select the proper radio buttons to View All Customer Projects with Open Status or All Customer Projects with All Types of Status, or they may select to View Projects for One specific Customer's projects with Open Status or All Types of Status from the Selection Screen below.
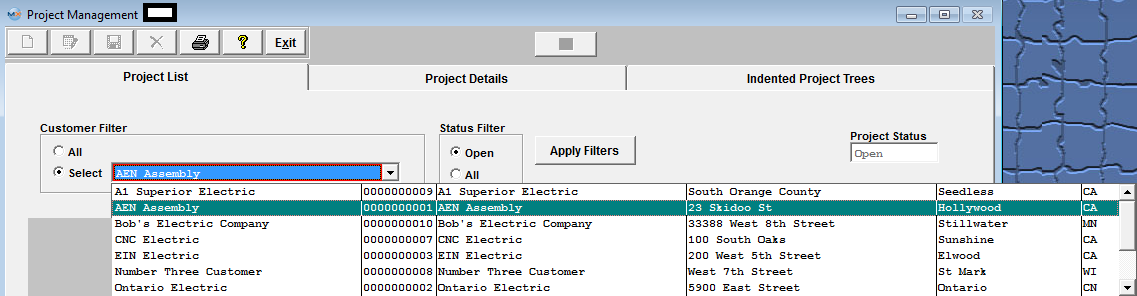 |

| 1.8.4.2. Add a Project | ||||
The following screen will be displayed: This will list summary information regarding all open projects.
Depress the Project Details tab and the following screen will appear:
Depress the Add action button and enter password. The following screen will be displayed:
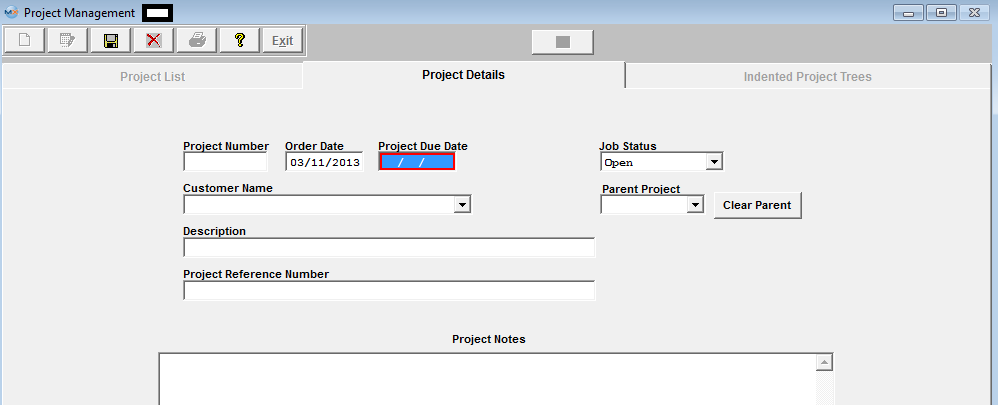 Enter in the following information: Project Number (if setup to manual), New Order Date (if desired), Project Due Date, Select the Customer from the pull down list.
Assign a Parent Project (if desired) to this project (another project that is identified with the SAME customer), depress the down arrow next to the Parent Project filed. A list of all of the project associated with the SAME customer will appear. Choose one from the list. Project Description, Project Reference Number, and any project notes (if desired). Depress the Save record action button to save changes or depress the Abandon changes action button to abandon changes. |
| 1.8.4.3. Edit a Project | ||||
The following screen will be displayed: This will list summary information regarding all open projects. Highlight the Project you want to Edit. Depress the Project Details tab and the following screen will appear:
Depress the Edit action button and enter password. The following screen will be displayed:
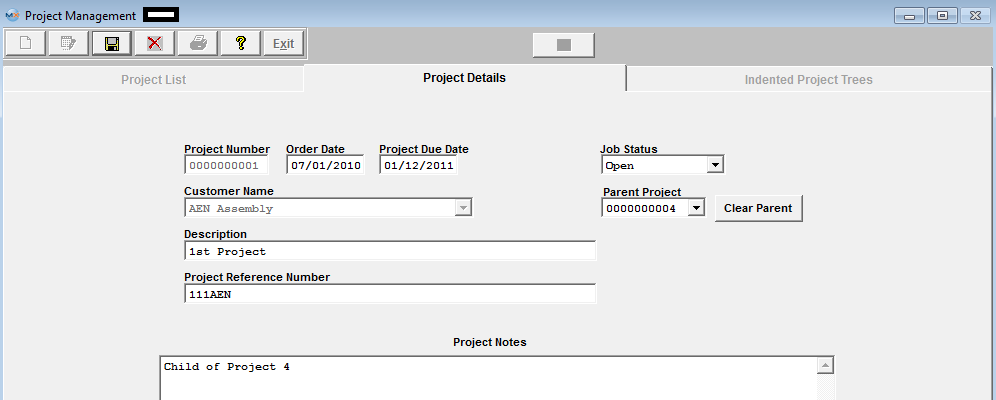 Edit the following information: New Order Date (if desired), Project Due Date, Job Status, Parent project, Description, Project Reference Number, or Project Notes.
|
| 1.8.5. Reports - Project Setup | ||||||
|
To obtain the Project Setup Reports within the Web, select the WEB Print button from the ManEx action buttons at the top of the screen. For further detail on How the Reports work within the Web refer to Article #5477.
Note: In order to access the Reports within the Web the Company Root URL must be setup within the System Appearance module and user must be linked to web within the System Security Module.
Select the Report Type: PROJECT - A List of Reports will be displayed that are available on the Web for PROJECT
To obtain the Project Setup Reports within the desktop, select the Print button from the ManEx action buttons at the top of the screen.  The following reports screen will display a list of reports that are available on the ManEx Desktop: Project Inventory Status Report - This report shows all of the inventory and inventory value on hand that is allocated to open projects.
The following report will be displayed. Project Back Order Status / SO Report - This report set shows all of the assemblies and their value that are open for shipment against open projects.
The following report will display:

The following report will be displayed:
|