| 1. Customer Information (CI) |
| 1.1. Customer Information |
| 1.1.1. Prerequisites for Customer Information | ||||||||||||||||||||
|
After activation, "Customer Information" access for each user must be setup in the ManEx System Security module. Users with “Supervisor Rights” will automatically have access.
|
| 1.1.2. Introduction for Customer Information |
The Customer Management Module is used to enter the details about customers. This information is used to prepare invoices and packing lists, as well as establish defaults to be used when new orders are created for a customer. A customer may have more than one bill-to address, if there are different divisions for the customer with different accounting departments. Sometimes customers may wish to have material drop-shipped to a third party and bill them. One customer bill-to address will be identified as the default address to be used in the creation of new orders. One customer ship-to address will be identified as the default address in new orders. Also, terms and conditions identified in these screens will be used as defaults for shipping, invoicing and accounting. The user has the opportunity to modify the default information at the time a new order is created.
|
| 1.1.3. Fields & Definitions for Customer Information |
| 1.1.3.1. Customer Information Tab | ||||||||||||||||||||||||||||||||||||
Field & Definitons
|
| 1.1.3.2. Bill-To Tab | ||||||||||||||||||||||||||||||||||||||||
Field & Defintions
|


| 1.1.3.2.1. Customer e-Bank Information | ||||||||||||||||||||||||||||||||||||||||||||||||
Note: this information is here for future implementation at this time. It does not have any affect or functionality within Manex at this time. Information populated here would be the Customer's banking information
|

| 1.1.3.3. Ship To Tab | ||||||||||||||||||||||||||||||||||||||||||||||||||||||||||||||||||
US Tax - If user doesn't check "Use Foreign Tax", then the foreign tax set up will be invisible and the US Tax setup will be visible.
Foreign Tax - If user checks "Use Foreign Tax", then the foreign tax set up will be visible and the US Tax setup will be invisible.
|
| 1.1.3.4. Profile Tab | ||||
Fields & Definitions
|
| 1.1.3.5. Lookup Tab | ||||||||
Fields & Definitions
|
| 1.1.4. How To .... for Customer Information |
| 1.1.4.1. Find Existing Customer Information | ||||
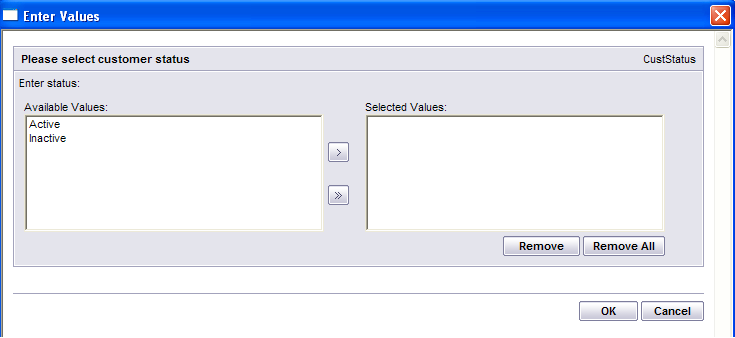
The following screen will be displayed: There are two ways to Find Existing Customer Information: 1. By using the Find button located in the tool bar at the top of the screen. The following screen will appear: Double click on the selected customer name to view the customer information. If you want to view customers with Inactive status or Quote status you must select the Inactive radio. 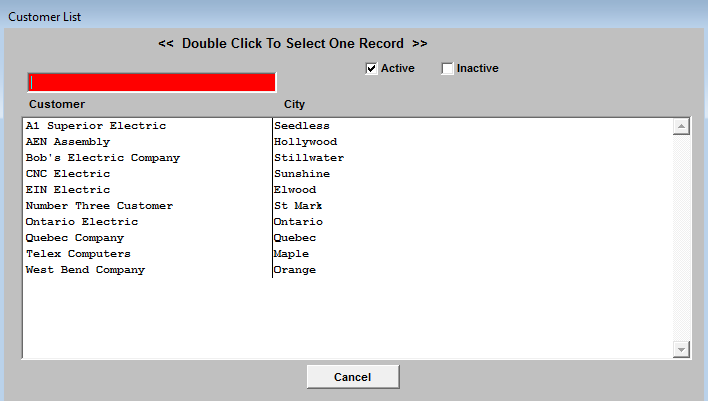 2. Depress the Lookup tab. This screen allows the user to locate a customer alphabetically. Double click on the customer name and view that customer information without having to use the FIND button. This screen will list all of the customers entered with their name beginning with the letters included in the tab selected. If you would like to view customers with Inactive status or Quote status you must select the Inactive radio. NOTE: If a customer's name begins with a number it will not be displayed in the Lookup. 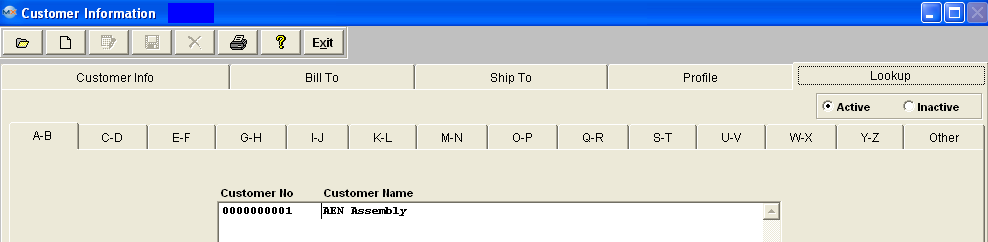 |
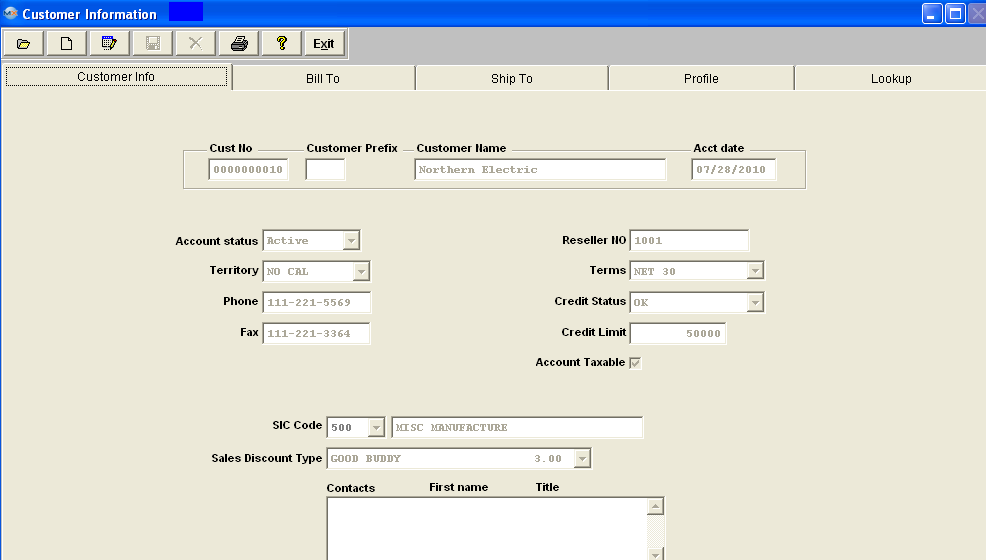
| 1.1.4.2. Add a Customer | ||||||||||||||||||||
|
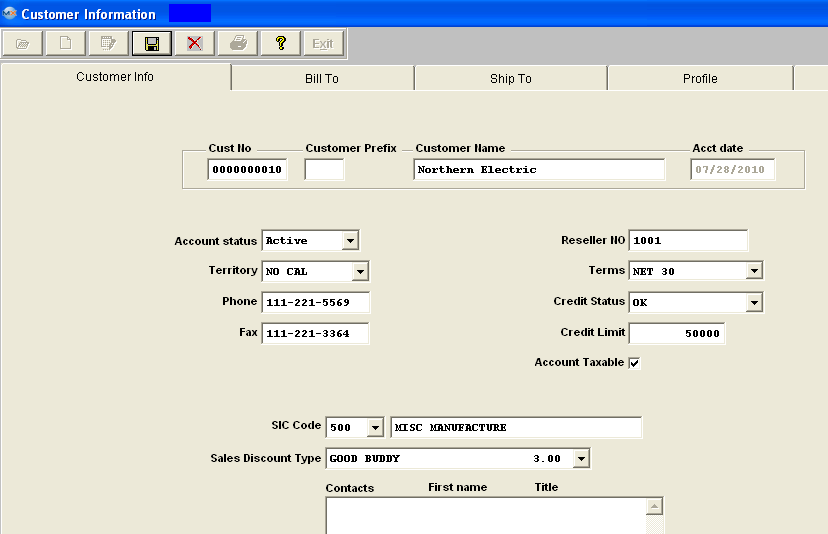
The following screen will be displayed:
The customer number assigned to the customer. If automatic, will be completed when the data is saved. If manual, must be entered. Enter the Customer Name. The date the account was established (defaults to current date). Enter the account status (Active, Inactive, or Quote). Active is the default. Choose the Territory for the account from the pull down (Territories are established in System setup/Sales Territory). Enter the phone number of the Customer. Enter the Fax Number of the Customer. The user may include the customer’s resale number for tax purposes. Enter the standard terms established for the customer from the pull down. Terms must first be established in the System setup/Payment Terms setup. Note that this field may be entered or edited only by a user with full Accounting rights. Choose the Credit status of the customer from the pull down. May be OK, On Hold or Reject. Note that this field may be entered or edited only by a user with full Accounting rights . Enter the credit limit established for the customer. The credit limit check takes place within the packing list. (Credit Limit Restrictions). Note that this field may be edited only by a user with full Accounting rights. Check the box if this account is taxable. Enter the SIC code for the Customer. If used, must first be established in the System setup/SIC Codes setup. Enter the Sales Discount available to this customer as established in System setup/Sales Discount Type setup. Contacts MUST be added for a customer within the Customer Contact module after the Customer has been created within the Customer Information. When this screen is viewed for an existing customer, contacts entered in the Customer Contact Module will show for this customer. This field is NOT editable from this module.
 After completing the Customer information screen, the user may click on the Bill To tab.
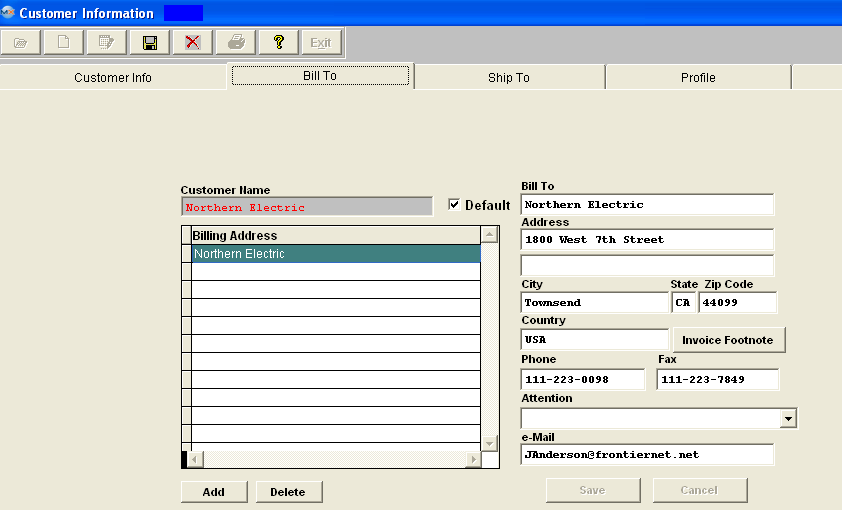
In this screen, the user defines the customer information for invoicing purposes. The Customer Bill-To Directive buttons will now be active:
This button allows the user to modify existing Bill-To information about a customer. If more than one Bill-To address exists for a customer, the address highlighted is the one that will be opened for editing. This button allows the user to delete an existing Bill-To record for a customer. This button allows the user to save the modified Bill-To information. This button will cancel any modifications made to the screen after the edit button has been pressed. Depress the Add directive button, located at the bottom of the screen and the following screen will appear:
 Enter the name of the organization to which invoicing is to be sent. (It may be a different division, or a drop-ship situation.) Enter the Customer Bill-To Address (may use two lines). Enter the City, State and Zip Code for the Customer Bill-To Address. Enter the Customer Country. Enter the phone number at the Customer’s Bill-To Address. Enter the fax number at the Customer’s Bill-To Address. The Contact Name at the Bill-To Address (if established in the Contact module). Enter the e-mail address for the Bill-To Customer.

Depressing this button will open a screen for a Invoice Footnote to be added that will appear on all of the Invoices for that customer. After completing the Bill-To information, depress the Save button at the bottom of the screen.
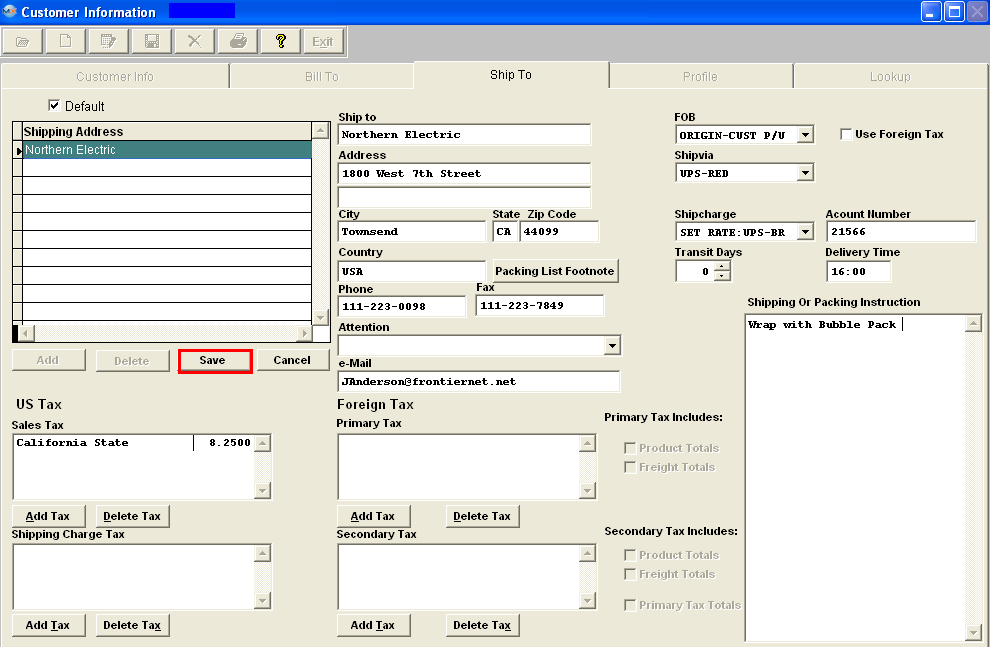
 The user then may click on the Ship To tab. In this screen, the user defines the customer information for shipping purposes. The Ship-To screen has additional tabs for more detailed information. The first screen is the Ship-To Address Information. The screen and fields are identical to the Bill-To screen, except that the information will be used for packing lists. Pressing the ADD button located at the bottom of the screen will automatically fill the information from the Bill-To screen, if it has been completed. All data may be edited and saved, or new data may be added to the database.
Select the FOB Terms from the pull down established for the customer. Must be established in the System setup/FOB setup prior to use. Select the Ship Via from the pull down definition established for the customer, as entered in System setup/Ship Via setup. Select the shipping charge from the pull down classification used for charging the customer, as entered in System setup/Ship Charge setup. Enter the number of Transit Days from user’s dock to customer’s dock, based on ship-via method. If the Customer transit days are blank or zero that then the system will take from the Delivery Schedule default. Enter the freight account number if the customer wishes the freight to be shipped against their own account. Enter the customer preferred delivery time to their dock.
When "Use Foreign Tax" box is checked, the foreign tax setup will be visible and US Tax setup will be invisible. When "Use Foreign Tax" box is unchecked the foreign tax set up will be invisible and the US Tax setup will be visible.
Check the "Use Foreign Tax" button to calculate foreign tax, if foreign tax applies to this Ship To address. This will allow users to use multiple taxes, based on the Province. See the Foreign Tax Overview below. Once this box has been checked for a specific address it should not be unchecked. If customer also uses US Tax user should setup another ship to address for US Tax. This box should not be checked and uncheck per shipment. Enter the Primary and/or Secondary tax information to be charged on taxable items shipped to this address, by depressing the "Add Tax" button and selecting a tax rate from the Pull Downs. Information being displayed in the pull downs is from the information entered in System Setup/Sales Tax Authority Table setup. The User can modify how the tax should be calculated by checking or unchecking the box on the right of the screen. If not using foreign tax, enter the sales tax to be charged on taxable items shipped to this address. See the US Sales Tax Overview below. Enter the shipping charge tax to be charged on freight costs for shipping to this address. Adding a Sales Tax or a Shipping Charge Tax in Customer Information requires that those items added be entered in System Setup/Sales Tax Authority Table setup. The Delete Tax button allows the user to select an existing tax authority for the customer for deletion.
Sales Tax Overview
Sales Orders/Customer Information US Sales Tax Overview
For Sales Order Items with no Tax, leave the Tax box unchecked. No further action is required. To Manually add US Tax (if not set up in Customer Information), enter line item and then in Pricing Screen click on Add Line and enter description of Sales Tax and Tax Amount manually. A Sales Type for the appropriate Tax G/L number should be setup in Accounting so that it can be selected when entering the Sales Tax manually. The full amount of the Tax will be Invoiced upon shipment of the first item so using manual sales tax entries may not be useful for shipments with multiple shipments against the same line item. Checking the Tax box in Sales Order Pricing will not calculate or add US Tax for a line item unless the Shipping Address for the particular Customer selected in the Sales Order Header has been set up. Shipping Address Tax Setup is done in the Tax and Shipping Mode screen under the Ship To tab under Customer Information Management. If a particular Customer Ship To Address has more than one US Tax (such as a Sales, Use, Excise, etc. tax), then the taxes may be entered in System Setup individually and added individually to the appropriate Customer Ship To addresses. If there are more than one US Tax setups for a Customer Ship To Address, Manex will add up all the tax rates and apply the combined percentage to the pre-tax line item total.
Foreign Tax Overview
User CANNOT manually add Foreign tax to Sales Orders or Invoices. The Foreign tax box must be checked for the Shipping Address for the particular Customer selected in the Sales Order Header.
If the Foreign tax box is checked for the Shipping Address for the particular Customer selected in the Sales Order Header. Pricing will be listed as follows on the Sales Order Acknowledgement, Invoice, RMA, and Credit Memo: First the Product Sub-tot AMT, the Sales Discount (if applicable), the Freight AMT (if applicable), a SUB-TOTAL, the GST TAX (Primary tax) (Note: the Primary tax will always be displayed even if it is zero, if a Secondary Tax is present), then a second Sub-Total, PST TAX (secondary tax), and last the TOTAL. If no PST tax (secondary Tax), Sales Discount, or Freight is involved, then no lines would print for these items. See the Foreign Tax Examples.xls attachment to see how the Primary and Secondary taxes are calculated.
The Primary tax and Secondary tax is divided into the Sales tax and Shipping tax on the Sales Tax reports.
For Example:
Primary Tax (GST): 144*10% (sales tax) + 0 (no freight tax is calculated) =$14.40
Secondary Tax (PST): 144*8% (sales tax) + 12*8% (Freight tax) = $12.48
Divided into sales tax and freight tax:
Sales Tax: 144*10% (sales tax) + 144*8% (sales tax) = $25.92
Freight Tax 0 (from primary tax) + 12*8% (from secondary tax) = $0.96
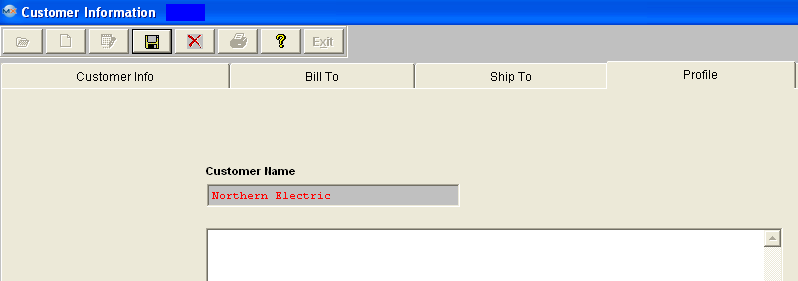
Enter the Shipping Instructions - This field is a memo field that may be used to record directions, notes, cautions, etc. for shipping to this Customer Address. After completing the Ship To information select either the Save or the Cancel button located below the Shipping Addresses. Then the user may click on the Profile Tab. In this screen, the user defines the Customer Profile notes for internal purposes. This screen is a memo field that may be used to record customer company information.
Once the record is complete user must depress the Save changes icon to save changes or the Abandon changes icon if you do not want to save change. |


| 1.1.4.3. Edit Customer Information | ||||||
|
The following screen will be displayed:
Depress the Find action button.
The Customers Information will appear on the screen: Depress the Edit action button. Enter password. All fields available for editing will be enabled for modification. Keep in mind that any changes within these screens will update all Open Sales Orders, Packing Lists, Invoices, RMA's, etc. upon save. Note: Terms, Credit Status and Credit Limit may only be edited by Accounting. All fields with the exception of the Customer No and Acct date become editable. If a user changes the Account status from Active to Inactive the program will check if there are any active BOM's and ask if the user wants to inactivate those BOM's at the same time or not. If the user will answer "YES" all BOM associated with the customer will be Inactive. When the user tries to Activate an Inactive BOM, which is associated with an inactive customer, the program will ask the user if they want to activate the customer at the same time, if not the system will abort BOM activation.
If a user changes the Terms, this will NOT affect existing Sales Orders, Packing Lists and/or Invoices. When creating a Packing List/Invoice from an existing Sales Order the old Terms will default in and user will need to manually change them. The new terms will ONLY affect any NEW Sales Orders that are created within the Sales Order Management module after the change has been made.
The Contacts field is not editable from this module. The Contacts must be edited in the Customer Contact section.
To Add a new Bill To address, user must select the "Add" button located below the List of Billing Addresses.
To edit an existing Bill To address, highlight the Bill To address located in the list on the right, and edit the information in the fields located on the left.
To Delete and existing Bill To address, highlight the Bill To address located in the list on the right, select the "Delete" box located below the List of Billing Addresses.
 Once changes have been completed user must first depress the "Save" or "Cancel" button at the bottom of the screen.
To Add a new Ship To address, user must select the "Add" button located below the List of Shipping Addresses.
To edit an existing Ship To, highlight the Ship To address located in the list on the right, and edit the information in the fields located on the left.
To Delete and existing Ship To address, highlight the Ship To address located in the list on the right, select the "Delete" box located below the List of Shipping Addresses.
Tax Setup CANNOT be changed until all OPEN credit memo's have been approved for this customer. If users attempts to change the Tax Setup and Credit Memo's with "OPEN" status are found for this customer, they will receive the following message.
  Once changes have been completed user must first depress the "Save" or "Cancel" button located at the bottom of the Shipping Address List.
At the conclusion of the modifications process, the user must Save changes, or Abandon changes using the action buttons. If you depress the Save changes button all records will be updated with new information. Note: User will only be allowed to delete an existing Bill-To or Ship-To address for a customer if this address is NOT linked to a Sales Order. If this address is or has been linked to a Sales order you will receive the following message: 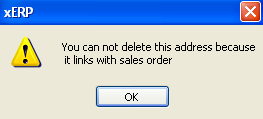 |
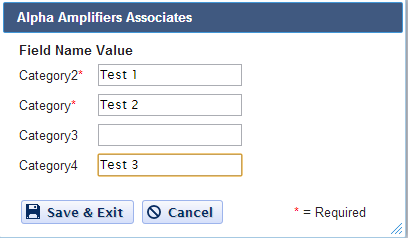
| 1.1.4.4. Link User Defined Fields to a Customer |
| The User Defined fields MUST be setup within Web ManEx. For further detail see Article #5454.
The User Defined Fields can
then be linked to a Customer by selecting a record in the ManEx
Desktop, and selecting the UD action button (as displayed below).
The UDF for that section will then be displayed, and user can make changes (if applicable), Save & Exit or Cancel.
|

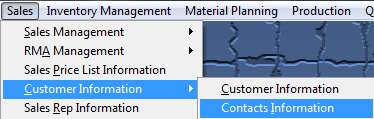
| 1.2. Contact Information |
| 1.2.1. Prerequisites for Contacts Information | ||||
|
After activation, "Customer Information & Customer Contact Information" access for each user must be setup in the ManEx System Security module. Users with “Supervisor Rights” will automatically have access.
|
| 1.2.2. Introduction for Contacts Information |
The Contact Module is used to record the details of customer contacts. Contacts may be of any nature, but must be associated with a customer. Manex provides the user with the ability to maintain both professional and personal details about a contact, including provision for personal tastes and affiliations. Contacts must be entered in this module if they are to be included in the customer Ship-To and Bill-To data fields at a later time. A contact who has moved to another customer may have a new customer assigned to them without having to re-enter their personal data. |
| 1.2.3. Fields & Definitions for Contacts Information |
| 1.2.3.1. Business Tab | ||||||||||||||||||||||||||
Fields & Defintions
|
| 1.2.3.2. Personal Tab | ||||||||||||||||||||||
Fields & Definitions
|

| 1.2.3.3. Lookup Tab | ||||||||||
Fields & Defintions
|
| 1.2.4. How To .... for Contact Information |
| 1.2.4.1. Find a Customer Contact | ||||
The Following screen will be displayed: There are two ways to Find Existing Customer Contacts: 1. By using the Find button located in the tool bar at the top of the screen. The following screen will appear: Select the desired Filter: by selecting the appropriate radio button - Active, InActive, or All. Select the desired Find: by selecting the appropriate radio button - Last Name, First Name, or Customer. Enter the information into the red box, depress the Enter key and the information will populate the screen. 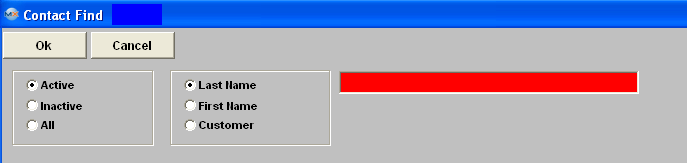 2. Depress the Lookup tab. This screen allows the user to locate a customer contact alphabetically. Double click on the customer contact name will bring the associated data into all screens without having to use the FIND action button. This screen will list all of the customer contacts entered beginning with the Last Name, First Name, Company, Title and Contact Phone number (not the company phone number).
|
| 1.2.4.2. Add a Customer Contact | ||||||||
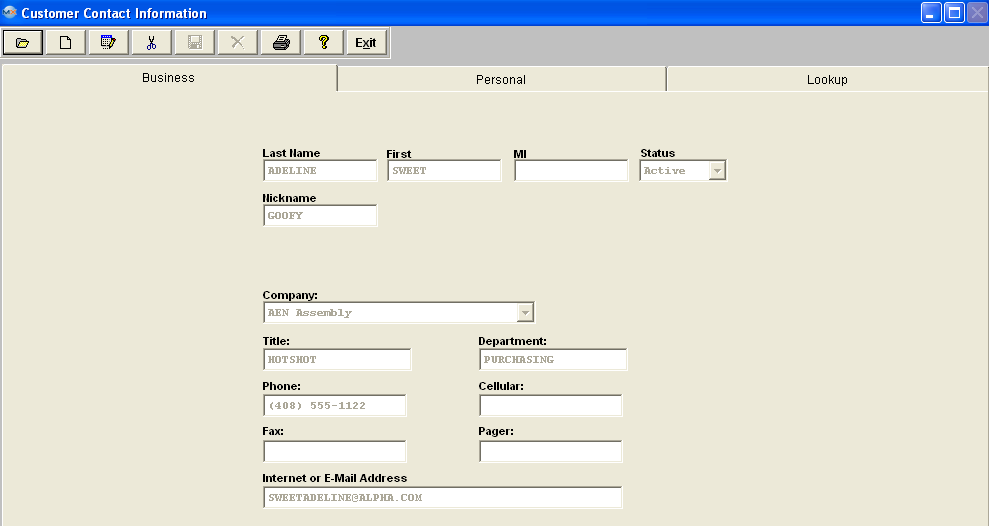
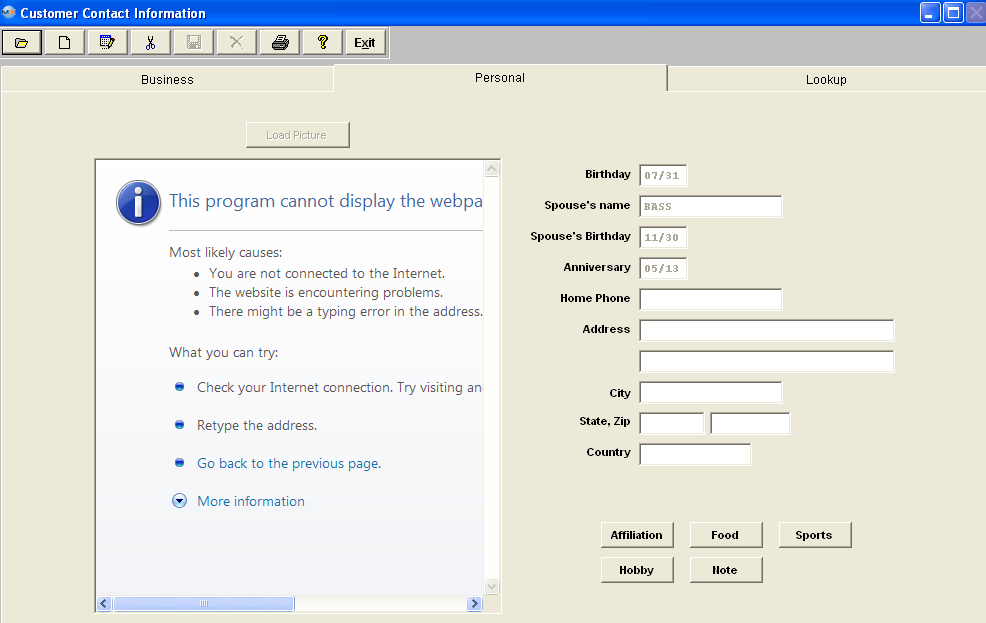
The following screen will be displayed: Enter in the last name of the contact being added. Enter in the first name of the contact being added. Enter in the middle initial of the contact. Select the status of the Customer Contact, either Active or Inactive. Enter in the nickname of the contact. Select the company to which the contact belongs by depressing on the down arrow located on the right hand side of this field and highlighting the selection. Enter in the title of the contact at the customer. Enter in the phone number and/or extension of the contact at the company (may be different than the company main number). Enter in the FAX number of the contact at the company (may be different than the company main number. Enter in the E-Mail address of the contact. Enter in the department at the customer in which the contact works. Enter in a Cellular phone number for the contact. Enter in a Pager number for the contact. After completing the Business information, the user may click on the Personal tab. In this screen, the user may enter personal information relating to the contact.
The Customer Contact Directive buttons will now be active.
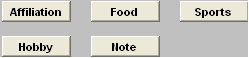
This set of buttons allow the user to record specific information that they may wish to retain about the customer contact. It is divided into several categories to narrow the search for information later. Pressing any of these buttons brings up a memo window that may be added to, edited or canceled at will. Enter in the Customer Contact Birth Date. Enter in the Customer Contact’s Spouse Name. Enter in the Contact’s Spouse’s Birthday. Enter in the Contact’s Anniversary. Enter in the Contact’s Home Phone. Enter in the Contact’s Home Address(two lines available). Enter in the Contact’s Home City. Enter in the Contact’s Home State and Zip code. Enter in the Contact’s home country. Depress the Save action button to save changes, or depress the Abandon changes action button to abandon changes. |
| 1.2.4.3. Edit a Customer Contact | ||||||
The following screen will be displayed:
Or user can find an existing Customer Contact by using the Lookup screen:
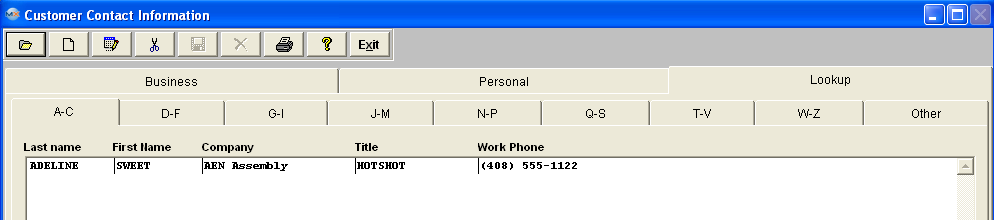 Once you have made your choice, the information will be displayed as follows:
Depress the Edit action button. Enter password. All fields available for editing will be enabled for modification. At the conclusion of the modifications process, the user must Save changes, or Abandon changes using the action buttons. Depress the Exit action button to return to the previous screen. |
| 1.3. Reports - Customer Information |
| 1.3.1. Reports - Customer & Customer Contact | ||
|
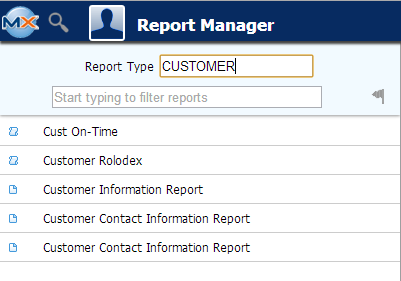
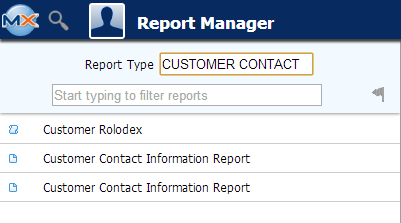
To obtain the Customer Information Reports within the Web, select the WEB Print button from the ManEx action buttons at the top of the screen. For further detail on How the Reports work within the Web refer to Article #5477. Note: In order to access the Reports within the Web the Company Root URL must be setup within the System Appearance module and user must be linked to web within the System Security Module. Select the Report Type: CUSTOMER OR CUSTOMER CONTACT - A List of Reports will be displayed that are available on the Web
for CUSTOMER OR CUSTOMER CONTACT
To obtain the Customer Information reports, select the Print button from the ManEx action buttons at the top of the screen.
The following reports screen
will display a list of reports that are available on the ManEx Desktop:
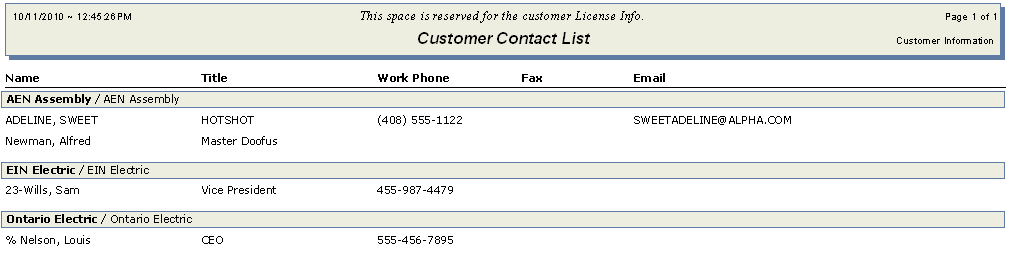
Highlight the desired report and then depress the OK button: Customer Information Report
The following report will print: 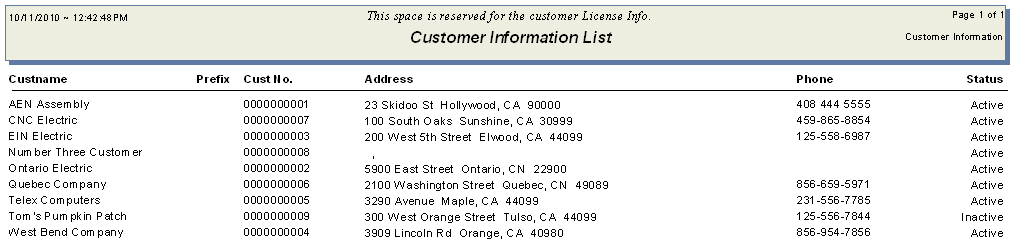 Customer Contact Information Report Highlight the report, depress the OK button:
The following report will print:
|

| 1.4. FAQs - Customer Information |
| FAQ's for the Customer Information Module |