1. Work Shift Setup

1.1. Prerequisites for Work Shift Setup
Complete the attached worksheet and  "Mark as Completed RoadMap Section B Item 3-abefore continuing the setup.
 
User MUST have full rights to the "System Setup"  in System Security to setup these modules.   User with "Supervisor Rights" will automatically have access.


1.2. Introduction for Work Shift Setup

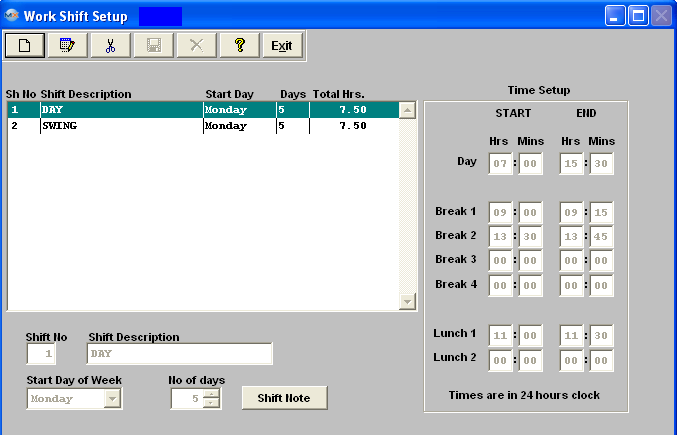
Work Center Shift Setups may be established for use in capacity planning. Your work shift setup is a factor in your capacity. The more work hours you have the higher your capacity.  Each work shift has a starting and ending time (entered in 24-hour format). The user may enter as many shifts as may be needed to describe the availability of resources. Shifts may overlap, and be any duration. Provision for multiple breaks and lunches are made for long shifts. 

1.3. Fields & Definitions for Work Shift Setup


Shift No

The shift number.

Shift Description

The description of the shift, 25 characters maximum length.

Start Day of Week

The day of the week considered to be the first day of the shift for the week. 

Number of Days 

The number of weekdays that define the shift. 

Total Hours

Total time actually working, does NOT including breaks and lunches. 

Division 

The division number for that shift, if applicable. 

Start and End times

This is where you setup the beginning and end of shift, along with the break and lunch times.

Activities:

 Day: The beginning and end of the shift

 Break (1-4)      Up to 4 break times defined.   

 Lunch (1-2)     Up to 2 lunch breaks defined.    


1.4. How To ..... for Work Shift Setup
1.4.1. Setup the Work Shift Module

Enter the SQLSYSSETTING.EXE (within the ManEx root directory)
This action will then prompt the user for a password

The following screen will be displayed, enter the Production/Work Shift Setup 


The following screen will be displayed:

The user may Add new or Edit and Delete existing shifts.

The user must either Save or Abaondon to close the screen.

Where Used:  In the job routing functions for a product.

«Mark as Completed in RoadMap in Section B Item 3-a»