| 1. General Ledger |
| 1.1. Fiscal Year Calendar |
| 1.1.1. Prerequisites for the Fiscal Year Calendar |
Complete the attached worksheet and "Mark as Completed RoadMap Section C Item 2-a" before continuing the setup.
There are no prerequisites required.
|
| 1.1.2. Introduction for the Fiscal Year Calendar |
This is the section to enter fiscal year calendar information. The setup screen will allow user to setup Fiscal Years with any number of periods from 1 to 13, this will accommodate a short year if the users have to change their Fiscal Year ending. Multiple years may be entered in advance (ManEx suggests a Min/Max of 2 years). Once the required information is entered, the system calculates all necessary tables and enters months and ending dates for each month for all periods. Systems will automatically assign the FY year when beginning date and number of periods are selected. System will also assign the period description (January – December) if 12 periods is selected. Descriptions for each period must be entered if 13 periods are used. If your company uses a 4-4-5 week calendar, check the Irregular Ending Dates box and then you’ll be able to manually enter the month end dates. The system will allow users to edit any future fiscal years as long as there are NO POSTINGS to it, but if they have posted anything to the current fiscal year, then the system will NOT allow the changing of ending period dates for any period that have posting to or the period after it because some transactions may fall on the other side of the ending date.
User will be allowed to change the description of the periods for ANY of the Fiscal Years even if it is open. These fields are text only and are NOT used within any calculations throughout the system.
|
| 1.1.3. Fields and Definitiions for the Fiscal Year Calendar | ||||||||||||||||||||||||||||||||||||||||
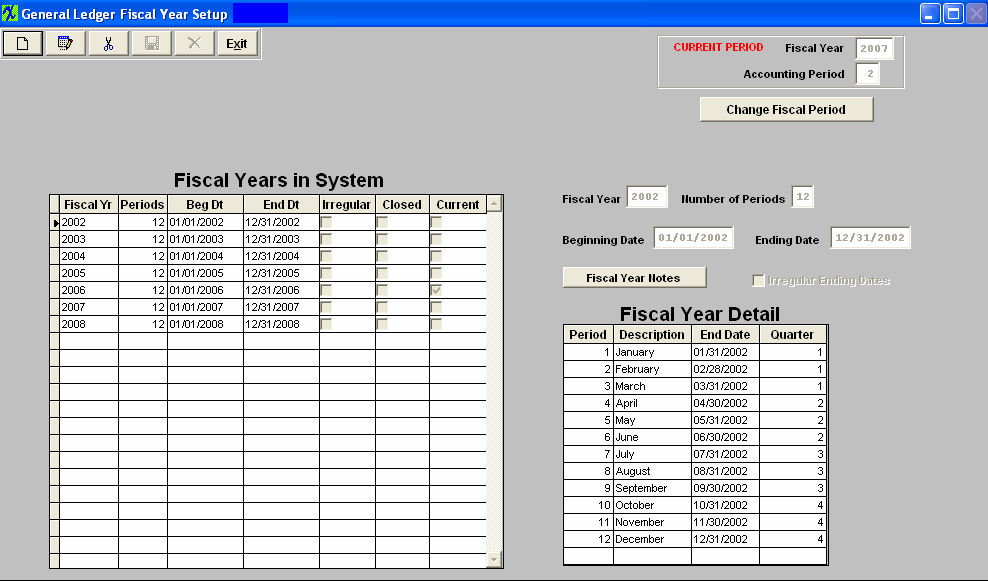 CURRENT PERIOD
Fiscal Years in System
Fiscal Year Detail
|
| 1.1.4. How To ...... |
| 1.1.4.1. Setup Fiscal Year Calendar | ||||
The following screen will appear:
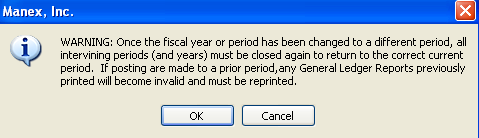 Clicking the ADD button activates the screen, and prompts for the beginning date and number of periods. Once entered, ManEx completes the rest of the fields. These may then be edited, if necessary, to match the worksheets. Notes may be added by pressing the NOTES button, and once added, the button will show red.
After Add or Edit is complete, depress the Save button to save the changes made or depress the Abandon Changes button to abandon the changes made. Repeat for as many years as needed. Where Used: Setup is required for every accounting and summary reports. After completing this section: «Mark as Completed in RoadMap in Section C Item 2-a»
|
| 1.2. General Ledger Account Types and Ranges |
| 1.2.1. Prerequisites for the GL Account Types & Ranges |
Complete the attached worksheet and "Mark as Completed RoadMap Section C Item 2-b" before continuing the setup.
There are no prerequisites for using this section. |
| 1.2.2. Fields and Definitions for the GL Account Types & Ranges | ||||||||||||||||
|
| 1.2.3. How To ...... |
| 1.2.3.1. Setup GL Account Types and Ranges | ||
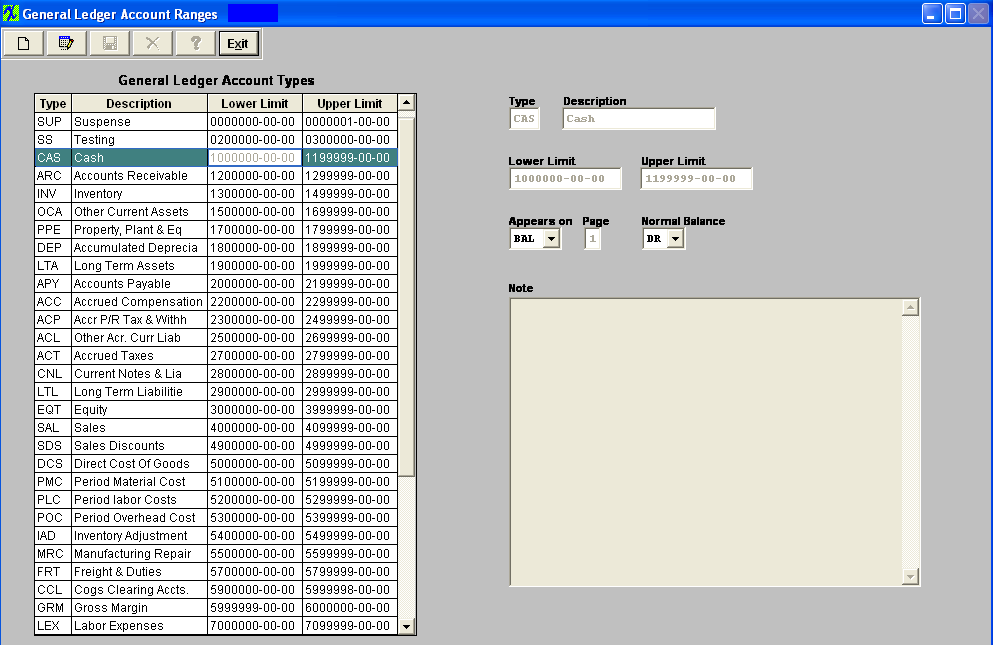
The following screen will appear:
Selecting the Add button allows the user to begin entry.
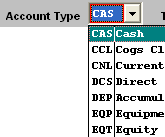
Prepare the General Ledger account types (current assets & long term assets) by establishing lower and upper ranges of the account numbers. For example, cash is a current asset and all current assets are within a range of accounts from 1000000-00-00 to 1199999-00-00. Therefore create the title “Cash”. This will be helpful later when searching for accounts in the accounting module. What will happen is that ManEx will display the account types clicked on, the type of account desired, and then it will list all the accounts under that classification. Once the ranges are created ManEx does NOT allow editing or changing the ranges. Also, user cannot create a range that is within another range. So, in setting up account ranges, it might be a consideration to leave some room between ranges in case there is a need for more at a later date (instead of setting it up so all possible account numbers are in some account type range, even if they are not yet created).
Selecting the Edit will allow the user to only modify the type of report in which it is included (Balance, Income) and the account signage (normally credit or debit) can be changed.
Chart of accounts are setup in the GL Account Setup module. In order for the sub-total Net Income Before Income Taxes to work correctly, a separate range must be set up and the Normal Balance must be defined as Credit, define the account as a CLOSING. This rule also applies to Total Revenue, Gross Margin, Total Other Income/Expense, Net Income Before Taxes and Net Income.
Once the changes have been completed, depress the Save button to save changes, or the Abandon Changes button to abandon changes.
Where Used: This Setup is required to be completed prior to establishing a Chart of Accounts, and for processing all other accounting functions. After completing this section: «Mark as Completed in RoadMap Section C Item 2-b» |
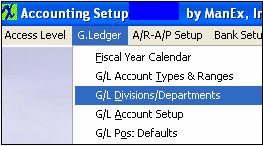
| 1.3. General Ledger Divisions/Departments |
| 1.3.1. Prerequisities for the G/L Divisions/Departments |
Complete the attached worksheet and "Mark as Completed RoadMap Section C Item 2-c" before continuing the setup.
There are no prerequisites for using this section. |
| 1.3.2. Introduction for the GL Divisions/Departments |
This section is to setup the Divisions and Departments if you are going to be using more than one independent ManEx system. For example one for the Main Company and one or more subsidiaries. There is a Consolidation system which must be Division 00. The Main Company would be Division 01, the Subsidiaries, Division 02, 03, etc. This information MUST be setup before using the GL Consolidation Export and GL Consolidation Import modules. This section is to setup Divisions and Departments to be used with account numbers. If desired, account numbers can be assigned to each department with multiple divisions. This also can be used as a means of tracking Non Recurring Expense charges or rework charges by assigning an account number to a Non Recurring Expense or Rework department. This will aid in account tracking in revenue analysis. |
| 1.3.3. Fields and Definitions for the GL Divisions/Departments | ||||||||||||||||||||||||||||||||
|
| 1.3.4. How To ...... |
| 1.3.4.1. Setup the GL Divisions/Departments for Headquarters | ||
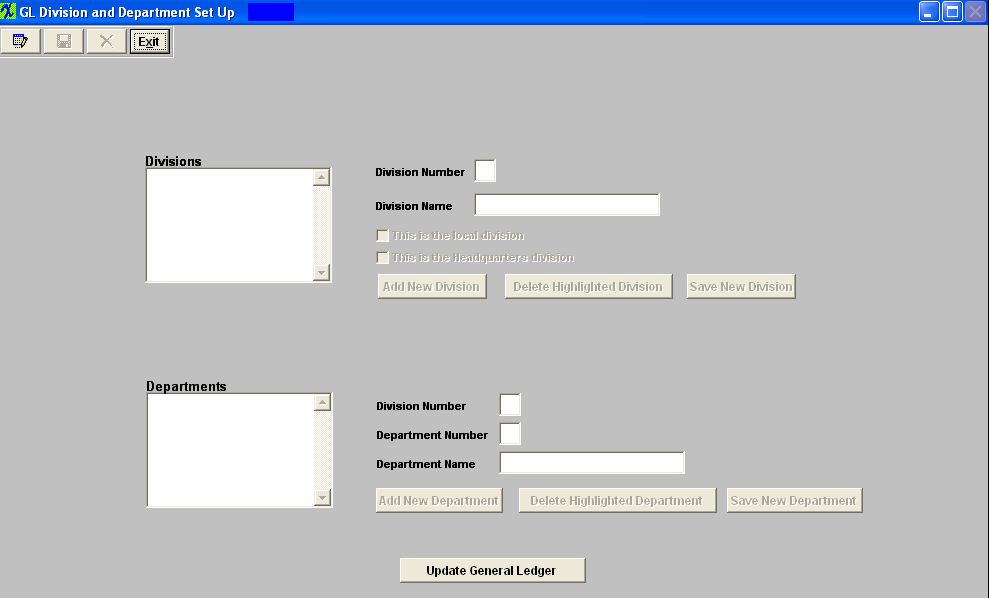
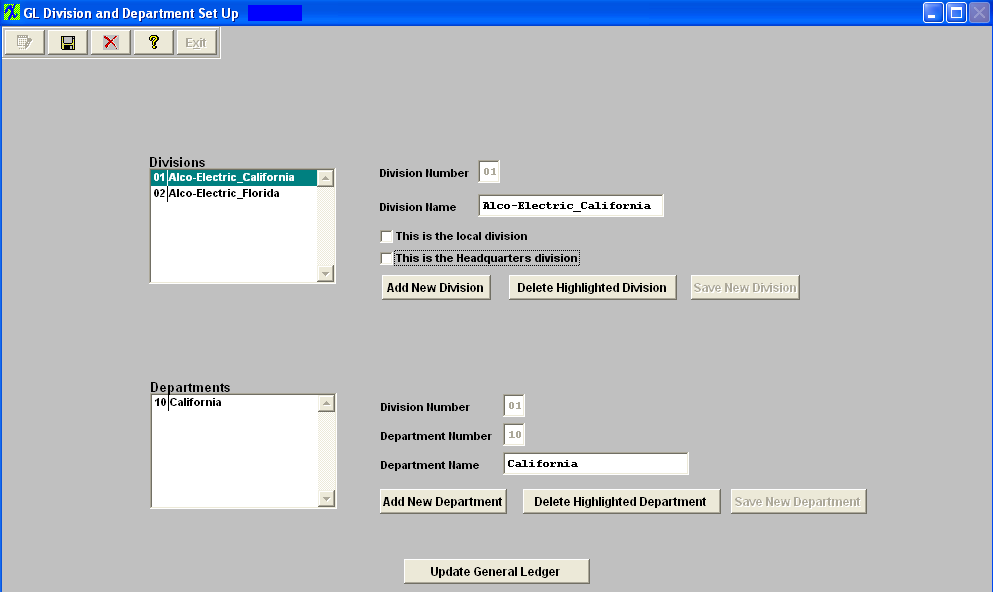
The following screen will appear:
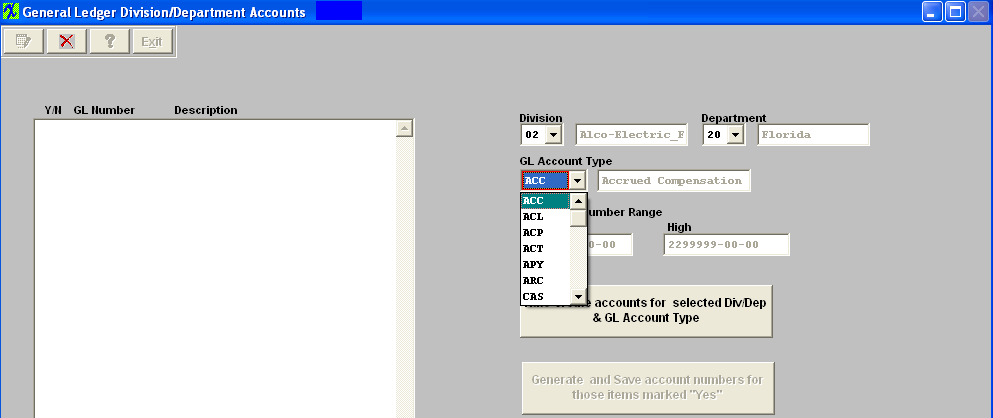
To setup the Headquarters ManEx System: First add the Headquarters Division. Depress the Edit button and the "Add New Division" button will become editable. Depress the "Add New Division" button Enter a Division Number (other than '00') and a Division Name in the fields provided. When setting up the Headquarters Division you MUST check both the "This is the local division" and "This is the Headquarters division" boxes. Depress the "Save New Division" button. To add a department depress the "Add New Department" button. The Division number will default in, user then can enter in a Department Number and a Department Name in the fields provided. There can be as many as 99 divisions. Each Division can have up to 99 departments. 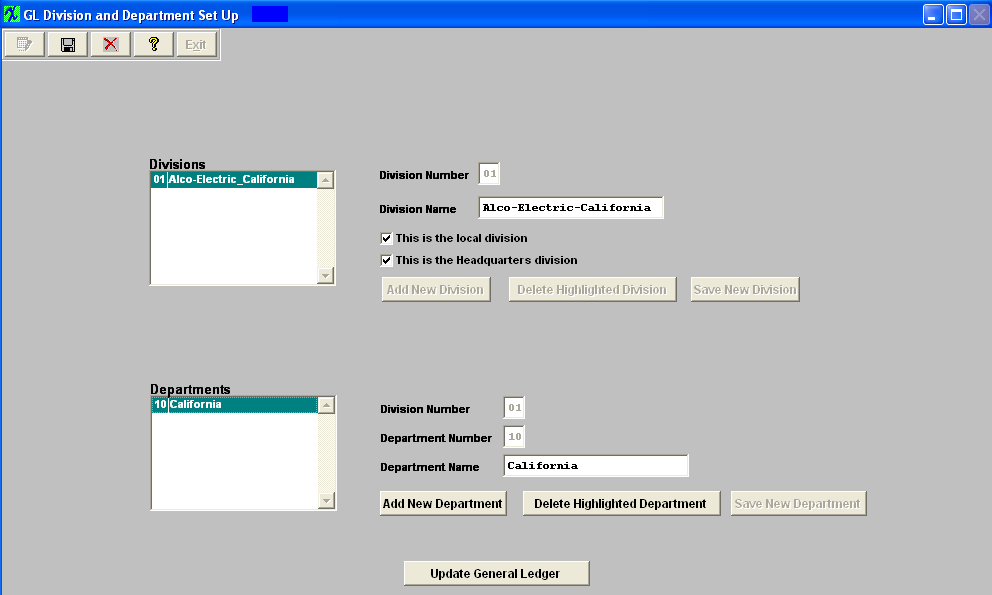 Depress the "Save New Department" button. The depress the Save button at the top of the screen. To add the Secondary divisions to the Headquarters ManEx System depress the Edit button and the "Add New Division" button will become editable. Depress the "Add New Division" button Enter a Division Number (other than '00' or the division number setup for the headquarters division) and a Division Name in the fields provided, when setting up the Secondary division to the Headquarters ManEx System you do NOT check either of the "This is the local division" or "This is the Headquarters division" boxes . Depress the "Save New Division" button. To add a department depress the "Add New Department" button. The Division number will default in and user may then enter a Department Number and a Department Name.  After one or more divisions have been added, the user may EDIT a division, or ADD a Department to a division. The division capability is intended to be used in conjunction with multi plant / division operations. It can also be used without Multi plant / division module, however. There can be as many as 99 divisions. Each Division can have up to 99 departments. Now user will need to "Update the General Ledger" information for the Headquarters Division number 01 and for the Secondary Divisions 02, 03, etc. Highlight the Headquarters Divison and depress the "Update General Ledger" button located at the bottom of the screen: 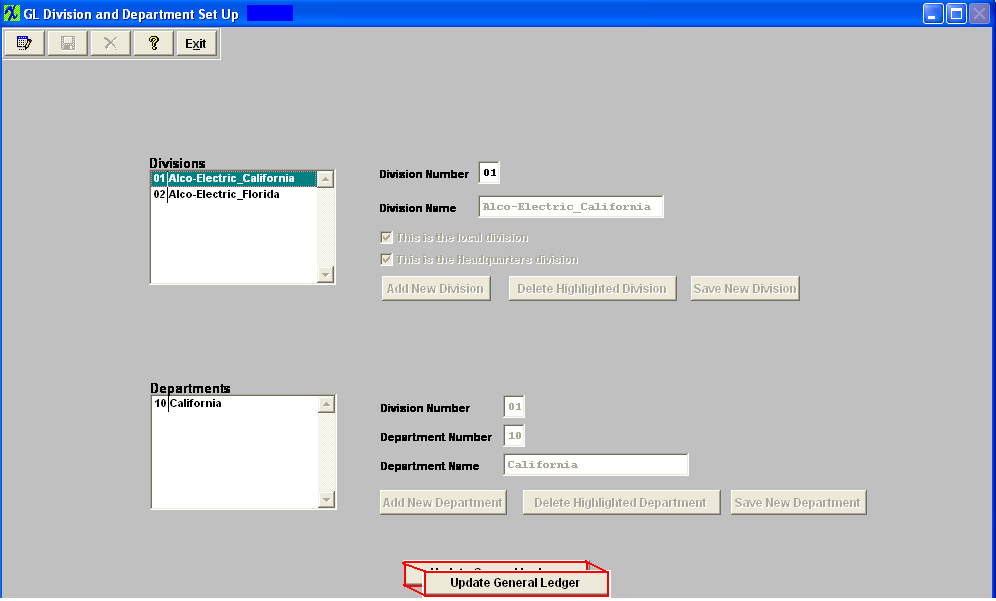 The following screen will appear: Depress the Edit button, select the Division, Department, and the GL Account Type from the pull downs.
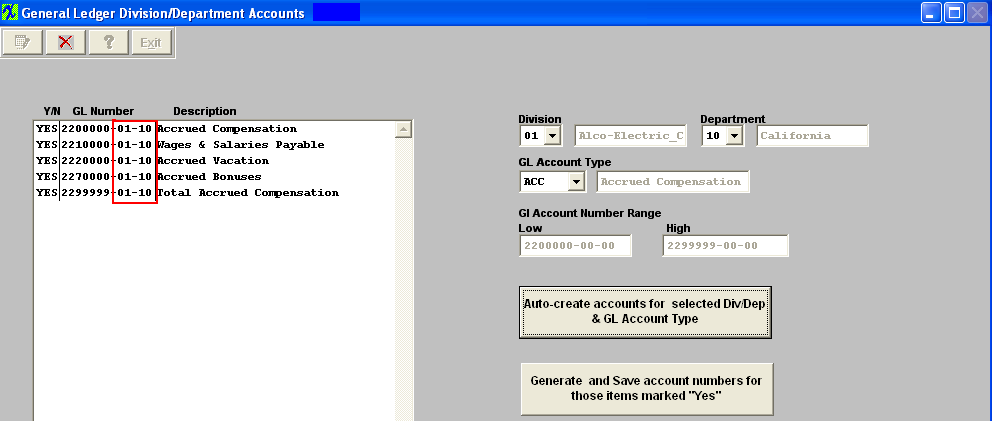
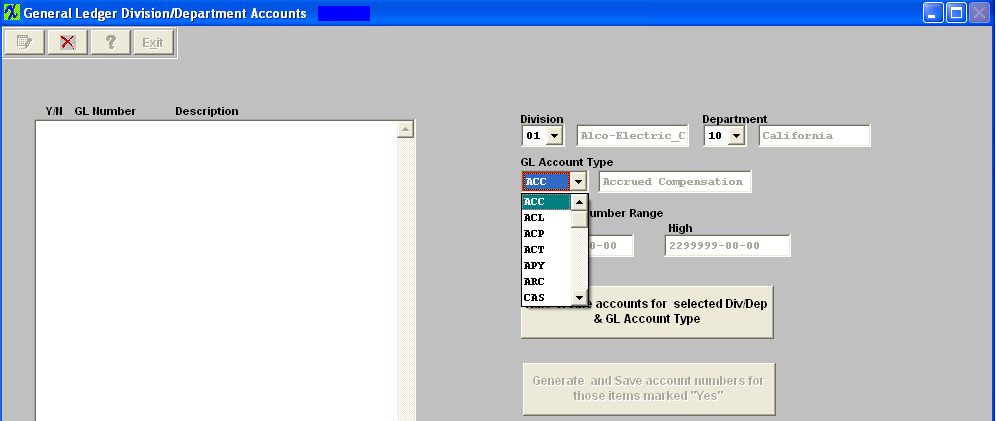 Once these items have been selected user may then depress the "Auto-create accounts for selected Div/Dep & GL Account Type" button, and the following screen will appear: 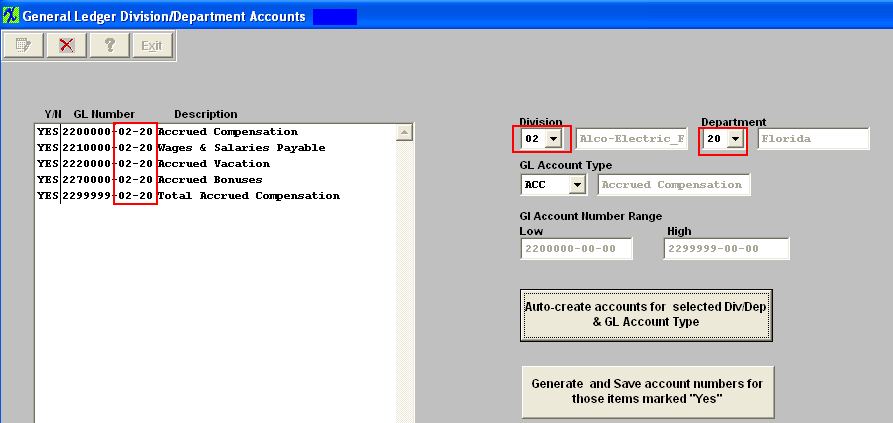 All of the accounts to be generated will appear on the screen for the new Divison and Department. If there are some accounts you want to exclude, turn the selection to “No”.
Note: You will want to exclude all Titles, Headings, Totals and Closing accounts, leaving only the Posting accounts. (Otherwise you will have duplicate titles, etc. on the reports.)
Depress the Abandon changes button to abandon the changes. Depress the "Generate and Save account numbers for those items marked "Yes" and the following message will be displayed:
 Continue the above steps, starting with "Auto Create Accounts ..." until ALL of the accounts have been created for all the New Divisions and/or New Departments. If the accounts have not been setup in the GL or the accounts for the department have been generated the following prompt will be displayed:
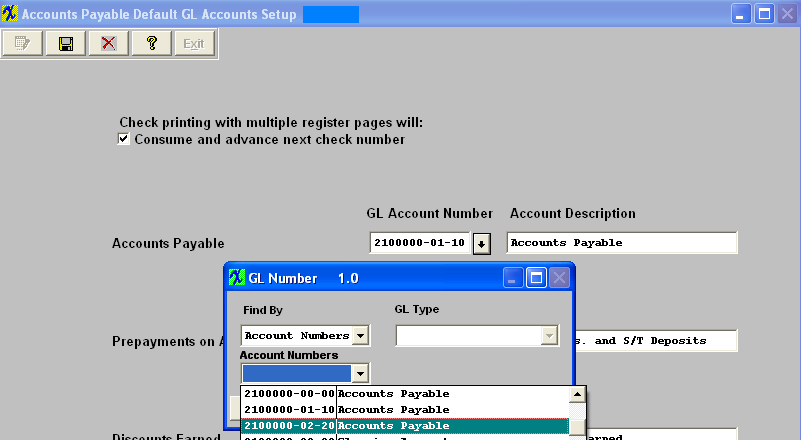
 User MUST then update AP accounts, with the correct account number for the Headquarter ManEx system.
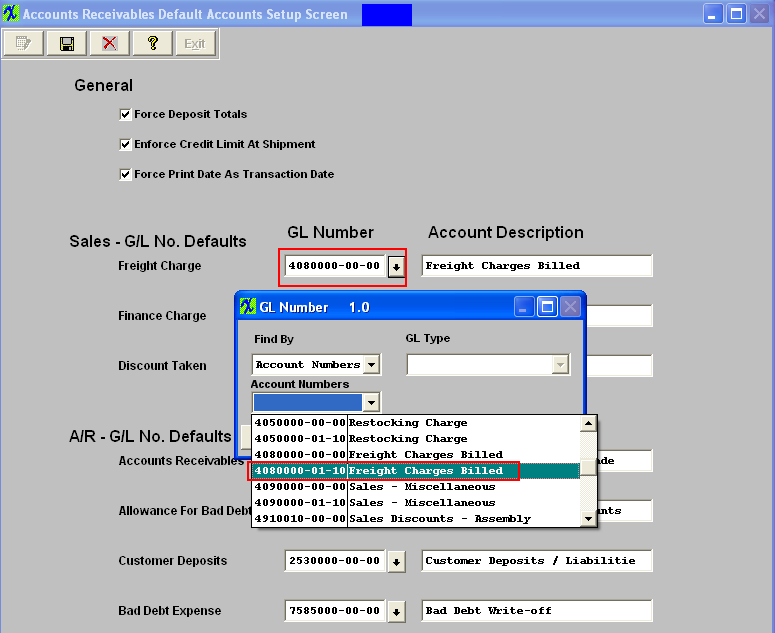
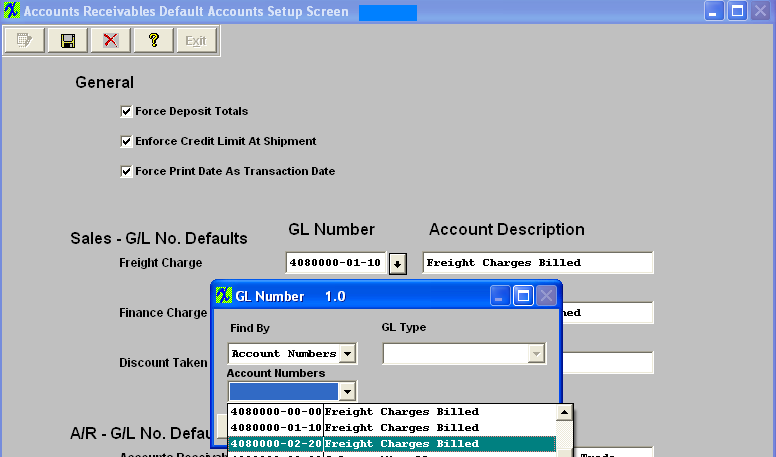
 AR Accounts
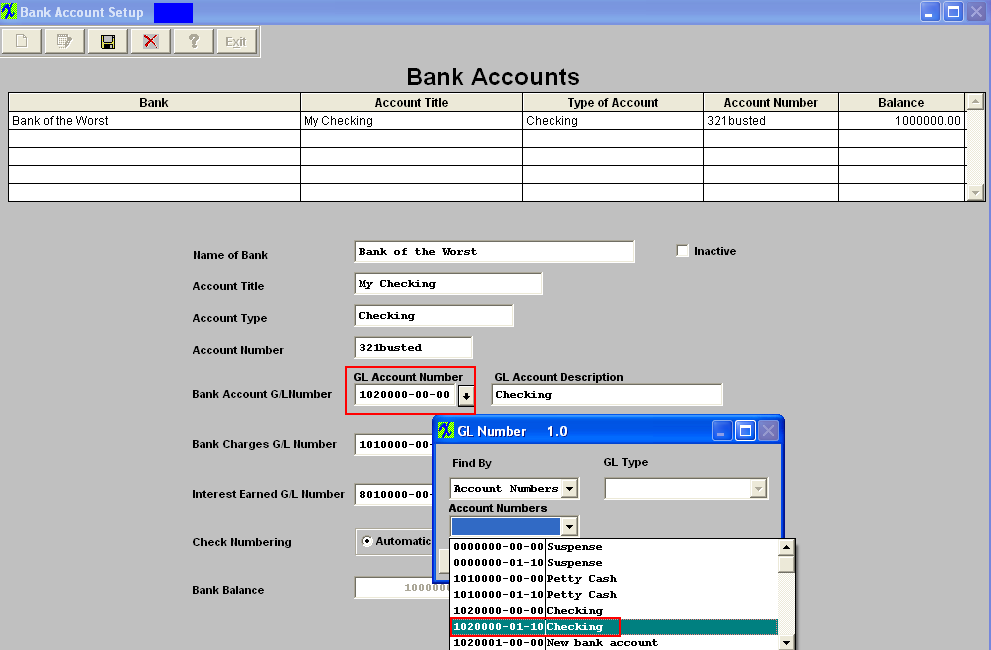
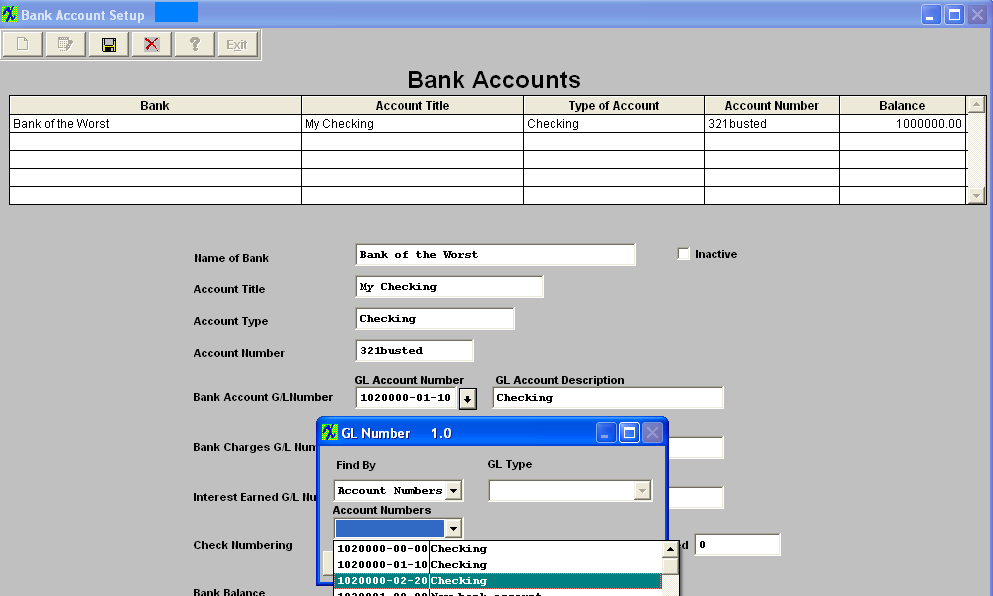
 Bank Accounts
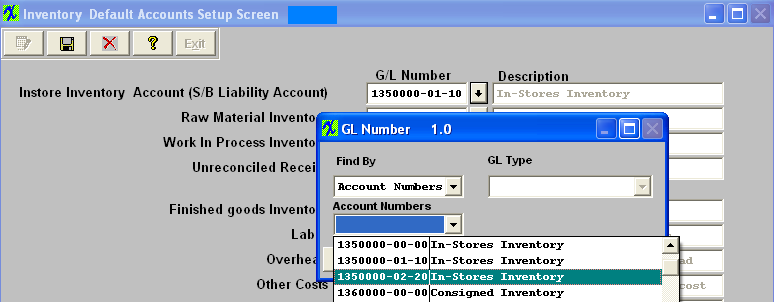
 Inventory Default Accounts
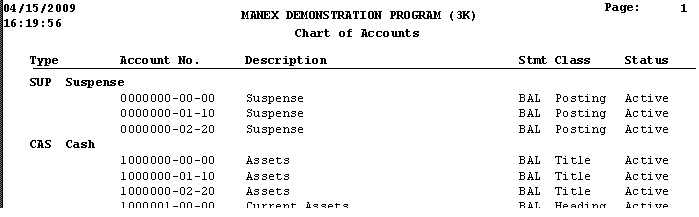
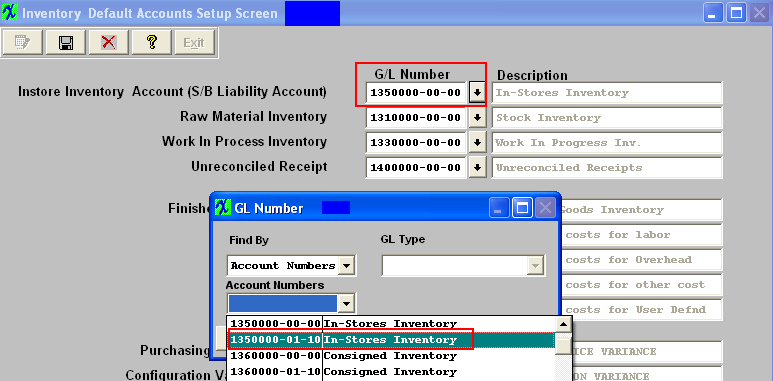 After completing this section: Print the Chart of Accounts to be sure that all of the accounts desired were added. There should be account numbers xxxxxxx-00-00 for all of the accounts. Then there should be account numbers xxxxxxx-01-xx for all of the accounts created for the Headquarters division and xxxxxxx-02-xx for all of the accounts created for the Secondary divisions, etc.
 Where Used: This Setup is required to be completed prior to establishing a Chart of Accounts.
«Mark as Completed in RoadMap Section C Item 2-c» |
| 1.3.4.2. Setup the GL Divisions/Departments for Secondary Divisions | ||
To setup the Secondary ManEx System you can follow the steps in Article #288 along with the steps described below.
The following screen will appear:
First add the Headquarters Division. Depress the Edit button and the "Add New Division" button will become editable. Depress the "Add New Division" button Enter the Division Number and name for the Headquarters division in the fields provided. When setting up the Headquarters Division in the Secondary ManEx System "This is the local division" or "This is the Headquarters division" boxes are NOT to be checked.
Depress the "Save New Division" button. To add a department depress the "Add New Department" button. The Division number will default in, user then can enter in a Department Number and a Department Name in the fields provided. There can be as many as 99 divisions. Each Division can have up to 99 departments. Depress the "Save New Department" button. The depress the Save button at the top of the screen.
 To add the Secondary division to the Secondary ManEx System depress the Edit button and the "Add New Division" button will become editable. Depress the "Add New Division" button Enter a Division Number (other than '00' or the division number setup for the headquarters division) and a Division Name in the fields provided, when setting up the Secondary division to the Secondary ManEx System the "This is the local division" box MUST be checked. Depress the "Save New Division" button. After one or more divisions have been added, the user may EDIT a division, or ADD a Department to a division. The division capability is intended to be used in conjunction with multi plant / division operations. It can also be used without Multi plant / division module, however. There can be as many as 99 divisions. Each Division can have up to 99 departments.
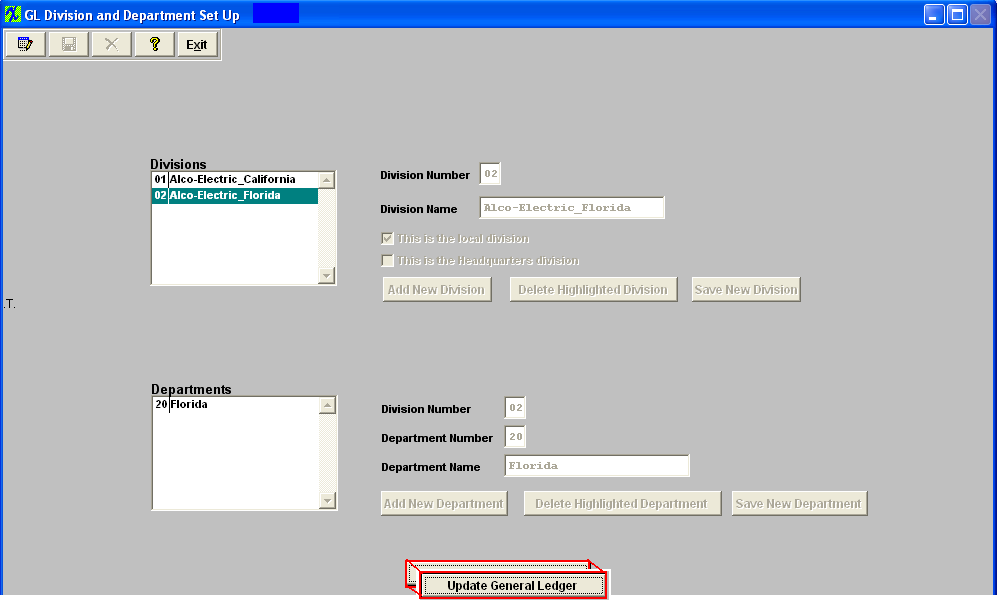
Highlight the Secondary Division and Check the "This is the local division" box. This box MUST be checked when setting up the Secondary division in the Secondary ManEx System. 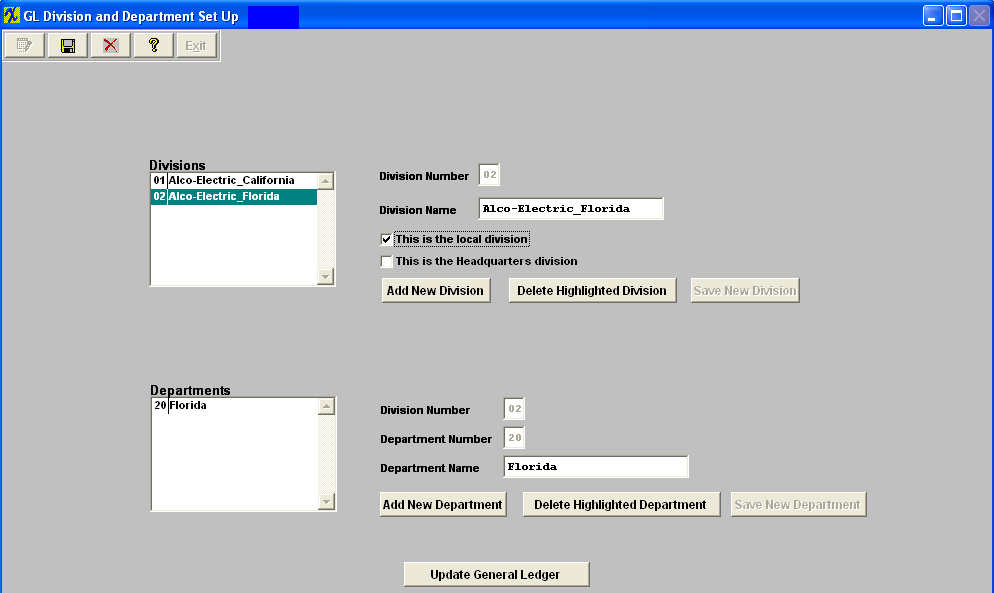 User will need to "Update the General Ledger" information for the Secondary Divisions 02, 03, etc. Highlight the Secondary Divison and depress the "Update General Ledger" button located at the bottom of the screen.
 Depress the Edit button, select the Division, Department, and the GL Account Type from the pull downs. Depress the Edit button, select the Division, Department, and the GL Account Type from the pull downs.
 Once these items have been selected user may then depress the "Auto-create accounts for selected Div/Dep & GL Account Type" button, and the following screen will appear:
 All of the accounts to be generated will appear on the screen for the new Divison and Department. If there are some accounts you want to exclude, turn the selection to “No”. Note: You will want to exclude all Titles, Headings, Totals and Closing accounts, leaving only the Posting accounts. (Otherwise you will have duplicate titles, etc. on the reports.) Depress the Abandon changes button to abandon the changes.
Depress the "Generate and Save account numbers for those items marked "Yes" and the following message will be displayed:
Continue the above steps, starting with "Auto Create Accounts ..." until ALL of the accounts have been created for all the New Divisions and/or New Departments. If the accounts have not been setup in the GL or the accounts for the department have been generated the following prompt will be displayed:
User MUST then update AP accounts, with the correct account number for the Secondary ManEx system.
 AR Accounts
 Bank Accounts
 Inventory Default Accounts
 After completing this section: Print the Chart of Accounts to be sure that all of the accounts desired were added. There should be account numbers xxxxxxx-00-00 for all of the accounts. Then there should be account numbers xxxxxxx-01-xx for all of the accounts created for the Headquarters division and xxxxxxx-02-xx for all of the accounts created for the Secondary divisions, etc.
Where Used: This Setup is required to be completed prior to establishing a Chart of Accounts.
«Mark as Completed in RoadMap Section C Item 2-c» |
| 1.4. General Ledger Account Setup |
| 1.4.1. Prerequisites for the GL Account Setup |
Complete the attached worksheet and "Mark as Completed RoadMap Section C Item 2-d" before continuing the setup.
G/L Account Types and Ranges must be completed before using this section. |
| 1.4.2. Introduction for the GL Account Setup |
This section is for preparing all general ledger account numbers for MANEX. If accounting is currently running within another software program, it may be helpful to print out the chart of accounts from the existing system. The “Txt and “Amt” columns are for the financial statements. This data is used to determine at what location on the page the Title of the account and the Amount of the account are to print out. The higher the number, the further to the right the information will be printed. You can leave these two boxes blank and set the report spacing up in the G/L Reports Setup. |
| 1.4.3. Fields & Defintions for the GL Account Setup | ||||||||||||||||||||||||||||||||
|
| 1.4.4. How To ......... |
| 1.4.4.1. Setup the GL Account Setup | ||||||
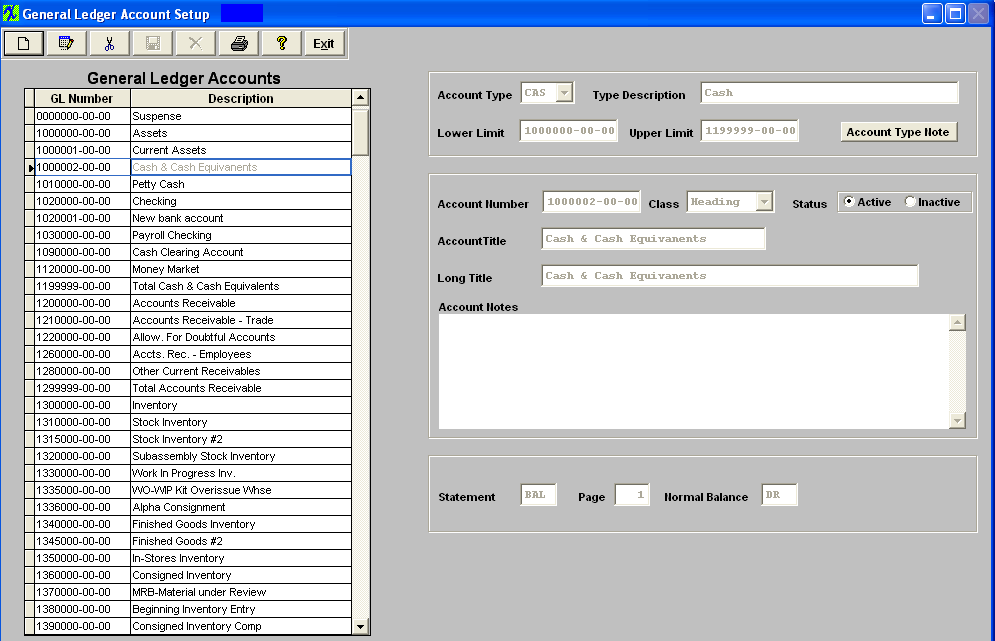
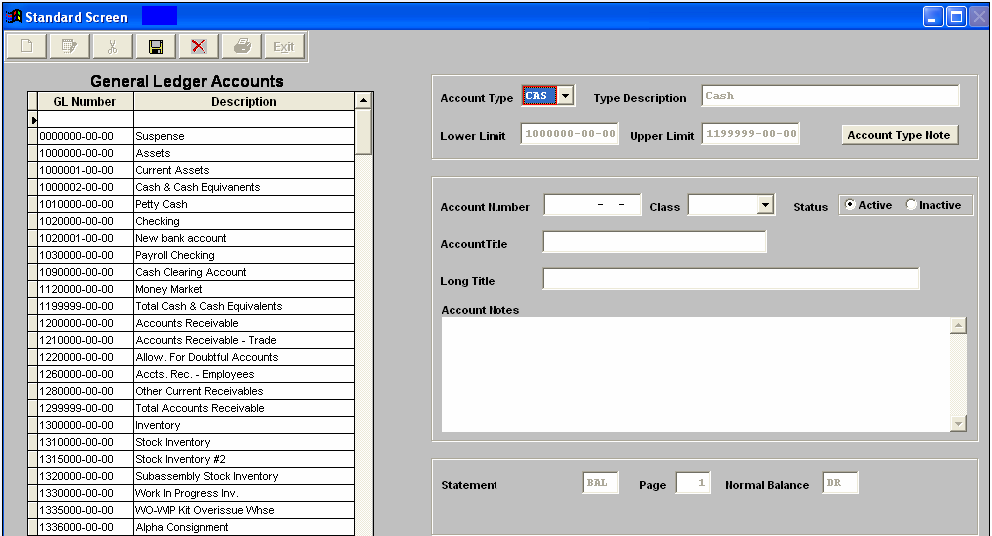
The following screen will appear:
Depress the Add action button.
Once the Account Type has been selected, the Type Description, Lower Limit, Upper Limit, Statement, Page, and Normal Balance fields will default in:
 Make sure the Status is Active.
Enter a Short Account Title and a Long Title. Enter any notes required for this account.
The completed entry will appear as follows: 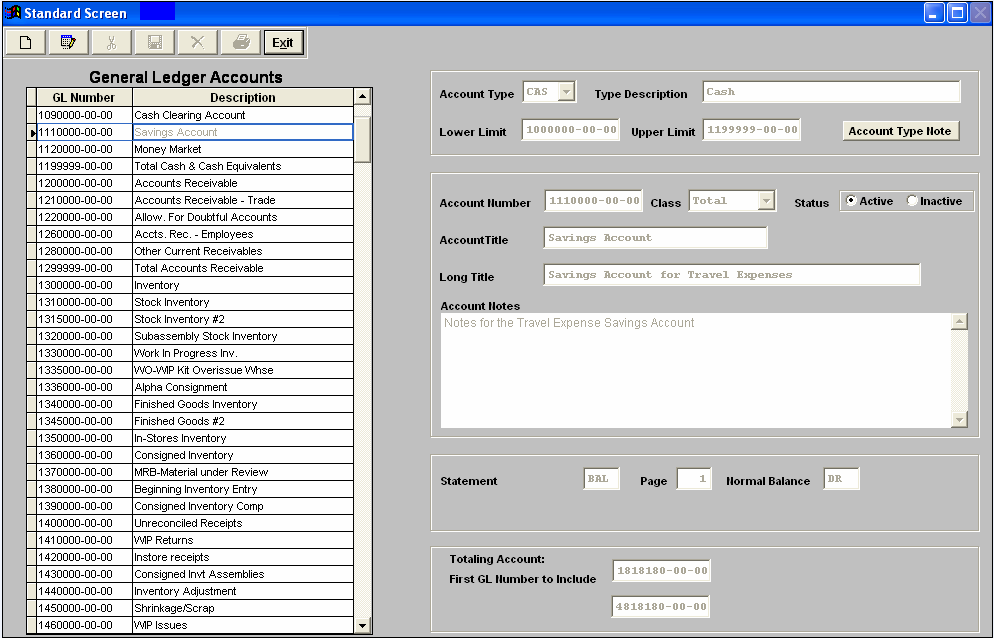 After establishment of one or more accounts, user may Edit or Delete the account Note: A user will NOT be allowed to delete or Inactivate an account which is used in any of the setup screens in System Setup or Accounting Setup. If it is necessary to delete or inactivate such an account, 1st go into the requisite set up screen and edit the account number, then the user can come back into this screen and delete or inactivate the account. You are also NOT allowed to delete an account which has been used within the last three years. However, you can change the status to Inactive. After Adding or Editing, the user must Save or Abandon the modifications. Please remember that you can’t add a natural debit account within a range where the Normal Balance was identified as a Credit, or visa versa.
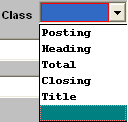
Users are allowed to change the Class of a GL number (Posting, Title, Total, etc) only if there is no activity, or if the only activity was in a period that started with a 0.00 balance, and has some activity but then ended with a 0.00 balance.
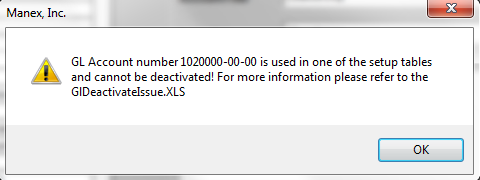
If a user tries to Inactivate an account which is used in any of the setup screens in System Setup or Accounting Setup they will receive the following message and a GlDeactivateIssue.XLS file will be created.
 Steps to Delete: Note: If you have any duplicate Titles, Headings, Totals or Closing accounts, please be sure to delete them. Otherwise, duplicate titles, etc. will appear on the reports. Delete the titles, etc. for Divs 01, 02, etc., but NOT for Div 00.
Highlight the account you want to delete. Depress the Delete button. The following confirmation message will appear:
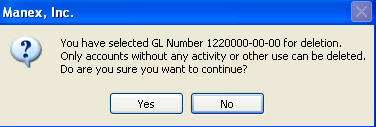 Depress Yes to continue, depress No to abort.
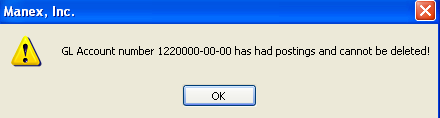
If the user depresses Yes to continue, the system will check all GLTRANS table for the existence of the account, as well as all tables used in the release and post transactions, and in any system setup default accounts (like inventotry, warehouse, etc) are using this account number. If yes, then the system will NOT allow it to be deleted from the system and users are suggested to change the description for that Account number to "Do Not Use" and change the status to Inactive.
Where Used: This Setup is required to be completed prior to establishing General Ledger numbers to inventory setups. After completing this section: «Mark as Completed in RoadMap in Section C Item 2-d» |

| 1.5. General Ledger Post Defaults |
| 1.5.1. Prerequisites for the G/L Post Defaults |
Complete the attached worksheet and "Mark as Completed RoadMap Section C Item 2-e" before continuing the setup.
General Ledger Accounts must be completed before using this section.
|
| 1.5.2. Introduction for the GL Post Defaults |
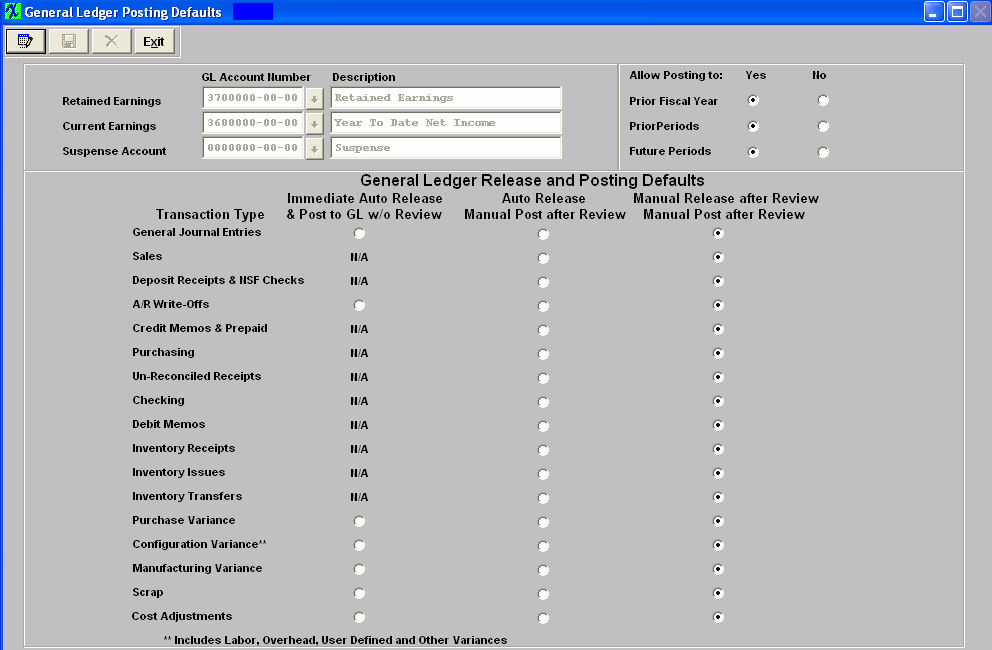
All GL default posting defaults for sales, inventory, earnings, etc. are set up here. User has three options to release and post records.
The first option is to Manually Release after Review and Manually Post after review for all items. Another option will be to AUTOMATICALLY Release transactions as they occur and Post after Review. And a third option will be to AUTOMATICALLY Release AND Post transactions as they occur. Furthermore, you will be able to make these selections for each of the 17 types of transactions involved in our General Ledger. On the same screen will be shown and be editable the ability to grant permission (or not) to allow posting to Prior Fiscal Years, Prior Periods and Future Periods, as well as assign account numbers for Retained Earnings, Current Earnings and Suspense Account. |
| 1.5.3. Fields & Definitions for the GL Post Defaults | ||||||||||||||||||
If users change the Posting Defaults they will receive a warning that they should make sure that ALL records have been released and posted before changing the posting default. ManEx strongly suggests NOT changing the Posting Defaults once they have been setup. NOTE: Changing the Posting Defaults could result in loss of records. |
| 1.5.4. How To ......... |
| 1.5.4.1. Setup the GL Post Defaults | ||
The following screen will appear: The user may modify this data by use of the Edit button. At the conclusion of any EDIT activity, the user must depress the Save button to save the changes or depress the Abandon changes ubtton to abandon the changes. If posting to Prior Fiscal Years, Prior Periods or Future periods is set to NO, then no types of transactions can be set to Immediate Release/Immeditate Posting. If any types of transactions are set to Immediate Release/Immediate Posting, then no restrictions can be placed on posting to Prior Fiscal Years, Prior Periods or Future periods. If users change the Posting Defaults they will receive a warning that they should make sure that ALL records have been released and posted before changing the posting default. ManEx strongly suggests NOT changing the Posting Defaults once they have been setup. NOTE: Changing the Posting Defaults could result in loss of records.
Note: That the Retained Earnings and Posting Suspense Posting accounts defined above must have the class of posting as determined in General Ledger Account Setup. The Current Earnings must be the YTD Net Income account from the Balance Sheet Equity section and must have the class of Closing. Where Used: This Setup is required to be completed prior to posting accounting activity. ManEx strongly suggests not changing the Posting Defaults once they have been setup. Changing the Posting Defaults could result in loss of records. After completing this section: «Mark as Completed in RoadMap in Section C Item 2-e» |