1. Fields & Definitions for PDM
1.1. Header Information


Product No  The part number of the assembly. 
Rev The revision of the assembly.
Description  This field will contain the Description of the assembly.  
Selected Work Center/Activity  This area displays the work center (or activity) from which each of the action buttons below are launched. It is selected by placing the cursor (by mouse or tab) on the work center (or activity) of interest 


1.2. Routing Tab

ID The ID or abbreviation established for the work centers 
Work Center The name of the work center 
ECO Pending  This Text/characters turn RED if an ECO is Added and Saved. When the ECO is approved, this button characters turns back To gray. This criteria is based on the product number and no revision number as the ECO will change the revision number.  This feature has been added because of the importance of the users needing to know that an ECO is being initiated by the production personnel. This will help prevent product being built according to the original instructions and cut down on any additional rework or schedule delays.

 
If this button is displayed in Red there is Related documents attached.    Depressing this button will give the users the ability to scan any related documents directly into the ManEx system and attached the document directly to the item in the ICM Module.  For further detail see Article #2396.  Once the information is loaded, the user may re-visit the Documentation in the PDM module and may also access the information from the Shop Floor Tracking Module.
 
If Red there is information available related to the product and the work center.  User may edit or add information in this module also. 
 
If Red, there is information available related to the product and the work center.   This field is provided as a means of recording observations and communications about the product as it is being manufactured.  User may edit or add information in this module, as well as from the Shop Floor module.  Production Feedback note is intended as one way of communication from the production floor to the engineers of the suggestions and pointing out the errors created by the engineering department.  Engineering department reading the feedback can take necessary action to correct or incorporate the information and then erase the contents of the Feedback note.  This information may be added or edited in this module as well as from the Shop Floor module.
 
If Red, this button displays Work Instructions in text and pictorial format for operations associated with the work center.  The Work Instructions must have been established in the Product Data Management module first.  Users may load a PDF file in the Work Instructions. This allows users access to whole textbooks from within ManEx. PDF files can be drawings, images, CAD files (as printed to a plotter) and multiple pages of mixed test and graphics. Users may also print these PDF files from ManEx. 
 
If Red, this button displays Special Instructions in text and pictorial format for setting up the work center. The Special Instructions are not printed on the travelers. The Special Instructions must have been established in the Product Data Management Module first.  
 
If Red, this button will display any Tool/Fixture information which has been assigned to the Product through the Routing or Product Data Management (PDM) Module.  This information is then also updated to the Routing setup module. Users will be able to edit the information from both the PDM and Routing setup screens. This information will then be available within the Shop Floor Tracking module for the users to View only.
 
If Red, this screen will display the WIP Status of all the open work orders for this product and show where the quantities are in the shop floor. 
 
If Red, the part numbers that are assigned to that specific Work Center within the BOM module will be listed within this screen. 
 
If Red, there is an ECO with the status of Approved within the system.   
 
If Red, this screen will list the detailed information pulled forward from the ECO Control Management module pertaining to any approved Deviations for the selected product.  
 
If Red, this screen will display Quality information for the Product that is displayed for the selected work center.


1.3. Check List Title Screen

This screen allows the user to establish check lists for each PRODUCT.  Note that this is a different check list than the one for Work Order which is set up in Shop Floor Tracking Defaults .   Items may be added to the check list in the edit mode.
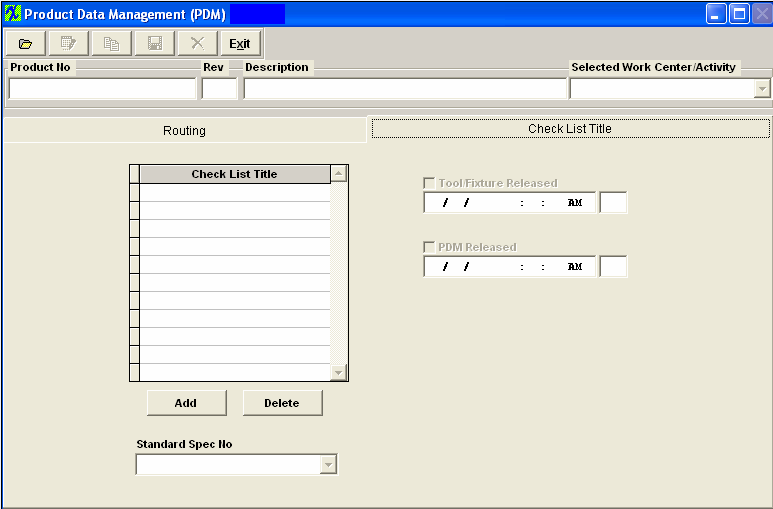
Check List Title Description of the Check to be Performed
Tool/Fixture Released Check this box to release the Tool Fixture.  This box MUST be check when usiing the Unreleased Work Order List  and/or for the Tool/Fixture button to be enabled in the Shop Floor Tracking module..  

Note: Users MUST have special rights within the Security module to check this box. Users with “supervisor’s rights” will automatically have access.  

This box will display the date and time of when the Tool/Fixture was Released and will also display the initials of the user that checked the box
PDM Released Check this box to release the PDM.  This box must be check when usiing the Unreleased Work Order List  

Note: Users MUST have special rights within the Security module to check this box. Users with “supervisor’s rights” will automatically have access.  

This box will display the date and time of when the PDM was Released and will also display the initials of the user that checked the box. 
Pressing the ADD button opens another field in which information may be placed in the Check List.

Pressing the DELETE button deletes the item from the Check List that the cursor is on when the delete button is pushed.

Standard Spec No Select the Standard Specification Number from the pull down list displaying after depressing the down arrow. These are defaulted in from the PDM Standard Process Specification module.
 

This information will be carried forward into the Shop Floor Tracking module for the highlight Work Center.