| 1. Express Import to BOM or Quote (OPTIONAL Module) |
| 1.1. Prerequisites - QBI | ||||||||||||||||||||||||||||||||||
Prerequisites Required to Import a BOM
ManEx’s standard module configuration allows most users to accomplish their daily tasks. For those users wanting to get more from ManEx by leveraging the total solutions, this is one of the optional modules available for purchase. To place an order or to learn more about this specific module or any of the other optional modules please contact us at http://manex.com\contactus.aspx
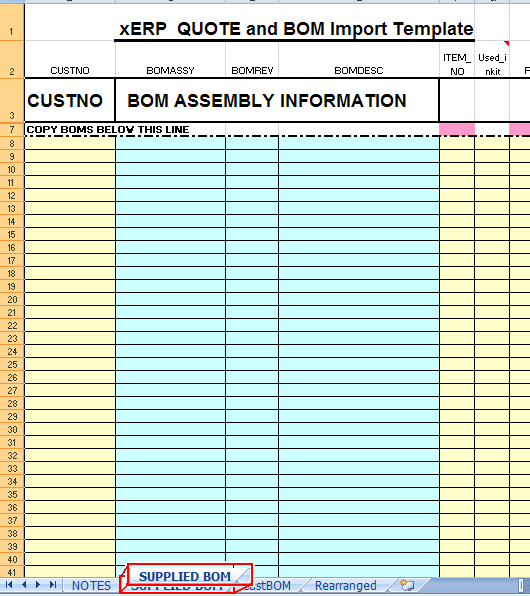
This template has the required fields to begin the import of new Item masters and BOMs. It contains two named ranges, COLHDR and IMPTDATA, which must be included. In the COLHDR are contained the field names for each column, and must not be modified. The IMPTDATA range must include all data to be imported (not the field names). The cells that must be in the IMPTDATA range are colored, and as the sheet is supplied, contain 1500 lines. More may be added, but the range must be expanded to include them.
The top four rows are protected to avoid accidental modification, but there is no password required to un-protect the sheet. Once un-protected, the user may rearrange the columns to match data as received from each customer, then saved the modified sheet as a template for each customer.
The BOMASSY, BOMREV, and BOMDESC (highlighted in blue) listed MUST match either what is already in the system , or MUST be listed as a component on the spreadsheet (as shown below in the RED box). The same assembly and revision cannot be for two different customers. These fields are required.
To import a brand new Product/assembly into the system from the spreadsheet, the customer number and the columns in pink are REQUIRED to be completed, as shown below:  The columns in pink are required to be completed.
To import Make or Buy parts to a BOM you must popluate the following fields: ITEM NO, Part Src, QTY, CPARTMFGR To import Consigned parts to a BOM you must popluate the following fields: ITEM NO, Part Src, QTY, CPARTMFGR, CPARTNO and/or CDESCRIP
To import to Quote you must populate the following fields: ITEM NO, Part Src, QTY, CPARTMFGR, CUSTNO, CPARTNO and/or CDESCRIP The fields listed on the XLS spreadsheet are:
NOTE: The Reference Designator field is unlimited in size, and can ONLY accept the following formats or combinations, thereof: C1, C2, C3, C5, C6, C10, . . . . . . ., C1-C3, C5-C6, C10, . . . . . . ., C103, C5-6, C10, . . . . . . . . . .,
It is very critical that the user follows these formats or combinations. If the program cannot decipher the reference designators it will confuse the system and create the system to hang up and/or crash.
If there are multiple AVL's for the same component, it is necessary to repeat all the information including the item number and Reference Designators for each AVL, ONLY changing the CPARTMFGR and MFGR PN. All other information MUST be the same. See example below.

The Assemblies listed must either already be in the system , or included in the spreadsheet. The same assembly and revision cannot be for two different customers.
The spreadsheet can be save in any folder accessible by Manex and under any name. |
| 1.2. Introduction for QBI |
To provide the capability to load Bills of Material (BOM), to Manex Production and Quotation modules from a simplified Excel spreadsheet.Parts lists, AVL's, and Reference Designators, are all included. A specific excel template has been created for the module and must be used.There is no limit to the size of the BOMs (number of components), nor to the number of BOMs (assemblies) that can be loaded at one time.The only restrictions are that when loading to a Quote, only one customer may be on the spreadsheet, and when loading to a BOM, only one customer may be associated with a given BOM. After a preliminary validation of the data, the Import procedure will attempt to locate existing components in the system, and offer the user the choice to use alternate existing components, or to load the spreadsheet again with a different part number. All NEW part numbers will be loaded into inventory, and the BOMs created. If there is already an existing BOM, the user will be prompt to decide to override the existing BOM, or ignore the BOM being loaded in the spreadsheet. If new AVLs are involved with existing parts, the user will be prompt to add the new AVL to the existing part, or create a new part number. However, it will not overide the material type on existing AVL's, due to the fact that there might be inventory on hand at that time that is not LF (for example) and if we changed the material type upon load it would no longer match the parts on hand. |
| 1.3. How To ..... for QBI |
| 1.3.1. Import to BOM or Quote | |||||||||||||||||||||||||||
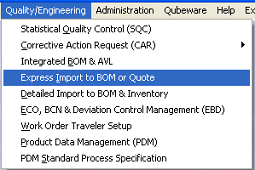
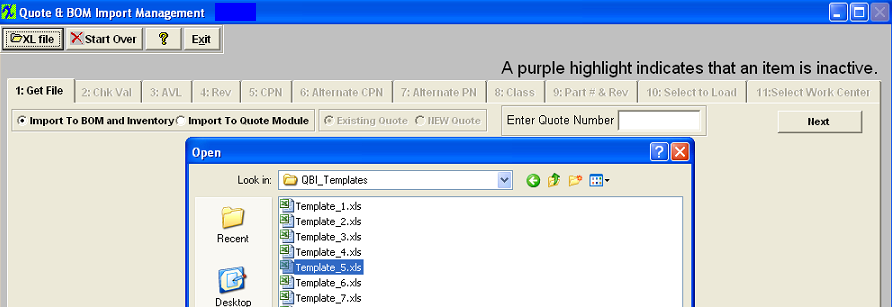
Enter the Express Import to BOM or Quote module and the following screen will appear:
 1. Choose to either Import to BOM and Inventory or Import to Quote Module by Selecting the appropriate radial.
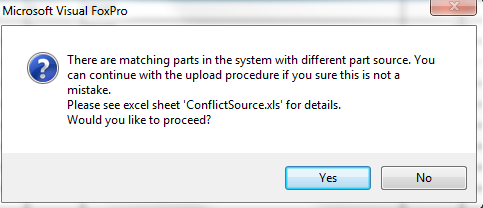
There are several validations run at this point, these are a few. Note: If the XLS file is not displayed on screen go to your Local_manex directory. There you should be able to find {{ C:\"_ManexLocal"temp"POExceptionXL}} within that directory is where some of the XLS files that are displayed for your reference could be listed.
Once all the validations are run, The 1: Get File tab appears and the contents of the file are displayed. 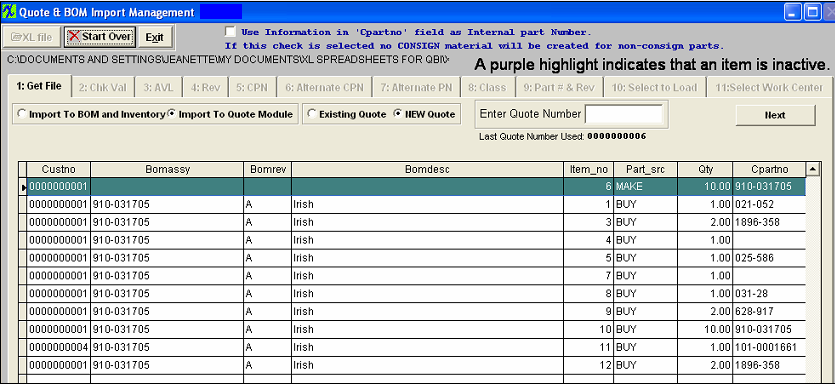 If user has entered an existing ManEx PN in the CPARNO field on the Template, they have the option to check this box "Use Information in 'Cpartno' field as Internal Part Number". If this box is checked the system will use the PN in the CPARTNO field on the template as the internal PN not as a customer/consigned PN. Note: The Mfgr on the template MUST be Genr, also. See the example below.
 4. The user may click on the "Next" button to continue or the "Start Over" button to clear the contents and select another file. Again several validations are run.
Once all the validations are run, The 2: Check Val tab appears. If validation of certain data fails, the following screen will be displayed, with a grid of problems, and the User asked to clarify the data. The first check is to verify that valid Customer Codes are used in the spreadsheet. If one or more invalid customers are found, then a grid will be displayed with the appropriate information, and the user must select an appropriate customer from the drop-down list of customer codes. Or, the user may exit the screen and clarify the spreadsheet. The next check is to validate that a valid Unit of Measure (UOM) is on each line of the spreadsheet. If an invalid UOM is found, the user is presented with a list of invalid UOMs and may select a valid one from a drop down list of valid UOMs. Or, the user may exit the screen and clarify the spreadsheet. Clicking on the dropdown arrow will display available Units of Measure to replace the invalid one. The next check is to validate that correct Manufacturer Codes have been used in the spreadsheet. If not, a grid is displayed with the invalid manufacturer codes, and the use may select from a dropdown list of valid manufacturers to replace the invalid code. Or, the user may exit the screen and clarify the spreadsheet. Clicking on the dropdown arrow will display available Manufacturers to replace the invalid one. Once the user identifies a MFGR all like MFGRS on the BOM will be updated with the same selection. The next check is to validate that correct Source Codes have been used in the spreadsheet. If not, a grid is displayed with the invalid source codes, and the user may select from a dropdown list of valid source codes (BUY, MAKE, CONSG or PHANTOM). Or, the user may exit the screen and clarify the spreadsheet. Clicking on the dropdown arrow will display available Source Codes to replace the invalid one. The next check is to ascertain whether or not there is an existing BOM for assemblies contained in the spreadsheet. If there is, the user must indicate whether or not the existing BOM is to be overwritten with the new data in the spreadsheet. If the user elects to NOT overwrite the existing BOM, the data will not be loaded to the BOM, but the item master will still be updated with any new parts contained in the spreadsheet. Or, the user may exit the screen and clarify the spreadsheet. 5. When all of the foregoing information has been validated or corrected, the user may click on the "Next" button. The program will be sure that all information is valid, and proceed to the next page. Or, it will redirect the user to the invalid information and allow correction of the data. The 3: AVL tab appears. The program will search the database for existing Item Masters with the same Customer Part Number and Revision and for the same Customer as contained in the spreadsheet (although is a different AVL. The user will be presented with a list of components on the spreadsheet with NEW AVLS (same customer, Customer Part Number, Customer Revision, but AVL is different on spreadsheet). The user is then prompted to select (by check box) AVLs they wish to add to the existing customer part numbers. Items not checked will be retained for further disposition in the program.
NOTE: If a customer selects to use an existing PN, when they import a BOM the new AVL(s) will NOT be added to existing BOM's.
For Example: If user has a part listed on their XL file with customer part number "215002-002" and customer id '0000000004'. When the user moves on to the AVL page (page 3), the program will try to located the part listed on the XL file in the inventory. It will search for all the consigned parts with customer part number = "215002-002" and customer id = '0000000004'. In the inventory data the system found two different internal parts with the same consigned part number and the same customer id. One part is '101-0001621' and another is '515-0003224'. Then the system will proceed with comparing AVL's for those parts with AVL's entered in the XL. It found that the part number '515-0003224' has Mfgr: 'SWITCHCR', MPN: 'RTT34B02', which is a match to the AVL entered in the XL file. You can see "Same as in upload" in the MPN column on the screen. For the part number '101-0001621' the system found "GENR" AVL, which is different from our XL file, so the system indicates that if this part will be selected a new AVL 'SWITCHCR' with MPN: 'RTT34B02' will be added to it. Base on this information a user can make a decision on which part to use. 
6. Pressing the "Next" button will add the checked AVLs to existing Customer Part Numbers. It will also find all existing parts in the item master and include all inventory item master information with those parts being loaded. The 4: Rev tab appears. The import program will search the existing database for parts having the same AVL (Mfgr and Mfrg PN) as the spreadsheet parts, under the same customer part number, but with a different customer revision. The user will be presented with a list of those parts, and may take the option to use them instead of creating a new part number. If accepted (by check box), the alternate customer part number and revision will be used in the BOM.Items not checked will be retained for further disposition in the program.
7. Pressing the "Next" button will revise the checked items to existing (alternate) Customer Part Numbers. The 5: CPN tab appears. The import program will search the existing database for parts having the same AVL as the spreadsheet parts, under the ANY CUSTOMER with the same customer part number, and without regard to customer revision. (Some users may use the manufacturers part number for their own.) The user will be presented with a list of those parts, and may take the option to use them instead of creating a new part number. If accepted (by check box), the alternate customer part number and revision will be used in the BOM. However, the Customer will be added to the customer list for the existing part. Of the checked items, there must be only one check to select an alternate part number, although the search of existing part numbers may find several. Items not checked will be retained for further disposition in the program.
8. Pressing the "Next" button will revise the checked items to existing (alternate) Customer Part Numbers. The 6: Alternate CPN tab appears. The import program will search the existing database for parts having the same AVL as the spreadsheet parts, under the same customer, but with ANY customer part number, and without regard to customer revision. The user will be presented with a list of those parts, and may take the option to use them instead of creating a new part number. If accepted (by check box), the alternate customer part number and revision will be used in the BOM. However, the Customer will be added to the customer list for the existing part. Items not checked will be retained for further disposition in the program.  9. Pressing the Next button will revise the checked items to existing (alternate) Part Numbers. The 7: Alternate PN tab appears. The import program will search the existing database for ANY parts having all the same AVL(s) (Same Mfgr and Mfgr PN) as the spreadsheet parts. If the part number listed on the spreadsheet has ALL the same AVL(s) and/or some additional AVL(s), as a part in the system, the user will be presented with a list of those parts, and may take the option to use them instead of creating a new part number. If accepted (by checkbox), the alternate part number and revision will be used in the BOM, the Customer will be added to the customer list for the existing part, along with any new AVL information from the xls spreadsheet, which is automatically added to the BOM and Inventory Control records. If the part number listed on the spreadsheet has some AVL(s) that match a part in the system, but not all of them, the system will NOT consider this as an alternative part number. Here is an example of why the system will NOT list a part as an Alternative part if only 1 AVL matches and not all AVLs match: Lets say we have PART A (internal part) with AVL1, AVL2, AVL3. This part is on the BOM for the customer A. Lets say the user is loading BOM for customer B and it has PART B (which is NOT in the system yet) with AVL6, AVL7, AVL1. If the system recognized PART A as an alternative to PART B and adds AVL6, AVL7 to the PART A. Then when you go and view BOM for customer A you will see AVL1, AVL2, AVL3, AVL6, and AVL7 on the list of approved manufacturers. This list was changed seamlessly and without real understanding on the users part or without customers consent. If this is not enough we added X-Ref that will find anything the user want and replace the part selected.
Items not checked will be retained for further disposition in the program. A purple highlight indicates that the item is Inactive. If the user still elects to use the Inactive part the system will display a warning message that the inactive items selected and the users will option of changing the status to Active. 10. Pressing the "Next" button will revise the checked items to existing (alternate) Customer Part Numbers. The 8:Class tab will appear. The import program will display all parts for which an existing nor alternate part number have been selected. These parts will be new parts added to the item master, and must have additional information included in order to be loaded. The user may select a part class and (optionally) part type for each item or leave it blank. Blank classes will be assigned "TBD" when loaded into Inventory. Items for which there are multiple AVLS will only require the class and type to be entered once. The user selects each from a dropdown list. Once a Class is assigned, the available Types for that class will be available for inclusion in the part Type. Because the descriptions are loaded from customer documentation, and the user may wish to clarify the description, the opportunity to do so is on this page.Items not completed will be loaded into the item master with a part class of TBD. 
11. Pressing the "Next" button will then search the database for the default information for the class and type, and populate the required fields for the new parts based on the class and type. If no parts have been checked for uploading the system will prompt the user and place them back on the Part Class/Type page. The 9:Part # & Rev tab appears. The import program will determine whether or not the user has Auto-Part Numbering enabled. If it is enabled, the program will assign internal part numbers based on the class and type setups, and move to the next page. If Auto-Part Numbering is disabled (or off), the user must enter valid internal part numbers and Revisions for each new part. The internal part number entered may not already exist in the database. If user wants to use the CustPN and CustRev (from the template) for the internal Part # and Rev check the Copy box. Checking/Uncheckiing the "Check All" box (located above the CustPN and CustRev columns) will check/uncheck all the records. If user wants to add the prefix setup for that customer (the prefix must be setup within the Customer Information Module) to the new part number they must check the PRFX box. Checking/Un-checking the "Check All" box to the far right globally check/uncheck all the records. Items not completed will NOT be loaded into the item master nor the BOM.
12. Pressing the "Next" button will then search the database to validate the entered part numbers. The 10:Select to Load tab appears. The import program will display the entire list of part numbers being entered by assembly. If the auto numbering is on, user will have the ability to copy the XL revision to the new part revision by checking the box. Check/Un-Check All box (located above the Rev column) gives the user the ability to check/uncheck all records to copy the XL Rev to new part Rev. The user has a final opportunity to verify that the parts and BOMs are to be loaded. A Check/Un-Check All box is available (located after the Step 10: Select items to Load title) to give the user the ability to check/uncheck all records to be loaded into the item master or the BOM. (In-Active records will have to be manually checked). Items not checked will NOT be loaded into the item master nor the BOM.
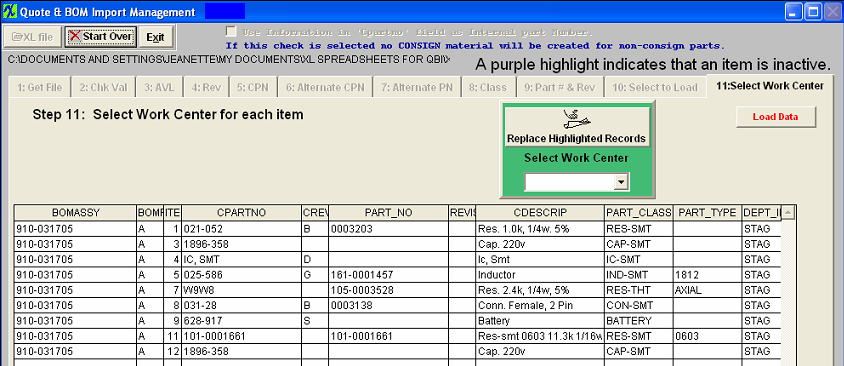
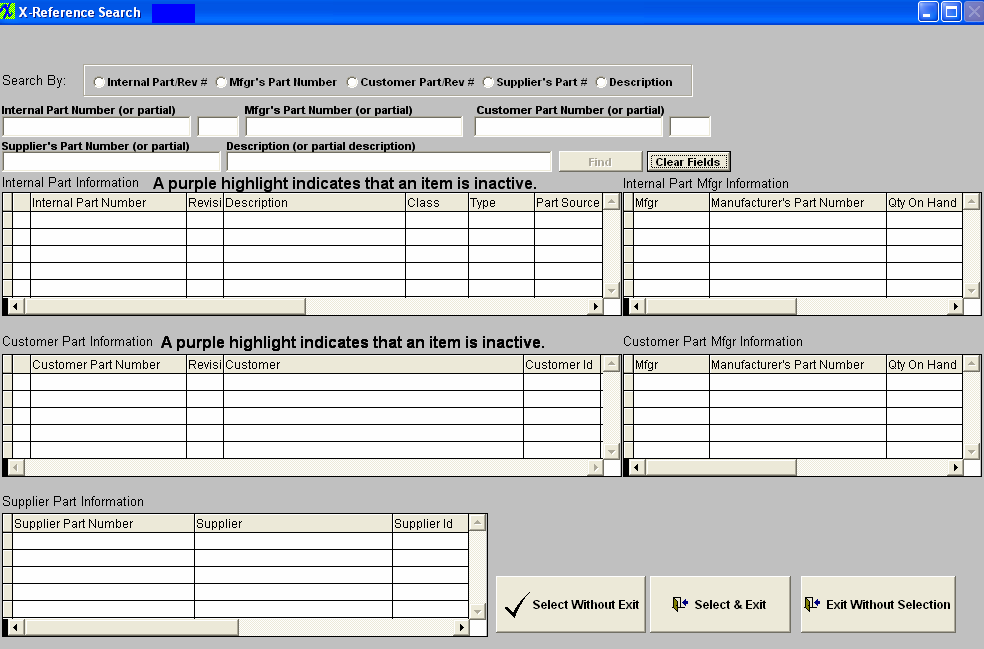 The user can enter partial string and search is not case sensitive. After system will find parts in response to the search, the user can make a selection by checking on one of the check boxes. The user can click one of the buttons on the bottom of the screen when done. And if the user selects one of the buttons with "Select" on it the part that was highlighted in the BOM import screen will be replaced. Please note the search screen can be up all the time, so if the user selects a part find replacement and click "Select without Exit" button then select next part on the import screen and look for the replacement without exiting search screen. 13. Pressing the "Next" button will then remove the parts that are not to be loaded into the system. The 11:Select Work Center tab will appear. The import program will display the entire list of part numbers to be loaded into the item master or BOM. All components will be defaulted to the Staging work center. The user has the option to change the work center at this time. Highlight the part number you would like to change.Choose a work center from the pull down list. Click on the Replace Highlighted Records box. 14. Pressing the "Load Data" button will complete the upload. The tables updated will be the INVENTOR, INVTMFGR, INVTMFHD, BOM_DET and BOM_REF.
|
| 1.4. FAQs - QBI |
| Facts and Questions for the Express Import to BOM or Quote (QBI) Module |
