| 1. Capacity & Scheduling (OPTIONAL Module) |
| 1.1. Dynamic Production Scheduling |
| 1.1.1. Prerequisites for Dynamic Production Scheduling |
Setup Required:
ManEx’s standard module configuration allows most users to accomplish their daily tasks. For those users wanting to get more from ManEx by leveraging the total solutions, this is one of the optional modules available for purchase. This screen provides visibility of all open and scheduled orders. To place an order or to learn more about this specific module or any of the other optional modules please contact us at http://manex.com\contactus.aspx After activation, "Dynamic Production Scheduling" access for each user must be setup in the ManEx System Security module. Users with “Supervisor Rights” will automatically have access. User MUST activate the Re-Schedule trigger and setup e-mail for the notification. This trigger will re-schedule all of the jobs that were scheduled and still open. The purpose is to recalculate “In” and “Out” date/time for the Work Centers to make capacity view more accurate, otherwise in/out of the WC will not recalculate (only priorities of the job are) and capacity view will be always off. The Dynamic Production Schedule module is based on the following setup:
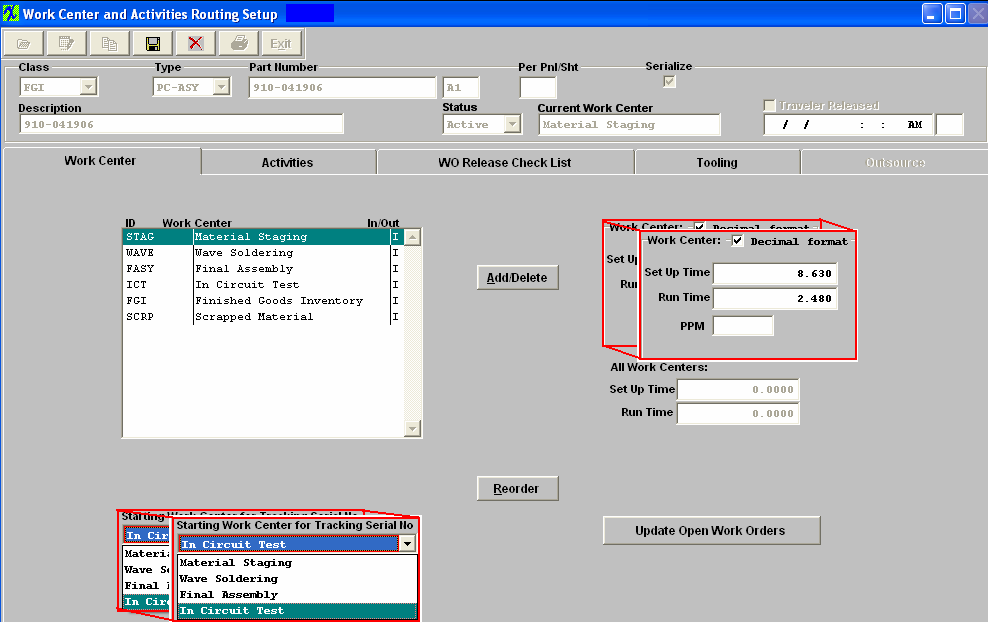
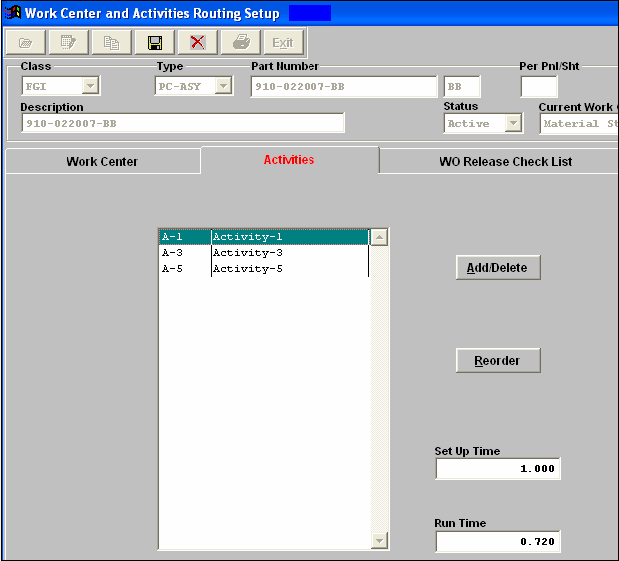
The prcoess time within the Dynamic Production Schedule module is calculated from the Setup and Run time entered in the Work Center and Activities Routing Setup.
 The Production Capacity Setup module. 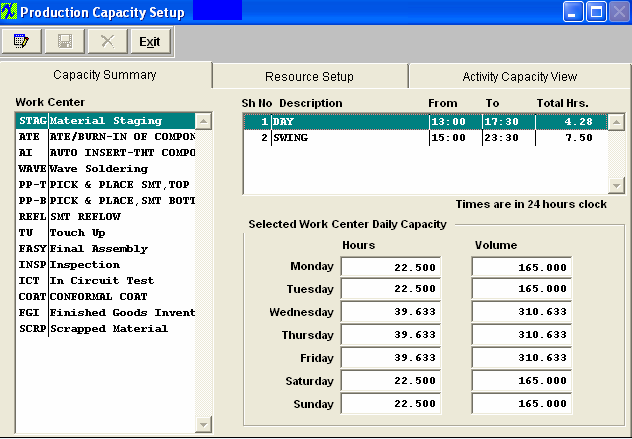 Also check the status of the Work Order of interest – it can not be on Administrative Hold (for example), to complete the scheduling.
|
| 1.1.2. Introduction for Dynamic Production Scheduling |
This screen provides visibility of all open and scheduled orders. Users are able to see when capacity constraints may hinder production and any time in the future. This module can provide sufficient notice to adjust the production schedule or adjust capacity to maximize production and meet promised delivery dates. It will also indicate when a job will not be completed on time based on processing time remaining and the current due date.
This module will aide in managing jobs by the work orders and/or work centers based on customer requirements (due date or complete date). The work orders can be managed by work center with the ability to prioritize within each work center. This module will allow you to view and schedule the workload to ensure deadlines are met. The system will assume that you have a 24 hour capacity shop. The idea behind the work order schedule module is not to predict when the job will move through the shop, but to accurately prioritize the job so the user knows which job has to be processed first. To get a better understanding on how this module calculates the priority for a job see the attached word document <Production Schedule Module>.
The Work Center Tab - allows user to view all the work orders scheduled for a specific work center
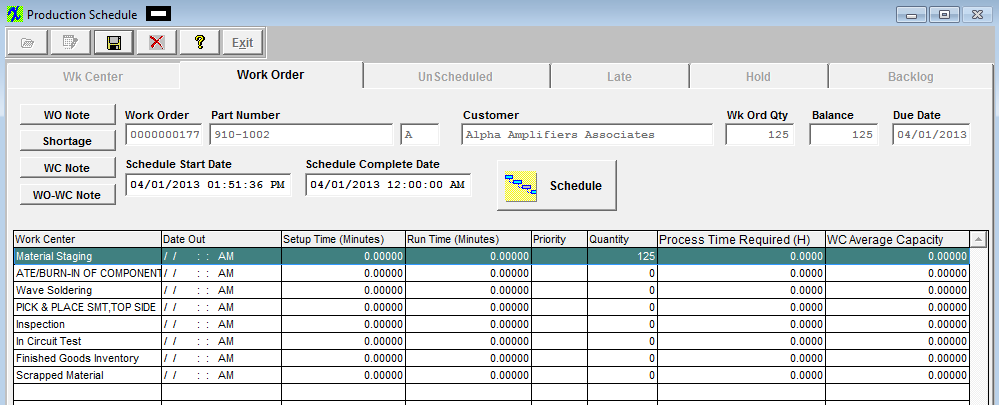
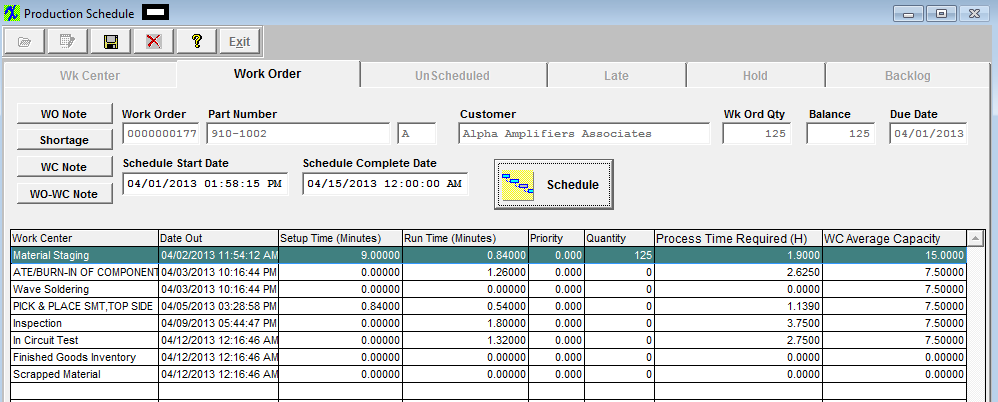
The Work Order Tab - allows the user to schedule the work order
The Unscheduled Tab - displays all Work Orders with a status of "Open" that are not scheduled
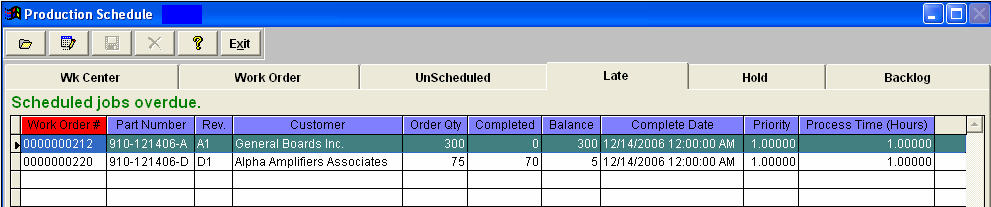
The Late Tab - displays a list of Work Orders that have exceded the WO due date, unless they have opt to use the Trigger then it will display a list of Work Orders that have exceded the Complete Date
The Hold Tab - displays a list of Work Orders that have a status of "Hold"
The Back Log Tab - displays a list of Work Orders with a status of "Open" that have been scheduled and still have a balance remaining
|
| 1.1.3. Fields and Definitions for Dynamic Production Scheduling |
| 1.1.3.1. Work Center | ||||||||||||||||||||||||||||||||||||||||||||
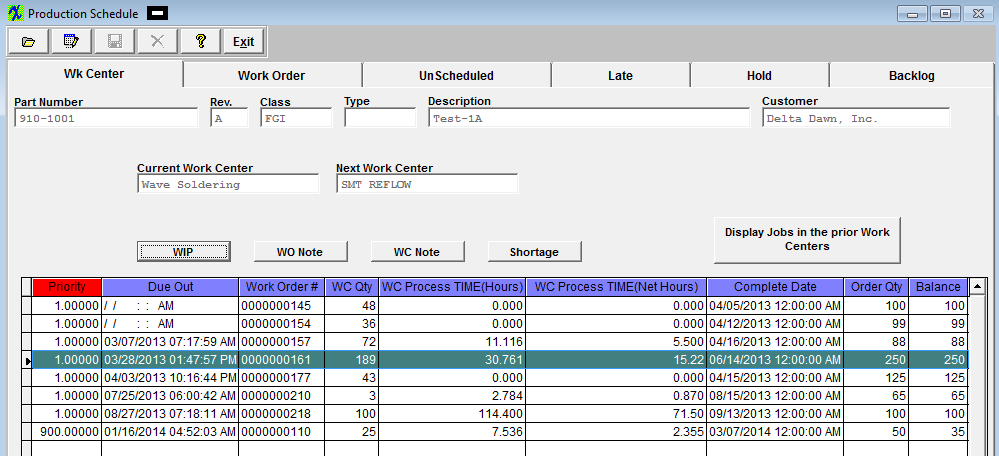
The Work Center Tab - allows user to view all the work orders scheduled for a specific work center
Work Center Tab Fields and Definitions
|
| 1.1.3.2. Work Order Tab | ||||||||||||||||||||||||||||||||||||||||||
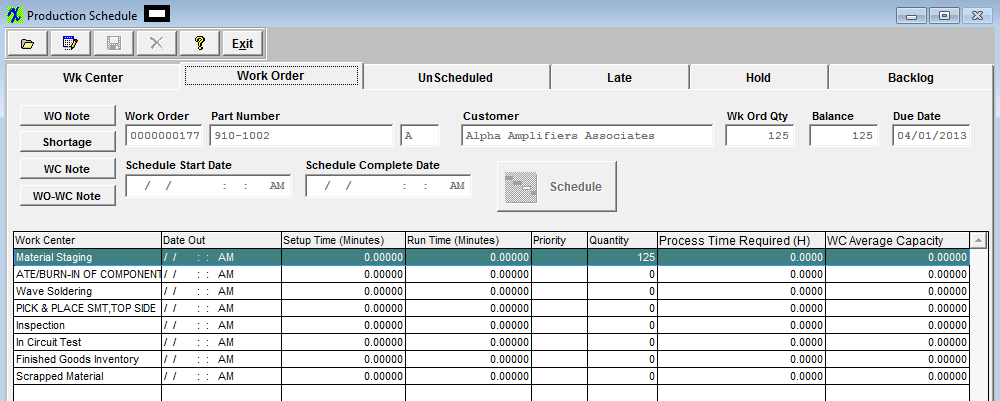
The Work Order Tab - allows the user to schedule the work order 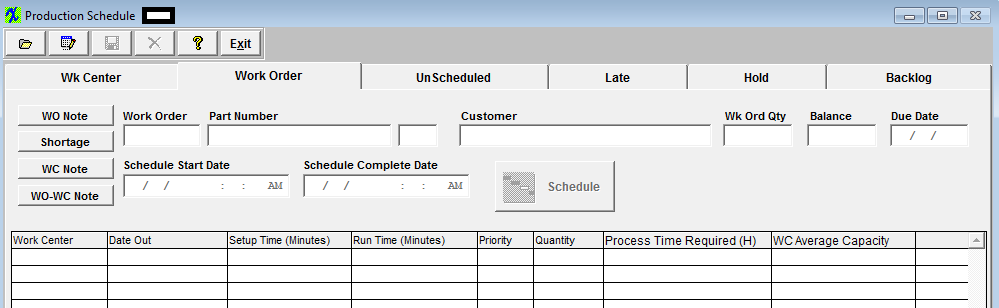 Work Order Tab Fields and Definitions
|
| 1.1.3.3. Unscheduled Tab | ||||||||||||||||
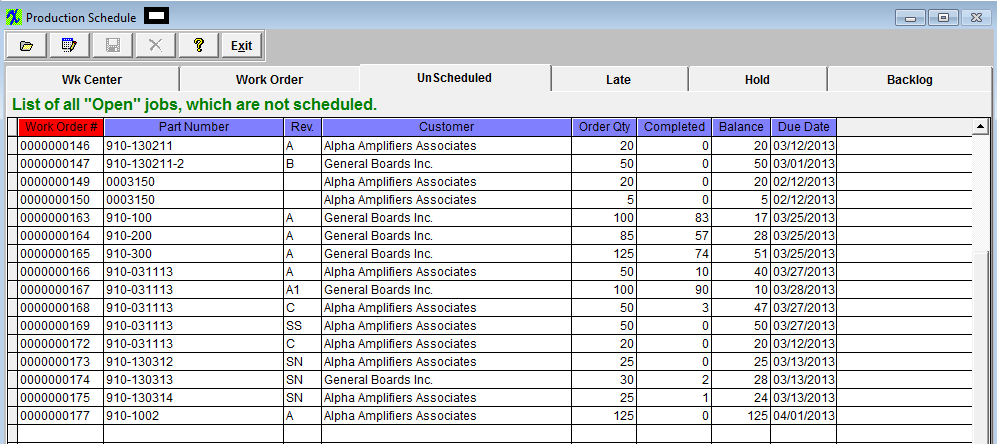
The Unscheduled Tab - displays all Work Orders with a status of "Open" that are not scheduled 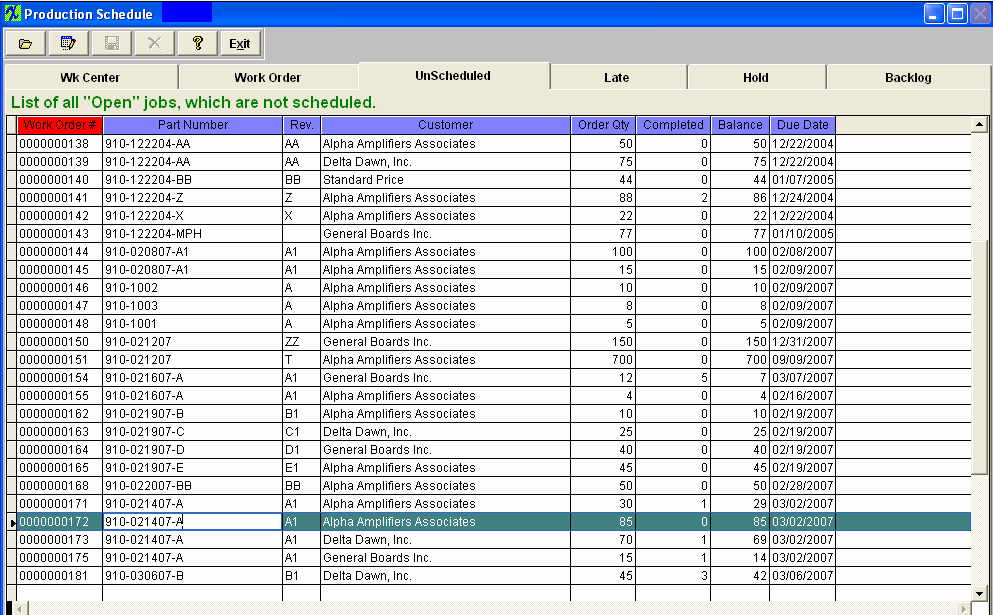 Unscheduled Tab Field and Definitions
|
| 1.1.3.4. Late Tab | ||||||||||||||||||||
The Late Tab - displays a list of Work Orders that have exceded the WO due date, unless they have opt to use the Trigger then it will display a list of Work Orders that have exceded the Complete Date
|
| 1.1.3.5. Hold Tab | ||||||||||||||||||||
The Hold Tab - displays a list of the Work Orders that have a status of either “Administrative Hold” or “Manufacturing Hold” on them: Hold Tab fields and Definitions
The user may sort the display by clicking on the Work Order, Product Number, Build Quantity, Complete, Balance or Complete Date header buttons.
|
| 1.1.3.6. Backlog Tab | ||||||||||||||||||||||
|
The Backlog Tab - displays a list of Work Orders with a status of "Open" that have been scheduled and still have a balance remaining
Backlog Tab fields and definitions
The user may sort by Work Order, product Number, Build Quantity, Complete, Back Order or Completion Date by clicking on the header buttons. |
| 1.1.4. How To ...... for Dynamic Production Scheduling |
| 1.1.4.1. Find Work Order | ||||||
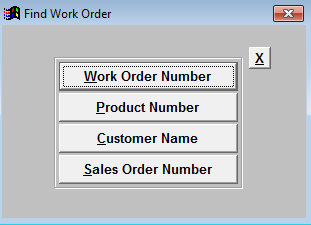
The following screen will appear: Depress the Work Order tab. The following screen will appear:
Depress the Find button.
The Work Order selected will appear on the screen:
 |


| 1.1.4.2. Find Work Center | ||||||||
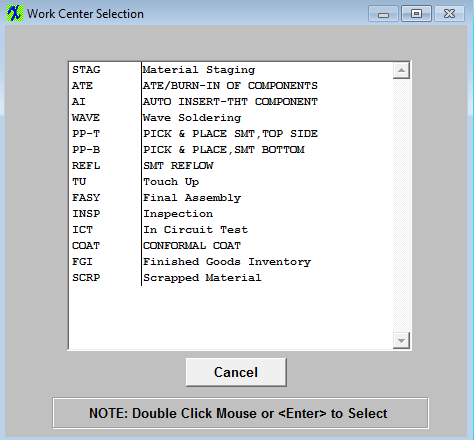
Clicking on the
Depress the Find button and the following
The following will appear for all of the Work Orders listed in the Work Order tab. The user may sort on any of the following buttons: Due Out, Work Order #, Priority, WC Qty, WC Process Time, Complete Date, Order Qty, or Balance.
Depressing the WO Note button will bring up the Notes entered in the Work Order Screen. To add a note, depress the Edit button, type in the note and depress the Save button.
Depress the WC Note button will bring up the notes entered in SFT per work center, for the Work Order highlighted. To add a note, depress the Edit button, type in the note and depress the Save button.
|

| 1.1.4.4. Re-Schedule a Work Order |
Find a Scheduled Work Order, depress the Edit Button, and enter your password. 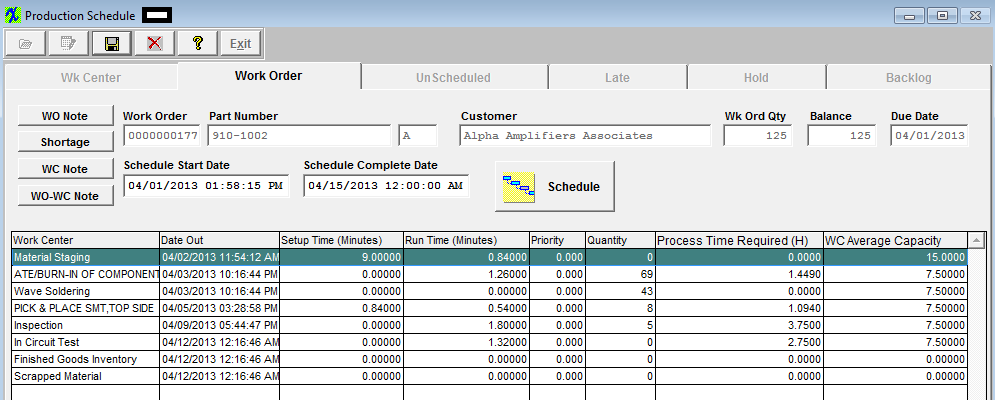  Depress the Exit button. Once user has completed the changes they may depress the Save button, to save the changes or the Abandon changes button to abandon the changes.
NOTE: There is also a Capacity Planning Trigger option that my be setup to re-schedule all of the jobs that were scheduled and still open automatically. When the trigger runs, it will recalculate the "In" and "Out" date/time for the Work Centers so the capacity view is current.
|
| 1.2. Capacity Critical Path |
| 1.2.1. Prerequisites for Capacity Critical Path |
After activation, "Dynamic Production Scheduling" access for each user must be setup in the ManEx System Security module. Users with “Supervisor Rights” will automatically have access.
A Production Schedule must be setup for the Work Order
|
| 1.2.2. Introduction for Capacity Critical Path |
| 1.2.3. Fields and Definitions for Capacity Critical Path |
| 1.2.3.1. Work Center Tab | ||||||||||||||||||||||||||||||
|
| 1.2.3.2. Work Order Tab | ||||||
|
| 1.2.4. How To ...... for Capacity Critical Path |
| 1.2.4.1. Create a Graph | ||
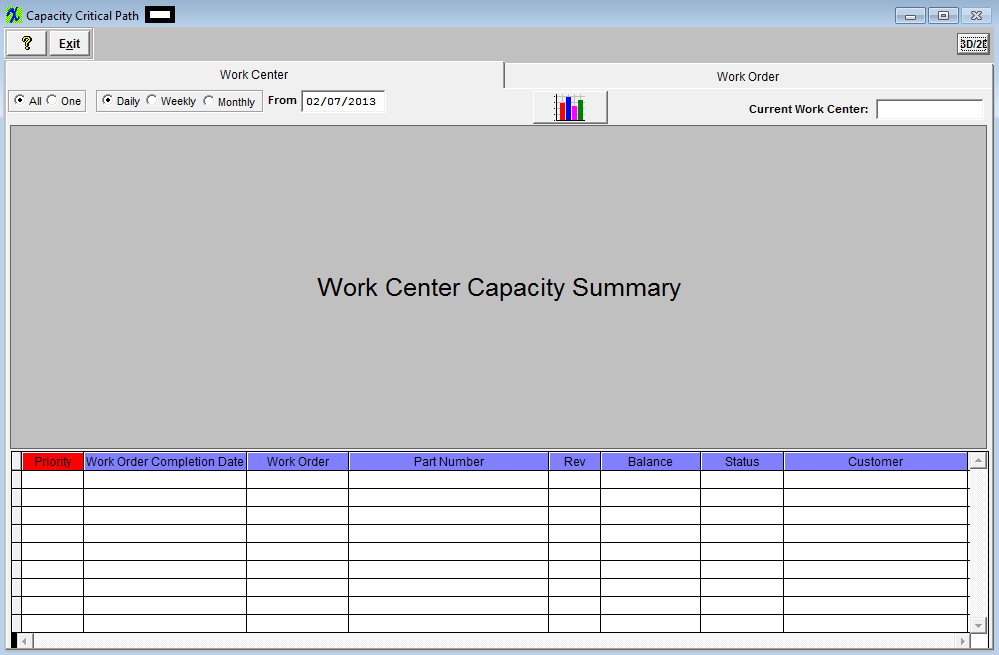
The following screen will appear:
To create a graph, select Work Center(s), by clicking on the appropriate radial
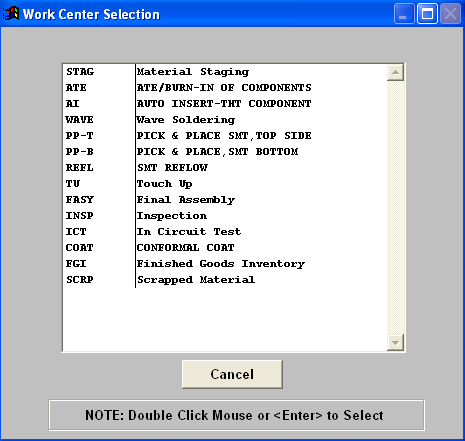 Highlight a Work Center.
Decide what period you want the graph to cover, Daily, Weekly or Monthly. Type in the From date. Depress the
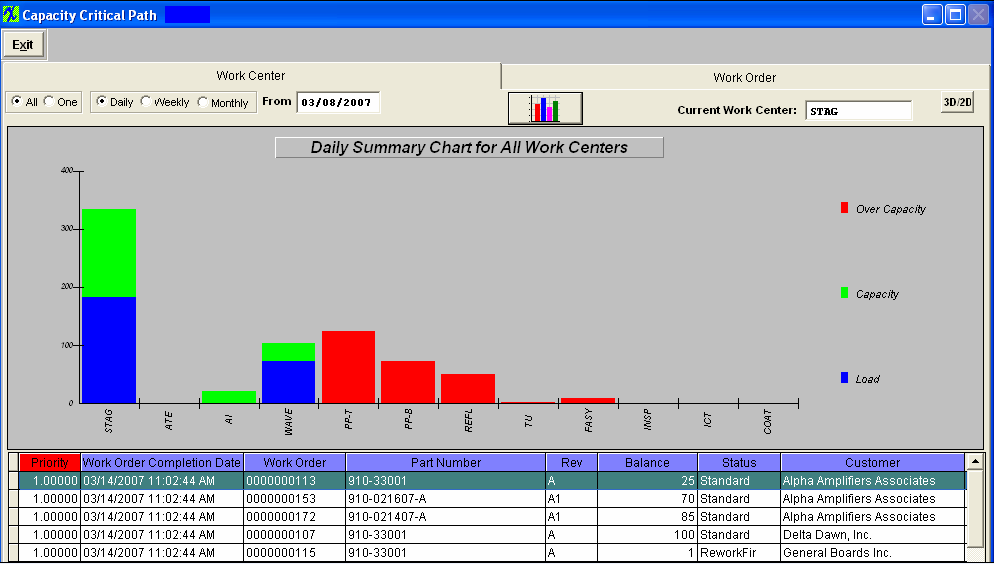 The bar graph will include all jobs that affect the load (including jobs that are on any type of Hold), so users are not misled about the available capacity. The grid below will display the status of the job and if the user feels that a job should not be included they may re-schedule it to a future date.
To display the detail click on the bar within the BLUE and the detail information for that date will be displayed at the bottom of the screen. The WOs display at the bottom of the screen are sorted by complete date (disregarding the time). User may sort the display at the bottom of the screen, by depressing any of the Header titles. The GREEN on the bar means NO capacity and the RED on the bar means over capacity.
A drill down to the Production Schedule module is available within this screen. If user double clicks on a specific Work Order number in the "Work Order" column the Production Schedule module will open for that work order on the schedule screen, so user may view, edit, etc. When user is finished viewing the Production Schedule module, they may depress the exit button, and it will bring you back to the Capacity Critical Path screen.
Note: The graph and the grid may get out of synchronization. If that happens simply click on the “3D/2D” button. The graph button will work also, but may take longer because it will go through the whole process of collecting the data again.
WORK ORDER TAB
Depressing on the Work Order tab will bring up the following: Select the desired Work Order from the pull down. Depress the
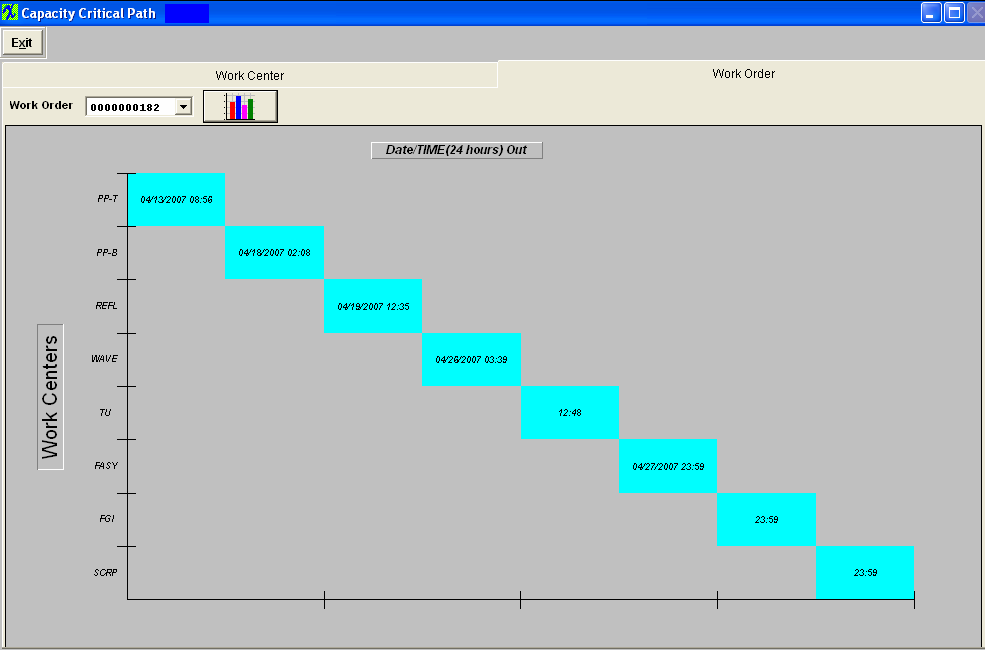 The dates and times displayed in the blue boxes are the dates and times that the product is due to be moved out of the Work Center per the Production Schedule module.
|
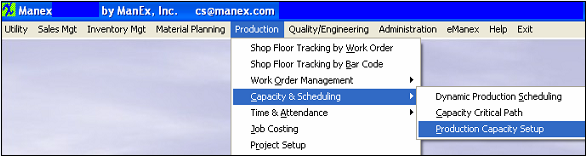
| 1.3. Production Capacity Setup |
| 1.3.1. Prerequisites for Production Capacity Setup |
The following setup is required before the user will be able to use the Production Capacity Schedule.
After activation, "Production Capacity Setup" access for each user must be setup in the ManEx System Security module. Users with “Supervisor Rights” will automatically have access.
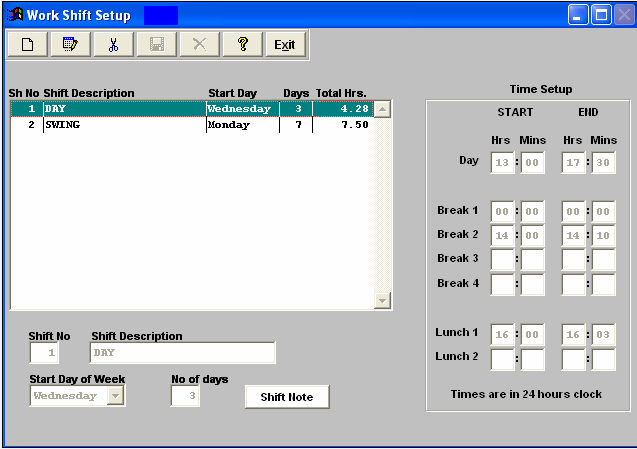
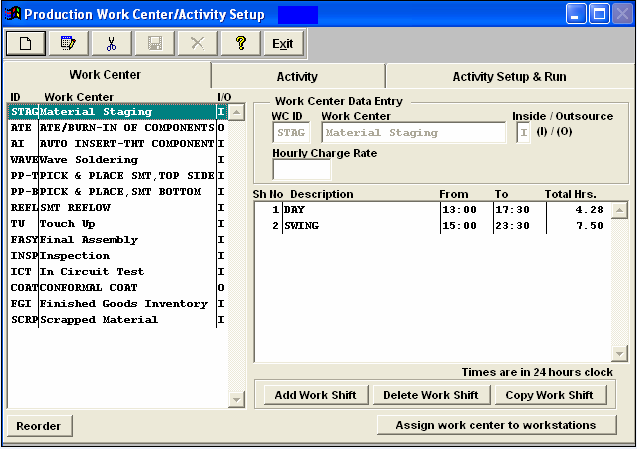
Work Shifts must be setup in the Work Shift setup module. The more work hours you have the higher your capacity.
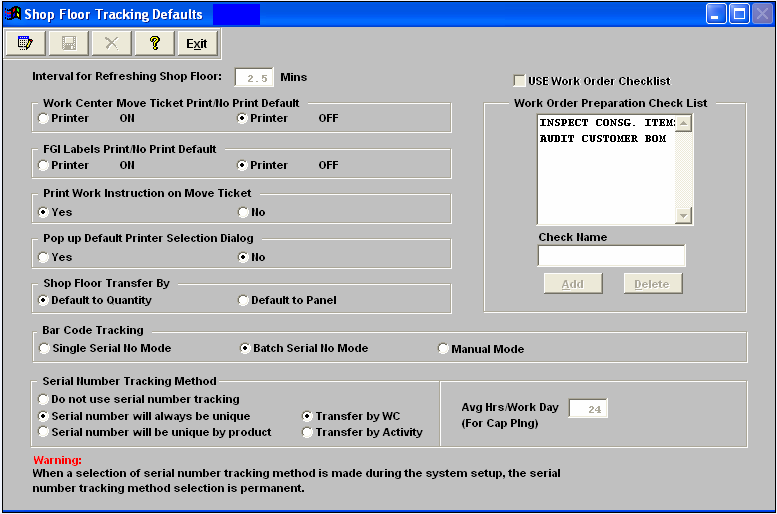
 In System Setup for Shop Floor Tracking Defaults the system assigns the Average Hrs/Work Day as 24 hours.
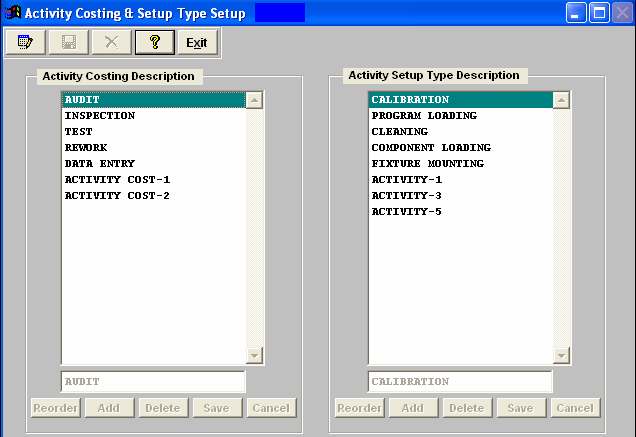
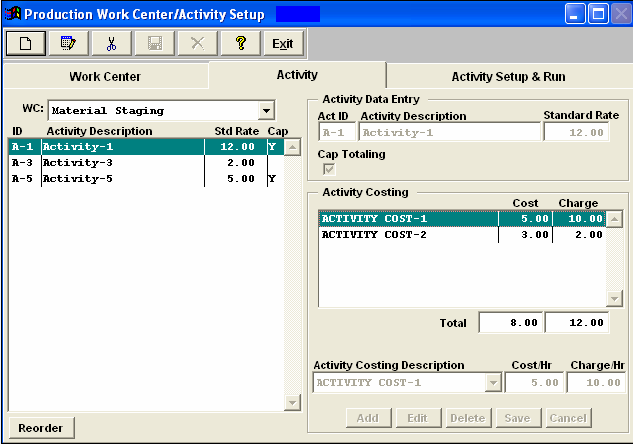
The Activity Costing Description and Activity Setup Type Description must be setup in the Activity Costing & Setup Type Setup module.
 Shifts and activities must be entered to each application Work Center in the Production Work Centers & Activities module.
 Within the Activity screen, the user checks the Cap Totaling box and enters the applicable Activity Costing information.
 The Work Center Activity Setup and Run Times must be entered in the Work Order Traveler Setup module for any applicable product.
 Check the status of the Work Order of interest – it can not be on Administrative Hold (for example), to complete the scheduling.
|
| 1.3.2. Introduction for Production Capacity Setup |
Capacity is at units/hour/operator-machine. Capacity then depends on the number of resources available, and that includes the number of shifts available. The program determines the duration of the job based on the resources, shifts, and active time during shifts (breaks and meals are excluded). The capacity planning module will stack up the requirements for multiple jobs on the same day and either require the user to add resources, or extend the completion time. Once the extensive setup requirements are met, the user may add a resource assignment. There are two views available in the Production Capacity Setup module. The Capacity Summary screen and the Activity Capacity View screen.From there, the user can enter the Dynamic Production Scheduling module and re-schedule Work Orders. There is also the opportunity to graphically view the Capacity Critical Path. |
| 1.3.3. Fields and Definitions for Production Capacity Setup |
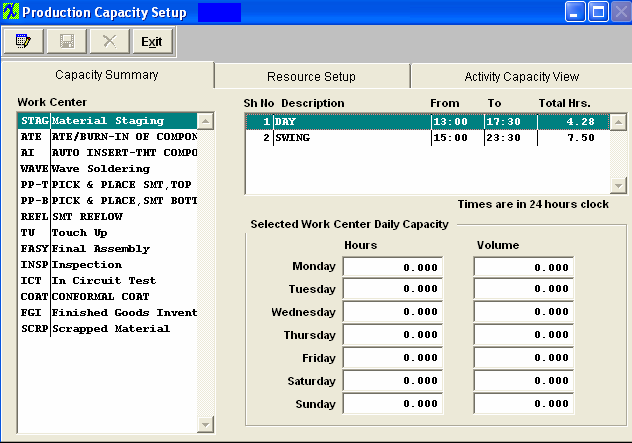
| 1.3.3.1. Capacity Summary Screen | ||||||||||||||||
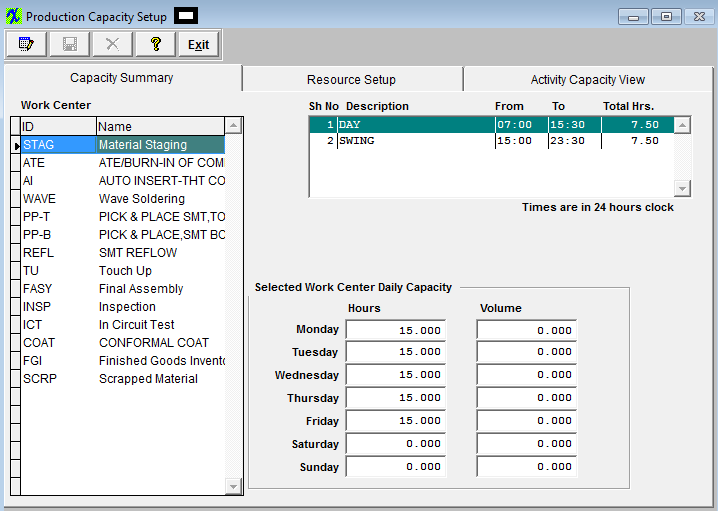
Selected Work Center Daily Capacity
|
| 1.3.3.2. Resource Setup Screen | ||||||||||||||||||
|
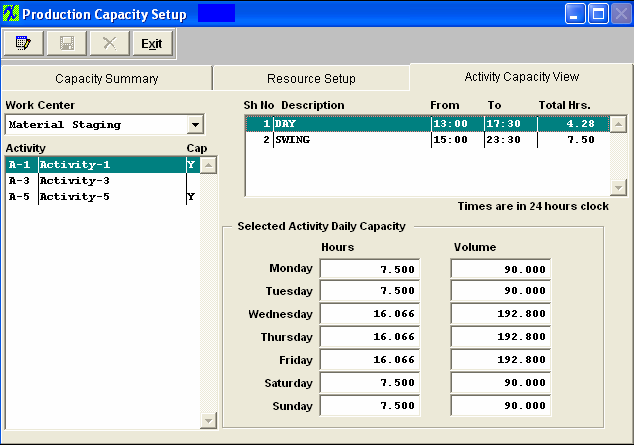
| 1.3.3.3. Activity Capacity View Screen | ||||||||||||||||||||
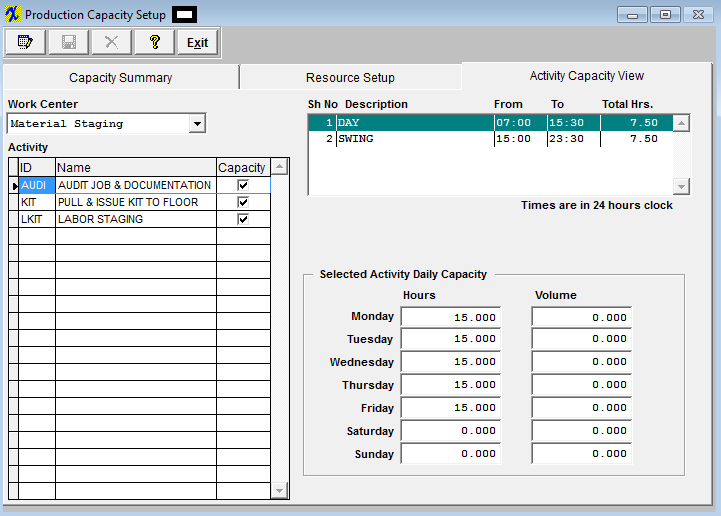
Selected Activity Daily Capacity
|
| 1.3.4. How To ....... for Production Capacity Setup |
| 1.3.4.1. Production Capacity Setup | ||
The following screen will appear. Each Work Center can have different shifts associated with it, but it must have at least one
 To setup the Resources and Capacity pertaining to a
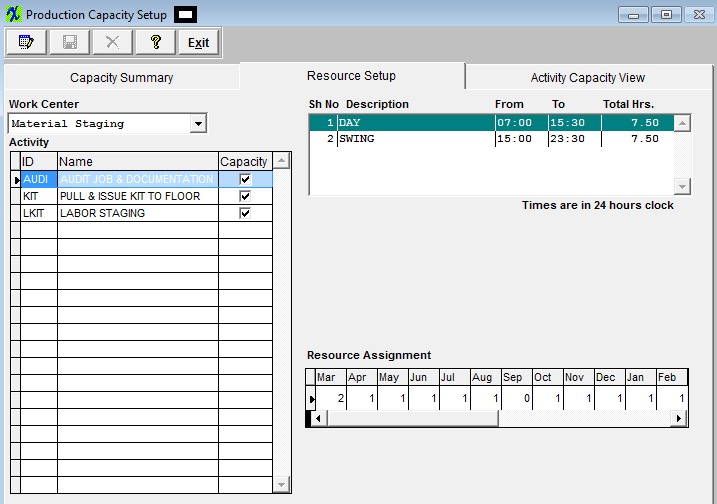
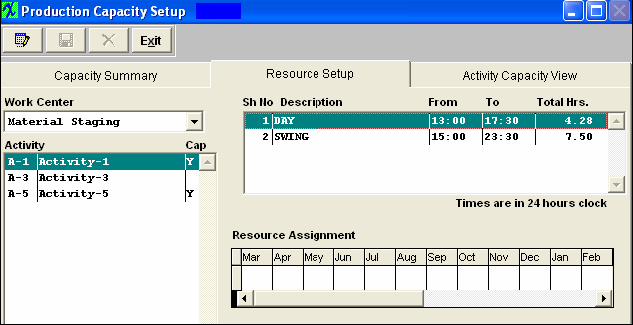 Each time a user enters the Capacity Setup module, the program checks the current date, and updates the month in the "Resource Assigment" grid to show the 12 months from current month. For Example: If the last time a user entered the module was March, so the 12 months are March/2008 to February/2009 (as displayed below). If user re-enters this module in June, the program will change the 12 months to June/2008 to May/2009 and also assign "1" to the 3 new new added months (March, April, and May/2009).
Notice there are three activities listed, but only 2 of them (“Activity-1” and “Activity-5”) will be calculated in the capacity because the “Cap” box has been checked in the Production Work Centers & Activities module.
To add/change a Resource Assignment, depress the Edit button and type in your password. Type in the required Resource Assignment. Depress the Save button to save changes or depress the Abandon Changes button to abandon changes.
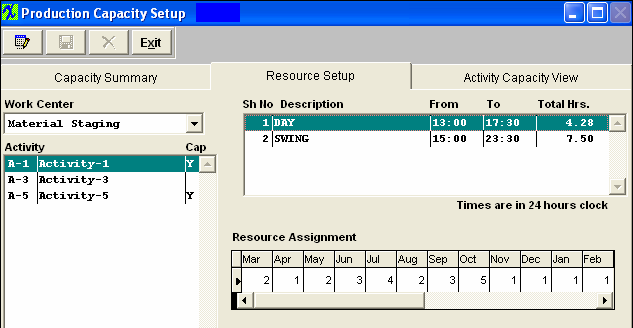 User may enter a different Resource Assignment number in each month for each activity/shift. Example for March: Activity-1 Day Shift is 2 and Swing Shift is 1; Activity-5 Day Shift is 2 and Swing Shift is 2.
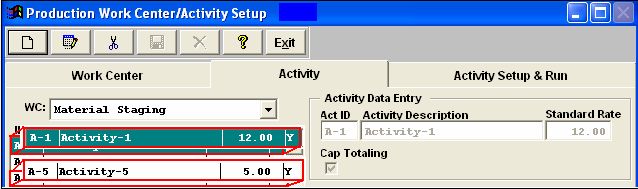
The Activity-1 Standard Rate is 12.00 and the Activity-5 Standard Rate is 5.00 (Setup in the Production Work Centers & Activities module)
 The way the system calculates the hours and volume is: Monday: has only the Swing Shift but is associated with both Activity-1 and Activity-5.
Hours: (7.5*1) + (7.5*2) = 22.50 or (Swing Shift hours x Resource Assignment for Activity-1) (Print Screen 2) plus (Swing Shift hours x Resource Assignment for Activity-5) (Print Screen 4) = 22.50
Volume: (7.5*1*12) + (7.5*2*5) = 165.00 or (Swing Shift hours x Resource Assignment for Activity-1) (Print Screen 2) x Standard Rate for Activity-1 (12.00) = 90.00 plus (Swing Shift hours x Resource Assignment for Activity-5) (Print Screen 4) x Activity-5 Standard Rate (5.00) = 75.00 for a total of 165.00 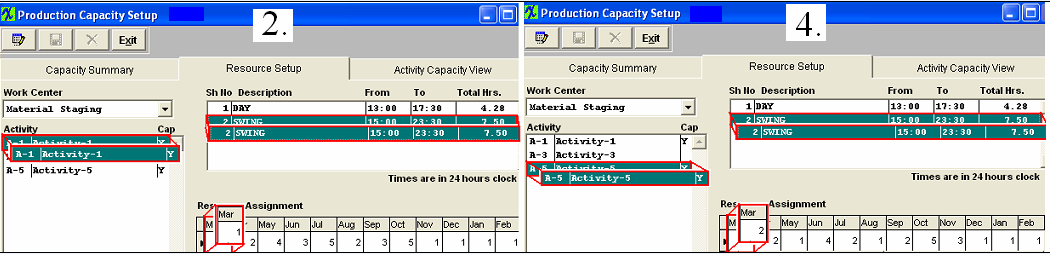 Tuesday: The same as Monday
Wednesday: has both the Day Shift and the Swing Shift and is associated with both Activity-1 and Activity-5. Hours: (4.28*2 + 7.5*1) + (4.28*2 + 7.5*2) = 39.633 or (Day Shift hours x Resource Assignment for Activity-1) (Print Screen 1) plus (Swing Shift hours x Resource Assignment for Activity-1) (Print Screen 2) = 16.06 plus (Day Shift hours x Resource Assignment for Activity-5) (Print Screen 3) plus (Swing Shift hours x Resource Assignment for Activity-5) (Print Screen 4) = 23.56 for a total of 39.633 Volume: (4.28*2 + 7.5*1)*12 + (4.28*2 + 7.5*2)*5 = 310.633 or (Day Shift hours x Resource Assignment for Activity-1) (Print Screen 1) plus (Swing Shift hours x Resource Assignment for Activity-1) (Print Screen 2) x Activity-1 Standard Rate (12.00) = 192.72 plus (Day Shift hours x Resource Assignment for Activity-5) (Print Screen 3) plus (Swing Shift hours x Resource Assignment for Activity-5 (Print Screen 4) x Activity -5 Standard Rate (5.00) = 117.80 for a total of 310.52
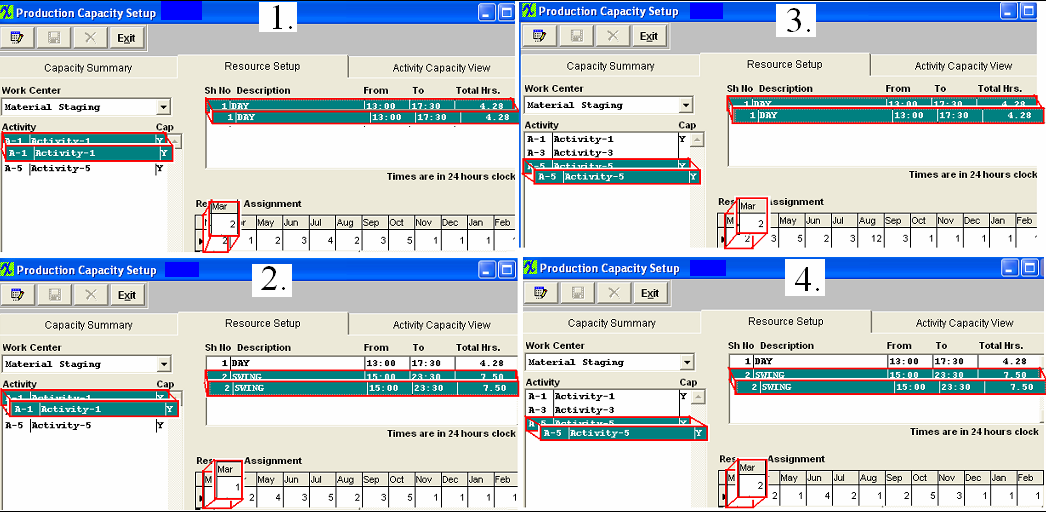 (The screen calculates from minutes, not by hours, so there may be a little bit of a difference.)
Thursday: The same as Wednesday Friday: The same as Wednesday Saturday: The same as Monday Sunday: The same as Monday
To refresh the view in the Capacity Summary tab, highlight the
 For each
|
| 1.4. FAQ - Capacity & Scheduling |
Facts and Questions for the Capacity and Scheduling Modules
|