| 1. Shop Floor Tracking by Bar Code (OPTIONAL Module) |
| 1.1. Prerequisties - SFT by Bar Code | ||||||||
|
ManEx’s standard module configuration allows most users to accomplish their daily tasks. For those users wanting to get more from ManEx by leveraging the total solutions, this is one of the optional modules available for purchase. This module is designed primarily for transfer of products in shop floor tracking and input of inspection data by serial number and defect code. To place an order or to learn more about this specific module or any of the other optional modules please contact us at http://manex.com"contactus.aspx
After activation, "Shop Floor Bar Code" access for each user must be setup in the ManEx System Security module. Users with “Supervisor Rights” will automatically have access.
|
| 1.2. Introduction - SFT by Bar Code |
Overview: Manex Manufacturing System Software has bar code scan and print capability which is designed primarily for transfer of products in shop floor tracking and input of inspection data by serial number and defect code. Installation: Bar Code Shop Floor Tracking is an extra cost option; it is not a part of the Core Manex MES modules. Upon purchase of the module, Manex will send a soft key to activate the module.
Specification:
|
| 1.3. Fields & Definitions for SFT by Bar Code |
| 1.3.1. Transfer Tab | ||||||||||||
Single Serial No. Mode
Batch Serial No. Mode
Manual Mode
|
| 1.3.2. List of Item for Transfer Tab | ||||||||||
|
| 1.4. How To ..... for SFT by Bar Code |
| 1.4.1. Install Bar Code Font |
|
The following procedures must be followed for each workstation from which the user expects to print barcodes. If the following font is not installed, the barcodes will print very large and will not be usable.
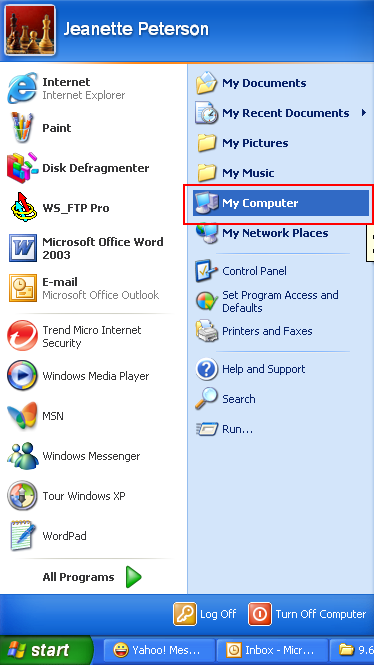
1.Go to Start
2.Select My Computer
 3.Select Control Panel  4.Select Fonts
5.Select File
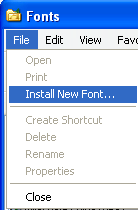 6.Select Install New Font. In the Add Fonts dialog box, go to the system location for fonts in your system.In most cases, it will be in C:"Windows"Fonts.
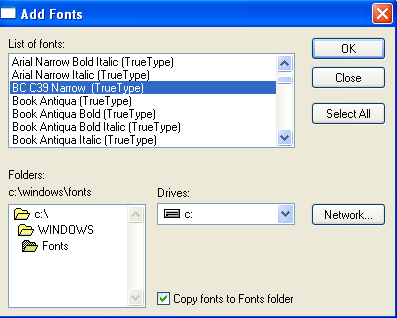
7.The font BC C39 should show up in the List of fonts window. Highlight it. Be sure there is a check mark in the Copy fonts to Fonts folder box and click OK. If this font is NOT listed then you can Download the attached [BarCodeFont_C39N.zip] file and extract it into your C:"WINDOWS"fonts directory.
 8.The new font will appear in the Fonts window. Double clicking on the font will produce the following:

|
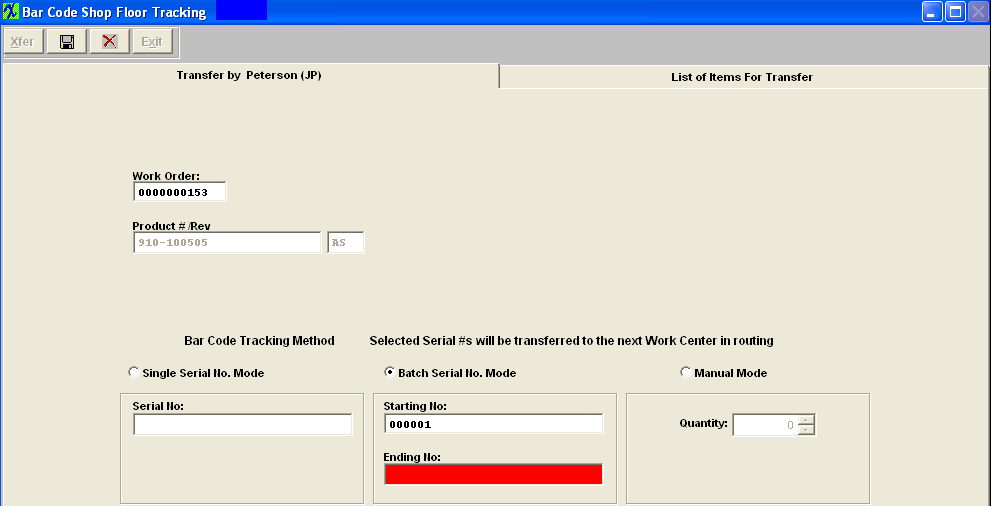
| 1.4.2. Transfer Product | ||
The following screen will be displayed:
Depress the Xfer button. Type in your password or scan employee id . The user can either enter in the Work Order number (which will then display the Product and Rev) or go to the Bar Code Tracking Method section and enter in the Serial Numbers desired. The system will then default the Work Order #, Product and Rev onto the screen.
The Bar Code Tracking method is dependant on how it is setup within the Shop Floor Tracking Defaults . Note: When in "Single Serial no. mode" if the serial number entered has more than one work order associated instead of asking user to select the WO number everytime, if the serial number is linked to previously entered WO, the system will just take the WO and save to 2nd page. If the serial no scanned does not match the previous entered WO, then a WO selection box will be presented to the user.
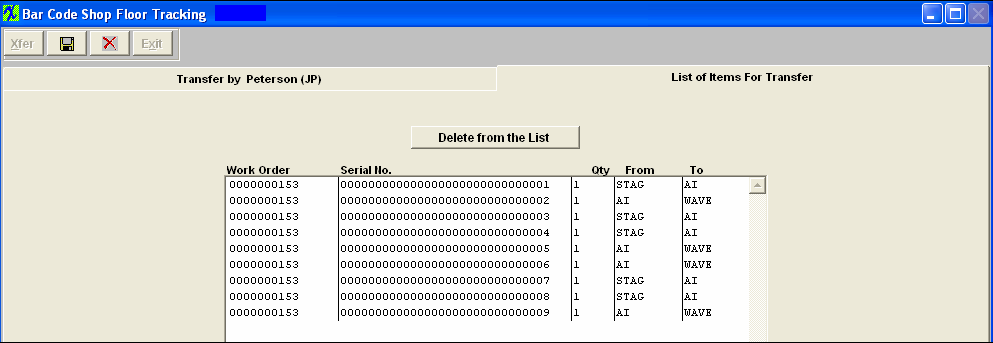
Once the Serial Numbers have been selected, go to the List of Items for Transfer screen. The Work Order number, Serial No., Quantity, From Work Center and To Work Center or from Work Center to Activity will display, depending on the selection within SFT Defaults to Transfer by WC or Activity.
Depress the Save button. The items will then be properly transferred within the system.
If the product is included in an active Cycle count, or Physical Inventory count, the following message will appear after depressing the OK button on the transfer screen and user will not be allowed to transfer product until the count has been completed and posted.
 If the work station being used to transfer serialized material is assigned to use a default work center in Production Work Center/Activity Setup module, when the user first opens the module, the module will use the default work center assigned for this workstation, if the transfer is "FROM" a different work center other than the default and user is NOT a supervisor or has the option "Allow Changing Default Work Center for Serial Number Transfer" box checked within the Security module, they will receive the following message:
 When user depresses "OK" a supervisor approval is required to continue. After supervisor’s password is entered, the default work center will be changed to the one that the supervisor entered password for. For example: the workstation is assigned to use “TU” as default work center, now if user chooses to use “AI” to transfer, the system will ask for supervisor’s password, if user cancels the password, the default work center will still be “TU”, but if the supervisor enters his/her password on this machine, the default work center will be changed to “AI”. If now the user tried to transfer from “TU” again, the system will ask for supervisor’s password again. If user exits the module and come back, the default work center will be “TU” again. |
| 1.5. FAQ's - SFT |
| Facts and Questions for the Shop Floor Tracking Modules |