| 1. How To ..... for Purchase & Receiving Mgmt |
| 1.1. Find a Purchase Order in Receiving Inspection |
| Depress the Inventory Mgt/Purchase Order Receiving & DMR/Purchase & Receiving Management module |
 |
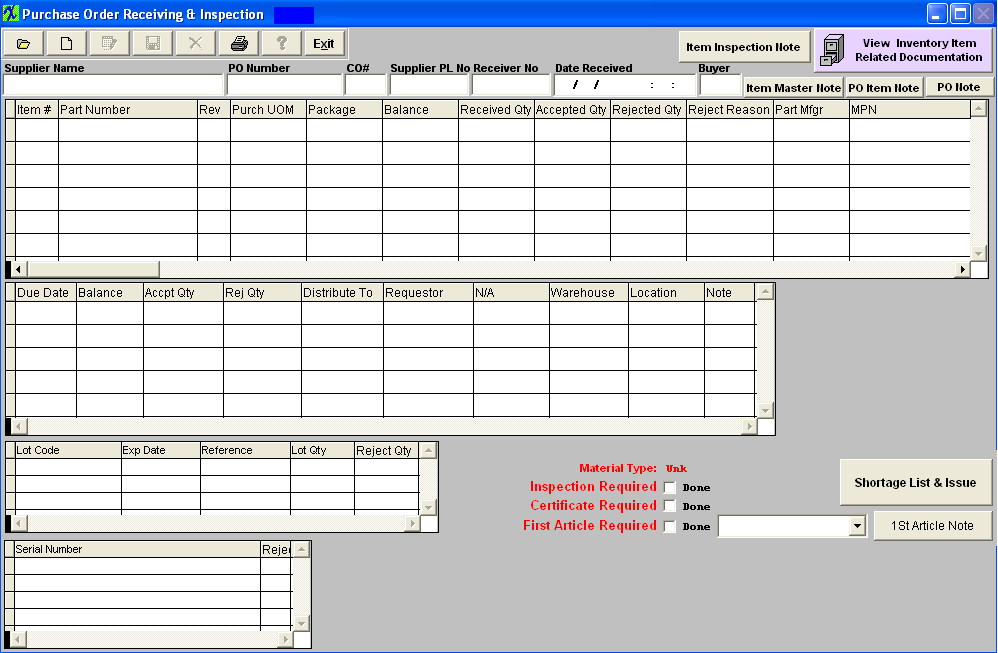
The following screen will appear:
|
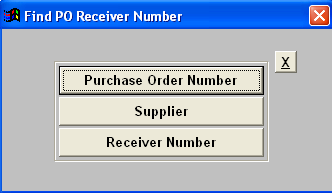
1. Pressing the Find action button at the top of the main screen displays the following sequences:
This allows the user to search by Purchase Order Number, Supplier, or Receiver Number.
|
 |
|
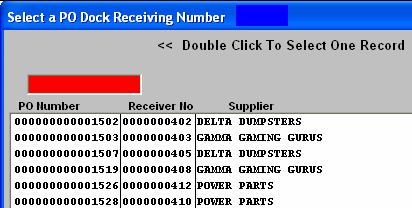
2a. If the user selects to find by Purchase Order Number, a screen is presented listing all orders placed.
Type the PO number into the red box or highlight the PO Number of choice and double click.The PO information will populate the screen.
|
 |
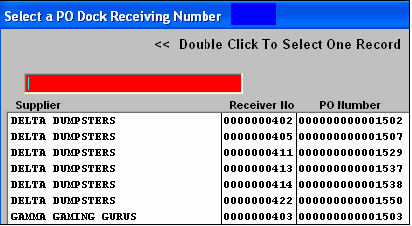
| 2b. If the user selects to find by Supplier, a screen is presented listing all of the suppliers with all orders placed.
Type the supplier into the red box or highlight the supplier of choice and double click.The PO information will populate the screen.
|
 |
|
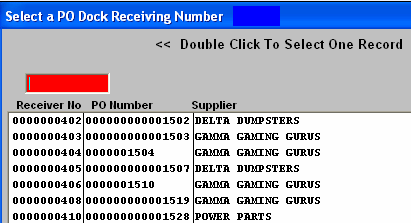
2c. If the user selects to find by Receiver Number, a screen is presented listing all of the receiver numbers with all orders placed.
Type the receiver number into the red box or highlight the receiver number of choice and double click.The PO information will populate the screen.
|
 |
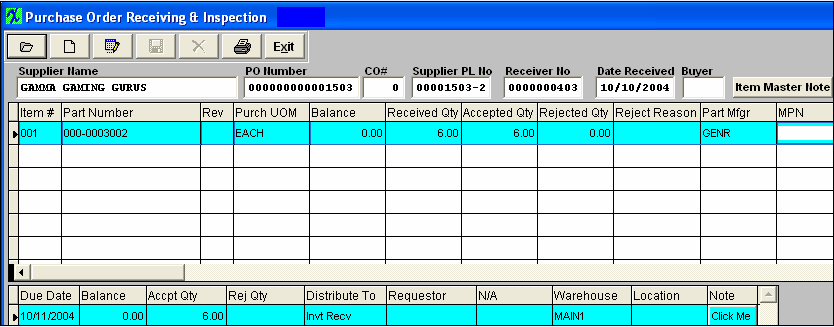
3. The found information will populate the screen, as follows:
|
| 1.2. Add a PO Receiving Inspection Record | If system is setup for Dock Receiving follow a. If system is setup for Inventory receiving ONLY follow b.
-
- Print out the Purchase Order Receipt Inspection Worksheet.
- You will go directly to step 3.
- Inspect the shipment received.
- Add a record.
- The user will be prompted for the password.
- Find a Purchase Order
- If Supplier Packing List Number is not already entered, enter it now.
- Select the part to receive.
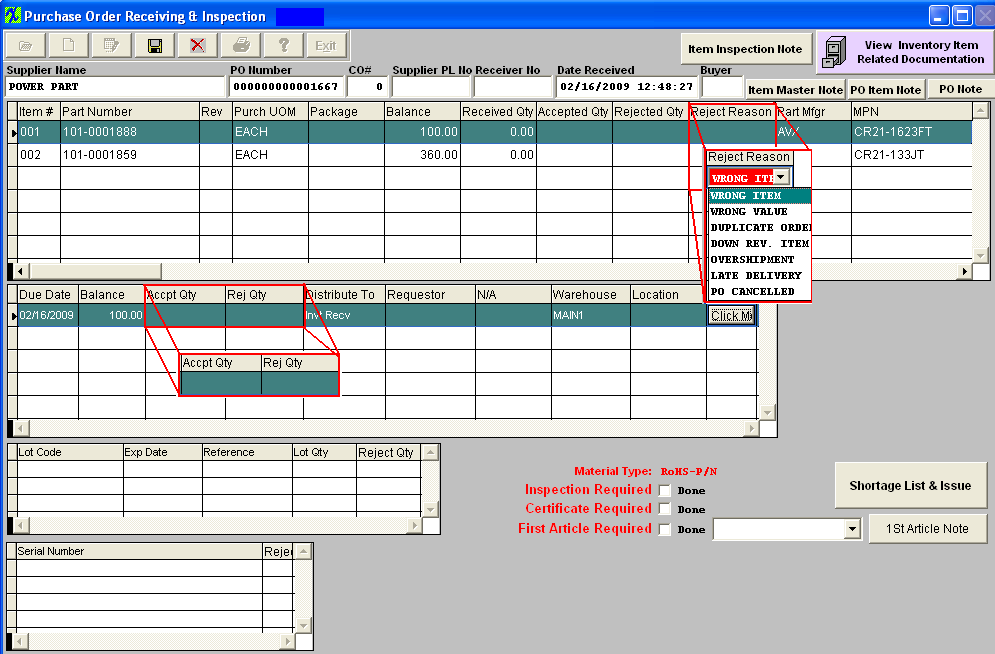
- Enter the quantity accepted and/or rejected and reject reasons. (When using the PO Dock, user has to either accept the entire Dock qty or reject the balance. User can not accept only a partial PO Dock qty). Note: Users must have special access in order to receive overages, receive early shipments,and/or receive banned MPNs. There is a checkbox to allow user to receive overages, receive early shipments, and/or receive banned MPSs, within Security/User Rights for PO Receiving.
User will receive the following warning if the number of parts received is higher than the qty ordered.
The overage is applied to the entire PO order qty - it does NOT go down to the schedule level. Example: If you have an order qty of 100 and an allowed overage of 5% the system will allow you to receive in a total overage of 105. But if you have only scheduled a qty of 25 and go to receive in qty of 30 the system will allow you to do so, because it has not met the order overage yet. Note: A negative qty will appear in the balance column on the PO when an overage has been received.
Note: User must have special access in order to receive overages. There is a checkbox to allow overages within Security/User Rights for PO Receiving. If user does NOT have these rights, they will NOT be able to continue.
|
 |
|
User will receive the following warning if the receipt is before the PO due date and the early tolerance time allowed in the Purchase Setup screen.
Note: Users must have special access in order to receive early shipments. There is a checkbox to allow early shipments within Security/User Rights for PO Receiving. If user does not have these rights, they will NOT be able to continue.
|
 |
-
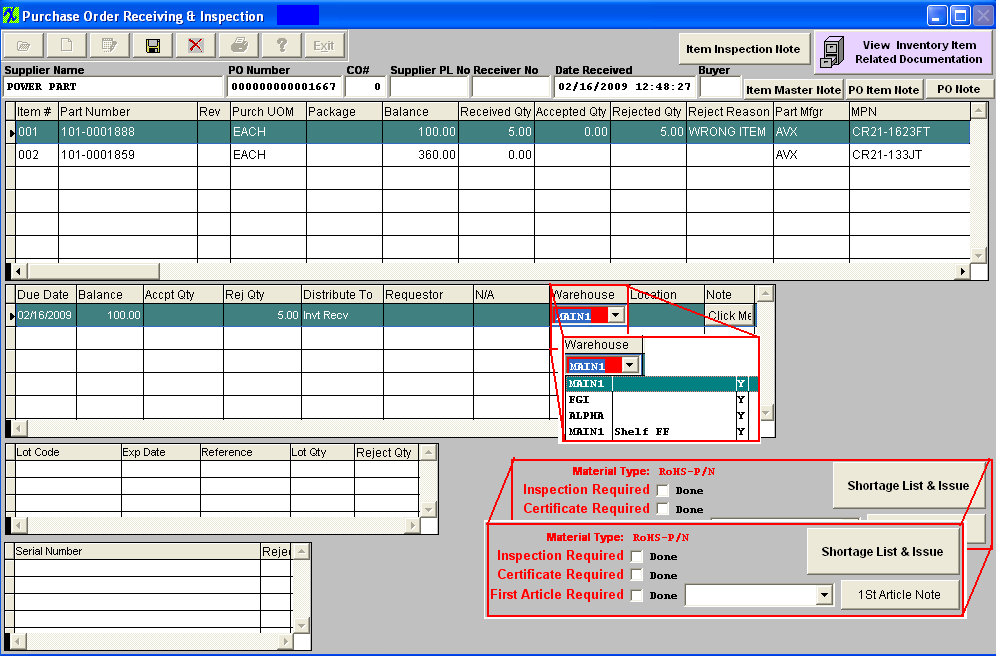
If the “Allow auto creating location at receiving” box is checked in Inventory Control, AVL level & Warehouse Setup, this will allow the user to add or edit the location at time of receipt. User may also select an existing warehouse at receiving instead of having to create one before receiving. For further information on the "Allow auto creating location at receiving" see Inventory Control & Warehouse setup. If the Inspection Required, Certificate Required, and/or the First Article Required is setup in the Inventory Control Management module, these boxes will be displayed in Red and the "DONE" boxes must be checked to continue the receiving process.
-
In the system setup - Purchase Setup user can choose to allow receiver to change AVL at the receipt. The pull down will display all the Mfgr and Mfgr PN's listed in the AVL screen in the ICM module.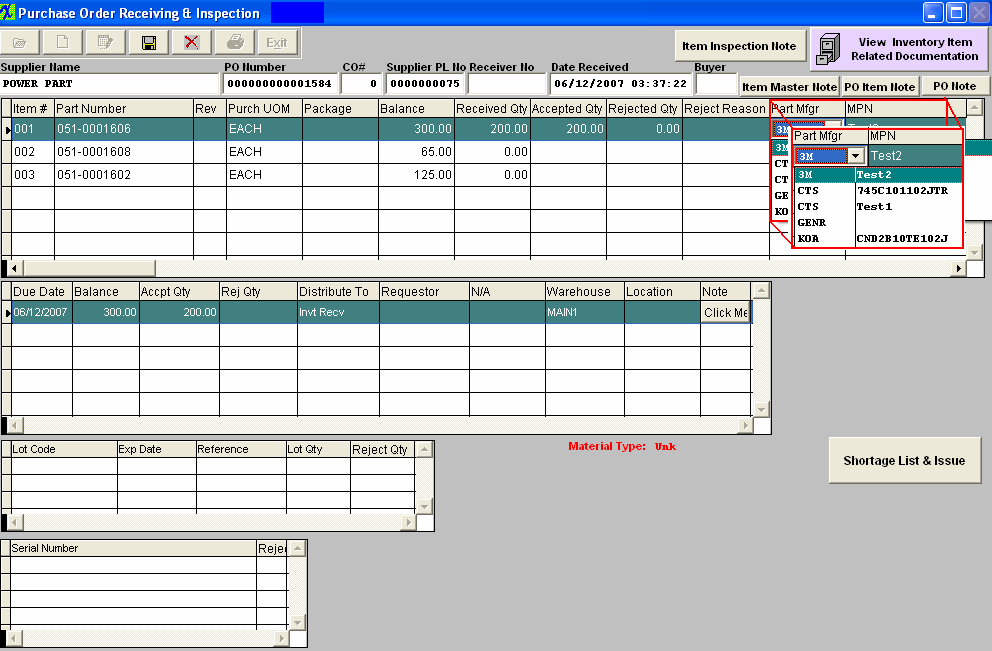
-
Enter Serial Number and/or Lot Information if required.
-
Issue parts directly to Work Order Shortages.
-
Save the record.
NOTE: If there is a Item Master Note, Purchase Order Item Note, or a Purchase Order Note, it will be RED. To view the note, depress the button of interest. When finished viewing Depress the OK button at the bottom of the screen. The user will have the ability to edit the Item Master Notes if they have “Edit” rights to the Inventory Module, which can be setup in the Security Module.
|
| 1.2.1. Entering Serial Number and/or Lot Information | Introduction
The users can receive components that require Lot Code Only, Serial Number Only, or both Serial Number and Lot Code, following the instructions listed below. A part that requires a Lot Coded is setup in the Inventory Part Class set-up module. A part that requires Serial numbers is set-up in Inventory Control Module.
- Fill in accepted item quanitity as instructed in the Add a PO Receiving Inspection Record.
- Depress the Add button next to the Lot Code section.
-
Type in the Lot Code. The expiration date, reference date and quantity will automatically update, (if the part class/type setup is set to auto update expiration date and reference for the lot code). In order for a Lot Code to be unique, the system looks at four fields for comparison. They are Lot Code, Reference, and PO Number. So while a batch may have the same Lot Code as another batch, if it arrives in a different PO, the it will be classified as a different lot. The expiration date is optional and is not required when creating a new lot.
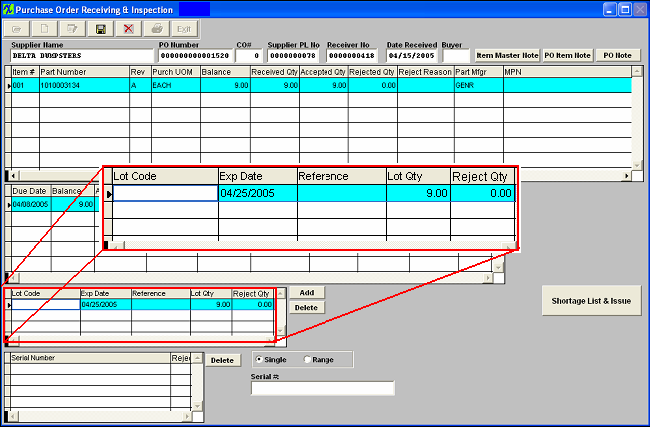
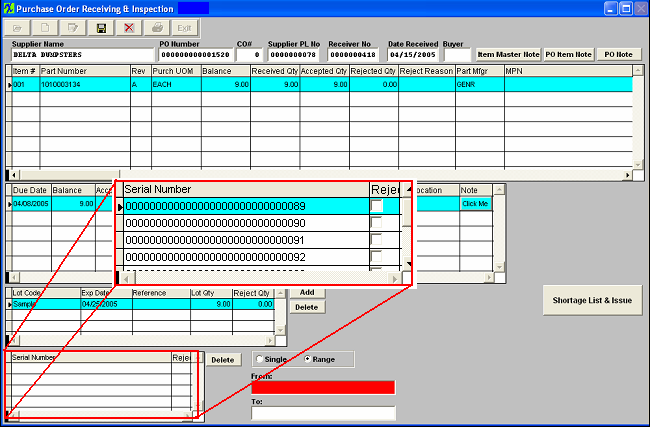
- Serial numbers will have to be assigned only if a part has the serial number box checked in the inventory module.
- Select either single or range.
- Enter the serial number in the red box and depress enter.
- The serial numbers will automatically update. (Serial numbers may or may not have lot codes).
|
| 1.2.2. Issue Directly to Work Order Shortages | Highlight the line item of interest on the PO Receiving and Inspection screen.
Depress the Work Order Shortage List and Issue button.
Highlight the work order shortage at top of screen.
Drag Available Qty located in the middle of your screen under Incoming Receipt.
Drop it in the quantity issued at the bottom of your screen as displayed below. System will allow users to pick to each of the individual shortages within the same Work Order and/or different Work Orders.
The Approved box will be checked if the AVL that you are receiving is an approved AVL for that shortage. This will give the users the needed information on screen to make the decision to use or not use a non-approved AVL to fulfill a shortage.
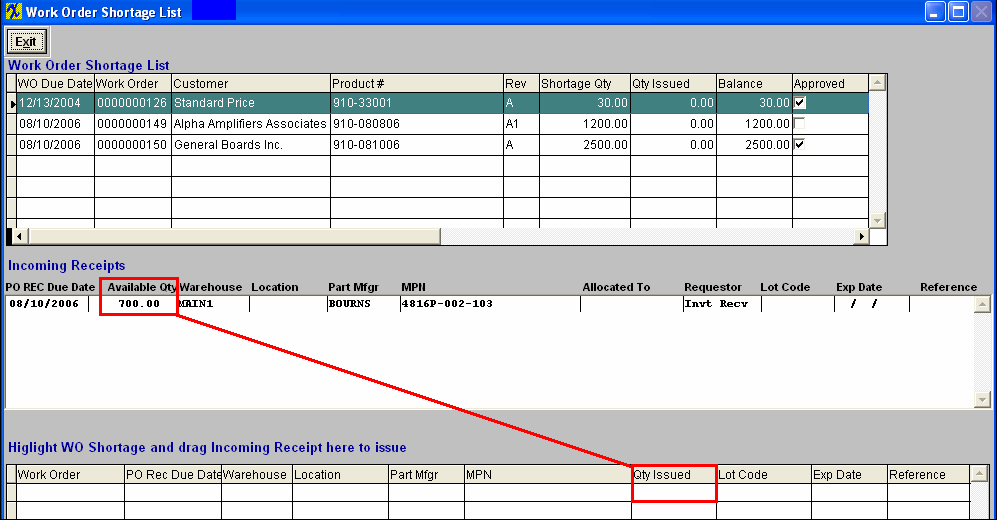
System will not allow user to issue quantities greater than the shortage quantity. See Article #2479 for further detail.
The following messge will be displayed if user issues a quantity greater than the shortage quantity.

NOTE: If a user has the Work Order Checklist feature active and tries to use the PO Receiving shortage and issues feature within the PO Receiving, it will not recognize the shortages until the kit has been flagged as "Kit Complete". It is designed this way because the user will not know if the parts are short until the kit is completed.
You may have parts in the inventory and have not pulled them to the kit yet. If you allow seeing the shortage (which may not be a shortage because parts are not pulled yet) from the PO receiving, the receiver may be trained to automatically issue to the shortages first, but it may not be a shortage because parts have not been pulled from inventory, so how would they know if it is a real shortage or just not pulled from inventory yet.
|
| 1.3. Rejecting Quantity in PO Receiving & Inspection |
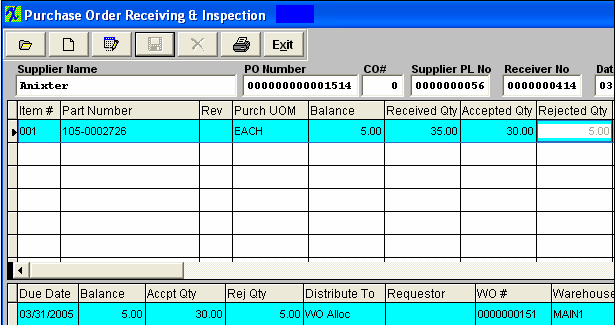
- Highlight the PO item number located in the middle section of the PO Receiving and Inspection screen.
- Type in the accepted quantity (if any).
- Place the cursor in the next box (rej qty) and type in the rejected quantity.
- Select a reject reason from the pull down in the top section of the screen.
- If lot coded type in the accepted qty and rejected qty in the lot code screen.
- If serial numbers are required check the serial numbers that have been rejected.
- Continue this process until all items are either accepted or rejected.

- Depress the Save button.
- If all items on the Purchase Order have been received it will be marked "CLOSED".
|
| 1.3.1. Rejecting Items if Accounting has Processed the Invoice |
- If the Purchase Order has been processed through accounting:
- Transfer the discrepant material into the MRB (materials review board) warehouse via Inventory Handling.
- Enter the PO DMR module (discrepant material return).
- Add from Inventory. (This is called an INVENTORY DMR).
- If the user has already pulled the kit associated with the part to be returned to the supplier.
- Enter the Kitting module.
- Find the work order.
- Depress the Utility tab and depress the De Kit button. This process will return the part into the inventory warehouse. (Please refer to the Kitting & Shortage Mgmt module).
|
| 1.3.2. Rejecting Items if Accounting hasn't Processed the Invoice | Introduction
After the user has accepted all of the items on a Closed Purchase Order and then subsequently it’s discovered that the material received is discrepant, do the following if Accounting hasn’t already processed the Supplier’s Invoice for payment:
-
Enter the Purchase and Receiving Managment Module.
-
Find the closed PO, using the Find a Purchase Order.
-
-
Type in your password.
-
Highlight the discrepant Part Number Line Item in the top section of the screen.
-
In the middle section of the screen, enter the revised accepted quantity, and the rejected quantity.
-
Go back up to the top section of the screen and select a reject reason.
-
If there is Lot Code Tracking involved, also adjust the Lot accepted quantity and rejected quantity, and check the serial numbers that have been rejected.
-
|
|


