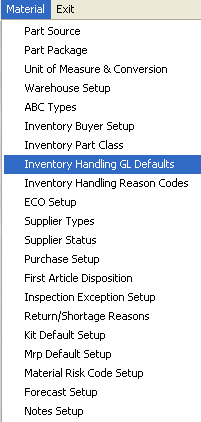
| 1. Material |
| 1.1. Prerequisites |
User MUST have full rights to the "System Setup" in System Security . Users with “Supervisor Rights” will automatically have access. |
| 1.2. Introduction |
This section covers the system setups required to use Materials and Inventory related modules. These setups are fundamental to Inventory Control Management, Inventory Handling and Materials Requirements Planning. They affect everything from data entry and conversion of existing (legacy) part numbering systems to the layout of the Stockroom. It is absolutely essential to review all aspects of these Materials setups prior to beginning data entry, because once entered, many setup fields cannot be backed out without Manex's assistance. Data Entry MANEX System Setups and Defaults are designed to minimize the user’s keystrokes when entering actual data. Careful choice of a scheme for item master numbering of products and parts will allow MANEX to automatically create item master part numbers and enter default data when the user selects Class and Type and enters a Description.
Conversion of Legacy Product and Part Number System The first decision to be made prior to System Setup is whether to try to use your existing product and part numbers in Manex. Because Manex item numbering is significantly different than most legacy numbering systems, this decision is best made after you understand Manex's numbering system structure, options and functionality. · Manex uses Classes (similar to Commodity Codes) to "classify" all Items entered in the Item Master. Each Class is further broken down into Types. All screens and printouts of Items (Products and Parts) show the Class and Type for each Item; therefore it is not necessary to include Class and Type information in the Description field for an item. · An "intelligent" prefix (3 digit numeric suggested) is usually assigned as an identifier of a particular Type of part under a particular Class which allows grouping of like items for: 1. Automatic entry of Default (common) information during data entry of items in the Item Master. 2. Prevention of double-assignment of part numbers to items already having numbers. 3. Rapid searches for existing part numbers in the database. 4. Organized viewing of items in screen displays and reports 5. Ease of assignment for planning, purchasing and inventory management. 6. Simplifying receiving, stocking, locating and kitting. 7. Maintenance of standard costing by commodity. 8. Assignment of Buyers by commodity. · Using Autonumbering of the "root" or main part of a part or product number creates a unique identifier for each number which: 1. Is never reused, once it has been assigned to prevent two different items from having the same part number. 2. Becomes a unique identifier to provide an audit trail of any and all transactions and changes. 3. Has no significance other than unique identification to allow assignment without encoding. 4. Should be all-numeric for ease in finding, sorting and arranging items. 5. Should be at least 5 digits to allow for a minimum of 99,999 part numbers to be assigned. · Manex suggests that you use your customers' product numbers as Manex product numbers in order to: 1. Allow transferring open Sales Orders and Work Orders into Manex with the least amount of confusion. 2. Retain established numbers for customer recognition on Sales Orders, Packing Lists and Invoices. 3. Minimize the need for reprinting of labels, travelers, serial plates and pcb artwork. 4. Provide a link between the old Bills of Material and the new ones. · Legacy Part numbering systems that have been maintained manually usually cannot be imported directly into Manex because they: 1. Contain duplicate part number assignments, use the same part number root more than once and are not uniform in structure. 2. Use item descriptions with non-standard nomenclature, sequence, separators, abbreviations and data. 3. Have Manufacturer's data such as part number, name and/or specifications imbedded in the part number, prefix or description. 4. Use Customer part numbers instead of internally created numbers. These numbers can create confusion when created by one customer but used for another customer. 5. Were not under Engineering Change Control to insure correct assignment or change of Revision Level. 6. Have different versions or revisions all with the same part number. A new Manex part number should be assigned for each item that differs in form, fit or function. Stockroom LayoutThe simplest layout for a stockroom is in part number sequence. To make this work, Prefixes must be systematically assigned to each Item Class and Type. This type of layout: · Eliminates the need for assignment, data entry and maintenance of aisle, row and shelf location codes for every item. · Allows expansion for added items without re-entry of location codes. Expansion may be achieved by just shifting everything down, using empty or expansion spaces. · Simplifies Cycle Counting and Physical Inventories by having only one location for each part number. · Concentrates all of the same parts and all like items together for uniformity of storage of similar packaging. The materials application module setup section allows you to prepare tables for specific material related modules your company has purchased. Once setup in the system, you will be able to use these tables and or perform certain functions automatically. Sample data is provided as a guideline in preparing the Pre-Installation Work Sheets. These Sample setups are not necessarily the only ways to setup Manex Materials, but they have been compiled as the result of many successful Manex installations and may save you many hours of "re-inventing the wheel". This section will first explain each of the Material Setup screens, then describe how to fill out the work sheets, and finally, how to enter the data into the MANEX system. |
| 1.3. Part Source |
| 1.3.1. Prerequisites for Part Source |
User MUST have full rights to the "System Setup" in System Security . Users with “Supervisor Rights” will automatically have access. |
| 1.3.2. Introduction for Part Source | ||||||||
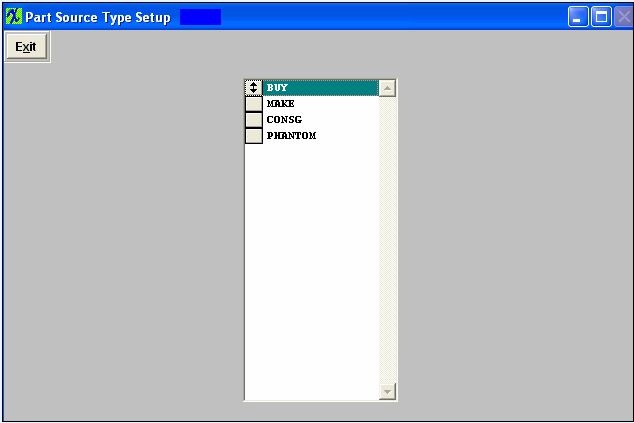
A Part Source describes the source of the part in inventory. The sources may be:
|
| 1.3.3. Fields & Definitions for Part Source | ||||||||
Part source table contains the following items:
A phantom assembly is a bill of materials assembled for the convenience of the user, and is not actually built or maintained in inventory. This may be useful when a certain sequence of parts is always used in many different assemblies, but the parts are actually assembled at the same time as the top assembly. Any components reporting to a phantom will be picked and assembled with the assembly to which the phantom reports.
|
| 1.3.4. How To ..... for Part Source |
| 1.3.4.1. Setup the Part Source | ||
|
The following screen will appear:
The Part Source screen is presented so that the user may rearrange the order of the presentation of the sources. If the user most frequently uses consigned parts, then the CONSG tab should be at the top of the list, probably followed by MAKE parts, etc. This table is hard coded in the system. Therefore it is not necessary for the user to enter any information here. This is a requirement to setup the item master in the Inventory Control Management module.
These items may be sorted in any order by clicking on and dragging the box on the left side, to the (vertical) position desired. This order will be the order displayed in the pull downs when using this list in other modules within the system. Suggestion: Have the one most used at the top of the list. «Mark as Completed in RoadMap Section B Item 4-a» |
| 1.4. Part Package |
| 1.4.1. Prerequisites for Part Package |
|
Complete the attached worksheet and "Mark as Completed RoadMap Section B Item 4-b" before continuing the setup. User MUST have full rights to the "System Setup" in System Security . Users with “Supervisor Rights” will automatically have access.
|
| 1.4.2. Introduction for Part Package |
When parts are purchased, they may have several different kinds of packaging. Some examples of the way parts may come are:
in boxes at the convenience of the vendor
in reels for automatic machine operations in tubes for automatic and semi-automatic operations
in crates for protection and handling
on pallets for handling
in barrels for storage
in six-packs for convenience
in bulk
The user may identify these packaging properties in the item master descriptions for parts so that the rest of the company will know what to expect in the way of storage and handling when the parts arrive and must be stored or issued to production. The package descriptions entered may be up to 15 characters long. |
| 1.4.3. Fields & Definitions for Part Package Setup |
When parts are purchased, they may have several different kinds of packaging. Some examples of the way parts may come are:
in boxes at the convenience of the vendor
in reels for automatic machine operations in tubes for automatic and semi-automatic operations
in crates for protection and handling
on pallets for handling
in barrels for storage
in six-packs for convenience
in bulk
The user may identify these packaging properties in the item master descriptions for parts so that the rest of the company will know what to expect in the way of storage and handling when the parts arrive and must be stored or issued to production. The package descriptions entered may be up to 15 characters long. |
| 1.4.4. How To ..... for Part Package |
| 1.4.4.1. Setup the Part Package Module | ||
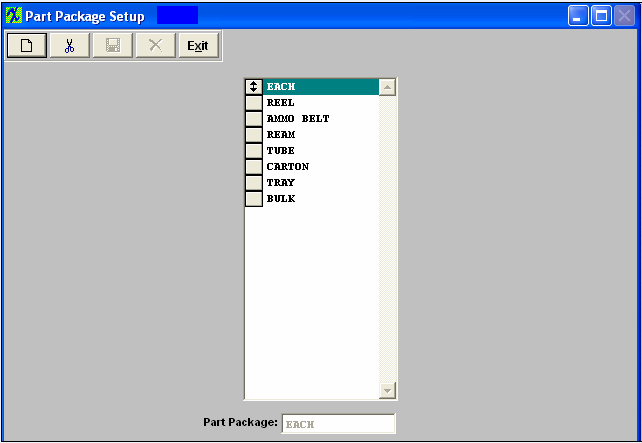
The following screen will appear:
This field is to specify the kind of package the part must be in so the parts can be used in certain specific kind of machine, processing, handling, etc. This is particularly helpful if a part can be packaged so the automatic machine can accept them directly. This information is used in all materials modules including Material Requirements Planning and Purchasing. Part package examples are: Reel, Tube, Tray, Bulk, etc. The user begins entry of a new package by depressing the Add button, then enters the data in the window at the bottom of the page. When satisfied that the data was entered correctly, click on the Save button, and the item will be added to the list. Items may be deleted by selecting the item and clicking on the Delete button.
These items may be sorted in any order by clicking on and dragging the box on the left side, to the (vertical) position desired. This order will be the order displayed in the pull downs when using this list in other modules within the system. Suggestion: Have the one most used at the top of the list. Where Used: Inventory Item Master.
«Mark as Completed in RoadMap Section B Item 4-b» |
| 1.5. Unit of Measure & Conversion |
| 1.5.1. Prerequisites for UOM & Conversion |
Complete the attached worksheet and "Mark as Completed RoadMap Section B Item 4-c before continuing the setup.
User MUST have full rights to the "System Setup" in System Security . Users with “Supervisor Rights” will automatically have access.
Note: Purchasing units of measure, if different than the stocking units of measure, must have a conversion factor entered in order for ManEx Material Requirements Planning and Purchasing modules to correctly interpret the amount of material required. Identifying the purchasing unit and the stocking unit and a factor between the two does this. For example, 1 foot = 12 inches, and 12 is the conversion factor.
|
| 1.5.2. Introduction for UOM & Conversion |
When parts or assemblies are stored in the storeroom, or used in Bills of Materials, the unit of measure must be defined. It is important to know if a particular wire is stored in inventory, if it is 100 inches, 100 feet, 100 yards, etc. This definition is required so that when items are counted and removed from stock inventory, it is clear what the quantity numbers represent. Other examples might be ounces, pounds, quarts, gallons, pints, milliliters, liters, etc. It is also possible to purchase material in different units of measure than the material is accounted for in stock inventory and bills of materials. For example, wire might be purchased in feet, yards or miles, but because of the way that it is used in manufacturing, is probably stored and issued in inches. All units of measure, for both stock inventory and purchasing, are to be entered in this screen, if not already available. Once a unit of measure is entered in this screen, it can never be removed as the value of any purchases and inventory depends on having a unit of measure associated with it. Manex is provided with a number of units of measures. The length of the unit of measure field is 4 characters.
« Purchasing units of measure, if different than the stocking units of measure, must have a conversion factor entered in order for MANEX Material Requirements Planning and Purchasing modules to correctly interpret the amount of material required. Identifying the purchasing unit and the stocking unit and a factor between the two does this. For example, 1 foot = 12 inches, and 12 is the conversion factor. |
| 1.5.3. How To ..... for UOM & Conversion |
| 1.5.3.1. Setup the Unit of Measure & Conversion | ||
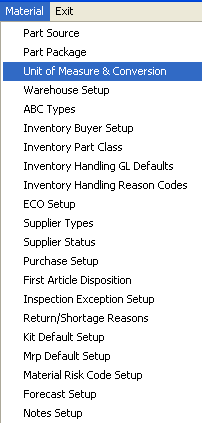
|
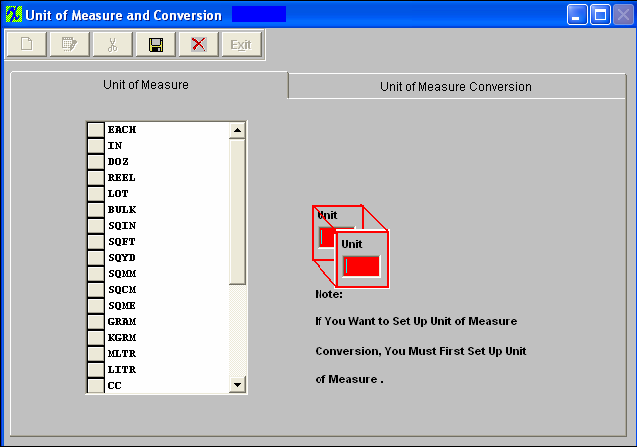
The followng screen will appear:
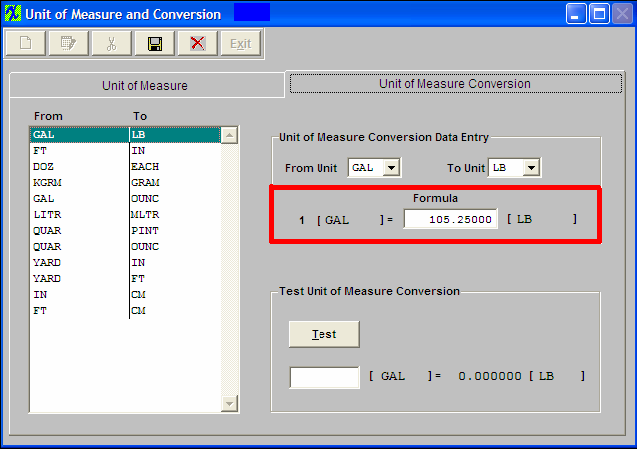
Data in this table is already entered in the basic system. Therefore, it is not necessary for the user to enter any information here, but the user may have some specific requirements that they may add to the table. Unit Of Measure table is used in all materials related modules.
To add, depress the Add button. A "Unit" window will appear.
Type the unit into the window. Depress the Save button. Find the new entry and highlight it. Depress the Unit of Measure conversion tab.
These items may be sorted in any order by clicking on and dragging the box on the left side, to the (vertical) position desired. This order will be the order displayed in the pull downs when using this list in other modules within the system. Suggestion: Have the one most used at the top of the list.
Prerequisites
Each Unit of Measure must be in the Unit of Measure table before establishing a conversion factor. When the user expects to purchase material in different units than which it is stored and used in BOMs, the conversion factors are required.
These factors may be entered in the second page (tab) of the Units of Measure screen. To ADD a new conversion, depress the Add button, and the units of measure data-entry fields are made available for editing. The user selects the unit of measure for purchasing, and the unit of measure for stocking, and then enters the conversion factor. The user may test the equation by entering a number in the lower field and pressing the test button. When the user is satisfied with the equation, depress the Save button. Conversion factors already entered may be Edited or Deleted but the user must be aware of any currently open orders using the factor.
Depress the Add button. The From Unit field will be available. Depress the down arrow next to the From Unit field. Click on the new unit you just added. It will appear in the From Unit field. Then depress the To Unit field down arrow. Select the To Unit from the list by highlighting. The To Unit should appear in the To Unit field. Go to the Formula field. Type in the equation as 1 (new) = nn (to unit). For example, say there are 20 gallons in each new unit, the Formula display will appear as highlighted above. To test the unit of measure conversion, type in the same number you entered above into the blank field appearing under the Test button, then depress the Test button. The exact same formula should appear in the test section. Once you are satisfied, depress the Save or Abandon changes button. Where Used: In all Purchasing and Receiving Modules
«Mark as Completed in RoadMap Section B Item 4-c»
|
| 1.6. Warehouse Setup |
| 1.6.1. Prerequisites for Warehouse Setup |
|
Complete the attached worksheet and "Mark as Completed RoadMap Section B Item 4-d before continuing the setup.
To Add, Edit, or Save a Warehouse the user MUST have "System Setup" rights within the System Security module and also MUST have "Warehouse Setup" rights within the Accounting Security module.
Note: If you have "Supervisor Rights" in the System Security module the Warehouse Setup module will still require you to have "Warehouse Setup" rights in the Accounting Security and vis-versa if you are an Accounting Supervisor you will still be required to have "System Setup" rights in the System Security module to Add, Edit, or Save a Warehouse in Warehouse Setup.
If the user is using the Accounting Module, the General Ledger Accounts must be completed.
Note: The GL numbers are required if the ACCOUNTING Module is active. ManEx recommends choosing the accounting GL numbers with care because we do NOT recommend changing them once the selection is saved. WIP and MRB GL numbers must be unique. |
| 1.6.2. Introduction for Warehouse Setup |
ManEx users may identify an unlimited number of warehouses in which to store materials. If the user wishes, it is possible to establish a wide variety of warehouses for special needs. If the user is involved with much consigned activity, it is possible to set up a warehouse for each customer and their material. A warehouse might be set up as a secure location for very high value material, with additional physical security precautions to access this area.
|
| 1.6.3. Fields & Definitions for Warehouse Setup |
|
ManEx users may identify an unlimited number of warehouses in which to store materials. If the user wishes, it is possible to establish a wide variety of warehouses for special needs. If the user is involved with much consigned activity, it is possible to set up a warehouse for each customer and their material. A warehouse might be set up as a secure location for very high value material, with additional physical security precautions to access this area.
For those users who want to separate the Finished Goods from the Raw Materials Inventory, be sure to include a Finished Goods Warehouse. The MRB (Materials Review Board) Warehouse is required for the DMR (Discrepant Material Return) module. There are at least two warehouses that cannot be removed from the system: WIP and WO-WIP. These warehouse locations are used by MANEX to track materials within the manufacturing process. For more detail on WO-WIP see Article #3061. Also, any warehouse that has material purchased to be placed in it, or has inventory in it, may not be deleted. All other warehouses may be deleted. Deletion of a WHSE is only flagged as deleted but is still retained within the tables for history preservation.
One warehouse must be selected as the default warehouse. This is normally Main1 Warehouse.
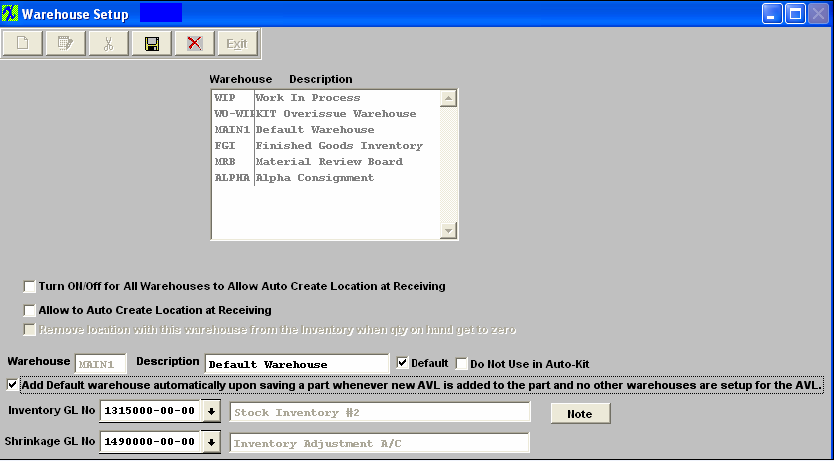 Each warehouse has associated with it a warehouse code (6 characters), a warehouse description (25 characters), Division designation, if applicable, and Inventory General Ledger Account number (setup in the GL Account Setup) and an Inventory Shrinkage General Ledger Account number (also setup in the GL Account Setup ).
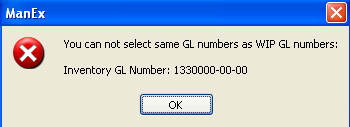
Note: The Inventory GL number is required if the ACCOUNTING Module is active. ManEx recommends choosing the Inventory GL number with care because we do NOT recommend changing it once the selection is saved. WIP and MRB Inventory GL numbers must be unique. It is VERY important that the Account Number for WO-WIP is NOT the same as the WIP account number. WIP and MRB Inventory GL numbers MUST be unique. The system will not allow Inventory GL numbers that have been used by other warehouses to be entered for WIP and/or MRB warehouses and other warehouse can not use the same Invnetory GL numbers that are used by WIP and/or MRB warehouses. ManEx does plan on removing the Shrinkage GL account number because it does not serve a purpose at this time.
Turn ON/Off for All Warehouses to Allow Auto Create Location at Receiving Box -If this box is UNCHECKED it will not “Allow Auto Create Location at Receiving” for all Warehouses listed in Warehouse setup. If this box is CHECKED it will “Allow Auto Create Location at Receiving” for all Warehouses listed in Warehouse setup. This is not only controlled at the System Setup level. You will also need to check the "Allow to Auto Create Location at Receiving" box located in the Inventory Control, AVL level for this option to work properly. Allow to Auto Create Location at Receiving Box - checking this box (along with checking the box in Inventory Control AVL level) will allow user to create a location at the PO level, PO receiving level, and/or Inventory Handling Receiving level for this warehouse. Unchecking the Auto Create disables that warehouse from being used on the fly. Remove location with this warehouse from the Inventory when qty on hand gets to zero Box - This will only be available if user checks the “Allow to Auto Create Location at Receiving” box. You would check this box (along with checking the box in Inventory Control AVL level) if you want the Warehouse and location created at the Inventory level, PO level or PO Receiving level to be rendered inactive (made invisible in most screens) from that Inventory part once the inventory reaches “0”. If the user de-kitted the work order, that same warehouse would be reactivated and product inserted. Default Box – If none of the WHSE or Inventory AVL's are marked for Auto-location creation then the system will automatically assign the default whse upon creation of a brand new part number/avl. If you have the auto-location creation option enabled for the WHSE and AVL then the system will leave the WHSE section blank for new parts, and allow users to create new locations from PO Receiving. Do Not Use in Auto-Kit – If this box is checked this warehouse will not be used in Auto-Kitting. Add Default warehouse automatically upon saving a part whenever a new AVL is added to the part and no other warehouses are setup for the AVL -The default warehouse is added automatically upon saving a part whenever a new AVL is added to a part EXCEPT; If the "Allow to Auto Create Location at Receiving" button is checked and the "Add Default warehouse automatically ....." box is unchecked the system will NOT add a warehouse within the Inventory module upon saving the record. This works in conjuctions with the “Allow to Auto Create Location at Receiving” button. Note: The Inventory GL number is required if the ACCOUNTING Module is active. ManEx recommends choosing the Inventory GL number with care because we do NOT recommend changing it once the selection is saved. WIP and MRB Inventory GL numbers must be unique. The system will not allow Inventory GL numbers that have been used by other warehouses to be entered for WIP and/or MRB warehouses and other warehouse can not use the same Inventory GL numbers that are used by WIP and/or MRB warehouses. ManEx does plan on removing the Shrinkage GL account number because it does not serve a purpose at this time.
|
| 1.6.4. How To ..... for Warehouse Setup |
| 1.6.4.1. Setup the Warehouse Setup Module | ||||||
|
The following screen will appear:
To add a new warehouse, depress the Add button. Enter your password. Type the Warehouse abbreviation into the Warehouse window. Type the Description pertaining to the warehouse into the Description window. If this is the default warehouse, check the Default box. (You may have only one default Warehouse, but MUST have at least one.) If there is not default warehouse setup using will receive the following warning upon save:
 Turn ON/Off for All Warehouses to Allow Auto Create Location at Receiving Box -If this box is UNCHECKED it will not “Allow Auto Create Location at Receiving” for all Warehouses listed in Warehouse setup.If this box is CHECKED it will “Allow Auto Create Location at Receiving” for all Warehouses listed in Warehouse setup. Allow to Auto Create Location at Receiving Box - checking this box will allow user to create a location a the PO level or PO receiving level for this warehouse. Unchecking the Auto Create disables that warehouse from being used on the fly. Remove location with this warehouse from the Inventory when qty on hand gets to zero Box -This will only be available if user checks the “Allow to Auto Create Location at Receiving” box.You would check this box if you want the Warehouse and location created at the Inventory level, PO level or PO Receiving level to be rendered inactive (made invisible in most screens) from that Inventory part once the inventory reaches “0”. If the user de-kitted the work order, that same warehouse would be reactivated and product inserted. Default Box – If none of the WHSE or Inventory AVL's are marked for Auto-location creation then the system will automatically assign the default whse upon creation of a brand new part number/avl. If you have the auto-location creation option enabled for the WHSE and AVL then the system will leave the WHSE section blank for new parts, and allow users to create new locations from PO Receiving. Do Not Use in Auto-Kit – If this box is checked this warehouse will not be used in Auto-Kitting. Add Default warehouse automatically upon saving a part whenever a new AVL is added to the part and no other warehouses are setup for the AVL -If this box is checked the system will add a warehouse within the Inventory module upon saving the record even if the Allow to Auto Create Location at Receiving box is checked.
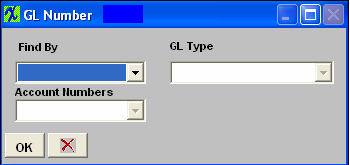
If accounting is installed, depress the Inventory GL No field down arrow. The following GL Number account selection will appear: Depress the down arrow next to the Find By field. Choose between Account Type or Account Numbers. Depending upon your selection, either GL Types or Account Numbers will appear. Highlight the number of choice. Depress the Ok button. he account number will appear in the Inventory GL Number field. Repeat this process for the selection of the Shrinkage GL number. (Note: The GL numbers are required if the ACCOUNTING Module is active. ManEx recommends choosing the accounting GL numbers with care because we do NOT recommend changing them once the selection is saved. WIP and MRB GL numbers must be unique.
Depress the Save button. The following message will appear: If you are totally satisfied with your selection, depress the OK button. If there has been no activity in the Warehouse, the user may delete it. Highlight the warehouse. Depress the Delete button. (Note: You cannot delete a default warehouse. So, if you want to delete a default warehouse, you must create or assign the default status to another warehouse first.) You will receive a message to confirm the deletion. Depress the Yes button to confirm the deletion. Where Used: In all Materials, Production and WIP functions «Mark as Completed in RoadMap in Sect. B Item 4-d» |
| 1.6.4.2. Edit an Existing Warehouse | ||
The following screen will appear:
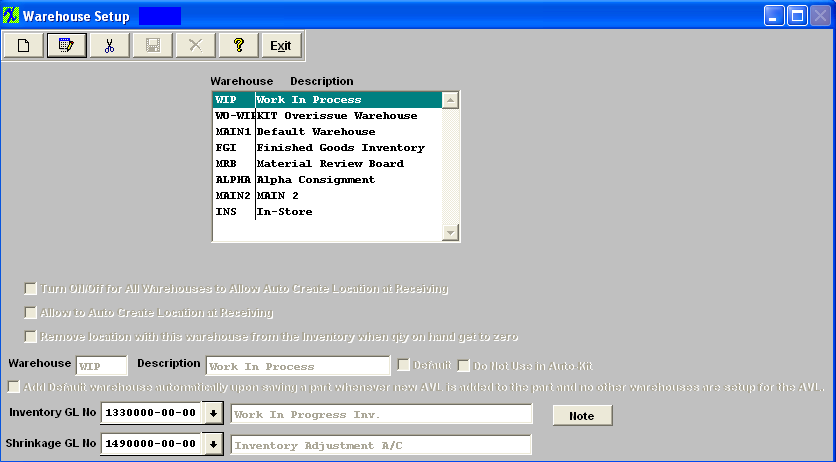 Highlight the warehouse you would like to edit and depress the Edit button, all fields are editable with the exception of the Warehouse field.
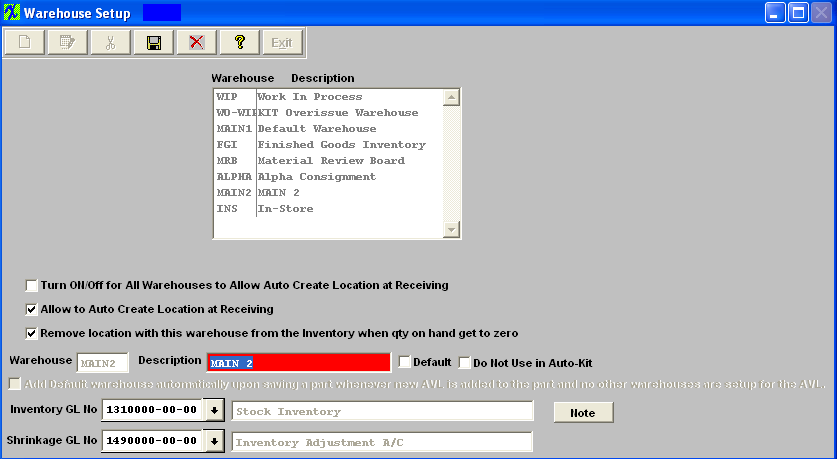 If user decides to change the GL numbers the following reminder message will be displayed: Note: ManEx does NOT recommend changing the GL numbers once they have been setup.
 |
| 1.6.5. ManEx Minutes (Warehouse Setup) |
| 1.7. ABC Types |
| 1.7.1. Prerequisites for ABC Types |
|
Complete the attached worksheet and "Mark as Completed RoadMap Section B Item 4-e before continuing the setup. User MUST have full rights to the "System Setup" in System Security . Users with “Supervisor Rights” will automatically have access.
|
| 1.7.2. Introduction for ABC Types |
This section is provided to setup ABC Code template table. This information is used in the item master during add or edit mode. ABC types are used when setting up part class and types, which in turn are used when adding an inventory part to the item master. ABC codes are used as an aid to manage inventory tracking. Traditionally, ABC codes are established to divide the inventory by value, and to guide in the cycle counting of inventory. First the value of all inventory in stock is added up and listed by part in order of the highest extended value first. Then, the top 80 % of the parts value would be classified as “A” items, and will probably consist of about 10-15% of the inventory part numbers. The next 15% of the value items would be classified as “B” items, and will be in the neighborhood of 20-40% of the part numbers. The last 5% of the value will be classified as “C” items, and represent at least 50% of the part numbers.
ManEx allows the user to differentiate between assemblies and components. Users may create a setup of ABC (and DEFG...if they choose) for components (buy/consigned parts) and a different set (e.g. MNO) for assemblies. The reason for this is that it is likely that the assemblies may need tighter control than the ranges available for the whole inventory, and the user has the option of differentiating between components, and assemblies. If a user is carrying components in finished goods inventory to ship to a customer, they will still be counted as components in the ABC group. The type of warehouse is not considered when calculating cycle counts (except for in-house items, regardless of where they are stored).
|
| 1.7.3. Fields & Definitions for ABC Type | ||||||||||||||||||||||||||||||||||||||
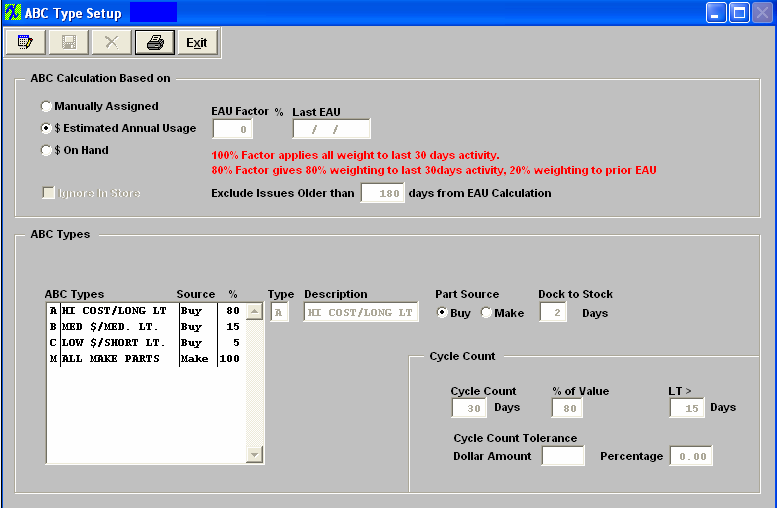 ABC Calculation Based on:
ABC Types:
|
| 1.7.4. How To ..... for ABC Types |
| 1.7.4.1. Setup the ABC Types | ||
|
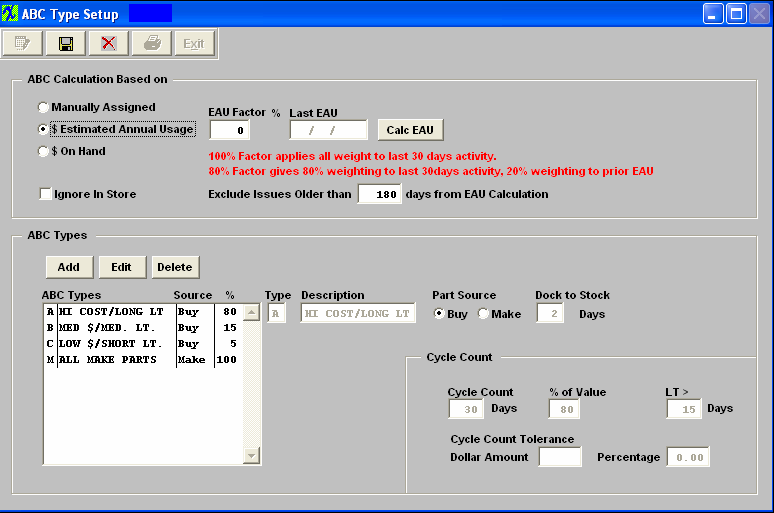
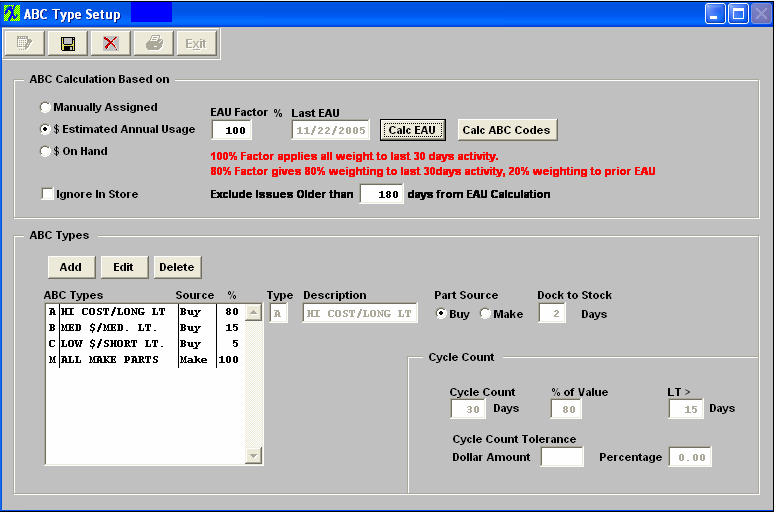
The following screen will appear:
The "ABC calculation based on" affects the meaning of the % of Value field. If Manual has been selected then it does not apply. If $ Estimated Annual Usage (EAU) has been selected, then it is EAU x STD cost and % of that value (top 80%, 15-80%, etc) If $ On-Hand has been selected, then it is On-Hand x STD cost and % of that value (top 80%, 15-80%, etc).
ABC Codes will be calculated using the information in the % value and LT> fields. These fields are used to determine which parts should have their ABC codes automatically adjusted. After the ABC codes are updated, those parts will be included with the appropriate group for cycle counting.
Check the "Ignore In-Store" box only if you do NOT want the In-Store material to be included when running Cycle Counts, regardless of which Calculation Based on is selected. If the user selects "$ Estimated Annual Usage", the following screen will appear. Type in the EAU factor, then depress the "Calc EAU" button will update the EAU field within the ICM screen. This button will only be available if the screen is in "EDIT" . Depressing this button will update the EAU field within the ICM screen. The term EAU, (ESTIMATED Annual USAGE) may be considered as consumption, depletion, loss, used up, etc. So the EAU calculations MUST include the In-store issues to be accurate. If a user is issuing a part out of in-store to a Sales Order to be shipped the parts still count as an issue, or usage and was consumed, so it is necessary to include them when considering plans for future usage. If a user were to deliver ALL material directly to work orders from in-house, and these transactions were NOT included, there would be no calculated EAU. This is why we do NOT allow in-store issues to be ignored. The only time in-store issues will NOT be calculated in the EAU is if they are being returned to the vendor through Inventory Handling.
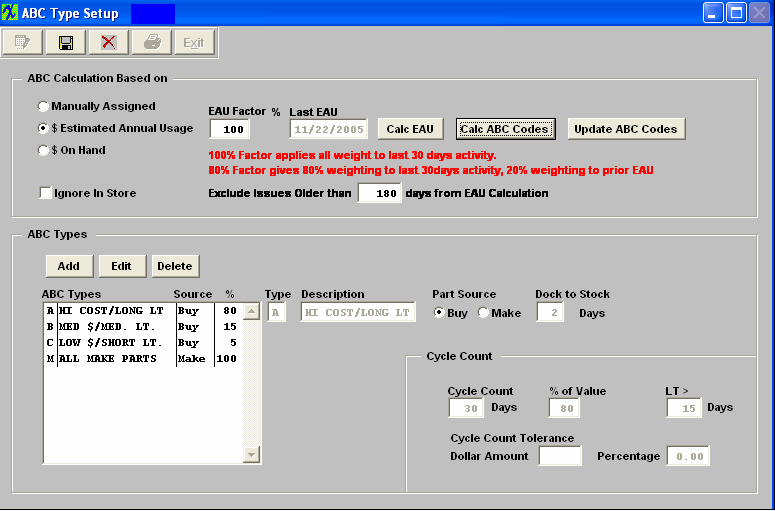
The last EAU date will fill in and the "Calc ABC Codes" button will appear on screen. Depress the "Calc ABC Codes" button, this button will use the information in the % value and LT> fields are used to determine which parts should have their ABC codes automatically adjusted. After the ABC codes are updated, those parts will be included with the appropriate group for cycle counting.
The "Update ABC Codes" button will appear on screen. Depress the "Update ABC Codes" button will use the information in the % value and LT> fields are used to determine which parts should have their ABC codes automatically adjusted. After the ABC codes are updated, those parts will be included with the appropriate group for cycle counting..
The user then sets up an inventory counting program called “Inventory Cycle Count”, which assists in counting all inventory over a period of time. The “A” items might be counted completely within each month. Therefore, a list of all of the “A” items (the highest dollar value) is generated, and randomly divided into 20 days, and each day 1/20th of the list counted and checked. The “B” items might be checked every quarter, and the “C” items checked once a year. This is a way to verify the accuracy of stockroom transactions, and to take measures necessary to keep the counts accurate. Type the ABC Types into the appropriate boxes. The ABC code identifies a part source for inventory parts. Because ManEx allows up to 26 ABC codes, it also provides for identifying if a part is a make or buy part. Click on the desired Part Source radial, either Buy or Make. Enter the Dock to Stock days. In ManEx, the ABC codes have a slightly different meaning. In addition to identifying the most or least expensive part numbers, a Dock to Stock period may be included in each ABC code. Dock to Stock is the number of days a part is expected to take to be delivered to the stock room after the part is received on the user’s dock. Also, for each ABC code, ManEx provides a cycle count tolerance, which, if exceeded, will result in reporting unfavorable results during cycle counting. These tolerances may be an absolute dollar value, or a percentage of the inventory being counted. In the Cycle Count section, enter Cycle Count Days (NOTE: This field MUST be populated with a number other than "0". If "0" is entered these parts will NOT be included in the Cycle Count), % of Value, Lead Time Greater than, and Cycle Count Tolerances: Dollar Amount and Percentage. The user must either depress the Save or Abandon changes button. Where Used: In all Part Type Setup, Inventory Item Master, Material Requirements Planning and Cycle Count functions.
«Mark as Completed in RoadMap in Sect. B Item 4-e» |
| 1.7.5. Reports for the ABC Types |
Proposed ABC Changes Report To obtain a printout, depress the Reports button. The following screen will appear:
Highlight the report and depress the Options tab.The following screen will appear:
Select the output desired by clicking on the Screen, Printer, XL File, TXT File, or PDF radial. Click on the Make Parts and/or Buy Parts box(es), as desired. Click on the Proposed Changes Only or All Parts radial, as desired. Depress the OK button. The following report is available:
|
| 1.8. Inventory Buyer Setup |
| 1.8.1. Prerequisites for Inventory Buyer Setup |
Complete the attached worksheet and "Mark as Completed RoadMap Section B Item 4-f before continuing the setup.
User MUST have full rights to the "System Setup" in System Security . Users with “Supervisor Rights” will automatically have access. |
| 1.8.2. Introduction for Inventory Buyer Setup |
| This is the section to enter all the inventory buyers responsible for procuring materials. This is a requirement when adding to or editing the item master record. This information is used when setting up Part Class and Type in system setup. |
| 1.8.3. Fields & Definitions for Inventory Buyer Setup |
For inventory parts, it is often useful to assign code to parts of the person responsible for buying the parts. This makes it easy for receiving to resolve any issues with incoming material, and it makes it easy to divide up the workloads in purchasing. Also, several reports are available which can be sorted by the buyer code. One valuable report is the order actions necessary to be taken as a result of running MRP. The buyers may have a list of only those parts affecting their own workload, and not be burdened with looking at all of the rest of the actions. Also, shortages may be better resolved with the inclusion of a buyer code for the part number.
Manex provides the ability to assign a three-character buyer code to each part. Manex also provides for the eventuality that the buyer codes will change from time to time, and provides a buyer reassignment utility to change all parts for a specific buyer to another buyer.
|
| 1.8.4. How To ..... for Inventory Buyer Setup |
| 1.8.4.1. Setup the Inventory Buyer Setup Module | ||
|
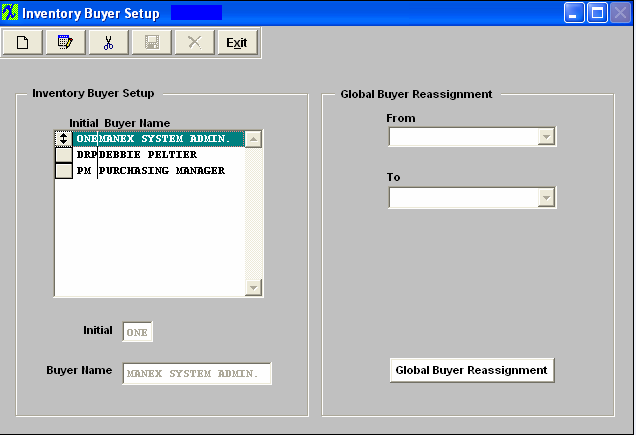
The following screen will appear:
To add and Inventory Buyer, depress the Add button. Type in the Initial, type in the Buyer Name. Depress the Save or Abandon changes button. These items may be sorted in any order by clicking on and dragging the box on the left side, to the (vertical) position desired. This order will be the order displayed in the pull downs when using this list in other modules within the system. Suggestion: Have the one most used at the top of the list. Global Buyer Reassignment is a utility program that allows users to replace current inventory buyers of all items linked to a buyer to another buyer. This is helpful when a buyer goes on vacation or leaves the company. To reassign, depress the Global Buyer Reassignment button. The following message will appear:
 Depress the OK button to continue.
Depress the down arrow next to the From field. A list of existing buyers will appear. Select the buyer to be changed. Depress the down arrow next to the To field. Select the To buyer. Depress the Done button. All of the records associated with the From buyer will update to the To buyer.
If you depress the Cancel button on the message above the following message will appear giving you the option to continue or not.
 Where Used: In all Part Type Setup, Inventory Item Master and Material Requirements Planning functions.
«Mark as Completed in RoadMap in Sect B Item 4-f» |
| 1.8.4.2. Global Buyer Re-assignment |
Global Buyer Reassignment is a utility program that allows users to replace current inventory buyers of all items linked to a buyer to another buyer. This is helpful when a buyer goes on vacation or leaves the company. To reassign, depress the Global Buyer Reassignment button.
 The following message will appear:  Depress the OK button to continue.
Depress the down arrow next to the From field. A list of existing buyers will appear. Select the buyer to be changed. Depress the down arrow next to the To field. Select the To buyer. Depress the Done button. All of the records (inventory part class/type setup, inventory, and purchase order) associated with the From buyer will update to the To buyer. If the Done button is depress with the From and To fields blank, user will receive the following message:
 |
| 1.9. Inventory Part Class and Type |
| 1.9.1. Prerequisites for Inventory Part Class |
|
Complete the attached worksheet and "Mark as Completed RoadMap Section B Item 4-g before continuing the setup. User MUST have full rights to the "System Setup" in System Security . Users with “Supervisor Rights” will automatically have access. Part Types require Unit of Measure , Part Package , ABC Codes , and Inventory Buyer setups to be available.
|
| 1.9.2. Introduction for Inventory Part Class |
The inventory class and types are one of the most powerful parts of the ManEx system. These classifications allow the users to break up large inventories into groups and sub-groups. The smaller groups make it easier to locate an item, to view reports by classes, and easier to identify a part. In ManEx, it also guides users in the addition of new parts, insuring that there are common approaches to descriptions for common parts. ManEx even will allow for automatic part number generation, where the user has only to enter a description, after selecting a part class and type. Utilization of the class and types greatly simplifies the amount of information that must be contained in the description and part number for each part. The user must enter part classes for each part, but is not required to enter part types. However, without the part types established, the user is required to enter much more data when adding specific items to the item master. |
| 1.9.3. How To ..... for Inventory Part Class |
| 1.9.3.1. Setup a Part Class and/or Part Type | ||
|
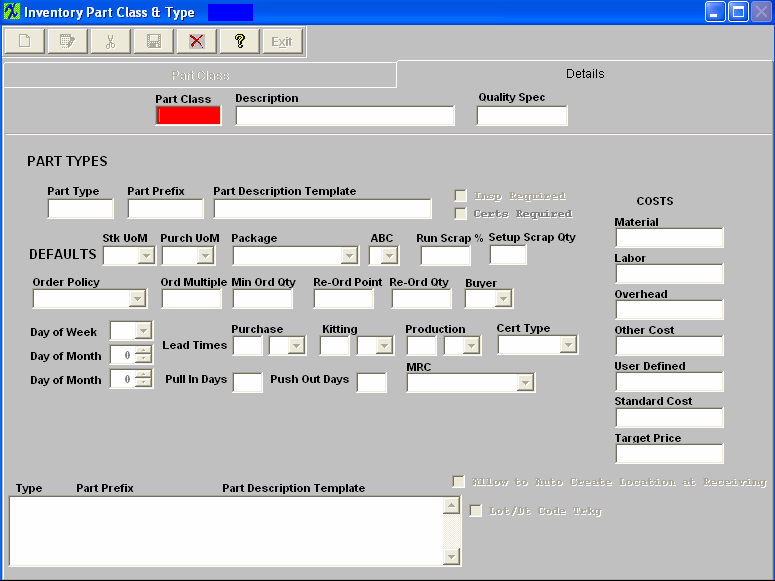
The following screen will appear: 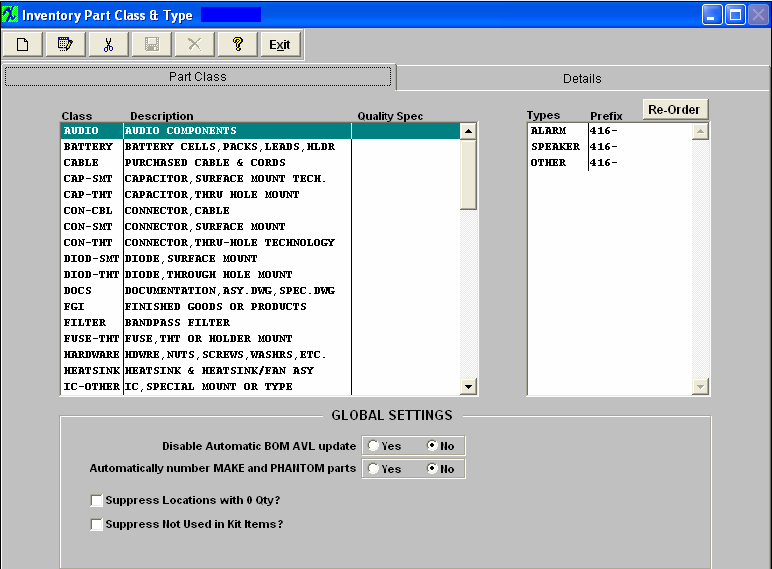 Re-Order - This gives the user the option to re-sort the order the part types are displayed in the pulldown when setting up parts in the Inventory Control Mgmt module.
 First select the Part Class, the Part Types for this Class will be displayed on the right. The Part Types may be re-sorted by clicking on the REORDER button, click on and drag the box on the left side of the part type desired to the (vertical) position desired. When completed with the order, click on the DONE button. This order will be the order displayed in the pull downs when using this list in other modules within the system. Suggestion: Have the one most used at the top of the list.
There are two screens for setting up Part Class and Types within each part class. The main screen, Part Class, lists the existing records. Highlighting a part class will show the corresponding types linked to it. The second screen, Details, is where records are created.
To begin to add a part class depress the Add button. This enables the second screen, where the part class, description and quality specification may be entered:
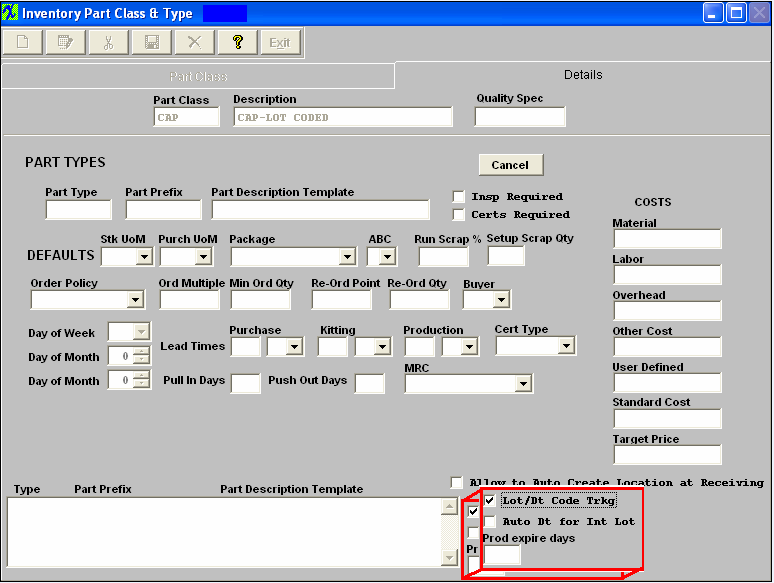
Type in the Part Class, Description and Quality Spec information. If the user wishes to add part types to the class, after entering the part class and description, another ADD button becomes visible in the PART TYPE section of the screen. Clicking on this button opens up all of the part type fields for data entry. Enter the Part Type,Part Prefix, and Part Description Template. Check whether Inspection and/or Certificates are required. Select the Stock Unit of Measure, Purchasing Unit of Measure, Package, ABC code and Buyer code by depressing on the down arrow next to the field. Type in the Run Scrap %, Setup Scrap Quantity and Cost Information – Material, Labor, Overhead and/or User Defined. The total of the Costs entered will appear in the Standard Cost field. Important Note - If accounting is installed: For all buy parts, the material cost field must have data entered. If this data is missing (or wrong), the Raw Materials Inventory and the Work In Process (WIP) will be incorrect for the accounting records. All make parts which are not labor only (the customer brings you the kit and all you do is apply the labor), must have data entered in the material cost field. Additionally, the data entered in the material cost field for the make part must equal the sum of the Bill of Materials components. (Please refer to Bill of Materials Reports – Bill of Material With Standard Cost.) If the data is missing or wrong on a Make Part, the Work In Process, Cost of Goods Sold and Finished Goods Inventory will be wrong for the accounting records. If the sum of the Bill of Materials components does not equal the standard cost per the Item Master, a configuration variance will generate. Select the Order Policy by depressing on the down arrow next to the field.Type in the Order Multiple, the Minimum Order Quantity, Re-Order point and Re-Order Quantity. Select the Certificate type by depressing the down arrow next to the field. Select the Day of the Week or Day of the Month by depressing on the down arrow next to the field. Select the Purchase, Kitting and Production Lead Times by entering the number in the appropriate box and depressing on the down arrow to select the Days, Weeks or Months. Type in the Pull In or Push Out days. Check the Lot Code box, if desired. If you select Lot/Date Code tracking, you’ll also be prompted for Auto Date for all Lots and for the product expiration days, as displayed below. If the user wishes to edit part type information, pressing the Edit button enables the user to choose a part type used in the class (assuming there is more than one) and either edit or delete it. (NOTE: Users will not be allowed to delete a part type which has active inventory or orders.) After Adding, Editing or Deleting a part type, the user must save the data, by depressing the Save button.
When saving a new part type the user will receive the following message to remind the user that once this record is saved the Lot/Date code tracking field can not be edited:
 At this time the user can select "YES" to continue the save or "NO" to abort the save.
Where Used: In all Material functions. «Mark as Completed in RoadMap in Sect. B Item 4-g» |
| 1.10. Inventory Handling G/L Defaults |
| 1.10.1. Prerequisites for Inventory Handling GL Defaults |
|
Complete the attached worksheet and "Mark as Completed RoadMap Section B Item 4-h before continuing the setup. All applicable General Ledger Account Numbers must be set up in the G/L Account Setup module.
User MUST have full rights to the "System Setup" in System Security . Users with “Supervisor Rights” will automatically have access. |
| 1.10.2. Introduction for Inventory Handling GL Defaults |
This section sets up the General Ledger account number defaults for items received or issued via the Manex Inventory Handling screen. This is for adding to or subtracting the quantities in the Inventory Master without using a Purchase Order or a Sales Order. |
| 1.10.3. Fields & Definitions for Inventory Handling GL Defaults |
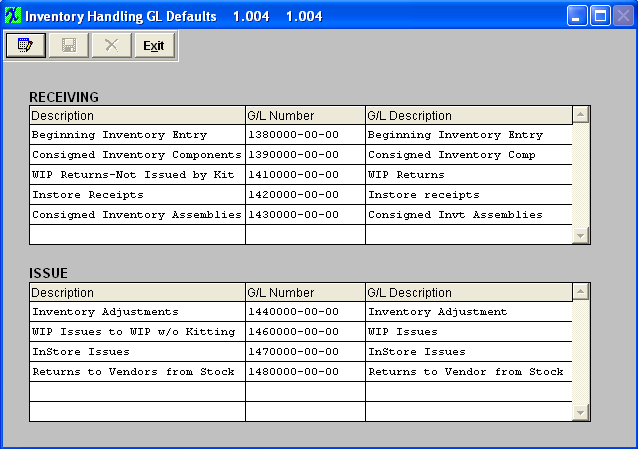
This section sets up the General Ledger account number defaults for items received or issued via the Manex Inventory Handling screen. This is for adding to or subtracting the quantities in the Inventory Master without using a Purchase Order or a Sales Order. Determine the description of the inventory receiving or inventory issuing. At data entry, the system will display the General Ledger account number and description for your selection. Plan your selections using the worksheet. Examples of Receiving could be Opening Inventory, receipt of free sample, etc. Examples of Issue could be Special Project Samples sent to customers, etc.
NOTE: The Inventory Handling GL Codes entered within this screen should NOT be the same as the GL Codes selected for the Warehouse setup .
|
| 1.10.4. How To ..... for Inventory Handling GL Defaults |
| 1.10.4.1. Setup the Inventory Handling GL Defaults | ||
|
The following screen will appear:
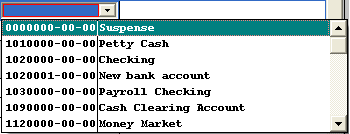
To Add a record, depress the Edit button, depress the Add button in the Receiving or Issue section. Type in the description in the section and then select the general ledger number, from the list shown below:
Depress on the Down arrow next to the field until you reach the account. Depress the Save button in the section. The General Ledger Description will automatically fill in. When finished depress the Save or Abandon changes button. Where Used: This section sets up the General Ledger account number defaults for items received or issued via the Manex Inventory Handling module.
«Mark as Completed in RoadMap in Sect. B Item 4-h»
|
| 1.11. Inventory Handling Reason Codes |
| 1.11.1. Prerequisites for Inventory Handling Reason Codes |
|
Complete the attached worksheet and "Mark as Completed RoadMap Section B Item 4-i before continuing the setup. User MUST have full rights to the "System Setup" in System Security . Users with “Supervisor Rights” will automatically have access. |
| 1.11.2. Introduction for Inventory Handling Reason Codes |
This screen is to enter Inventory Receiving and Transferring codes in order to save the user from a lot of repetitive data entry. The information entered here will be used in the Inventory Handling module. |
| 1.11.3. Fields & Definitions for Inventory Handling Reason Codes |
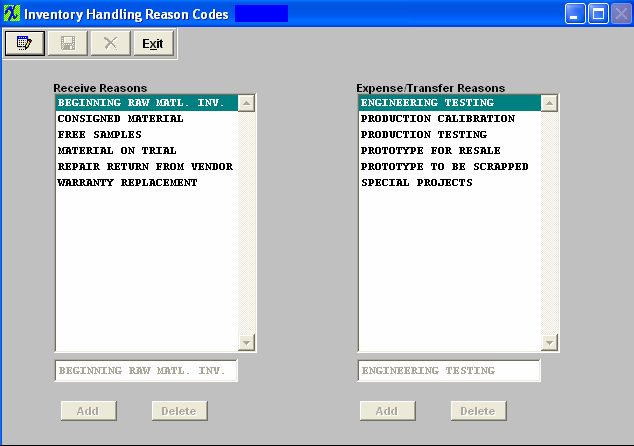
This screen is to enter Inventory Receiving and Transferring codes in order to save the user from a lot of repetitive data entry. The information entered here will be used in the Inventory Handling module. Examples of Receiving reasons would be Opening Inventory, Material Received on Trial, etc. Examples of Transferring codes would be Special Projects, Prototype, etc. Enter the reasons in the table. |
| 1.11.4. How To ..... for Inventory Handling Reason Codes |
| 1.11.4.1. Setup the Inventory Handling Reason Codes | ||
The following screen will appear:
To Add a new reason code, depress the Edit button. The Add and Delete buttons will appear at the bottom of the screen under each section. Depress the Add button. Type in the reason. To delete a reason code, depress the Edit button, highlight the reason, and depress and delete button.
When finished making changes depress the Save or Abandon changes button. Where Used: The Reason Codes are used in the Inventory Handling module.
«Mark as Completed in RoadMap in Sect. B Item 4-i»
|
| 1.12. Engineering Change Order Setup |
| 1.12.1. Prerequisites for ECO Setup |
|
Complete the attached worksheet and "Mark as Completed RoadMap Section B Item 4-j before continuing the setup.
Administrative Departments must be set up.
User MUST have full rights to the "System Setup" in System Security . Users with “Supervisor Rights” will automatically have access. |
| 1.12.2. Introduction for ECO Setup |
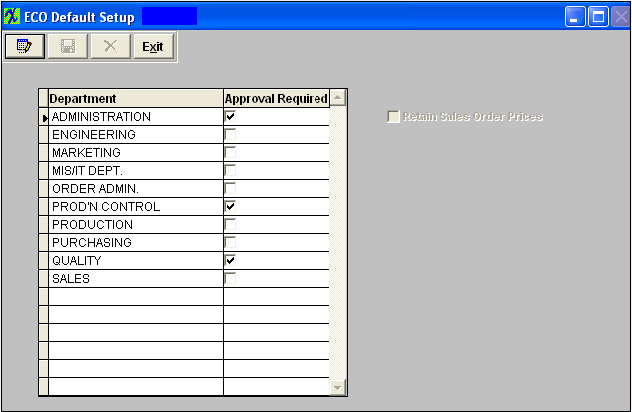
This setup screen is used in the Engineering Change Order module. Check off the department(s) which must approve an Engineering Change. Note: The departments are set up in the Administration Department Setup . The users within those departments are set up in the Security module. |
| 1.12.3. Fields & Definitions for ECO Setup | ||||||
|
| 1.12.4. How To ..... for ECO Setup |
| 1.12.4.1. Setup the ECO Setup Module | ||
|
The following screen will appear:
The departments displayed on the screen are setup in the Administration Department Setup module.
Depress the Edit action button, click on the appropriate boxes for those departments which must authorize an Engineering Change Order. Uncheck the appropriate boxes to remove a department which no longer must authorize an ECO. Where Used: In the Engineering Change Order Module.
«Mark as Completed in RoadMap in Sect. B Item 4-j»
|
| 1.13. Supplier Types |
| 1.13.1. Prerequisites for Supplier Types |
Complete the attached worksheet and "Mark as Completed RoadMap Section B Item 4-k before continuing the setup. User MUST have full rights to the "System Setup" in System Security . Users with “Supervisor Rights” will automatically have access. |
| 1.13.2. Introduction for Supplier Types |
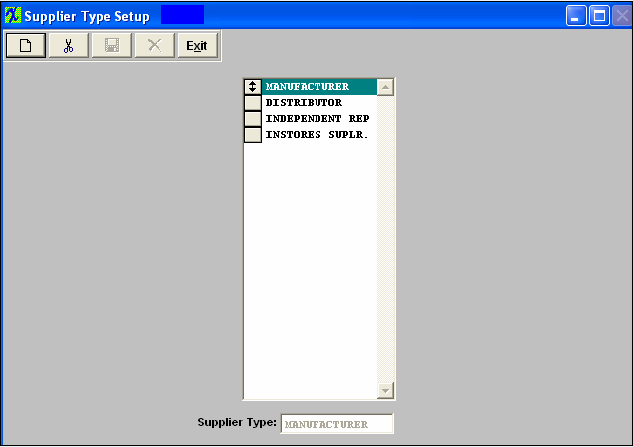
When adding suppliers, it is convenient to identify the supplier by a type. Examples of supplier types might be: Manufacturer, Distributor, Rep. Etc. |
| 1.13.3. Fields & Definitions for Supplier Types |
When adding suppliers, it is convenient to identify the supplier by a type. Examples of supplier types might be: Manufacturer, Distributor, Rep. Etc. A supplier type must be entered prior to entering suppliers. The field length is 20 characters. |
| 1.13.4. How To ..... for Supplier Types |
| 1.13.4.1. Setup the Supplier Types | ||
|
The following screen will appear:
To add additional Supplier Types depress the Add button. Tye in the Supplier Type. To delete an existing Supplier Type, highlight the Supplier Type you want to delete, and depress the Delete button. These items may be sorted in any order by clicking on and dragging the box on the left side, to the (vertical) position desired. This order will be the order displayed in the pull downs when using this list in other modules within the system. Suggestion: Have the one most used at the top of the list. Where Used: Supplier types are used in the addition of suppliers, and in some reporting functions.
«Mark as Completed in RoadMap in Sect. B Item 4-k» |
| 1.14. Supplier Status |
| 1.14.1. Prerequisites for Supplier Status |
Complete the attached worksheet and "Mark as Completed RoadMap Section B Item 4-l before continuing the setup.
User MUST have full rights to the "System Setup" in System Security . Users with “Supervisor Rights” will automatically have access. |
| 1.14.2. Introduction for Supplier Status |
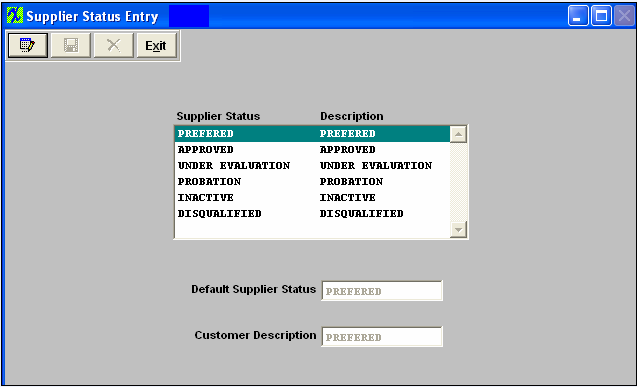
MANEX provides six classifications of vendor status: Preferred, Approved, Under Evaluation, Probation, Inactive and Disqualified. These Status types are permanently installed in the software, and MANEX has already provided a description for these classifications the same as the status. However, if the user wishes, the description of this status may be changed to suit the user. No action is necessary in the setup if the user is satisfied with the current defaults. |
| 1.14.3. Fields & Definitions for Supplier Status |
MANEX provides six classifications of vendor status: Preferred, Approved, Under Evaluation, Probation, Inactive and Disqualified. These Status types are permanently installed in the software, and MANEX has already provided a description for these classifications the same as the status. However, if the user wishes, the description of this status may be changed to suit the user. No action is necessary in the setup if the user is satisfied with the current defaults. |
| 1.14.4. How To ..... for Supplier Status |
| 1.14.4.1. Setup the Supplier Status Module | ||
|
The following screen will appear:
To modify the description of a supplier status, click on the Edit button, and enter the new description.
When changes have been complete, depress the Save or Abandon changes button.
Where Used: Supplier status is used during the selection of suppliers for purchasing «Mark as Completed in RoadMap in Section B Item 3-l» |
| 1.15. Purchase Setup |
| 1.15.1. Prerequisites for Purchase Setup |
Complete the attached worksheet and "Mark as Completed RoadMap Section B Item 4-m" before continuing the setup.
The prerequisites for entering Purchasing Setups are:
General Ledger Account Numbers set up in the G/L Account Setup module.
User MUST have full rights to the "System Setup" in System Security . Users with “Supervisor Rights” will automatically have access. |
| 1.15.2. Introduction for Purchase Setup |
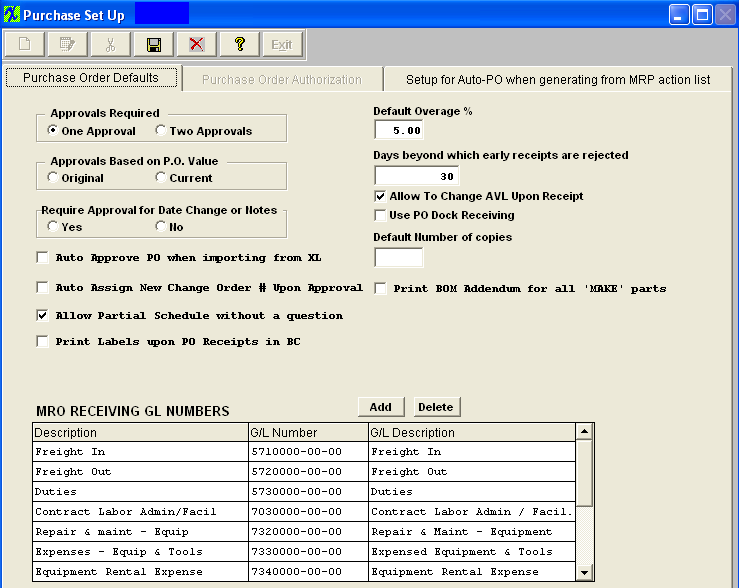
In this section, the approval authority is established for purchase order approval for each user. The company has the option to declare whether one or two approvals are required in order for a purchase order to be approved. If the user chooses to have two approvals, then one of the approval-users must have final approval authority. The company also has the option to declare whether they want approvals Based on the PO Value and approvals when there is date changes or note changes. This section also establishes a default percentage that is allowed over and above the purchase order line item quantity. If material is received that exceeds in quantity the ordered amount by this percentage, then the receiving department cannot receive the material until the order is modified by purchasing. This is a default percentage applied to each order as it is placed, but may be over-ridden at the time the order is created.
|
| 1.15.3. Fields & Definitions for Purchase Setup |
| 1.15.3.1. Purchase Order Default Tab | ||||||||||||||||||||||||||
|
When a buyer generates a purchase order, it is created as a temporary order until it is approved. These orders will be created with a prefix to distinguish them as temporary until approved. As a temporary order, the document cannot be printed, nor will the order be considered as supply for Material Requirements Planning considerations. When a purchase order undergoes a revision, changing schedules, quantities and/or pricing, the order returns to a temporary status until approved. Note: These changed orders are not changed back to a prefix.
The company has the option to declare whether one or two approvals are required in order for a purchase order to be approved. If the user chooses to have two approvals, then one of the approval-users must have final approval authority.
When a non-inventory item is being purchased, the user must indicate the General Ledger MRO receiving numbers, if Accounting is used.
|
| 1.15.3.2. Purchase Order Authorization | ||||||||
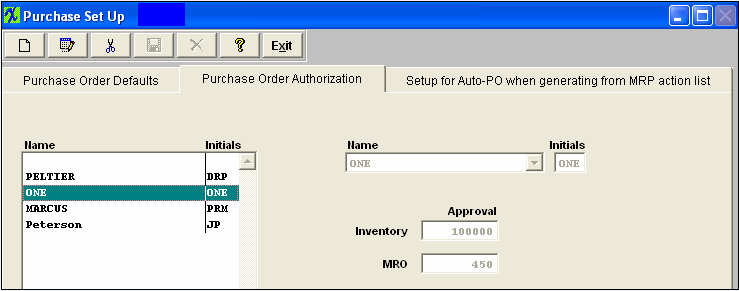
For each user approval, the user may be authorized to approve one or both: Inventory and/or MRO. And each of these may have different levels of dollar amounts. If the administrator chooses to have one approval for orders, then there must be at least one person with approval for the expected dollar value of purchase orders. If two approvals are chosen, then there must be at least two people with approvals for the expected dollar vaule of purchase orders. The names of the users must have been entered in the Security Setup before entering in the Purchasing Setup, as they become available in the pull down listing for names.
Approval
|
| 1.15.3.3. Setup for Auto-PO when generating from MRP action List | ||||||||||||||
|
| 1.15.4. How To ..... for Purchase Setup |
| 1.15.4.1. Setup the Purchase Setup Module | ||
|
The following screen will appear:
Depress the Edit button. For Approvals Required, click on the desired radial for either One Approval or Two Approvals. Enter Default Overage % if applicable. Click on desired radial for Approvals based on P.O. Value. Click on desired radial if Approvals are required for Date or Note Changes. Enter a Qty of Days beyond which early receipts are rejected if applicable. If you want to Change AVL Upon receipt this box must be checked. If you want to Use PO Dock Receiving this box must be checked. If you want to Auto Apporve PO's when importing from XL this box must be checked. If you want the system to Auto Assign New Change Order #'s upon Approval this box muxt be checked. If user wants to Allow partial schedule without receiving the reminder popup this box must be checked. If you want to Print labels upon PO receipts in the BC (Bar Code Receiving module) this box must be checked. To add additional MRO (Materials, Repairs and Other) Receiving GL Numbers, select the ADD key, type in the description, then select the appropriate General Ledger account number and description, by clicking on the down arrow next to the field, as follows:
When finished, the user must depress the Save or Abandon changes button. Purchase Order Authorization On this screen, the user establishes the procurement authority levels for individuals.
To add a new user, click on the Add button and select a user from the Name pulldown field. Then enter the dollar amount authorized for either or both (Inventory and/or MRO) Approval and Final OK. If the company chooses only one approval, it must be in the Final column. Each user may have different authority levels for different kinds of purchases. Additionally, the user may have different amounts authorized, depending on whether they are the first approval or the final approval. For example, a buyer may have authority to do a final approval for $1000, but must also approve P.O.s up to $10,000 before the person with final authority will authorize the P.O.
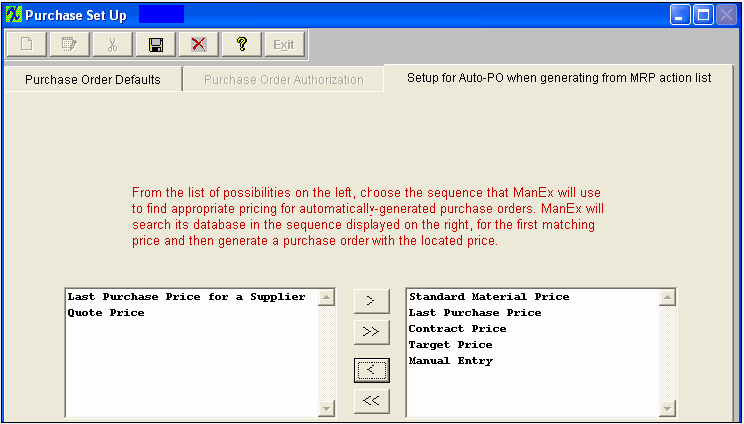
Setup for Auto-PO when generating from MRP action list
In order to create an automatic PO within the MRP action list, the system has to figure out unit cost. Within this screen the user can select multiple methods ordered by their preference, from selecting items on the left and entering them on the right. The system will try to find the price based on the first method in the selected list (on the right) and if the system cannot find any price information it will proceed with the next method (on the right) until price is found. If not found system will assign "Manual Entry" and leave it at zero as a default. The price source can be changed and the price can be overwritten in the screen which creates POs from the MRP action list.
 Where Used: Approvals are required on all purchase orders in order to place and receive material. General Ledger Account selection for all MRO purchases.
«Mark as Completed in RoadMap in Section B Item 3-m» |
| 1.15.5. ManEx Minute for Purchase Set-up |
| 1.16. First Article Disposition |
| 1.16.1. Prerequisites for First Article Disposition |
|
User MUST have full rights to the "System Setup" in System Security . Users with “Supervisor Rights” will automatically have access. |
| 1.16.2. Introduction for First Article Disposition |
|
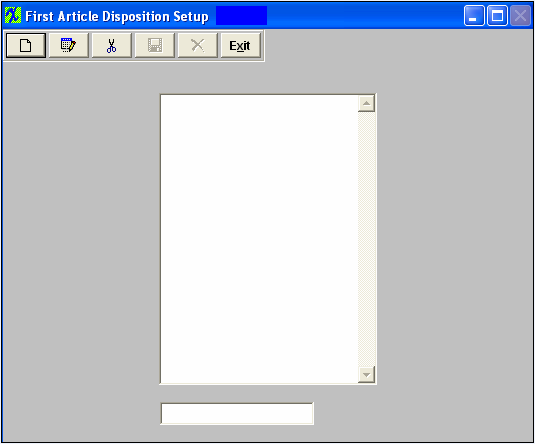
The First Article Disposition section is used to set up standard system instructions. The information entered here will be used in the PO Receiving module for Inventory items that require First Article Inspections.
|
| 1.16.3. Fields & Definitions for First Article Disposition |
 |
| 1.16.4. How To ..... for First Article Disposition |
| 1.16.4.1. Setup the First Article Disposition Module | ||
The following screen will appear:
To add a new record, depress the Add button and type in description. |
| 1.17. Inspection Exception Setup |
| 1.17.1. Prerequisites for Inspection Exception Setup |
|
User MUST have full rights to the "System Setup" in System Security . Users with “Supervisor Rights” will automatically have access. |
| 1.17.2. Introduction for Inspection Exception Setup |
|
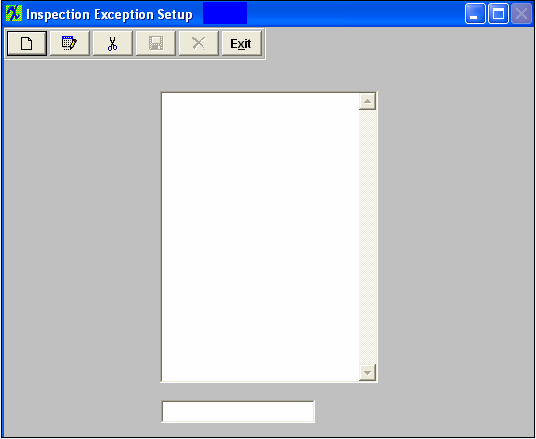
This screen is to enter Inspection Exception codes in order to save the user from a lot of repetitive data entry. The information entered here will be used in the Purchase Order module for inventory items that require Inspection.
|
| 1.17.3. Fields & Definitions for Inspection Exception Setup |
 |
| 1.17.4. How To ..... for Inspection Exception Setup |
| 1.17.4.1. Setup the Inspection Exception Setup Module | ||
The following screen will appear:
To add a new record, depress the Add button and type in description. Depress the Save or Abandon changes button. You may Edit or Delete existing records, also.
|
| 1.18. Return/Shortage Reasons |
| 1.18.1. Prerequisites for Return/Shortage Reasons |
Complete the attached worksheet and "Mark as Completed RoadMap Section B Item 4-p" before continuing the setup. User MUST have full rights to the "System Setup" in System Security . Users with “Supervisor Rights” will automatically have access. |
| 1.18.2. Introduction for Return/Shortage Reasons |
Throughout the operation, there will be instances where material has been rejected in the course of business. Examples of these places are Purchasing Receiving, Kit Preparation, Material Shortages, Shipping, etc. It is useful to have a common terminology to choose from, and avoid development of similar nomenclature that mean the same thing. To aid in focusing terms for reason codes, this setup area is established to be used whenever material is rejected. The available number of reasons for rejection is unlimited, but the user must have at least one entered in order to reject material in operations. |
| 1.18.3. Fields & Definitions for Return/Shortage Reasons |
Throughout the operation, there will be instances where material has been rejected in the course of business. Examples of these places are Purchasing Receiving, Kit Preparation, Material Shortages, Shipping, etc. It is useful to have a common terminology to choose from, and avoid development of similar nomenclature that mean the same thing. To aid in focusing terms for reason codes, this setup area is established to be used whenever material is rejected. The available number of reasons for rejection is unlimited, but the user must have at least one entered in order to reject material in operations. |
| 1.18.4. How To ..... for Return/Shortage Reasons |
| 1.18.4.1. Setup the Return/Shortage Reasons | ||
|
The following screen will appear:
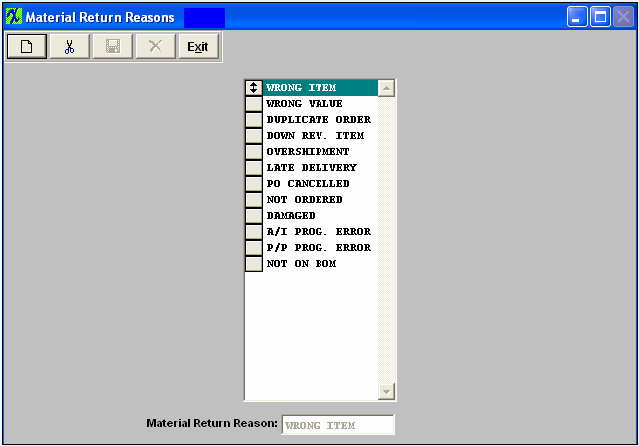
To Add a reason, depress on the Add button and enter the reason in the highlighted field. To Delete a reason, highlight the reason you would like to delete, and depress the Delete button. These items may be sorted in any order by clicking on and dragging the box on the left side, to the (vertical) position desired. This order will be the order displayed in the pull downs when using this list in other modules within the system. Suggestion: Have the one most used at the top of the list. Where Used: Used by Purchase Receiving, Kit Preparation & Audit and Material Shortage Management. «Mark as Completed in RoadMap in Section B Item 3-p» |
| 1.19. Kit Default Setup |
| 1.19.1. Prerequisites for Kit Default Setup |
Complete the attached worksheet and "Mark as Completed RoadMap Section B Item 4-q" before continuing the setup User MUST have full rights to the "System Setup" in System Security . Users with “Supervisor Rights” will automatically have access. |
| 1.19.2. Introduction for Kit Default Setup |
|
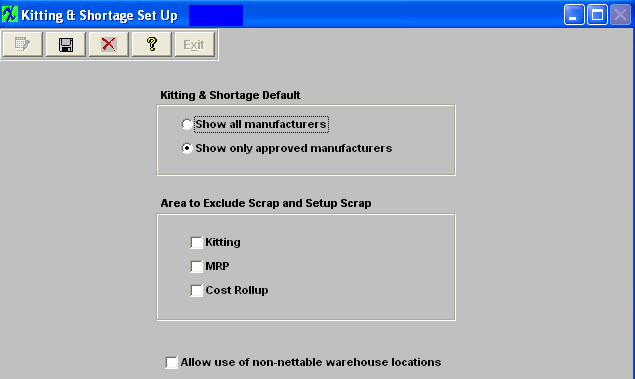
This screen is designed for the user to select Kitting and Shortage defaults regarding the display of manufacturers, excluding Scrap from kitting, MRP or Cost Rollup, and to Allow use of non-nettable warehouse locations. The user can choose between showing all manufacturers or show only approved manufacturers, and allow use of non-nettable warehouse locations when working with the Kitting & Shortage Management module. Within this screen the user can also select the default to exclude scrap and scrap setup from any of the following three modules; kitting, MRP, and/or Cost Rollup.
|
| 1.19.3. Fields & Definitions for Kit Default Setup |
This screen is designed for the user to select Kitting and Shortage defaults regarding the display of manufacturers. The user can choose between showing all manufacturers or show only approved manufacturers when working with the Kitting & Shortage Management module.
If the "Show all Manufacturers" is selected the kitting module will display ALL AVL's and then indicate the approved ones with an "A" on the screen and will allow user to pick from the non-approved AVL's as well as the approved AVL's.
If the "Show only Approved Manufacturers" is selected the kitting module will ONLY display the approved AVL's and so users will only be able to pull parts from the Approved AVL's.
User can select the default to Exclude Scrap and Setup Scrap from any of the following three modules; Kitting, MRP, and/or Cost Rollup. Note: When this field is changed it will update the setting in MRP Default Setup.and visa versa. For further detail on how Excluding Scrap and Setup Scrap values will affect the variances see Articles #3067, #3053, and #3320 .
User can also select the default to Allow use of non-nettable warehouse location when working with the Kitting & Shortage Management module.
|
| 1.19.4. How To ..... for Kit Default Setup |
| 1.19.4.1. Setup Kit Default Setup | ||
|
The following screen will appear:
This screen is designed for the user to select Kitting and Shortage defaults regarding the display of manufacturers. The user can choose between showing all manufacturers or show only approved manufacturers when working with the Inventory Management Kitting & Shortage Management option.
If the "Show all Manufacturers" is selected the kitting module will display ALL AVL's and then indicate the approved ones with an "A" on the screen and will allow user to pick from the non-approved AVL's as well as the approved AVL's.
If the "Show only Approved Manufacturers" is selected the kitting module will ONLY display the approved AVL's and so users will only be able to pull parts from the Approved AVL's.
User can select the default to Exclude Scrap and Setup Scrap from any of the following three modules; Kitting, MRP, and/or Cost Rollup. Note: When this field is changed it will update the setting in MRP Default Setup.and visa versa. For further detail on how Excluding Scrap and Setup Scrap values will affect the variances see Articles #3067, #3053, and #3320 .
User can also select the default to Allow use of non-nettable warehouse location when working with the Kitting & Shortage Management module.
Depress the Edit key and then select your choice. When finished making selections, depress the Save or Abandon changes button. Where Used: The Kit Default Setup selection is used in the Kitting module.
«Mark as Completed in RoadMap in Section B Item 3-q» |
| 1.20. MRP Default Setup |
| 1.20.1. Prerequisites for MRP Default Setup |
|
Complete the attached worksheet and "Mark as Completed RoadMap Section B Item 4-r" before continuing the setup. User MUST have full rights to the "System Setup" in System Security . Users with “Supervisor Rights” will automatically have access. Suggestion: We suggest that if the MRP takes a larger amount of time to run you may want to schedule it to run during non-working hours. If you run it during working hours and it takes a large amount of time, you might experience results that you are not expecting. Because, transactions could have been made in the system after the MRP was started and some data captured in the first part of the run may affect the transaction during the MRP run. The MRP time stamp does not get updated until the very end of the MRP run.
|
| 1.20.2. Introduction for MRP Default Setup |
This screen is used to setup what the user wants to see when using MRP. |
| 1.20.3. Fields & Definitions for MRP Default Setup | ||||||||||||||||
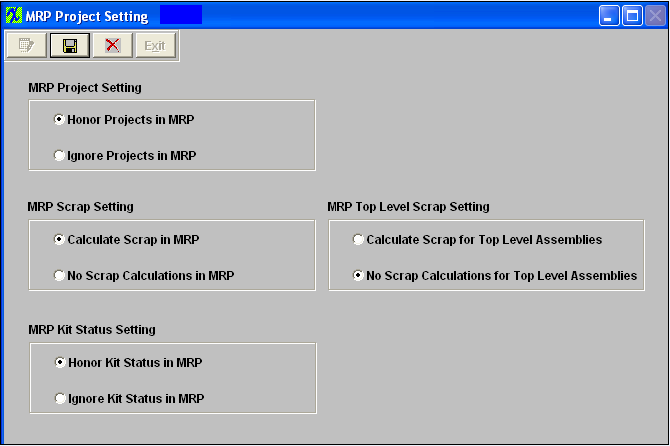 MRP Project Setting
MRP Scrap Setting - Note: If this field is changed it will update the setting in the Kit Default Setup and visa versa.
MRP Kit Status Setting
MRP Top Level Scrap Setting
|
| 1.20.4. How To ..... for MRP Default Setup |
| 1.20.4.1. Setup the MRP Default Setup Module | ||
The following screen will appear:
When editing the MRP Scrap Setting the following warning will appear: Note: When this field is changed it will update the setting in the Kit Default Setup and visa versa.

|
| 1.21. Material Risk Code Setup |
| 1.21.1. Prerequisites for Material Risk Code Setup |
User MUST have full rights to the "System Setup" in System Security . Users with “Supervisor Rights” will automatically have access. |
| 1.21.2. Introduction for Material Risk Code Setup |
| This is to inform the users which items are Low Risk or High Risk (can not be cancelled or returned). |
| 1.21.3. Fields & Definitions for Material Risk Code Setup |
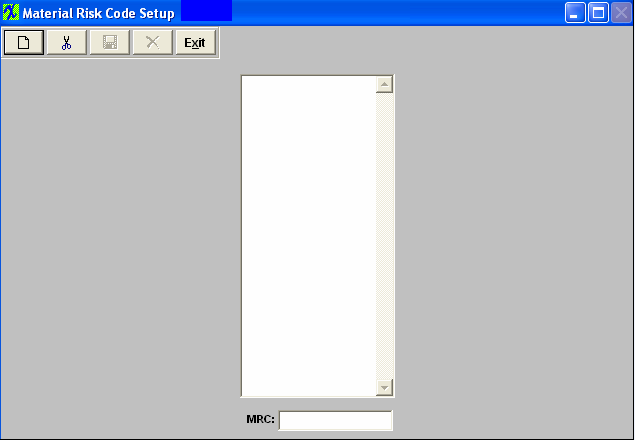 This is to inform the users which items are Low Risk or High Risk (can not be cancelled or returned).
|
| 1.21.4. How To ..... for Material Risk Code Setup |
| 1.21.4.1. Setup the Material Risk Code Setup Module | ||
The following screen will appear:
To add a new record, depress the Add button and type in a code. This is to inform the users which items are Low Risk or High Risk (can not be cancelled or returned). Depress the Save or Abandon changes button. You may Delete existing records, also. |
| 1.22. Forecast Setup |
| 1.22.1. Prerequisites for Forecast Setup |
User MUST have full rights to the "System Setup" in System Security . Users with “Supervisor Rights” will automatically have access. |
| 1.22.2. Introduction for Forecast Setup |
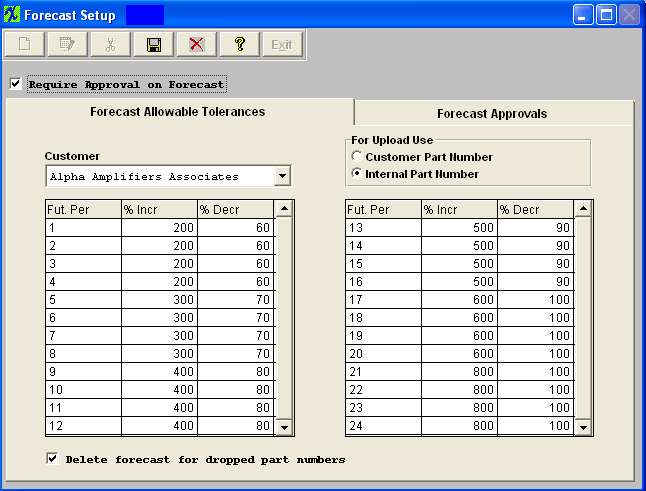
In this screen the user may elect to require Approvals on Forecasts, or not and establish guidelines for tolerances on the revisions of Customer Forecasts. |
| 1.22.3. Fields & Definitions for Forecast Setup |
| 1.22.3.1. Forecast Allowable Tolerances |
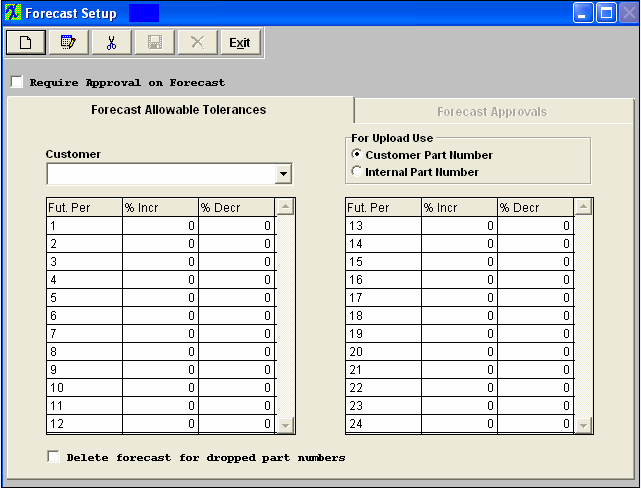 Enter the tolerances acceptable for a forecast to change within a given number of periods out from the current period. You may enter any percentage allowable for both the increased forecast and the decreased forecast. The definition of this Forecast Allowable Tolerances (FAT) is the amount the customer is allowed to change a forecast from the previous forecast in the future periods from the current period. |
| 1.22.3.2. Forecast Approvals |
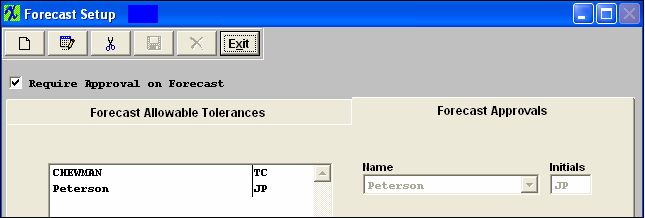
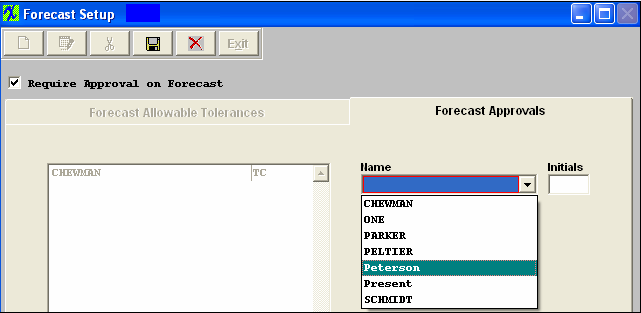 The User may elect to require specific approvals for each new and modified forecast. If the Require Approval on Forecast checkbox is checked the approval page wil be active. Click on the Forecast Approvals tab and depress the Add record action button. Select from a dropdown list of users to identify which users have authority to approve new and modified forecasts |
| 1.22.4. How To ..... for Forecast Setup |
| 1.22.4.1. Setup the Forecast Setup Module | ||
The following screen will appear:
To enter new customer tolerances, the User would select a customer from the dropdown list of customers.
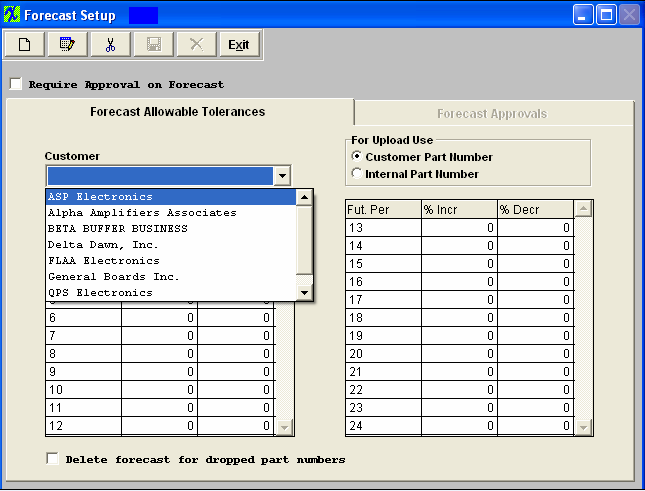
Once you have choosen the customer. Depress the Edit action button to enter the tolerances acceptable for a forecast to change within a given number of periods out from the current period. You may enter any percentage allowable for both the increased forecast and the decreased forecast. The definition of this Forecast Allowable Tolerances (FAT) is the amount the customer is allowed to change a forecast from the previous forecast in the future periods from the current period.
In this screen, as it is set up, we can see the tolerance for 1 future period out allows the forecast change to be up to 200 percent of the last forecast input into the system. In other words, in the next period (notice there isn’t a tolerance for the current period, assuming the current period is already in process) the customer can change the forecast for any given product upwards of 200%, or reduce it by 60%. So if the most recent forecast entered for the product for the next period is 100, then as of the current date, that forecast can be increased to 200% or to 300 units (100 + 100*200%). It also may be decreased by as much as 60% or down to 40 units in the next period. It is important to note that these tolerances are based on periods, or months, not weeks. Also in this screen is the ability to require approvals before forecasts are made active. By clicking on the “Require Approval on Forecast” checkbox, the second page becomes active and can be utilized. Depress the Save or Abandon changes button. If save is depress you will receive the following message:
Depress OK and the Forecast Allowable Tolerances will be saved. Users may elect to require specific approvals for each new and modified forecast. If the Require Approval on Forecast checkbox is checked the approval page wil be active. Click on the Forecast Approvals tab and depress the Add record action button. Select from a dropdown list of users to identify which users have authority to approve new and modified forecasts. When a user is added and the approvals are required, then in the main forecast screen, the "Approval" button will be visable.
HOWEVER – at this time, the reset carryover button does require an approval, whether or not the Approval is required for the Forecast itself. So to enable a user to reset the carryover, they must be added in the system setup as allowed to approve forecasts, but then the “Require Approval on Forecast” can be unchecked, and the user still allowed to use the reset carryover button.
If it becomes necessary to remove a users authority, highlight the users name and depress the Delete button
Once selection is complete depress the Save or Abandon changes button. If saved the new user with approval privileges will be shown in the listing.
|
| 1.23. Material Type Setup |
| 1.23.1. Prerequisites for Material Type Setup |
Complete the attached worksheet and "Mark as Completed RoadMap Section B Item 4-u" before continuing the setup. User MUST have full rights to the "System Setup" in System Security . Users with “Supervisor Rights” will automatically have access. |
| 1.23.2. Introduction for Material Type Setup |
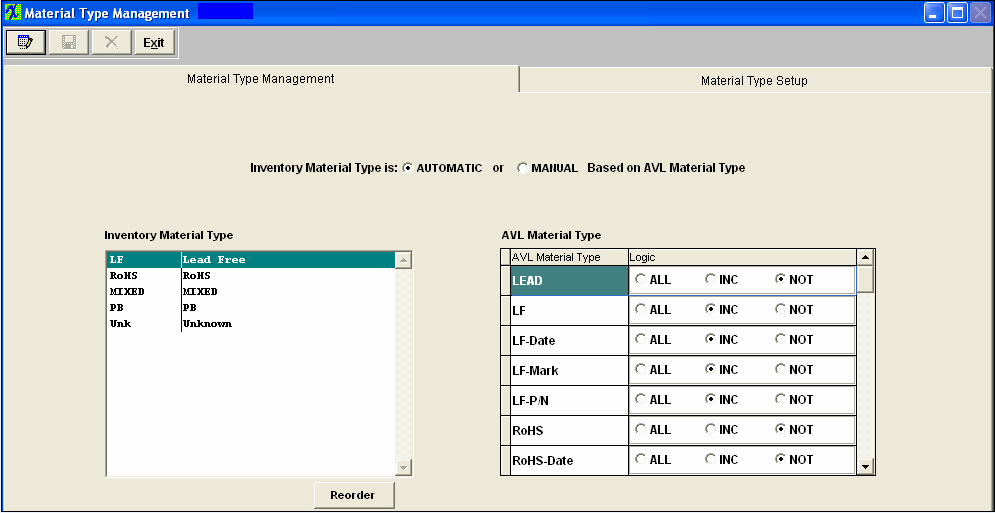
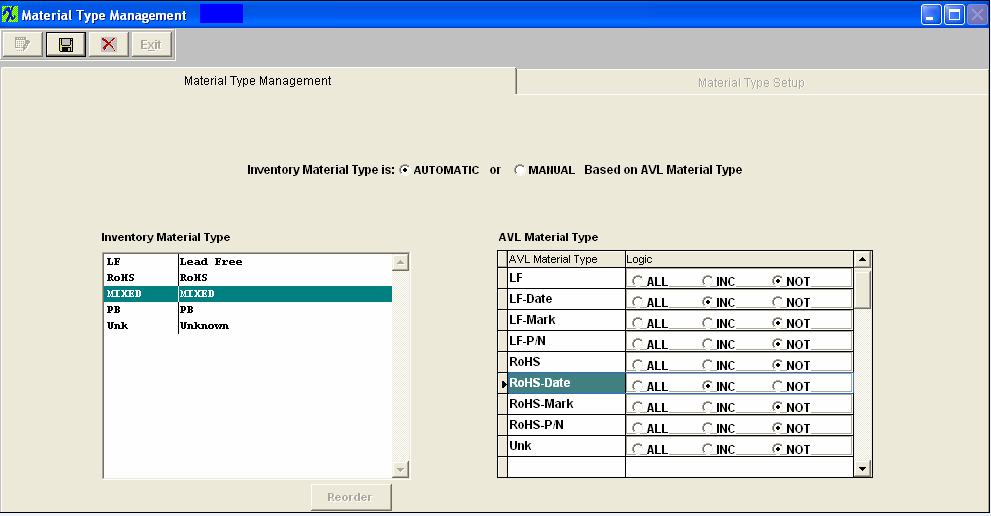
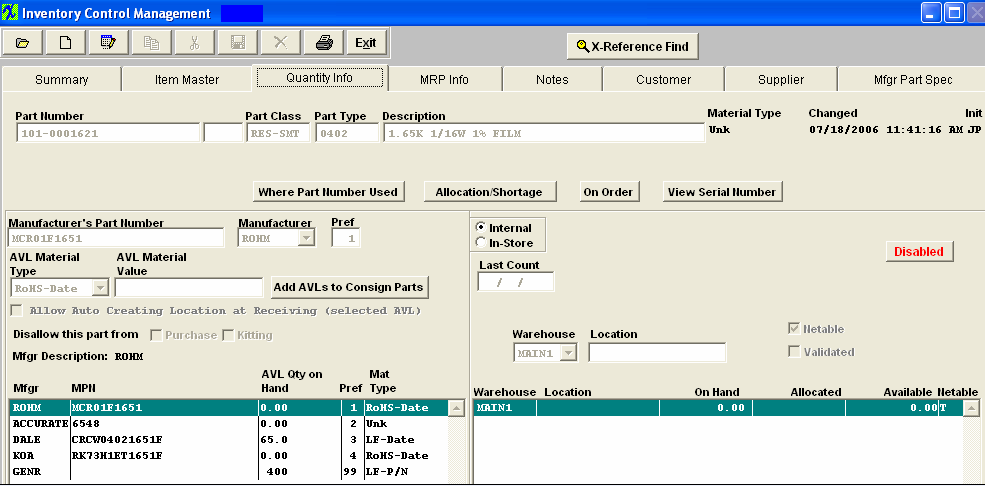
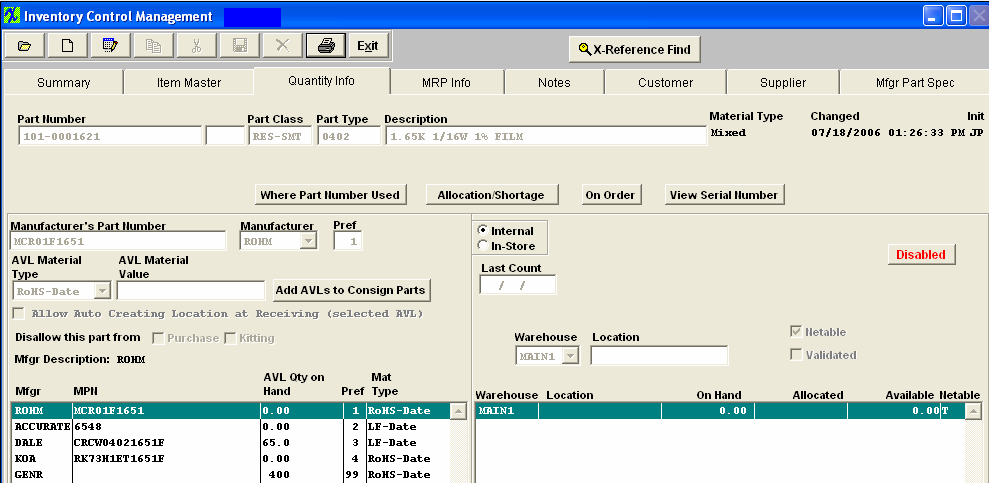
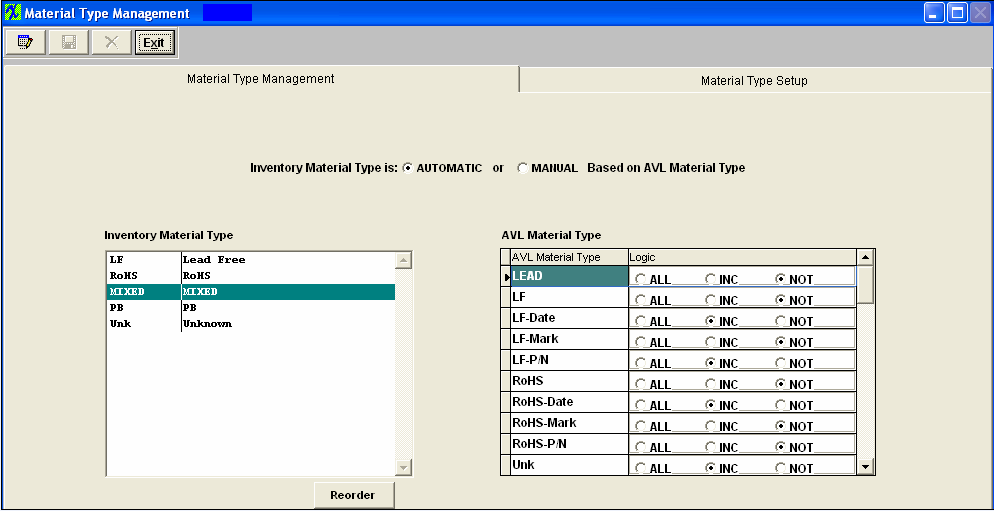
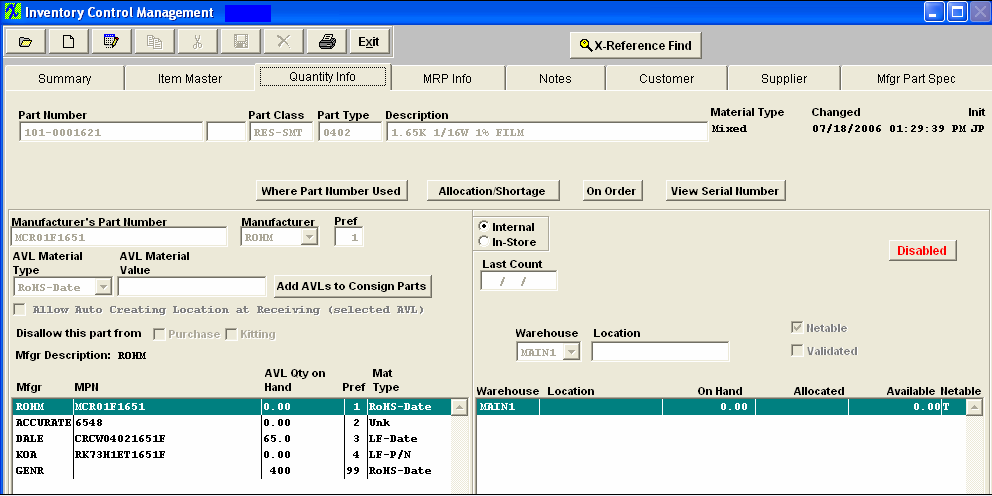
The User may establish the logic by which the material type for the parts are established by the material types at the AVL level. User may also reorder the Material Type per proirity. |
| 1.23.3. Fields & Definitions for Material Type Setup |
| 1.23.3.1. Material Type Management | ||||||||||
|
| 1.23.3.2. Material Type Setup | ||||||||||||
|
| 1.23.4. How To ..... for Material Type Setup |
| 1.23.4.1. Add a Material Type | ||
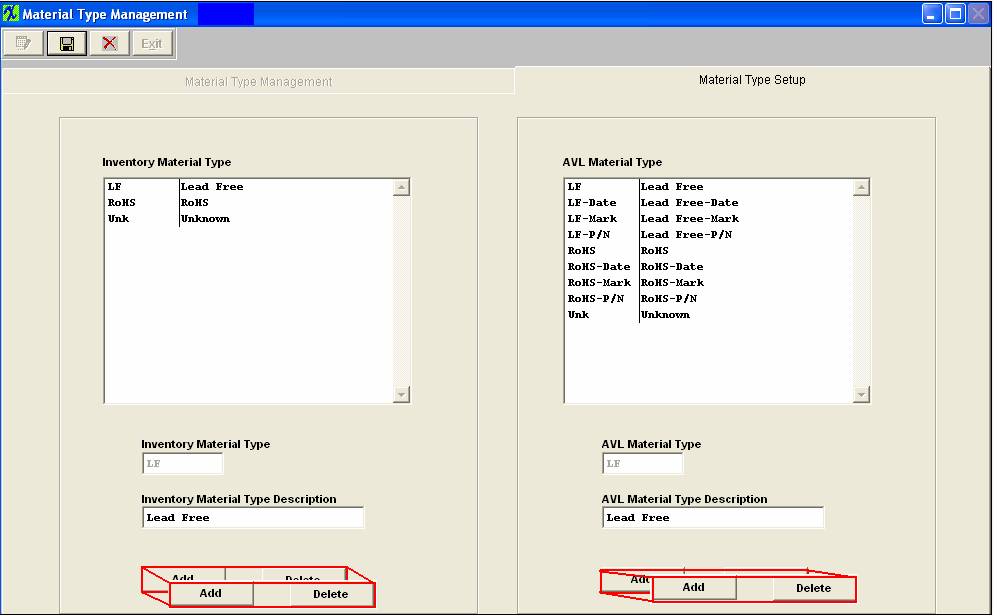
The following screen will appear:
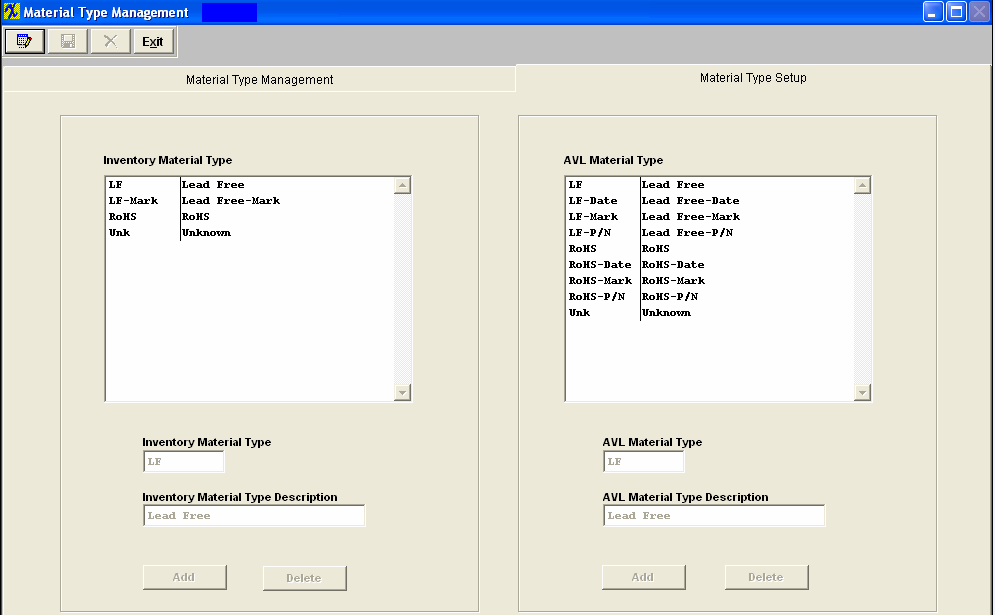
Depress the "Material Type Setup" tab
Depress the Edit action button and the ADD and DELETE buttons become available. The Inventory Material Types and the AVL Material Types shown in the screen below are the material types that are hard-coded into the system.
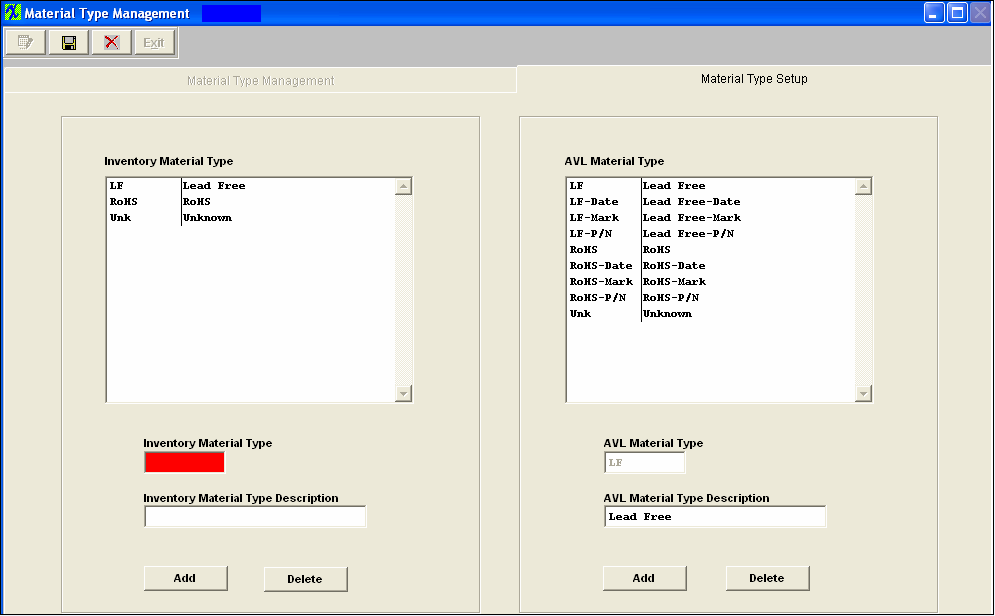
Depress the Add button within the Inventory or AVL Material Type box
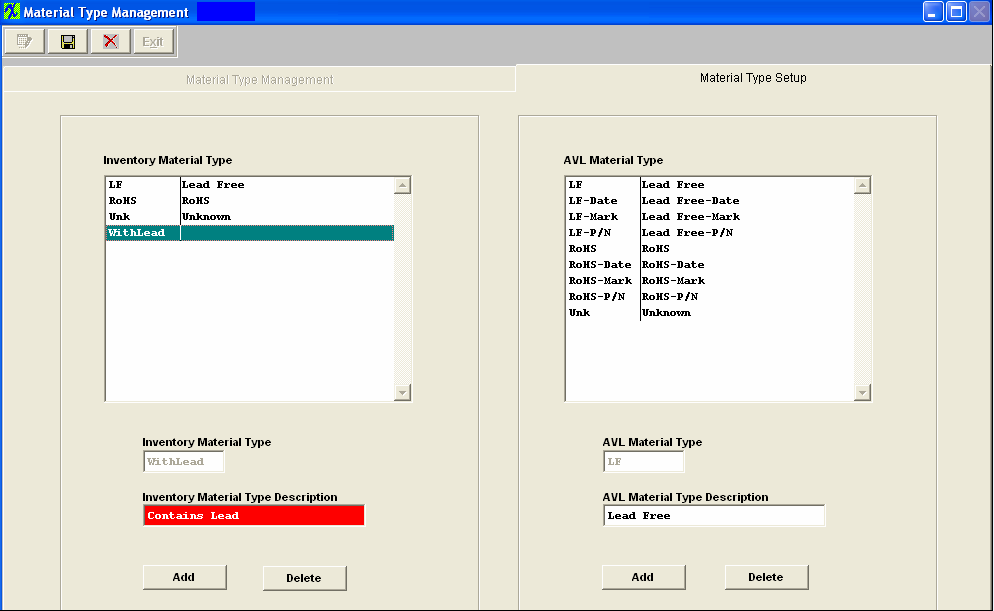
Enter in the New Material Type Code and Material Type Description it will then appear in the Material Type Box. The user can create the Inventory Material Types to be the same or different than the AVL Material Types, and you can have as many as you want of each. The logic between the part material type and AVL material type can be setup on the Material Type Management screen.
Depress Add to add another Material type, or depress the Save record action button to save changes or depress the Abandon changes action button to abandon changes. If you depress the Save record action button the following option screen will appear asking if you want to update Inventory level Material Type with the new changes:
|
| 1.23.4.2. Delete a Material Type | ||
The following screen will appear:
Depress the "Material Type Setup" tab
Depress the Edit action button and the ADD and DELETE buttons become available
Highlight the Material Type you want to Delete Depress the Delete button within the Inventory or AVL Material Type box, A message will appear to verify the material type being deleted and that the system will update the material type to "Unk" if being currently used in inventory.
Depress Yes to continue or No to abandon changes. Highlight another Material Type to Delete or depress the Save record action button to save changes or depress the Abandon changes action button to abandon changes. If you depress the Save record action button the following screen will appear:
|
| 1.23.4.3. Edit the Material Type Logic | ||
The following screen will appear:
Depress the Edit action button. This will allow you to change the Inventory Material Type to "Automatic" or "Manual" Based on AVL Material Type. If the user chooses the MANUAL option, there will be a pull down next to the Material Type field at the top of the Quantity Info screen within the Inventory Control Mgmt module, listing all the Inventory Material Types available:
User may highlight the Material Type they wish to be assigned to this Inventory part regardless of the material types of the AVLs. Each time an AVL is added, edited or deleted, the user will receive the following popup reminder:
If the user chooses the AUTOMATIC option user must also setup the Logic by clicking on the Radial next to "ALL" "INC" or "NOT". Reminder: Make sure you do not setup duplicate logics for different material types. There are two grids in the Material Type Management screen. The left side displays the different INVENTORY Material Types that the user has established in the Material Type setup screen. When one of these Material Types (MT) is selected, the grid on the right side of the page displays all available AVL Material Types setup by the user on the MT setup screen. For each INVENTORY MT, the user can select each of the AVL MT, and how they affect the INVENTORY MT. The choices to affect the INVENTORY MT selected are ALL, INC, and NOT: If ALL is selected, then every one of the AVL's available for that Inventory part must have the same MT. (There can only be one ALL selected). If INC is selected, then if any of the AVLs with that designations are included, then the INVENTORY MT will be assigned accordingly. IF ANY of the AVL's for an Inventory part contain a designation in the NOT category, then the inventory designation will become "UNK". If the AVL material type is automatic, and you edit the Logic setup the following message will be displayed:
EXAMPLE: Setup Logic for a new Inventory MT (Mixed). Go to the AVL Material Types; Check - LF-Date and RoHS-Date as INC, Check - all other AVL MT as NOT (For more MT Logic Setup Examples see attached document)
Find an existing Inventory Part # 101-0001621 with different AVL MT and Inventory MT as UNK
Edit record and change all AVL MT to either LF-Date or RoHS-Date and the Inventory MT will update to Mixed per the Mixed Logic in System Setup (Shown above)
OR User can leave all AVL MT as is, go to System Setup and Edit the Inventory MT - MIXED Logic to include UNK and LF-P/N, update records. User may also sort the Inventory Material Type in order of priority in which the logic is checked. By depressing the Reorder button. and Inventory MT will update automatically, with existing AVL MT's
|
| 1.24. Notes Setup |
| 1.24.1. Prerequisites for Notes Setup |
User MUST have full rights to the "System Setup" in System Security . Users with “Supervisor Rights” will automatically have access. |
| 1.24.2. Introduction for Notes Setup |
|
This setup screen will allow you to enter Template Notes or (Clauses) that can be applied to Inventory Parts, Purchase Orders and/or Items on the PO. |
| 1.24.3. Fields & Definitions for Notes Setup |
 |
| 1.24.4. How To ..... for Notes Setup |
| 1.24.4.1. Setup the Notes Setup Module | ||
The following screen will appear:
To add a new record, depress the Add button and type in description. |
