| 1. General Setup |
| 1.1. General Setup Introduction |
| This section covers the setups to be used in various modules. Please take time to consider how to use these tables to take the maximum advantage of the ManEx features. Each section entered will affect the way that operations are performed.
The ManEx program is designed to minimize the user’s keystrokes when entering data. By careful consideration of strategies for system control, the user may arrive at the point where ManEx can automatically assign numbers to a variety of functions.
The General Setup section covers the following modules: Number Systems, Admin/Production Calendar, Administrative Departments, Designate a PDF Directory, Payment Terms, Sales Tax Authority Table, Standard Footnotes, User Defined Reports Setup, and System appearance.
User MUST have full rights to the "System Setup" in System Security to setup these modules. Users with “Supervisor Rights” will automatically have access. |
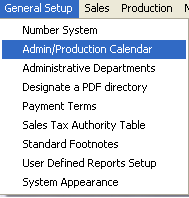
| 1.2. Number System |
| 1.2.1. Prerequisties for Number System |
Complete the attached worksheet and "Mark as Completed RoadMap Section B Item 1-a" before continuing the setup.
User MUST have full rights to the "System Setup" in System Security. Users with “Supervisor Rights” will automatically have access. |
| 1.2.2. Introduction for Number System |
The Number System setup gives the user the option to use auto or manual numbering per module.
If "Auto" numbering is chosen, the user will need to enter the starting number in the space provided on the right side of the form (starting number.) If no starting number is entered, the system will automatically start assigning numbers with number one. ManEx will automatically assign the next available sequential number (with no revision) when adding a new record in a selected module, user may at this time enter a revision if applicable. Once the "Next" number is selected, the counter moves to the succeeding number, if the abandon changes button is depress that number will be considered as used and will be skipped even though the record was never saved.
If "Manual" mode is chosen, the user will need to maintain a manual numbering sequence log and manually enter the number when adding a new record in a selected module. It is not necessary to fill in the starting number field when using manual mode. In the manual mode, the user may combine alpha and numeric characters up to the length of the field.
If the user wishes to begin with manual assignment of tracking numbers, it is recommended that they begin with an alpha character imbedded in the numbers. When the user decides to change to automatic number assignment, there will be no possibility of duplicate numbers, because all of the auto-numbering systems use numbers only. It may be appropriate for the user to enter the last number used in a manual system as the starting number for auto-numbering in the ManEx setup. |
| 1.2.3. Fields & Definitions for Number System |
The following numbering systems are established in this setup: 
If the user wishes to start the number sequence for a number type at a number other than the one shown, the user types in the new starting number. The user must NOT enter a number below a number already existing.
If "Auto" numbering is chosen, the user will need to enter the starting number in the space provided on the right side of the form (starting number.) If no starting number is entered, the system will automatically start assigning numbers with number one. ManEx will automatically assign the next available sequential number (with no revision) when adding a new record in a selected module, user may at this time enter a revision if applicable. Once the "Next" number is selected, the counter moves to the succeeding number, if the abandon changes button is depress that number will be considered as used and will be skipped even though the record was never saved. If "Manual" mode is chosen, the user will need to maintain a manual numbering sequence log and manually enter the number when adding a new record in a selected module. It is not necessary to fill in the starting number field when using manual mode. In the manual mode, the user may combine alpha and numeric characters up to the length of the field.
If the user wishes to begin with manual assignment of tracking numbers, it is recommended that they begin with an alpha character imbedded in the numbers. When the user decides to change to automatic number assignment, there will be no possibility of duplicate numbers, because all of the auto-numbering systems use numbers only. It may be appropriate for the user to enter the last number used in a manual system as the starting number for auto-numbering in the ManEx setup. Customer ID Numbers
As the user adds customers to the database, it is useful to have a customer code assigned to each customer. In many systems, the user is required to remember the customer code in order to process information concerning the customer. In such a system, mnemonic code is usually assigned so the user can remember the customer code. In ManEx, the customer code may be used to find a customer, but every screen requiring a customer identification code will display at least the customer’s full name to choose from, and often the code also. The ManEx user does not need to customize the customer codes, but can let ManEx automatically apply a new number for each new customer. Inventory Part Number As discussed in the Materials Setup section, ManEx provides users with the ability to automatically assign part numbers to new items being added to the inventory item master. Utilization of this numbering system relieves the user of the chore of having to maintain a separate logbook of assigned numbers. The user has the option of assigning a prefix to the number based on part type information established in the materials setup section. In most instances, the user may easily find an inventory item without having to remember the number, because ManEx provides several ways to locate a part – by customer, by class and type, by description, by where used, etc. Sales Quote Numbers If the user is in the quotation module, the creation of a new quotation will require a control number before saving the quotation. The user may have ManEx assign these numbers, releasing the user from having to maintain a separate log, or the user may assign numbers at the time of the quote generation. Sales Order Numbers When a sales order is created, there must be a control number assigned before the order is saved. The user may have ManEx assign these numbers, releasing the user from having to maintain a separate log, or the user may assign numbers each time a new sales order is entered. Work Order Number When a work order is created, there must be a control number assigned before the order is saved. The user may have ManEx assign these numbers, releasing the user from having to maintain a separate log, or the user may assign numbers each time a new work order is entered. Also, if the user elects to have ManEx automatically create work orders from sales orders, the numbering system for work orders MUST be automatic. Packing List Numbers When the shipping department is ready to make a shipment, they must create a packing list to go with the shipment, and to record in ManEx the details of the shipment. These too, must have a control number assigned at the time the packing list is created. The user may do this manually, or the user may have ManEx assign these numbers, releasing the user from having to maintain a separate log. Invoice Numbers Invoices are created after the shipment has been completed and delivered to a carrier or customer. When the user assigned to printing invoices is ready to do so, the invoices must have a control number assigned to them. The user may do this manually, or the user may have ManEx assign these numbers, releasing the user from having to maintain a separate log. Credit Memo Numbers Credit memos are created in accounting or via an RMA Receiver, and also require control numbers. The user may do this manually, or the user may have ManEx assign these numbers, releasing the user from having to maintain a separate log. Order Configuration Part Number Order configuration is set up in the ManEx Sales section’s Order Configuration module. The numbering selection for Order Configuration can be either automatic or manual.If automatic, the user is spared from maintaining a manual log. Supplier ID Numbers As the user adds suppliers to the database, it is useful to have a supplier code assigned to each supplier. In many systems, the user is required to remember the supplier or vendor code in order to process information concerning the vendor. In such a system, mnemonic code is usually assigned so the user can remember the vendor code. In ManEx, the supplier code may be used to find a vendor, but every screen requiring a supplier identification code will display at least the supplier’s full name to choose from, and often the code also. So the ManEx user does not need to customize the supplier codes, but can let ManEx automatically apply a new number for each new supplier. Purchase Order Numbers Tracking numbers are vital to purchase orders, as they are the legal binding of the user to the supplier for the delivery and payment of goods. These numbers may be assigned manually, as many users do. However, the reasons for assigning them manually is usually associated with the ability to group purchasing actions by buyer or commodity. In ManEx, the user may use a wide variety of selections to view procurement information. The user may view the orders by buyer code, by class code, by part types, by require actions, and more. Because of the ease of extracting data about the purchase orders, it is recommended that the user utilize the auto-numbering system to track order numbers. The auto-numbering obviates the need for separate log books for each buyer, and trying to find the book when the buyer is not available. PO Receiver Number Each time a shipment is received against a purchase order, it is assigned a tracking number to identify the specific receipt against the order, and to reconcile the accounts payable. The user may do this manually, or the user may have ManEx assign these numbers, releasing the user from having to maintain a separate log. Discrepant Material Return Numbers Discrepant Material Return Numbers track shipments when items previously purchased are returned to the supplier. The user may do this manually, or the user may have ManEx assign these numbers, releasing the user from having to maintain a separate log. Discrepant Material Return Packing List Numbers When the shipping department is ready to make a shipment, they must create a packing list to go with the shipment, and to record in ManEx the details of the shipment. These too, must have a control number assigned at the time the packing list is created. The user may do this manually, or the user may have ManEx assign these numbers, releasing the user from having to maintain a separate log.
Debit Memo Numbers Debit memos against a Supplier’s invoice are created in accounting or via a DMR return shipment, and also require control numbers. The user may do this manually, or the user may have ManEx assign these numbers, releasing the user from having to maintain a separate log. Corrective Action Request Numbers If the user is using the CAR module, whenever the user issues a corrective action request, the ManEx program requires the assignment of a tracking number in order to report on the progress and resolution of the findings. The user may do this manually, or the user may have ManEx assign these numbers, releasing the user from having to maintain a separate log. Calibration Numbers Calibration numbers are used to assign control numbers to specific equipment and tooling. If the user is using the Calibration and Maintenance module, these control numbers are provided to identify equipment and tooling that need regular maintenance or calibration. In a manual mode, the user may choose to use asset numbers (if available). Otherwise, ManEx can automatically assign numbers to each piece of equipment or tooling as it is entered into the ManEx database. (The user may wish to use these numbers as asset numbers for their equipment). ECO Numbers If the user has the Engineering Change Order module, whenever the user ADDs and Saves a new ECO, the ManEx program requires the assignment of a tracking and control number. The user may do this manually, or the user may have ManEx assign these numbers, releasing the user from having to maintain a separate log. Project Numbers If the user has a system which tracks project numbers, when the user sets up a NEW Project, there is a requirement of a new unique number.The user may do this manually, or the user may have ManEx assign these numbers, releasing the user from having to maintain a separate log. |
| 1.2.4. How To ..... for Number System |
| 1.2.4.1. Setup the Number System | ||
The following screen will appear;
To modify this screen, the user must click on the Edit button and supply the password. That action will enable the screen, and the user then chooses which option to apply by clicking on the radial indicating either "Auto" or "Manual" selection of the number type.
If the user wishes to start the number sequence for a number type at a number other than the one shown, the user types in the new starting number. The user must NOT enter a number below a number already existing. If "Auto" numbering is chosen, the user will need to enter the starting number in the space provided on the right side of the form (starting number.) If no starting number is entered, the system will automatically start assigning numbers with number one. ManEx will automatically assign the next available sequential number (with no revision) when adding a new record in a selected module, user may at this time enter a revision if applicable. Once the "Next" number is selected, the counter moves to the succeeding number, if the abandon changes button is depress that number will be considered as used and will be skipped even though the record was never saved. If "Manual" mode is chosen, the user will need to maintain a manual numbering sequence log and manually enter the number when adding a new record in a selected module. It is not necessary to fill in the starting number field when using manual mode. In the manual mode, the user may combine alpha and numeric characters up to the length of the field.
If the user wishes to begin with manual assignment of tracking numbers, it is recommended that they begin with an alpha character imbedded in the numbers. When the user decides to change to automatic number assignment, there will be no possibility of duplicate numbers, because all of the auto-numbering systems use numbers only. It may be appropriate for the user to enter the last number used in a manual system as the starting number for auto-numbering in the ManEx setup. "Mark as Completed RoadMap Section B Item 1-a"
Where Used: All activities that issue control numbers. |
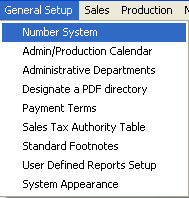
| 1.3. Administrative and Production Calendar |
| 1.3.1. Prerequisites for Administrator Production Calendar |
|
Complete the attached worksheet and "Mark as Completed RoadMap Section B Item 1-b" before continuing the setup. User MUST have full rights to the "System Setup" in System Security . Users with “Supervisor Rights” will automatically have access. |
| 1.3.2. Introduction for Administrative Production System Calendar |
Administrative and Production calendar sections consist of three parts. They are: Company Holiday setup, Work Days setup, and
ManEx recommends that the user maintain a minimum of at least two years of calendar data ahead of the current date. If the user places a purchase order a year in advance and the generated calendar range is not enough to cover the range, then the system will generate an incorrect schedule. Likewise, the user should have at least six months in the past, otherwise any MRP actions that show up as being required beyond that date will provide erroneous information. However ManEx recommends that the user does NOT setup an extensive amount of calendar years. Having extensive calendars (both accounting and production) will slow down operations in each. More specifically, MRP has to determine from the production calendar all of the possible dates necessary for production schedules. With larger files, it takes a little longer to find the target information. In accounting, each time they post and close, accounting makes a record for every account, for every period in the accounting calendar. So the fewer periods set up, the faster the process of updating the accounting records. |
| 1.3.3. Fields & Definitions for Administrative Production System Calendar |
WORK DAYS This section is to tell the system how many standard work days are available each week (exclusive of holidays) for all functioning operations. All computations for deliveries, action dates and resource availability are based on this information. The user simply indicates YES if the weekday is to be a regularly scheduled workday. CALENDAR DATE RANGES This section is to provide beginning and ending dates for generating a ManEx production calendar. This calendar will be used throughout the ManEx system. Date ranges chosen create files with which to associate activities. The larger the date range, the bigger the file record, and this will influence slightly the response time when ManEx is in the process of determining projected dates. As an absolute minimum, the range should exceed all open sales orders, work orders and purchase orders. The last calendar date should be at least two years from the current calendar year. It may take several minutes for the ManEx system to setup calendar date ranges when entered in the system. COMPANY HOLIDAYS This information is used by the system to disregard holidays when scheduling deliveries and action items. If the user enters NO holidays, then every day identified as a weekly workday will be assumed as available for scheduling actions. The user can enter the holiday for one or multiple years in advance.If the user enters holidays for one year at a time, then be sure to update the holiday list well in advance of the longest lead-times or future scheduling will not consider holidays. Enter the day the holiday that is observed not the actual holiday date. (For example, if July 4th occurred on Sunday, but the operations were to be closed on Monday, then the date entered should be July 5th, to account for the absence of resources available to do the work. On the attached file provided below enter the name of the holiday, two-digit month, two-digit day and four-digit year.
|
| 1.3.4. How To ..... for Administrative Production Calendar System |
| 1.3.4.1. Setup the Admin/Production Calendar | ||
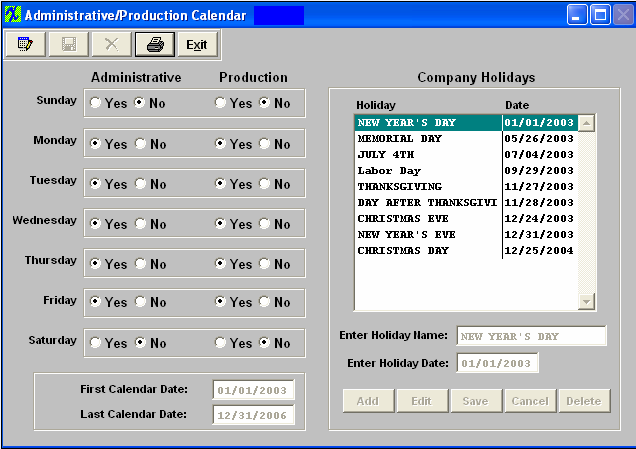
The following screen wiil appear:
To modify this screen, the user must click on the Edit button and supply the password. That action will enable the screen. WORK DAYS The user determines which weekdays will be considered as available for resources, and clicks on the YES button. If a weekday will not be available, click on the NO button.
CALENDAR DATE RANGES The user enters the first and last calendar dates for the system, in the format MM/DD/YYYY (for example 04/01/1999)
COMPANY HOLIDAYS
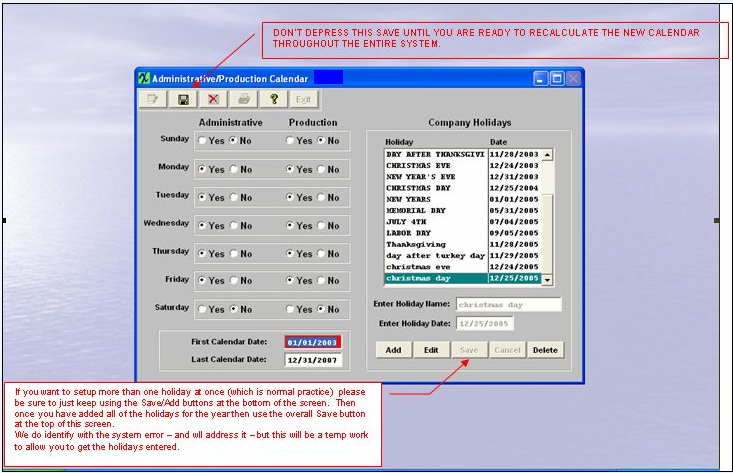
The user may Add, Edit or Delete holidays by using the buttons in the lower right hand corner. Pressing the ADD button opens the data entry fields for name and date. Entering the holiday name and the date in the MM/DD/YYYY format sets up a new holiday. Pressing the SAVE button adds the holiday to the list. Selecting a specific holiday and pressing the DELETE button will delete an already scheduled holiday. Selecting a specific holiday and pressing the EDIT button will allow the user to modify the information pertaining to the holiday.
Note: User should go through and add ALL Holidays for the next year using the buttons in the lower right hand corner before depressing the Overall Save button at the top of the screen. When the overall Save button is depressed it prompts the system to go through and re-calculate the calendar setting system wide.
 Where Used: All activities that consider available work days.
|
| 1.4. Administrative Departments |
| 1.4.1. Prerequisites for Administrative Departments |
Complete the attached worksheet and "Mark as Completed RoadMap Section B Item 1-c" before continuing the setup. User MUST have full rights to the "System Setup" in System Security . Users with “Supervisor Rights” will automatically have access. |
| 1.4.2. Introduction for Administrative Departments |
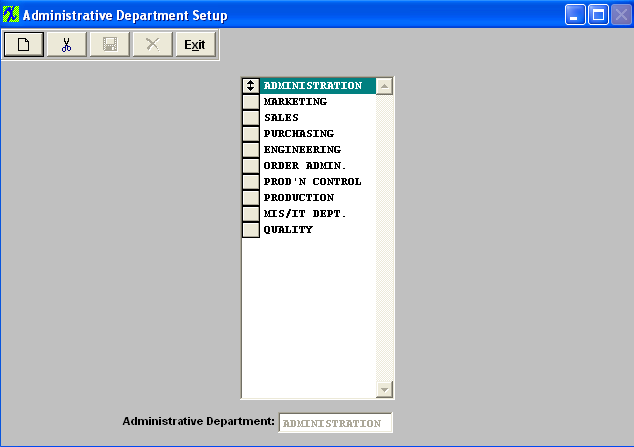
This screen is used to establish the different administrative departments within the company. |
| 1.4.3. Fields & Definitions for Admin Departments Module |
The ManEx System will use this information as a means for traceability. Do not use this screen for entering Production Department or Work Centers. Production departments are set up in the Production Work Centers & Activities setup. This information is used when setting up user access level in the System Security setup, and for tracking expenses against a department. The user may enter as many departments as desired. |
| 1.4.4. How To ..... for Administrative Department |
| 1.4.4.1. Setup the Adminstrative Departments | ||
|
The following screen will appear:
To modify this screen, the user must click on the Add or Delete button and supply the password. That action will enable the screen. The user may either add or delete department names to the list. After adding or deleting a department name, the user must Save or Abandon changes.
These items may be rearranged in any order by clicking on and dragging the box to the left side to the (vertical) position desired. This order will be the order the user sees when using this list in other modules within the system. Suggestion: Have the one most used at the top of the list. Where Used: When assigning non-production users to an administrative department, and in establishing accounts for the departments. «Mark as Completed in RoadMap Section B Item 1-c» |
| 1.5. Designate a PDF directory |
| 1.5.1. Prerequisites for Designate a PDF Directory |
User MUST have full rights to the "System Setup" in System Security . Users with “Supervisor Rights” will automatically have access. |
| 1.5.2. Introduction to Designate a PDF Directory |
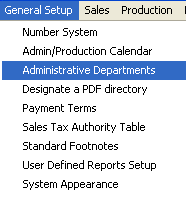
| This is the current default location for files generated from the pdf option. |
| 1.5.3. Fields & Definitions for Designate a PDF Directory |
 |
| 1.6. Payment Terms |
| 1.6.1. Prerequisites for Payment Terms |
Complete the attached worksheet and "Mark as Completed RoadMap Section B Item 1-e" before continuing the setup.
User MUST have full rights to the "System Setup" in System Security . Users with “Supervisor Rights” will automatically have access.
|
| 1.6.2. Introduction for Payment Terms |
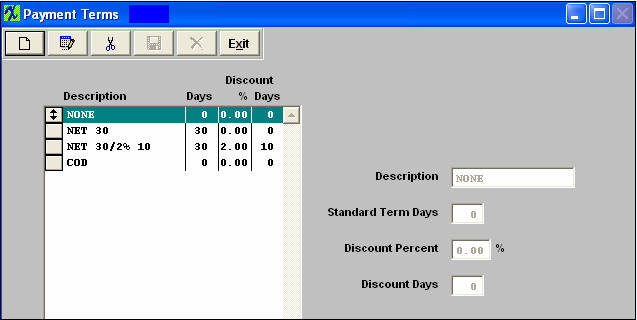
This is where the user sets up Payment Terms (used in Customer Information, Sales Order, Quotation, Invoicing, Supplier Information, Purchase Order and Accounts Payable). The description is a free text field to describe the payment terms as the user wishes to see it, i.e.: 2% 10 Days, N30 etc. This is provided for the user to select payment terms based on the description. |
| 1.6.3. Fields & Definitions for Payment Terms | ||||||||
|
In the example Net 30/2% 10, if the buyer pays the invoice within ten days of the invoice date, they are entitled to take a two percent (2%) discount on the amount of the invoice. After the ten days have passed, the buyer has up to thirty days from the date of the invoice to pay. Payments made after that time may be charged other fees.
|
| 1.6.4. How To ..... Payment Terms |
| 1.6.4.1. Setup Payment Terms | ||
|
The following screen will appear:
To modify this screen, the user must click on the Add, Edit, or Delete button and supply the password. That action will enable the screen. Pressing the Add button will enable the data entry boxes at the left of the screen for the user to enter new data. Selecting an existing Payment Term and pressing the Edit button will bring the selected information to the data entry box to be modified. Selecting an existing Payment Term and pressing the Delete button will remove the selected information. The user enters in the Description, standard days, discount (as a percent) and discount days. These items may be rearranged in any order by clicking on and dragging the box to the left side to the (vertical) position desired. This order will be the order the user sees when using this list in other modules within the system. Suggestion: Have the one most used at the top of the list. Where Used: In the Customer Setup, Sales Orders, Packing Lists, Invoicing, Supplier Setup, and Accounting.
«Mark as Completed in RoadMap Section B Item 1-e» |
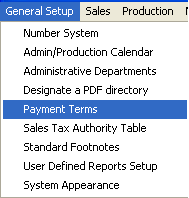
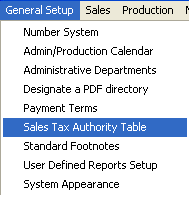
| 1.7. Sales Tax Authority Table |
| 1.7.1. Prerequisites for Sales Tax Authority Table |
|
Complete the attached worksheet and "Mark as Completed RoadMap Section B Item 1-f" before continuing the setup. If Accounting is used, the appropriate General Ledger numbers must have been set up in the Accounting Set Up section.
User MUST have full rights to the "System Setup" in System Security . Users with “Supervisor Rights” will automatically have access. |
| 1.7.2. Introduction for Sales Tax Authority Table |
This is where the user must enter all sales tax information. The tax ID, Tax Authority description, and rates for various city, county, state, province, etc. are entered. This information is used in Customer Shipping Information and Material Receiving Location default tables. This default setting assigned to each shipping address for each customer will be entered in orders automatically when a new order is added, if the Tax Box is checked. The tax ID is also associated with the user’s Bill-to / Ship to address for purchases, and added to taxable items on a purchase order. The default information in the invoice and purchase order can be modified during the entry process for a new order. This section may not apply to states that do not have local or state sales tax or states with manufacturing local & state sales exemption.
The user may also define the GL accounts to be used for taxes in this section, if the accounting module is active. |
| 1.7.3. Fields & Definitions for Sales Tax Authority Table |
| 1.7.3.1. US Sales Tax | ||||||||||
|
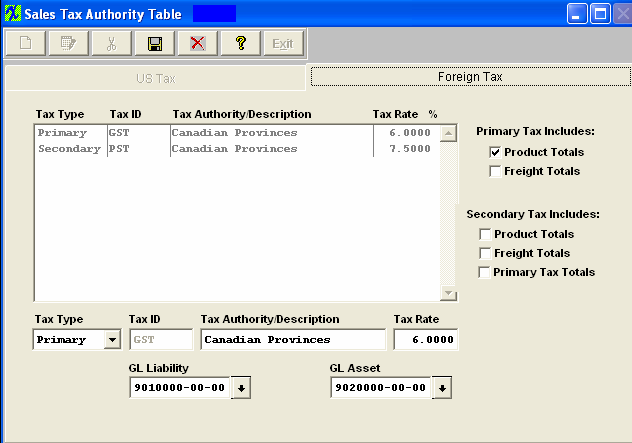
| 1.7.3.2. Foreign Tax | ||||||||||||||||
|
| 1.7.4. How To ..... for Sales Tax Authority Table |
| 1.7.4.1. Setup the US Sales Tax | ||
|
The following screen will appear:
To modify this screen, the user must click on the Add, Edit, or Delete button and supply the password. That action will enable the screen. Pressing the Add button will enable the data entry boxes at the bottom of the screen for the user to enter new data. Selecting an existing Tax ID and pressing the Edit button will bring the selected information to the data entry box to be modified. Selecting an existing Tax ID and pressing the Delete button will remove the selected information. The user enters in the Tax ID, Description, Rate, the GL Liability Account and the GL Asset Account. Pressing on the down-arrow keys will display the GL account numbers, if the user is using the accounting module. The user must Save or Abandon changes when finished adding or editing screen. Where Used: In the Customer Setup, Sales Orders, Packing Lists, Invoicing, Purchase Setup Receiving and Billing Information, and Accounting.
«Mark as Completed in RoadMap Section B Item 1-f» |
| 1.7.4.2. Setup the Foreign Sales Tax | ||
|
The following screen will appear: 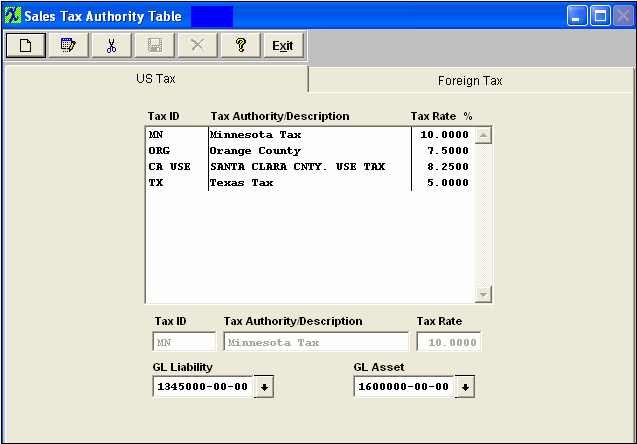 Depress the Foreign Tax tab
To modify this screen, the user must click on the Add, Edit, or Delete button and supply the password. That action will enable the screen. Pressing the Add button will enable the data entry boxes at the bottom of the screen for the user to enter new data. Selecting an existing Tax ID and pressing the Edit button will bring the selected information to the data entry box to be modified. Selecting an existing Tax ID and pressing the Delete button will remove the selected information. The user selects the Tax Type from the pull down, enters in the Tax ID, Description, Rate, the GL Liability Account and the GL Asset Account. Pressing on the down-arrow keys will display the GL account numbers, if the user is using the accounting module.
If user selects "Primary" tax type, this tax will be calculated first, the calculation will be based on what user checks for Primary Tax to include Product Totals, and/or Freight Totals. If user selects "Secondary" tax type, this tax will be calculated after primary tax, and the calculation will be based on what boxes are checked, Product Totals, and/or Freight Totals, and/or Primary Tax Totals. If user checks "Primary Tax Totals", the tax calculated will be based on only the "Primary Tax Total". The user must Save or Abandon changes when finished adding or editing screen. For examples see the "Foreign Tax Examples.xlsx" or the "canadian provice vats.xls" attached.
Where Used: In the Customer Setup, Sales Orders, Packing Lists, Invoicing, Purchase Setup Receiving and Billing Information, and Accounting.
«Mark as Completed in RoadMap Section B Item 1-f» |
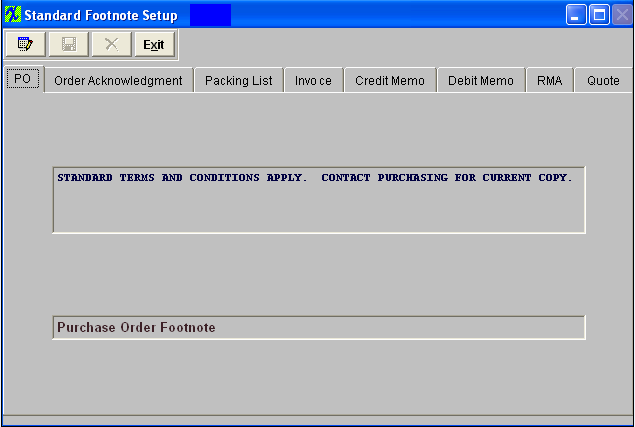
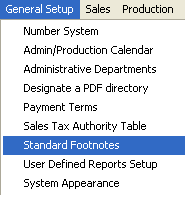
| 1.8. Standard Foot Notes |
| 1.8.1. Prerequisites for Standard Footnotes |
Complete the attached worksheet and "Mark as Completed RoadMap Section B Item 1-g" before continuing the setup.
User MUST have full rights to the "System Setup" in System Security . Users with “Supervisor Rights” will automatically have access. |
| 1.8.2. Introduction for Standard Footnotes |
The foot note section is used to set up standard system level messages that will print on the foot note section of the various type of forms. Whenever any of the forms listed are printed, the setup message will automatically appear on the foot note section of the form. Enter messages in the space provided. Sample verbiage provided is for reference only, and is not intended to be a suggestion for the user to adopt for their own use. |
| 1.8.3. Fields & Definitions for Standard Footnotes |
The foot note section is used to set up standard system level messages that will print on the foot note section of the various type of forms listed below. Whenever any of the forms listed below are printed, the setup message will automatically appear on the foot note section of the form. Enter messages in the space provided. Sample verbiage provided is for reference only, and is not intended to be a suggestion for the user to adopt for their own use.
|
| 1.8.4. How To ..... for Standard Footnotes |
| 1.8.4.1. Setup Standard Footnotes | ||
|
The following screen will appear:
To modify this screen, the user must click on the Edit button and supply the password. That action will enable the screen. This will allow the user to click on the tabs for the documents displayed. The user may enter text in each of these screens, but the text will be limited to the amount of space reserved on each of the documents for such notes. The user must Save or Abandon changes after entering the Edit mode.
Where Used: In ALL documents named on the screen.
«Mark as Completed in RoadMap Section B Item 1-g» |
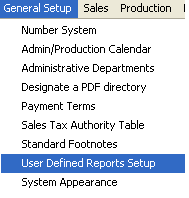
| 1.9. User Defined Reports Setup |
| 1.9.1. Prerequisites for User Defined Reports Setup |
A Crystal Report Interface is available. This function allows the user to view any custom Crystal Report that has been compiled into an Executable and loaded into the "User Defined Report Setup" screen. WITHOUT having to have any Crystal Report software loaded on this machine.
To view the Custom Crystal Reports once they have been linked in ManEx user must have the VFPODBC Drivers installed. For further detail on how to install these drivers see Article #3072 .
We are currently using CR XI Developer, but our new Library files should work with previous versions. You no longer need to compile your reports using Crystal Reports Designer software. You can now attach your Crystal Report in the User Defined Reports Setup and run them in ManEx. PRECAUTIONS WHEN USING CRYSTAL REPORTS AND CRYSTAL REPORT DESIGNER WITH THE MANEX DATABASE ManEx does not provide training on the use of Crystal Reports software. It is not our product. To arrange for training, call Seagate Software at 1-800-877-2340. If you do not have anyone on your staff who can do the reports and you want an outside designer, there are independent software consultants who do this type of work. In the Silicon Valley area, one of these consultants is Wisdom Technology. The number is 408-997-7165. The contact’s name is Bob Shatzer. ManEx can provide you or your designer with the database information for the reports you are trying to create. We will charge you phone support hours your company purchased for the time we spend. Complete the attached worksheet and "Mark as Completed RoadMap Section B Item 1-h" before continuing the setup.
Rights to "System Setup" in the System Security module. Users with "Supervisor Rights" will automatically have access.
|
| 1.9.2. Introduction for User Defined Reports Setup |
This module will allow each end workstation the ability to view any customer Crystal Report that has been compiled into an Executable and loaded into the "User Defined Report Setup" screen. ManEx includes the Crystal Reports viewer so custom reports created in Crystal Reports can be controlled and distributed through the software, WITHOUT having to have any Crystal Report software loaded on that machine. ManEx has several Crystal Reports available that allow users to modify the report according to their needs. These reports can provide completion percentage information, AVL availability, and production notes.
See Article #3160 for some Possible Custom Report Query's.
|
| 1.9.3. Fields & Definitions for User Defined Reports Setup |
|
1. Crystal Reports must NOT be designed using "live" MANEX DBFS tables. Data will be corrupted in MANEX if any of the tables used for the design are accessed and changed while the design is in progress. To use Crystal Report Designer, create a copy of the DBFS and use the copy to design the report. 2. MANEX has no reason to believe that running a previously designed Crystal Report using live MANEX files will cause any problems. It does not matter if the report was designed using Crystal Report Designer or written as a custom executable.3. However, when using Crystal Report Designer or running a pre-existing Crystal Report, the user's workstation should be using "absolute" NOT "relative" paths to the DBFS files in use (ie. X:\Manex\DBFS\xyz.dbf NOT \\Manex\DBFS\xyz.dbf), where “X” is the absolute drive letter. Therefore, workstations setup with shortcuts to MANEX using relative addressing (for security reasons*) shouldn't be used to run Crystal Reports.
* Normally MANEX suggests that users use the MANEX shortcuts with relative addressing (not mapped to the server) to keep users from accessing the MANEX Server files in Windows Explorer. 4. If you accidentally corrupt the MANEX DBFS files using Crystal Report Designer or relative addressing, get all users off of MANEX and reindex TWICE. The first time clears the incorrect End of File table and the second time writes a corrected index. So in conclusion, as long as you don't design on the live database and you use "absolute" mapping to the server, using Crystal Reports to look at the live data after the report is designed should not be a problem.
|
| 1.9.4. How To ..... for User Defined Reports Setup |
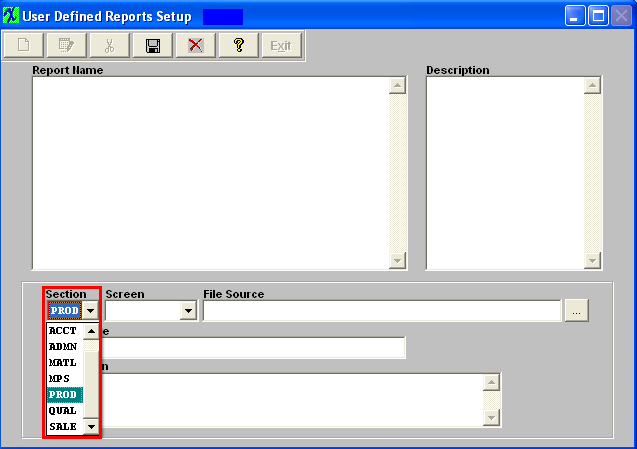
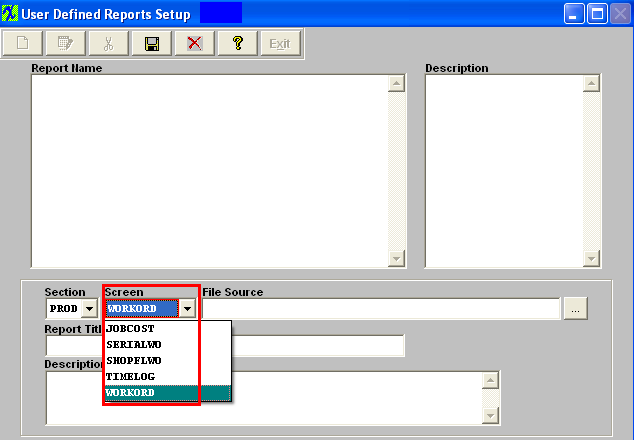
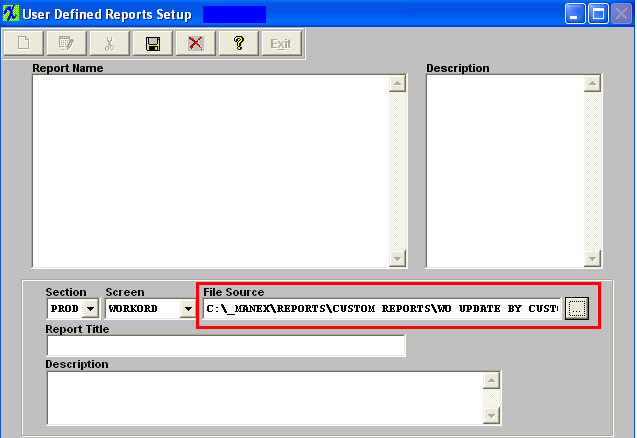
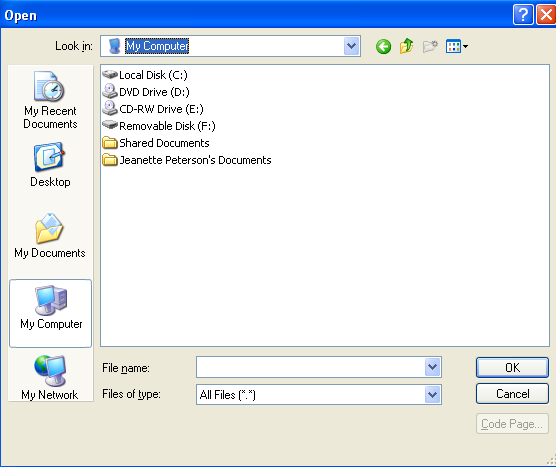
| 1.9.4.1. Setup the User Defined Reports | |||||||||||||||||||||
|
The following screen will appear:
When you visit the applicable module, the report you created will appear in the Reports Selection window, as illustrated:
1. Crystal Reports must not be designed using "live" ManEx DBFS tables. Data will be corrupted in ManEx if the any of the tables used for the design are accessed and changed while the design is in progress. To use Crystal Report Designer, create a copy of the DBFS and use the copy to design the report.
3. However, when using Crystal Report Designer or running a pre-existing Crystal Report, the user's workstation should be using "absolute" not "relative" paths to the DBFS files in use (ie. X:\Manex\DBFS\xyz.dbf NOT \\Manex\DBFS\xyz.dbf). Therefore, workstations setup with shortcuts to ManEx using relative addressing (for security reasons*) shouldn't be used to run Crystal Reports.
* Normally ManEx suggests that users use the ManEx shortcuts with relative addressing (not mapped to the server) to keep users from accessing the ManEx Server files in Windows Explorer. 4. If you accidentally corrupt the ManEx DBFS files using Crystal Report Designer or relative addressing, get all users off of ManEx and reindex TWICE. The first time clears the incorrect End of File table and the second time writes a corrected index.
So in conclusion, as long as you don't design on the live database and you use absolute mapping to the server, using Crystal Reports to look at the live data after the report is designed should not be a problem.
|
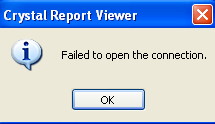
| 1.9.4.2. Setup the ODBC for Crystal Reports |
Check setting for an ODBC data source, which is usually found under:
Start > Programs > Administrative Tools> Data Sources(ODBC), or Start > Settings > Control Panel > Data Sources (ODBC). If you cannot find it under either of these locations you may want to go to the "Start" and do a search:
 To download and run the
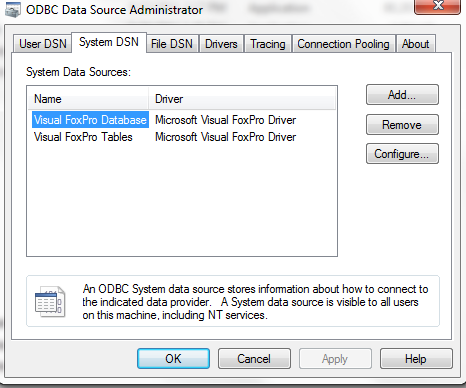
Enter the "System DSN" tab:
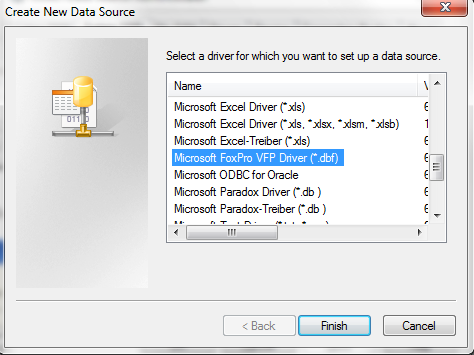
 Click “Add” and you will see the New Data Source wizard, select “Microsoft Visual FoxPro Driver”, and click “Finish”
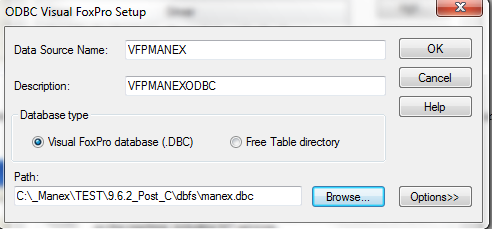
 ODBC Visual FoxPro Setup pops up. Enter a name and description. The Database type should be “Visual FoxPro database (.DBC), and you should select “Manex.DBC” in server Manex DBFS folder.
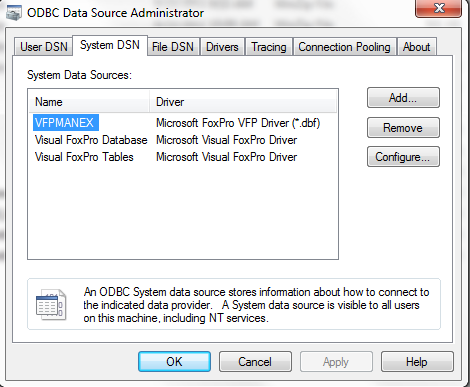
 Depress OK, the setup process is complete and the new file should display in the ODBC Data Source Administrator/System DSN.
|
| 1.9.4.3. Custom Crystal Reports Created by Manex |
The following Crystal Reports have been designed by ManEx. These Crystal Reports are 'AS IS" and any desired modifications would be up to the individuals. These are some examples on how we intended the CR's to report data.
|
| 1.9.4.3.1. WO Shortage Report |
Select the WO Shortage Report - the following screen will appear:
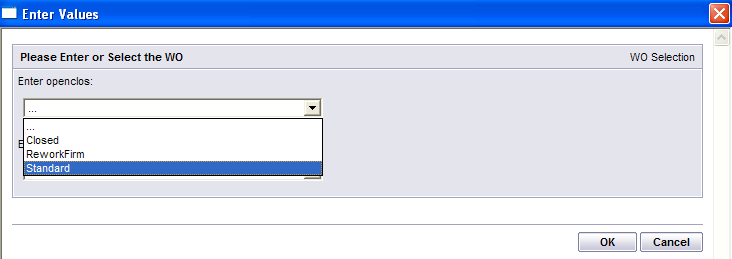
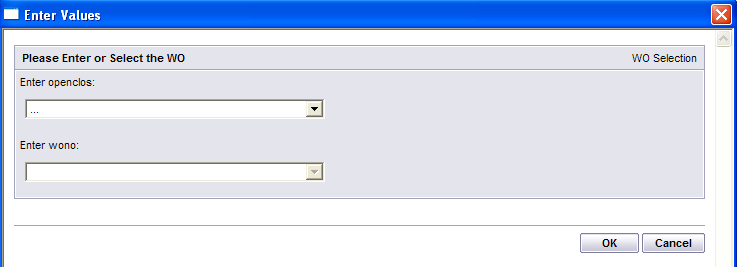 Select the WO Status - Closed, Rework Firm, or Standard
 Select the WO Number _ the Work Order Number and Product Number will appear:
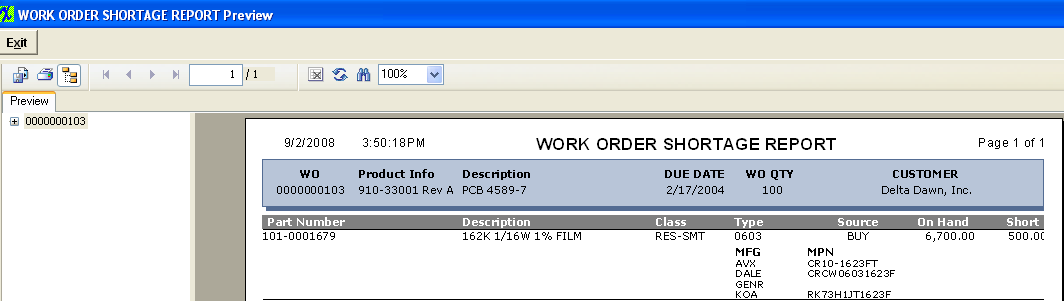
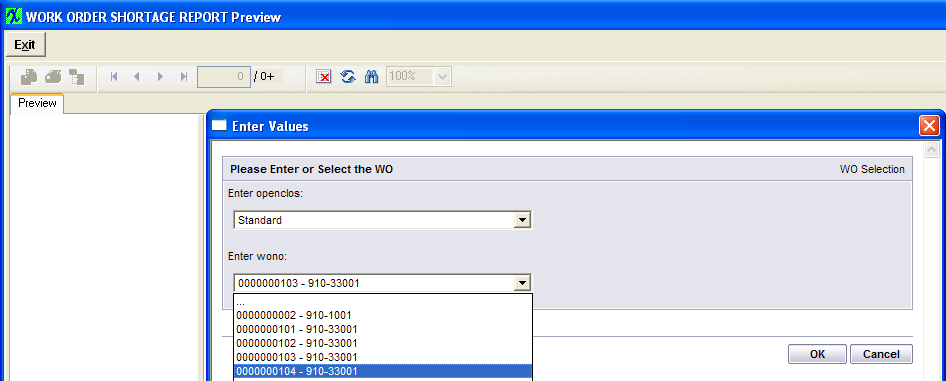 Depress OK and the following Report will be displayed:
 |
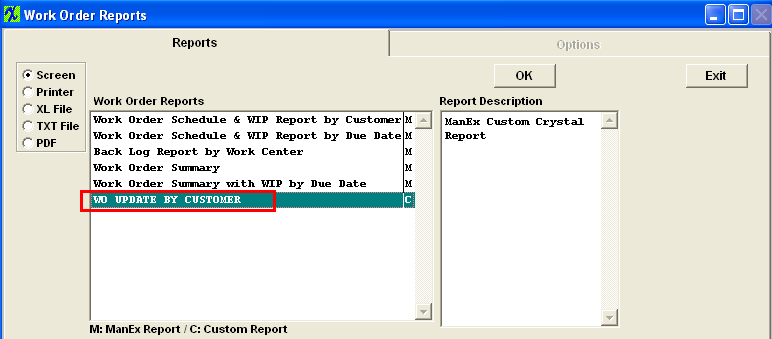
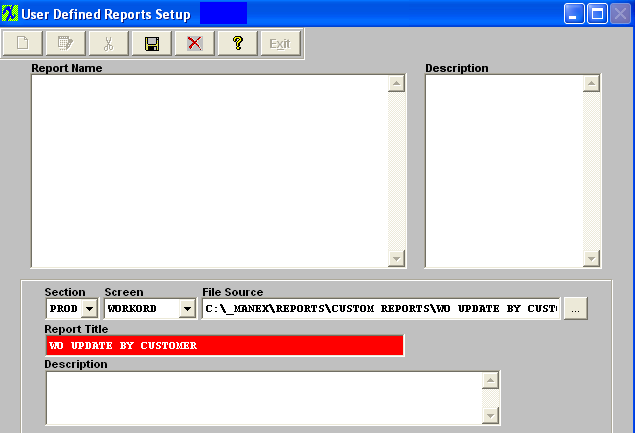
| 1.9.4.3.2. WO Update by Customer Report |
Select the WO Update by Customer Report - the following screen will appear;
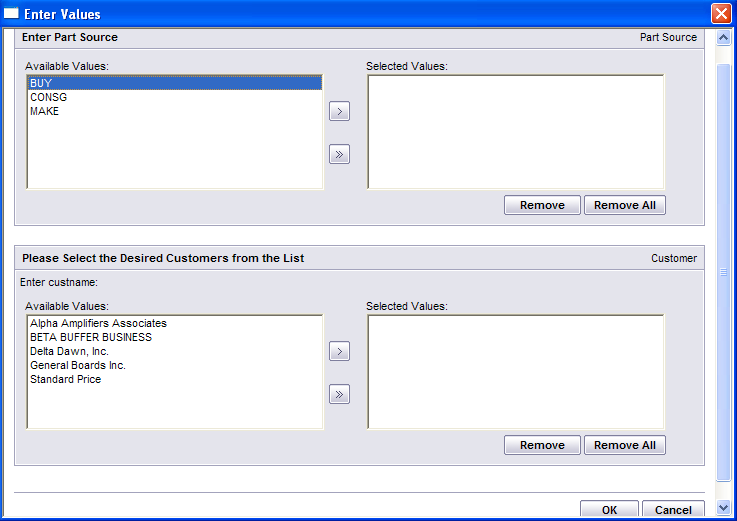 Select the Part Source and Customer by highlighting your selection and pressing the ">" to select all press the ">>"
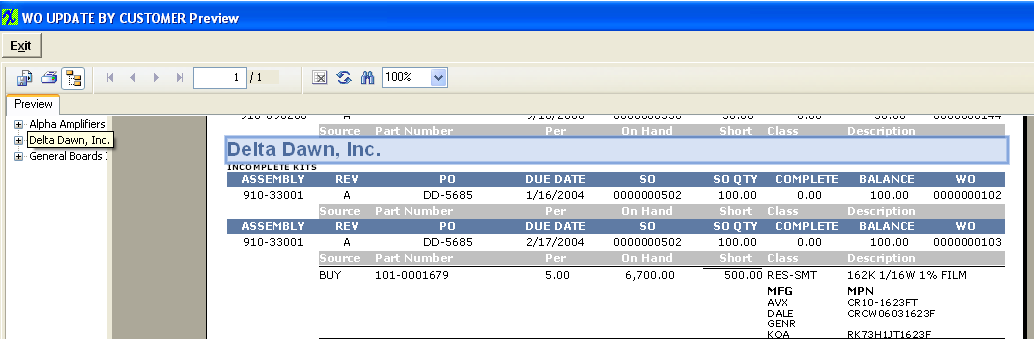
Depress OK and the followng Report will be displayed to the screen:
 |
| 1.9.4.3.3. WO Schedule & WIP by Customer Report |
Select the WO Schedule & WIP by Customer Report
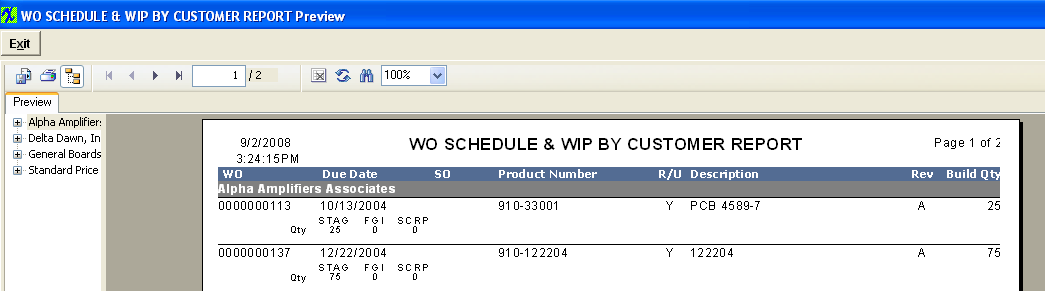
The first screen that will appear is the Enter Value Screen, select How you want to Orient the WO Status on the Shop Floor 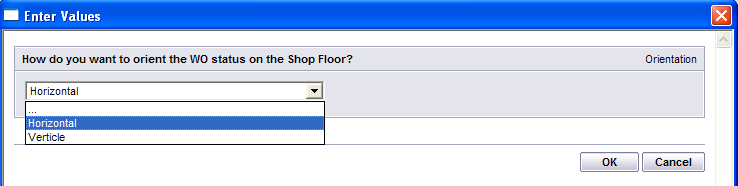 Select Horizontal and depress OK - the report will display the following information:
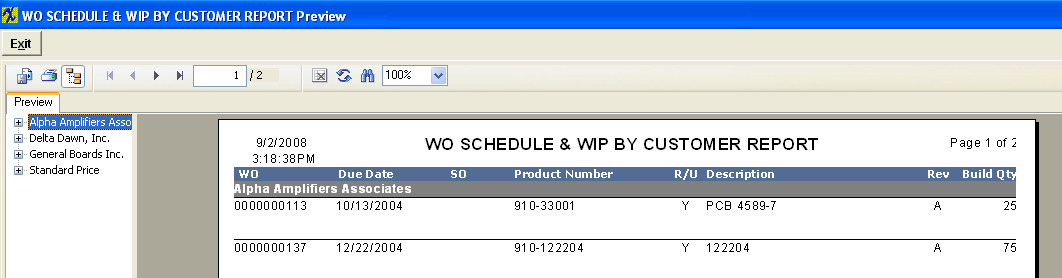
 Select Verticle and depress OK - the report will display the following information:
 |
| 1.10. System Appearance |
| 1.10.1. Prerequisites for System Appearance |
User MUST have full rights to the "System Setup" in System Security . Users with “Supervisor Rights” will automatically have access. |
| 1.10.2. Introduction for System Appearance |
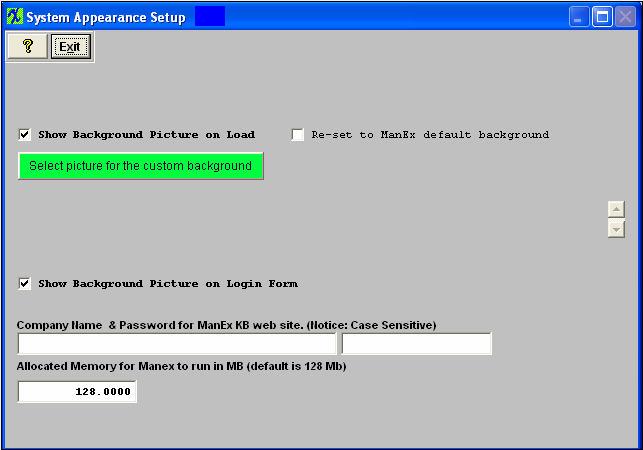
| This is to setup the System Appearance on screens. |
| 1.11. Wireless Interface to ManEx Development |
We are in the early stages of developing a wireless mobile interface to ManEx. This will allow users to access ManEx remotely from a Pocket PC through Terminal Services. Although it will work on any of the latest Pocket PCs, if the PDA is also a Bar-Code Scanner users will be able to quickly and simply enter and check information in ManEx. Initially, the sections we plan to integrate into the mobile ManEx module are: Inventory Receiving For a standard Pocket PC we have selected the Dell Axim X51 with WiFi. For an integrated bar-code scanner, we will have tested the Symbol MC9060. Any Pocket PC with Windows 2003+ and TS emulator should work, but we will complete our development and tests on these two devices. We are also finalizing the bar-code (BC) receiving process and are considering implementing the AIAG standard in the BC codes. I have confirmed with some vendors that they already meet this standard. This will make the receiving process much easier and faster. If you are aware of any of your suppliers who do not and cannot use this standard, please let us know (as this may impact how we proceed). For those who have never heard of this standard, it is simply placing a predefined character (or characters) in front of the provided data (i.e. K0000000012 = As this effort will require some time, we want to ensure we are developing to meet our customers’ needs. Please take a moment to consider the desirability and usefulness of this upgrade and let us know if any of the sections are not needed, or if any need to be added. |