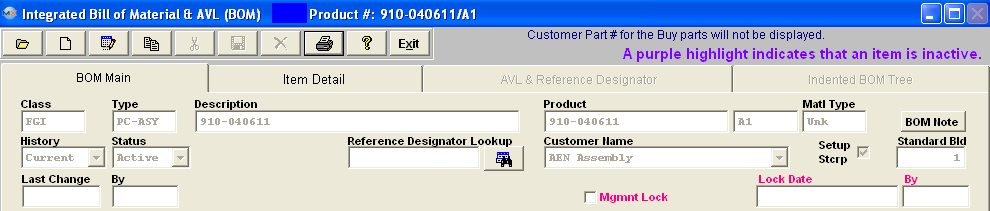
A BOM Header is created by the system when a Make Item is added to the Inventory Control Mgt Item Master and Saved. When the user wishes to create a BOM by adding Line Items to the header, the existing Header is used. The Header identifies the assembly or product and its revision level, shows the status and after creation, allows Viewing BOM components by Current, All, or Selected Effective Dates.
Depress the Find button. See Article #571 for Find procedures.
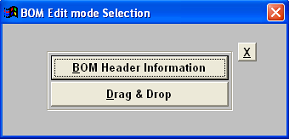
Depress the Edit button. Enter your password. The following selection screen will appear:
Select BOM Header Information button.
|
|
|
|
Select status from the drop down menu. When selecting the status, this status is for the BOM ONLY, it will NOT change the status of the Inventory part. The Inventory part status and BOM status can be different. This is to allow flexibility so the BOM can be inactive and will NOT be displayed in the BOM module, but the part will still be displayed in the inventory listing. User will be allowed to change the status on a BOM from Active to Inactive with open SO, WO, etc. and MRP will still show demands. User will also still be allowed to Create NEW SO, WO, etc if ONLY the BOM status is Inactive. Users will NOT be allowed to change the status on the Inventory part from Active to Inactive with open SO, WO, etc. |
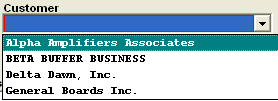 |
If there is a Customer associated with this product, select the customer by depressing on the down arrow next to the customer box. A list of customers will appear. Highlight the customer name and double click.
Assigning the customer name to the BOM is an option which you can elect to use or not as long as there is no consigned part. If you do not assign an assembly to a customer, this BOM can be used for any customer you want and not limited to a customer. Assigning to a customer is a requirement if you have any consigned part within the BOM. For the sales price, we allow you to add one or more customers in the Price List module and you can determine the quantity breaks and prices by each customer for the same assembly. When they are assigned in the Price List, SO module will show those assemblies only tied to the customer and avoids having to wade through all assemblies.
- If BOM is assigned to specific customer, and if there is CONSG part in the BOM -- Only that customer will be available in the WO customer list
- If BOM is assigned to specific customer, and no CONSG parts in the BOM -- Default to that customer, but all other customers are available to be selected.
- If BOM is not assigned to specific customer, all customer should be available.
|
To enter a BOM Note depress the BOM Note button. Depress the Edit button. Enter in the note. Depress the Save button. Depress the Exit button.
If you want set up scrap to be considered in Standard Cost calculation, check the Setup Stcrp box.
If you want a standard build to be considered in Standard Cost calculation, enter the quantity. See Article 2504 for information on how this affects the Std Cost.
To Lock or Unlock a BOM: Only Supervisors or users with Lock/Unlock rights within the Security/User rights can modify this checkbox. If locked, all users can access the screen, but only supervisors or those with Lock/Unlock rights will have the capability to bypass the lock and make changes, while the BOM is still in lock mode. The reason we do NOT force the user to unlock the BOM before making any changes, is to protect it from anyone else making changes while the 'authorized" user is making their changes.
When changes are complete depress the Save button to save the changes or Abandon changes button to delete changes.
|