When the user has displayed component parts on the BOM Main screen, and has highlighted one of the parts, pressing on the Item Detail Tab will display information about
that component part. The NEXT and PRIOR buttons are activated in the Detail Information Tabs. Clicking on either button will display the details of the next component in the BOM.
The first row of Header information repeats the assembly Product information.
The remaining fields describe Detail information about the component part.
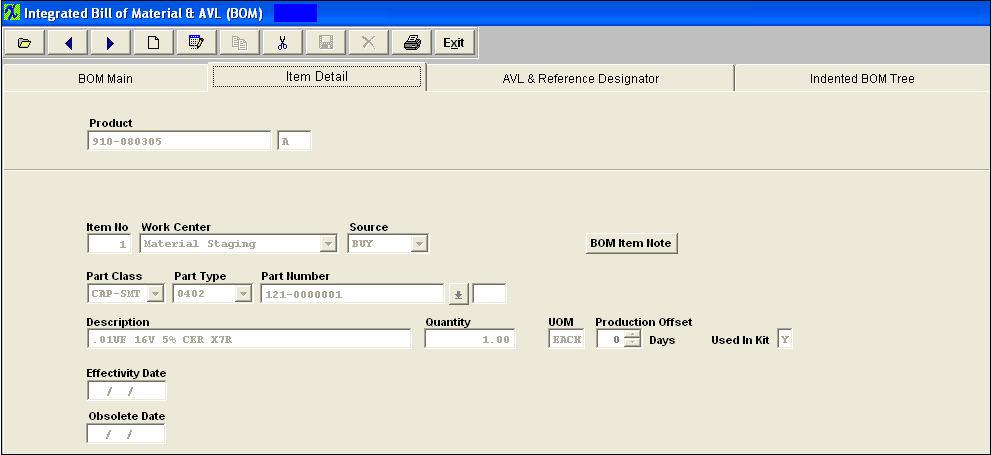
Item Detail Screen Fields
HEADER INFORMATION
| Product |
The Part Number of the assembly. Make Items are referred to as Products. |
| Rev |
The Revision of the assembly number, phantom or subassembly. |
COMPONENT INFORMATION
| Item No |
The item number assigned to the components in the BOM. |
| Work Center |
The work center identified in the routing for the assembly at which the part is needed. Kitting of the part by work center will use this information to determine which parts are to be kitted for each work center. |
| Source |
The Source Code for the component part on the BOM. May be another MAKE assembly, a PHANTOM assembly, a BUY part, or a CONSIGNED part.
When building a BOM in order to have the Source "CONSIGNED" displayed a Customer MUST be assigned to the BOM.
When building a BOM and you enter the source as a “Phantom”, then when entering the part number that is a “Make/Phantom”, the source changes to a Make” part. The reason the source field shows at all is to limit the number of part numbers that are available to choose from. But you can enter any valid part number and the source will change to the source of the part number entered. So, yes, the source of the sub-assemblies will show as a “Make” part, even though they are actually “Make/Phantom” parts. The details of the BOM will also show they are “Make/Phantoms”. We allow nested phantoms, of either the “PHANTOM” or the “Make/Phantom” variety. In kitting, we have the code to blow down through the first level of make/phantoms, so that the parts included in the first sub-assembly level down are listed as kit requirements. We have extended this further so that if there are Make/Phantom parts in the first sub-assembly level, those also break down to the components in the second sub-assembly level. This process extends as long as there are “Make/Phantoms” in the indented BOM.
|
| Part Class |
The Part Class of the component part. |
| Part Type |
The Part Type of the component part. |
| Part Number |
The component part number. |
| Rev |
The Revision number of the component. |
| Customer Part Number |
The number the customer uses to identify the part. |
| Rev |
The Revision number of the customer’s component. |
| Description |
The description of the component part. |
| Quantity |
The quantity of the component part used in the assembly. The maximum number of decimals in the BOM quantity is 2, allowing for 1/100th of an item. If users need a finer resolution, they may consider using a different UoM than EACH, and buy in one unit and use a fractional unit for inventory (e.g. Purchase in Gallons, and Stock/Issue in ounces). |
| UOM |
The stocking/kitting unit of measure for the part. |
| Production Offset |
Production offset is a BoM item level field that allows users to control delivery dates in relation to the starting date of the work order. By using this field, the user may move the material requirement date by the specified number of days in either direction. Enter the number of days after the start date (based on the production lead-time for the assembly) that the part is needed at the kit-to Work Center. NOTE: This will affect the MRP demands until the kit status has been changed to "KIT IN PROCESS". Once the kit status has been changed to "Kit in Process" the parts now become a kit shortage, and the system will calculate from the WO due date or production lead time and NOT from the production offset. . A Negative Offset is one that SUBTRACTS time from the normal kit required date. So an item normally due on March 26 would, with a -3 day offset, be due in the stockroom on March 21st . Conversely, a Positive Offset is one that ADDS time to the normal kitting time. So an item normally due on March 26 would, with a 3 day offset, be due in the stockroom on March 29th (skipping the weekend). Offsets are only managed by days, so there would never be a 3 week or 2 month offset, only 21 days or 60 days.
|
| Used in Kit |
"Y", "N", or "F" - Identifies the part if requires kitting from the storeroom. Typical Non-kitted items include chemicals and adhesives that are re-issued when they run low but are included on the BOM for costing or reference. Note: A non-kitted item will create MRP demands. For more information see Article #34. |
| Effectivity Date |
This is the date that the part is added and/or removed from the BOM and the demands will be displayed in MRP. MRP picks up all the records with an effective date earlier or equal to current date, and all NULL/BLANK effective dates. If the user changes parts in the BOM, without changing the revision of the BOM, then they should be entering the effectivity date of the new part, and the obsolete date of the old part. Usually, they are the same date for a replacement item. It is the date that is used in the determination of what material is to be used in kitting. If the kit is due to ship before the date(s), then the old definition will apply. If the kit is due to ship after the date(s), then the new definition will apply when the kit is updated. When printing BOMs, the information included will depend on the selection they want to see. Current will display whatever is effective on today’s date. History will display ALL items. Selected date will display the BOM as of the date entered. The old items will continue to show up on a where-used report. This is a good thing, because when you are trying to figure out where all of the old obsolete inventory came from, you can trace it back to the assembly and customer.
Note: The Kitted BOM Cost calculations displayed on the "Kit to Close Report" is based off the WO Due date and compares that to the EFF/OB dates on the BOM. So users need to be VERY careful with the WO Due Dates and make sure that they stay current along with the EFF/OB dates on the BOM.
|
| Obsolete Date |
The date the part is no longer required on the BOM for new work orders and the demands will NOT be displayed in MRP.
Note: The Kitted BOM Cost calculations displayed on the "Kit to Close Report" is based off the WO Due date and compares that to the EFF/OB dates on the BOM. So users need to be VERY careful with the WO Due Dates and make sure that they stay current along with the EFF/OB dates on the BOM.
|
DIRECTIVE BUTTON
The following button is displayed on the BOM Item Detail screen:
 |
Pressing the BOM Item Note button will allow the user to create a notation specific to the component shown, in the current BOM. To enter a note, depress the BOM Item Note button. Depress the edit button. Type in the note. Depress the Save button. Depress the Exit button. |
|