This header will be displayed throughout the WebManEx. For further detail on the header icons see Article #5292.
Depressing the "MX" icon
at the top left hand corner of the screen will list the ManEx modules available.
Depressing the "Magnifying Glass" Icon
at the top left hand corner of the screen will give the user all the
different option to find a record.
Depressing on the "Up Arrow" Icon
will give the user the opportunity to Change from "New" or "Reports".
Depressing on the "Bell" Icon will display a list of BOM Imports that have been started.
Depressing the "Clock" Icon
will allow you to clock into a Job or Work Order.
If you attempted to create a new import for the exact same assembly and rev that already exists in the Notifications. The following message will be displayed.
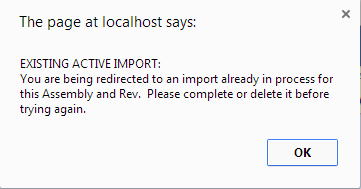
This is to prevent users from accidentally working on multiple versions of the same record and wondering why their last changes weren't sticking, we automatically redirect you to the existing active import. Once you transfer the bom, you can start a new one for the same bom. Or, you can change the part number or rev in order for it to be treated as a new import. Or, you can delete the current active record to start fresh.
NOTE: The import in process will NOT exist in the desktop. You must first transfer it in order to see the parts and changes. The "EXISTING ACTIVE IMPORT" is just an import that you can finish and transfer in order to see it in the desktop.

This header will display the Assembly/Rev.; Description; Customer; Part Class; Part Type; for the BOM Upload, along with the Date/Time the Upload was started and the initials of the user that started the upload.
This header has the following action icons:
Select the "Validate" button and the Validation screen will appear validating the information entered.

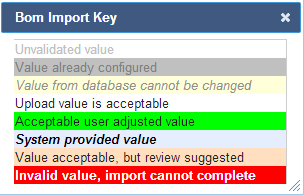
Note: During the Validated processes if the system finds errors these fields will be shaded in Red indicating that these fields have missing or incorrect information.
Select the "ShowKey" This screen will display what the field colors stand for:
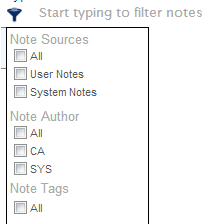
The Red Note Pad (to the right) will display notes pertaining to this BOM Import and allow user to add or edit the notes.
Depress the Filter in the left hand corner of the screen to change how the notes are being filtered:
Flag - on top left of note screen is to Flag the Note.
Clipboard - on top left of note screen is to copy Note to Clipboard.
Tag - on top left of note screen is to Add a Tag to Note.
Trash Can - on top right of note screen is to Delete Note.
Pencil - on top right of note screen is to Edit Note.
Plus Sign - on top right of note screen is to Add new Note.
The "Plus sign" on the top right of BOM Import header is to add a new item to BOM Import.
The "Import Parts" button on top right of BOM Import header is to import BOM to desktop.
The "Trash Can" on the top right of BOM Import header is to delete BOM Import completely.
| Itm # |
BOM Item Number |
| Used |
Used in kit, enter "Y" (used in kit), "N" (not used in kit), or "F" (Floor Stock) See Article #34 for further detail. |
| Source |
Component Source, enter "Make", "Buy", "Consg" or "Phantom" |
| Class |
Component Part Class |
| Type |
Component Part Type |
| Part Number |
Internal Component Part Number (New or Existing) |
| Rev |
Internal Component Revision Level |
| Description |
Part Description |
| qty |
Quantity of Component used in Parent Part |
| Cust Part No |
Customer Part Number (if applicable) |
| Cust Rev |
Customer Revision Level (if applicable) |
| UOM |
Stock/Usage Unit of Measure (each, feet, inches, ....) |
| WHS |
Warehouse/Location of component |
| Std Cost |
Standard Cost for Component |
| WC |
Work Center where Component is Used |
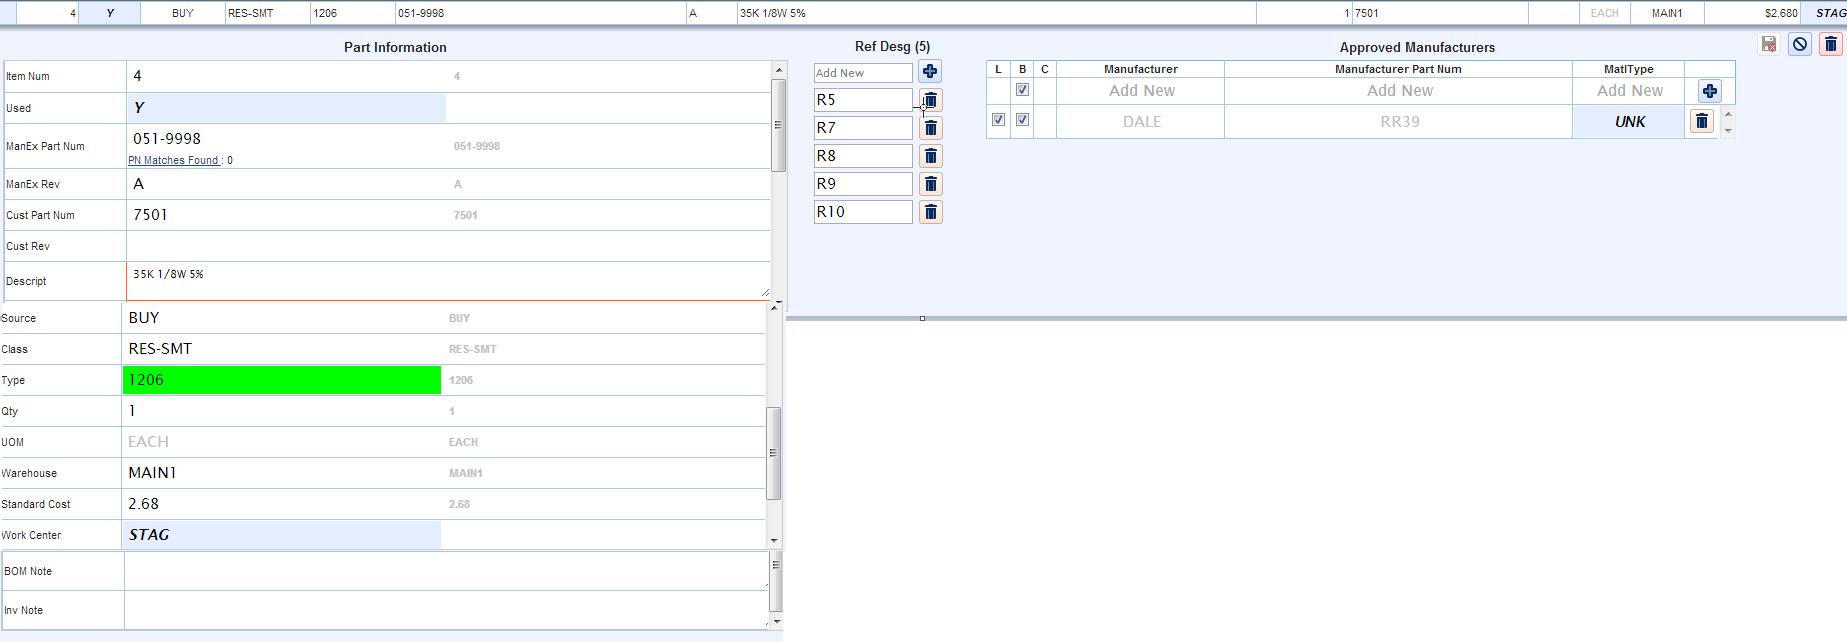
Part Information
| Item Num |
BOM Item Number |
| Used |
Used in kit, enter "Y" (used in kit), "N" (not used in kit), or "F" (Floor Stock) See Article #34 for further detail. |
| ManEx Part Num |
Internal Component Part Number (New or Existing) |
| ManEx Rev |
Internal Component Revision Level |
| Cust Part Num |
Customer Part Number (if applicable) |
| Cust Rev |
Customer Revision Level (if applicable) |
| Descript |
Part Description |
| Source |
Component Source, enter "Make", "Buy", "Consg" or "Phantom" |
| Class |
Component Part Class |
| Type |
Component Part Type |
| Qty |
Quantity of Component used in Parent Part |
| UOM |
Stock/Usage Unit of Measure (each, feet, inches, ....) |
| Warehouse |
Warehouse/Location of component |
| Standard Cost |
Standard Cost for Component |
| Work Center |
Work Center where Component is Used |
| BOM Note |
Note that pertains to BOM |
| Inv Note |
Note that pertains to Invoice |
Note: The data to the right in gray is the data that was imported originally.
Approved Manufacturers
| L |
Checking this box will add the AVL information to the part number |
| B |
Checking this box will add the AVL information to the BOM |
| C |
If this box is checked this means that it is connected to a Customer part number |
| Manufacturer |
Manufacturer Name |
| Manufacturer Part Num |
Manufacturer Part Number |
| MatlType |
Material Type |
|