|
Enter the SQLMANEX.EXE (within the ManEx root directory)
This action will then prompt the user for a password
|
 |
| The following screen will be displayed, select Production/Shop Floor Tracking by Bar Code |
 |
The following screen will be displayed:
User has the choice of Transfering product by "Single Serial No. Mode", "Batch Serial No. Mode" or "Manual Mode".
If "Single Serial No. Mode" or "Batch Serial No. Mode" is selected, when user enters a Work Order, they will receive the following message asking them to enter by Serial No., and the system will then populate the Work Order No. and Part Number and Rev. automatically.
If the first Serial Number entered has more than one Work Order associated the system will displayed a Work Order Selection screen as displayed below.
When in "Batch Serial No. Mode" - Once the user selects a Work Order all the SN's entered in that batch will use that Work Order No. to do the validation, instead of asking user to select the WO No. everytime. If the SN entered or scanned is NOT associated with that Work Order No., the system will not find it or add it to the list.
When using "Single Serial No. Mode" Once the user selects a Work Order, then enters the next SN, the system will use that Work Order No. to do the validation, instead of asking user to select the WO No. everytime. If the SN entered or scanned is NOT associated with the previous WO, then the WO Selection box will be presented to the user again.
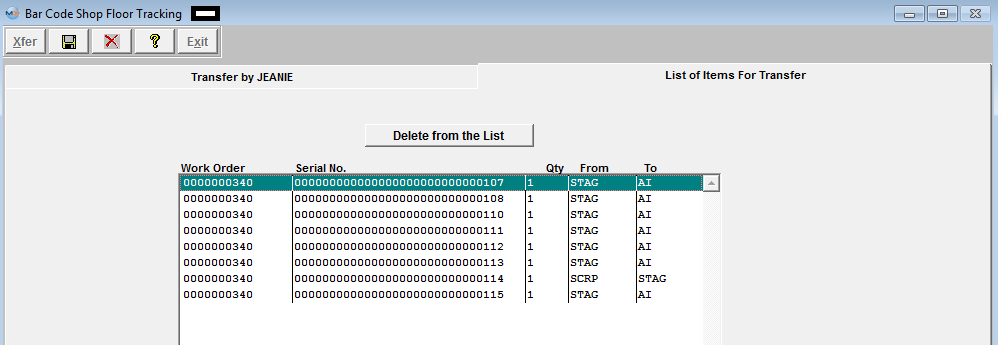
Once the Serial Numbers have been selected, go to the List of Items for Transfer screen.
The Work Order number, Serial No., Quantity, From Work Center and To Work Center or from Work Center to Activity will display, depending on the selection within SFT Defaults to Transfer by WC or Activity.

Depress the Save button.
The items will then be properly transferred within the system.
If the product is included in an active Cycle count, or Physical Inventory count, the following message will appear after depressing the OK button on the transfer screen and user will not be allowed to transfer product until the count has been completed and posted.
If the work station being used to transfer serialized material is assigned to use a default work center in Production Work Center/Activity Setup module, when the user first opens the module, the module will use the default work center assigned for this workstation, if the transfer is "FROM" a different work center other than the default and user is NOT a supervisor or has the option "Allow Changing Default Work Center for Serial Number Transfer" box checked within the Security module, they will receive the following message:

When user depresses "OK" a supervisor approval is required to continue. After supervisor’s password is entered, the default work center will be changed to the one that the supervisor entered password for. For example: the workstation is assigned to use “TU” as default work center, now if user chooses to use “AI” to transfer, the system will ask for supervisor’s password, if user cancels the password, the default work center will still be “TU”, but if the supervisor enters his/her password on this machine, the default work center will be changed to “AI”. If now the user tried to transfer from “TU” again, the system will ask for supervisor’s password again. If user exits the module and come back, the default work center will be “TU” again.
User also has option in single serial # mode to directly transfer all qty's to the Rework Work center using the directive button 
Please note when user transfers several serial numbers in one transaction, the following serial number transfers always take the same "TO'' work center from the previous serial number transfer. Therefore, if user changes the 'TO' work center to 'RWRK', the following transfer will all use -'RWRK' as 'TO' work center until user changes it again.
|