| How To Install SQL Server on Windows Server |
Please note this is reference to SERVER 2008 R2 and Windows Server 2008 R2. There may be slight differences in newer SQL Server version installations like 2012 and 2014 and Newer Windows Servers.
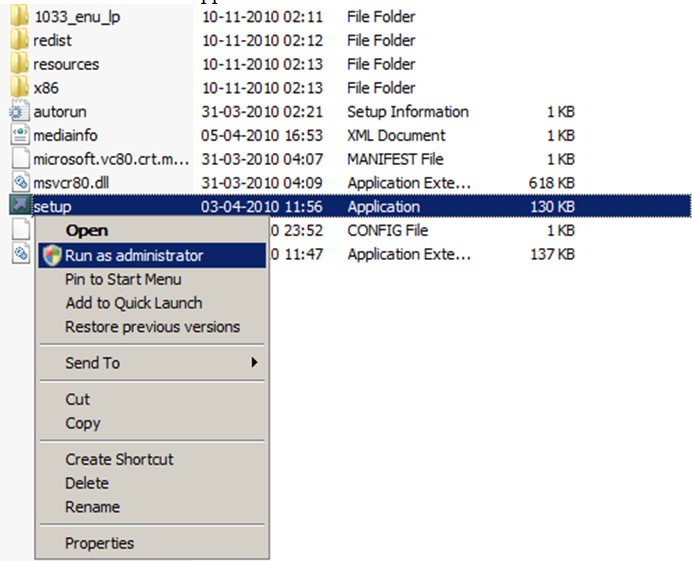
1. Database Administrator should log on to the server with administrative privileges and then right click Setup.EXE file and choose Run as administrator option from the drop down list as shown in the below snippet.
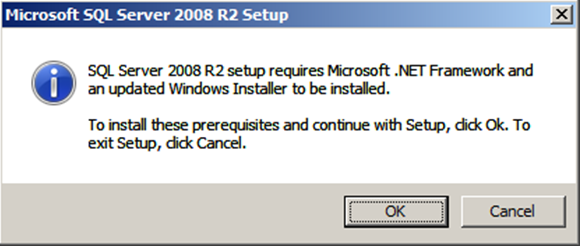
2. As a Prerequisite SQL Server 2008 R2 setup will require Microsoft .Net Framework 3.5 SP1 and the latest version of Windows Installer 4.5 to be installed. You can install the same by clicking the OK button.
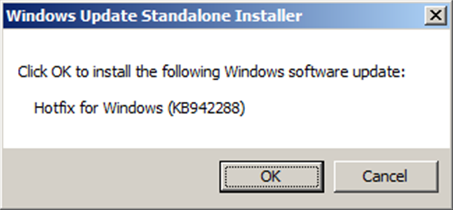
3. In Windows Update Standalone Installer popup, click OK button to install Windows Installer 4.5.
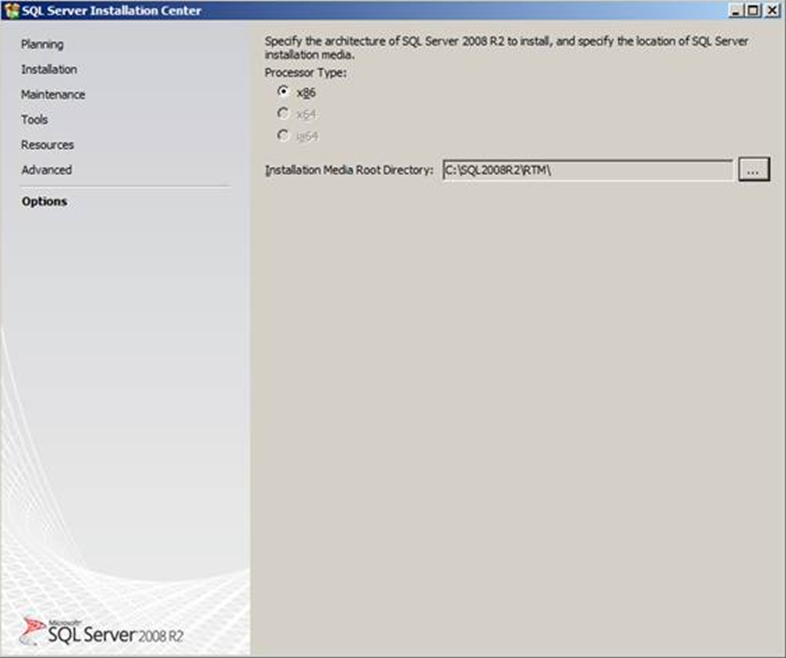
4. Once Windows Installer 4.5 is installed successfully the setup may ask you to restart the server. Once the server is up after the restart once again run the Setup.EXE file. This time setup will ask you to install .Net Framework 3.5 SP1 incase if it is not installed on the server. Once the installation of .Net Framework has completed successfully the SQL Server Installation Center will open up as shown in the snippet below. You need to navigate to the Options screen as shown in the snippet below to choose the appropriate Processor Type to specify the architecture of SQL Server 2008 R2 to be installed.
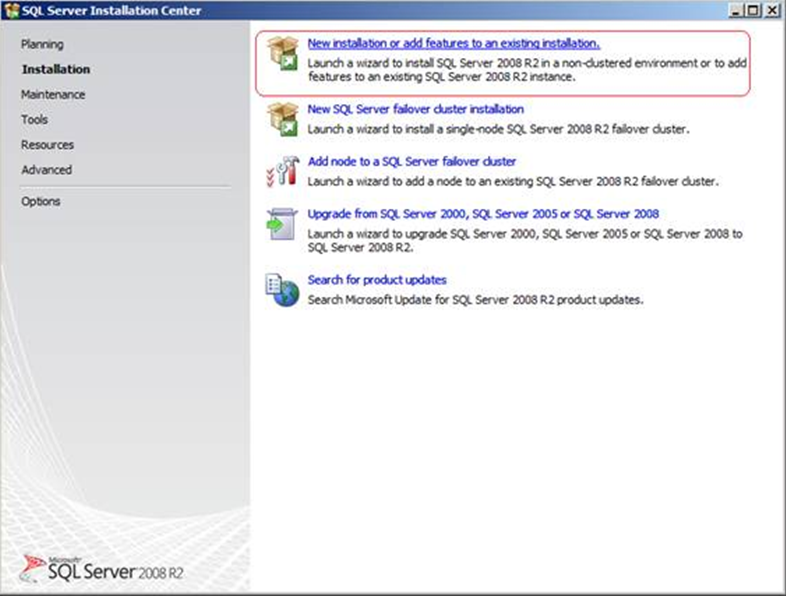
5. In SQL Server Installation Center’s Installation Screen you need to choose New Installation or add features to an existing installation option as highlighted to install a standalone instance of SQL Server 2008 R2.
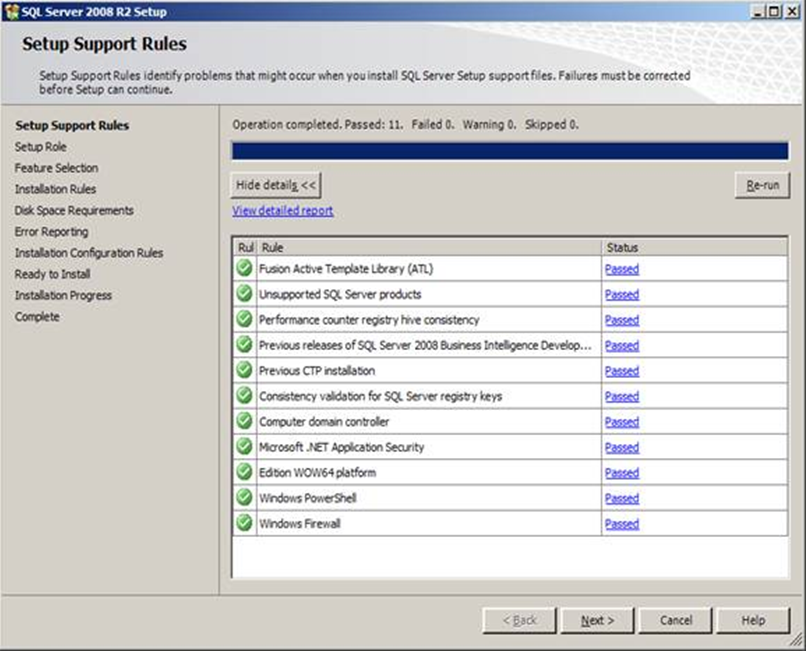
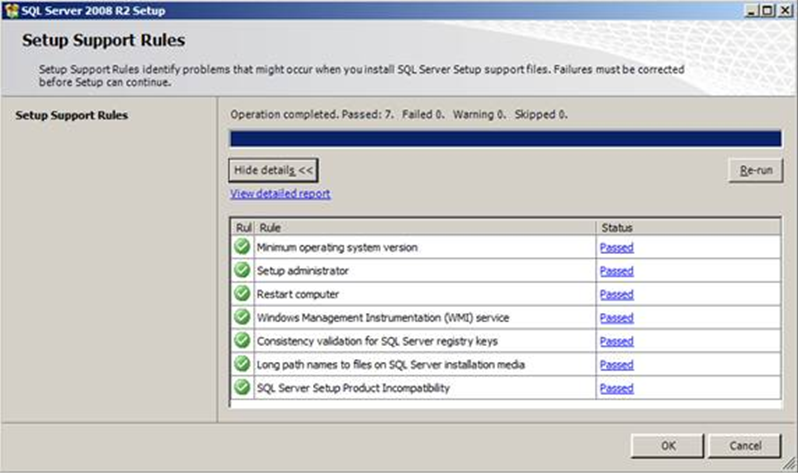
6. It will open up Setup Support Rules window which will identify problems that might occur when you install SQL Server Setup support files. You must correct the failures if there are any before the setup can continue. If there are no issues identified then click OK to continue with the installation.
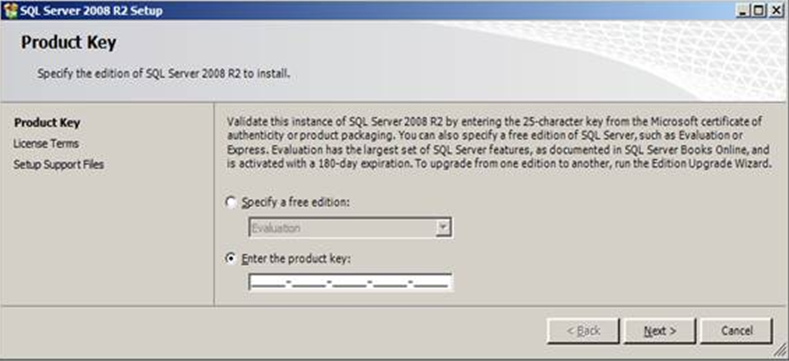
7. In Product Key window you can choose to install SQL Server 2008 R2 as an evaluation edition or else you can enter the Product Key to install the version specific to the Key. If you are installing the Evaluation Edition then you can upgrade to another edition using the Edition Upgrade Wizard. As like in SQL Server 2008 even SQL Server 2008 R2 also has a single installation for all editions of SQL Server 2008 R2. Once you have entered the Product Key or choose the free edition (Evaluation) then click Next to continue with the installation.
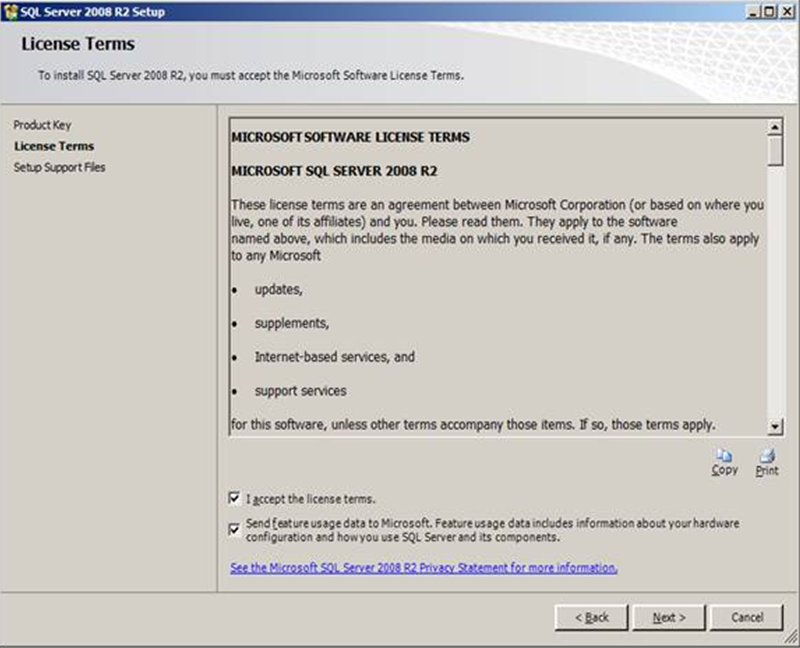
8. In the License Terms screen, you can go through the license agreement and then select the check boxes at the bottom of the screen to accept the license terms and conditions and then click Next to continue with the installation.
9. In Setup Support Rules screen it will identify problems that might occur when you install SQL Server Setup support files. In case if there are any issues identified then you need to fix the same before continuing with the installation. If you want to avoid getting Windows Firewall error then you can disable the windows firewall before the installation and enable the same once the installation is complete.
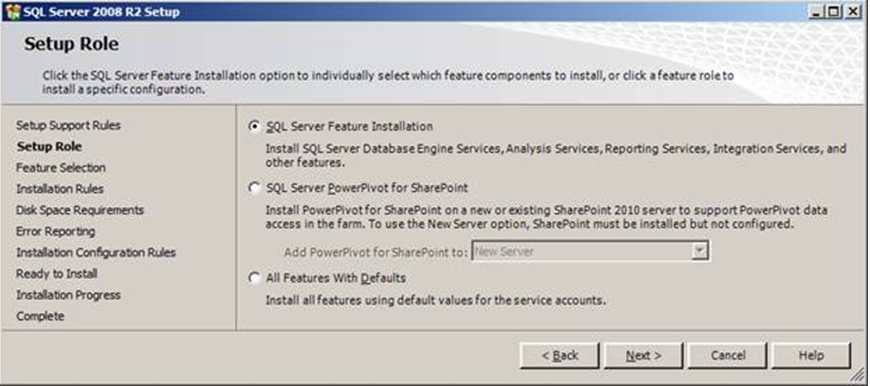
10. In Setup Role screen you can click the SQL server Feature Installation option to individually select which feature components to install or you can click a feature role to install a specific configuration. The different chooses available in this screen are:-
SQL Server Feature Installation: - Install SQL Server Database Engine Services, Analysis Services, Reporting Services, Integration Services and other features.
SQL Server PowerPivot for SharePoint: - Install PowerPivot for SharePoint on a new or existing SharePoint 2010 server to support PowerPivot data access in the farm. To use the New Server option, SharePoint must be installed but not configured.
All Features With Defaults: - Install all features using default values for the services accounts.
In the above snippet you need to choose SQL Server Feature Installation option and click Next to continue with the installation.
11. In Feature Selection screen you need to choose the features which you would like to install. The different components which are available for installation with SQL Server 2008 R2 are:-
Database Engine Services: - Includes the Database Engine, the core service for storing, processing and securing data. The Database Engine provides controlled access and rapid transaction processing and also provides rich support for sustaining high availability. The Database Engine also provides support for the utility control point in the SQL Server Utility. Only Database Engine Services and Analysis Services can be clustered.
SQL Server Replication: - Includes the Database Engine, the core service for storing, processing and securing data. The Database Engine provides controlled access and rapid transaction processing and also provides rich support for sustaining high availability. The Database Engine also provides support for the utility control point in the SQL Server Utility. Only Database Engine Services and Analysis Services can be clustered.
Full – Text Search: - Includes the Full-Text Search engine, for fast text search on content stored in SQL Server.
Analysis Services: - Includes Analysis Services and tools used to support online analytical processing (OLAP) and data mining. Only Database Engine Services and Analysis Services can be clustered.
Reporting Services: - Includes Reporting Services, a server-based application for creating, managing, and delivering reports in paper-oriented and interactive Web-based formats. Reporting Services cannot be clustered.
Integration Services: - Includes the designer, runtime, and utilities that enable Integration Services to move, integrate, and transform data between data stores.
Shared Features: - Some shared features are shared across all versions of SQL Server on a computer. Shared features for a major release are used only by multiple instances of the same version of SQL Server; other features are shared only across minor version instances.
Redistributable Features: - SQL Server redistributable and shared features are installed when needed: Error and Usage Reporting, SQL Server Native Client, MSXML version 6.0, SQL Server Compact Workbench, SQL Server Compact Runtime, Sync Services for ADO.NET, and SQL Server Browser.

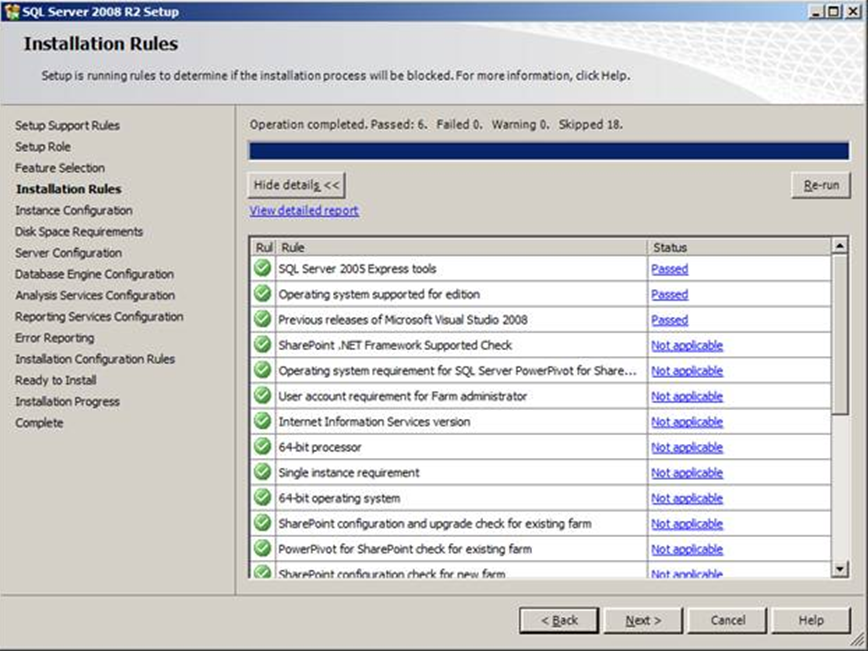
12. In Installation Rules screen the setup is running rules to determine if the installation process will be blocked. Click Next to continue with the installation.
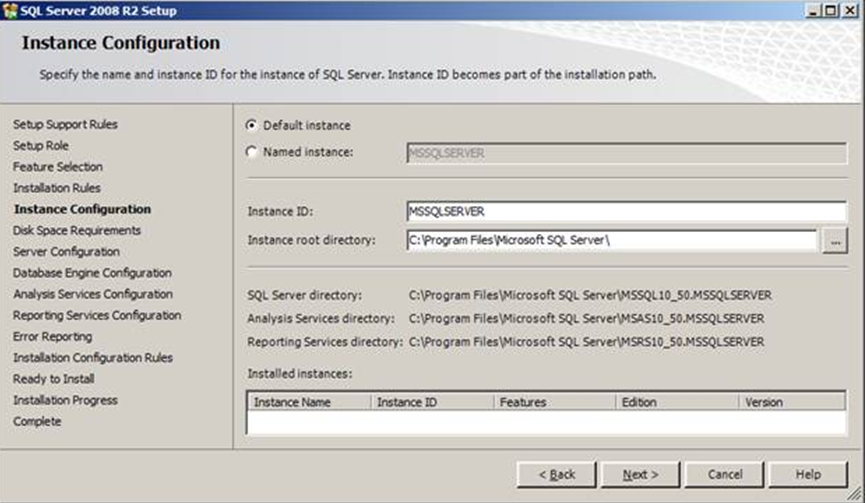
13. In Instance Configuration screen you need to specify the name and the instance ID for the instance of SQL Server and click Next to continue with the installation.
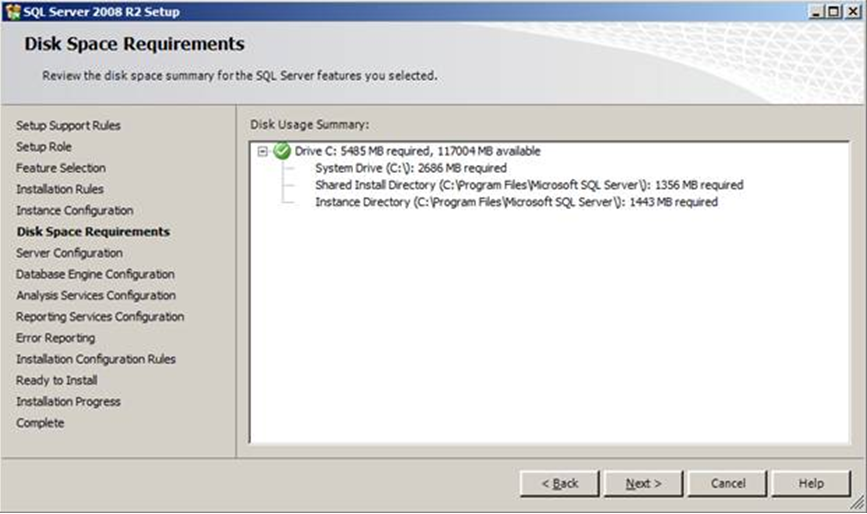
14. In Disk Space Requirements screen you will be able to see the amount of disk space which is required for the installation of SQL Server 2008 R2. Click Next to continue with the installation.
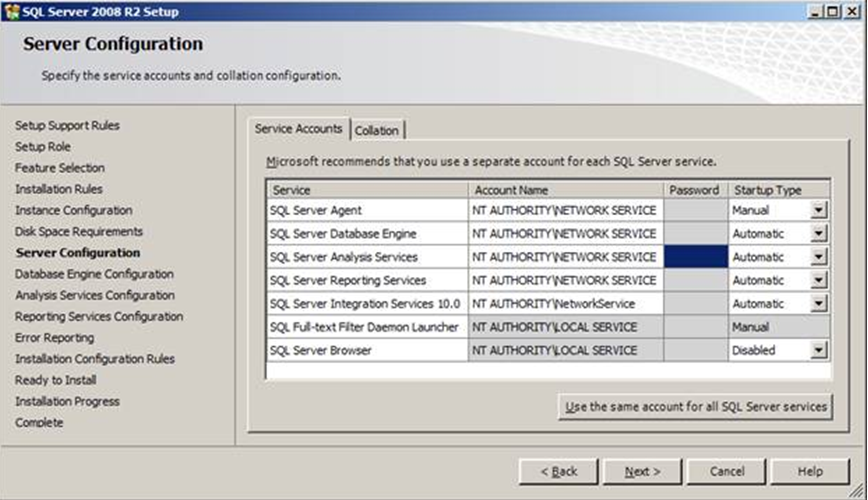
15. In Server Configuration screen you can specify the Service Account and the Collation. In the Service Accounts tab, you need to specify the Service Account under which SQL Server Services should be running. Here you can also specify the Startup Type for each of the SQL Server Services.
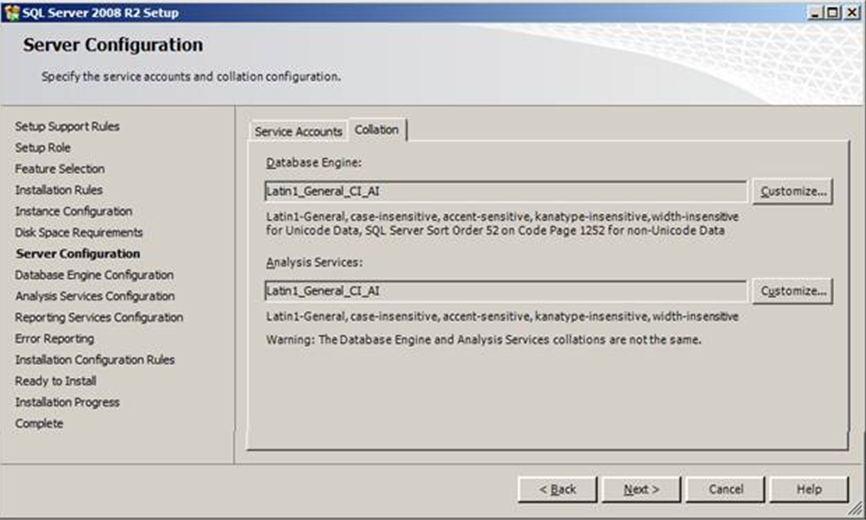
In the Collations tab, you can specify the collation for Database Engine and Analysis Services. Please use Latin1_General_CP1_CI_AS collation. We use this collation for our Manex DB and any temp db's we need to create for certain Stored procedures. These will not run correctly if your collation is different than one stated above. Click Next to continue with the installation screen.
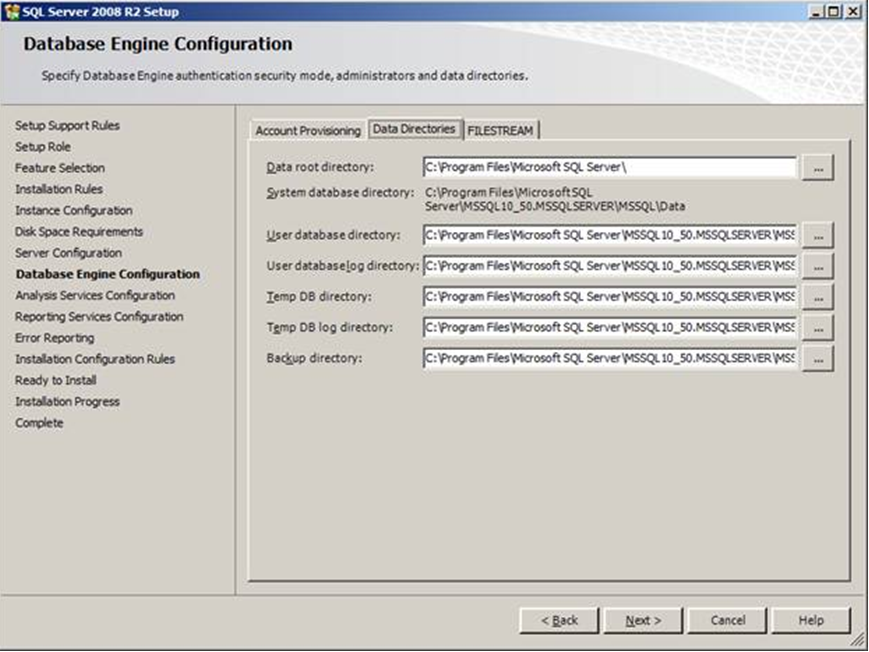
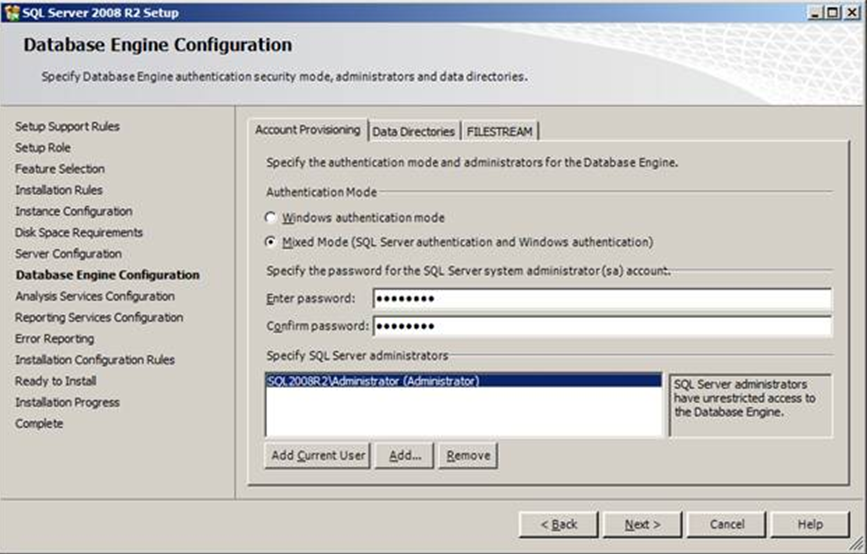
16. In the Database Engine Configuration screen, you can specify authentication mode and administrators for the Database Engine, Data Directories and FILESTREAM.
In the Account Provisioning Tab you can specify the Authentication Mode. It is always a best practice to choose Mixed Mode (SQL Server and Windows Authentication). You can then specify the password for the SQL Server system administrator (SA) account and also add Specify SQL server administrators as shown in the snippet below
In the Data Directories tab, you can specify the path of where user database data and log file should be stored. You can also specify the path where TempDB data and log file should be stored. It is always a good practice to store TempDB data and log file on different drives to improve performance. In this screen you can also specify the database backup directory as shown in the below snippet.
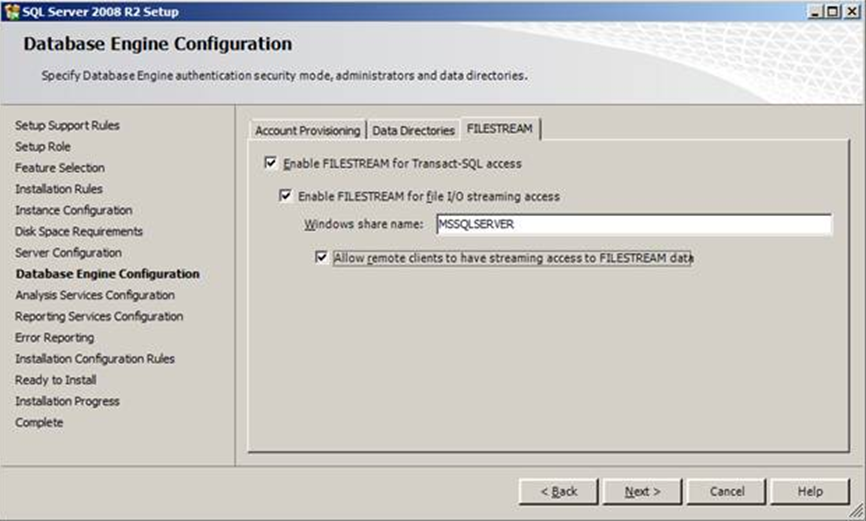
In the FILESTREAM tab, you can configure the FILESTREAM feature of SQL Server 2008 R2. There are basically three different FILESTREAM configuration options such as:-
• Enable FILESTREAM for Transact-SQL access
• Enable FILESTREAM for file I/O streaming access; here you can specify the windows shared folder name
• Allow remote clients to have streaming access to FILESTREAM data.
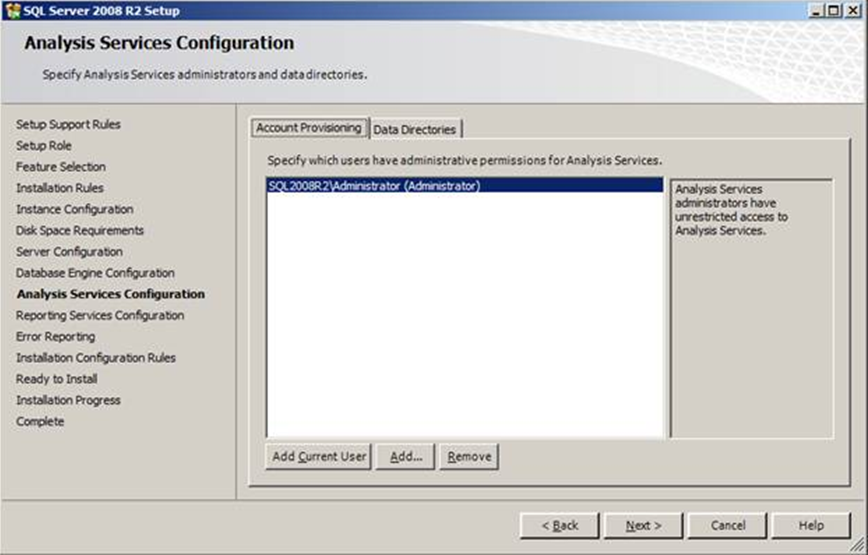
17. In the Analysis Services Configuration screen you can specify the analysis services administrators and data directories. In the Account Provisioning tab you can specify which users have administrative permissions for Analysis Services
In the Data Directories tab, you can specify the Data directory, Log file directory, Temp directory and Backup Directory for analysis services. Click Next to continue with the installation.
18. Integration Services Scale Out Configuration - Master Node and Integration Services Scale Out Configuration - Worker Node
In below example, we left it as is and clicked ' Next'


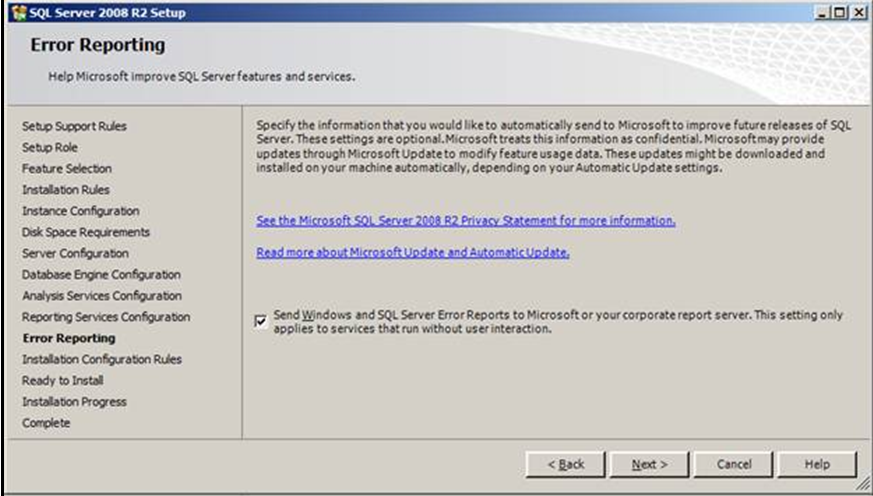
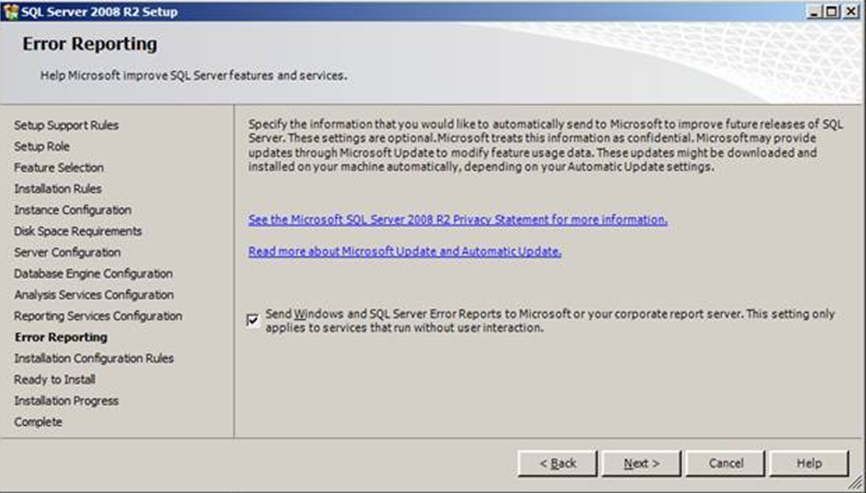
19. In the Error Reporting screen you can select the checkbox to automatically send logs to Microsoft to improve future releases. Click Next to continue with the installation.
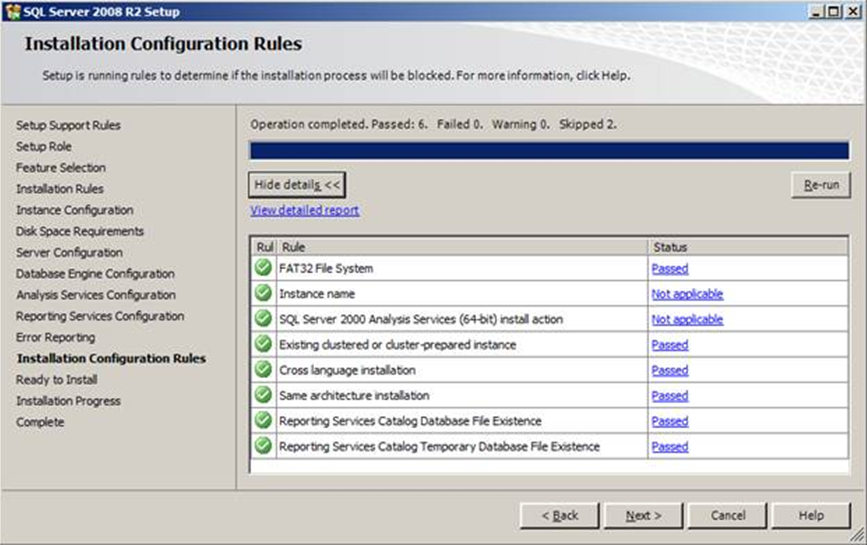
20. In Installation Configuration Rules screen the setup will run rules to determine if the installation process will be blocked. In case if there are any issues encountered then you need to fix the same before continuing with the installation.
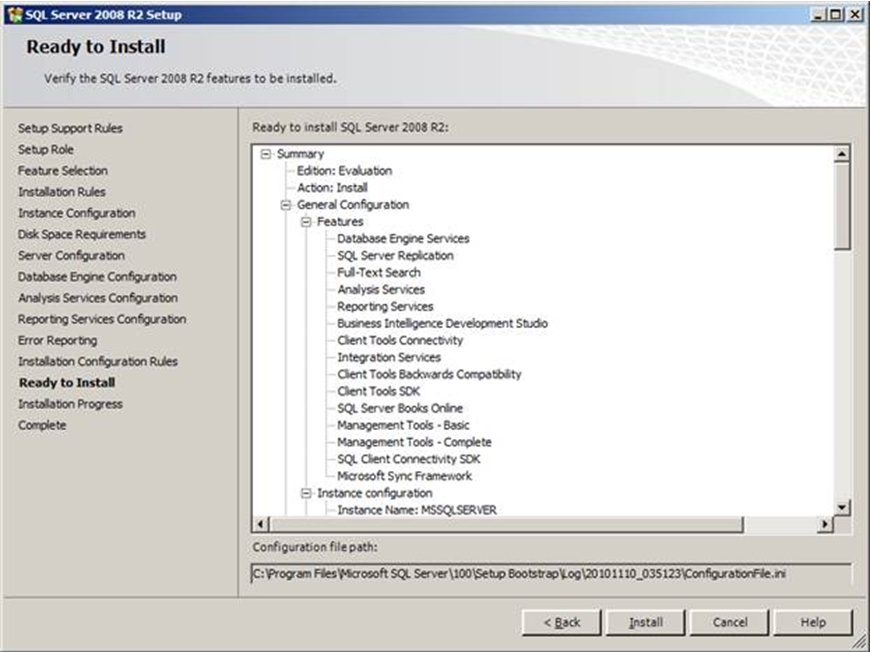
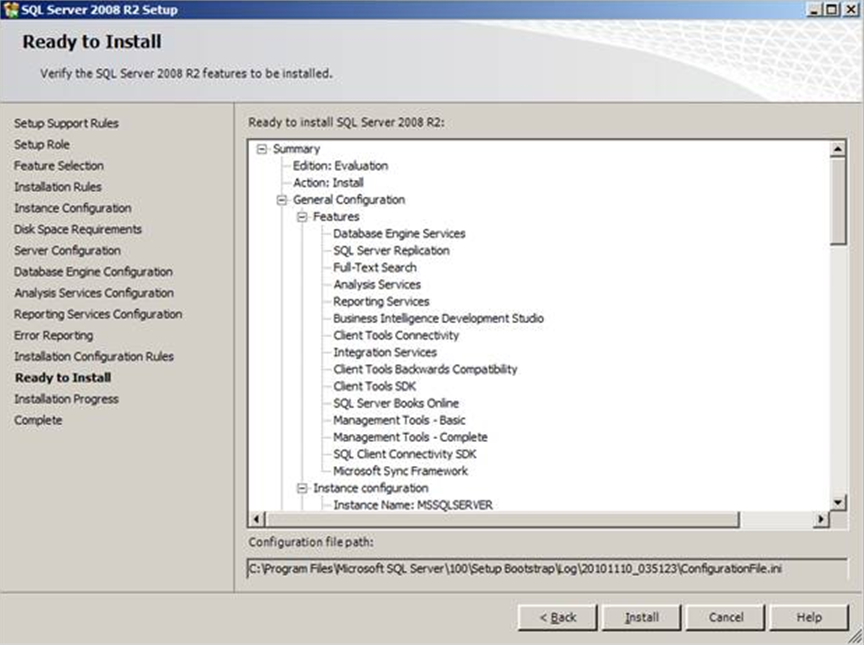
21. In Ready to Install screen you can quickly review the features which you have selected so far for installation and then click the Install button to begin the installation of SQL Server 2008 R2.
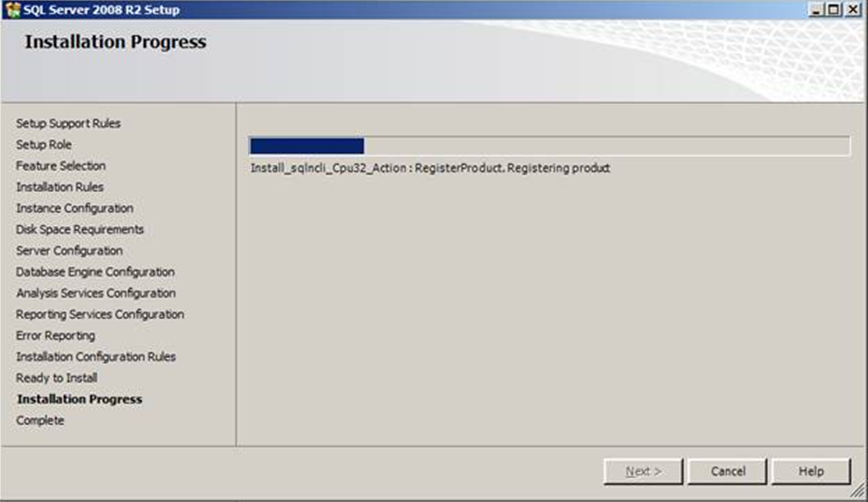
22. In the Installation Progress screen you can monitor the progress of SQL Server 2008 R2 installation. Click Next to see the Installation Summary.
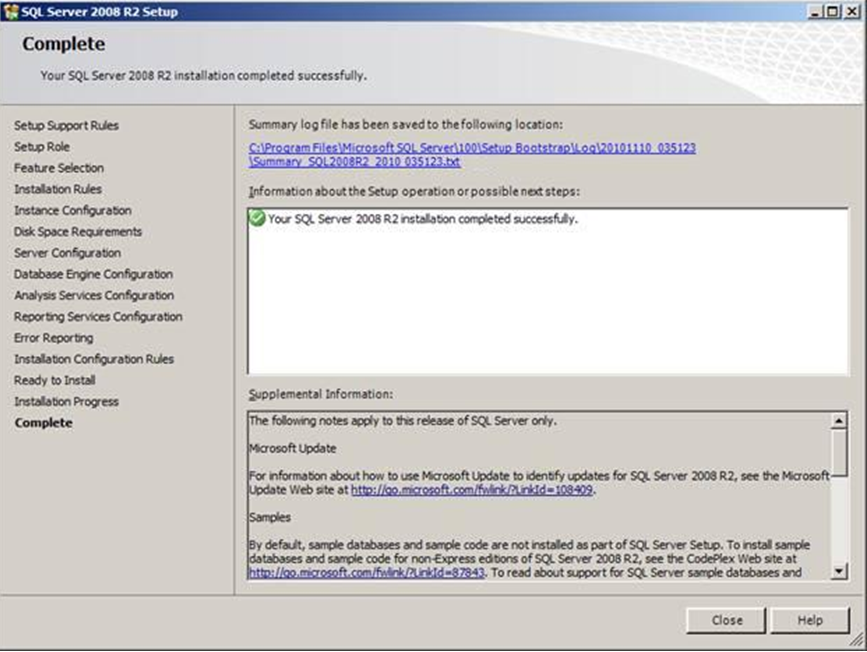
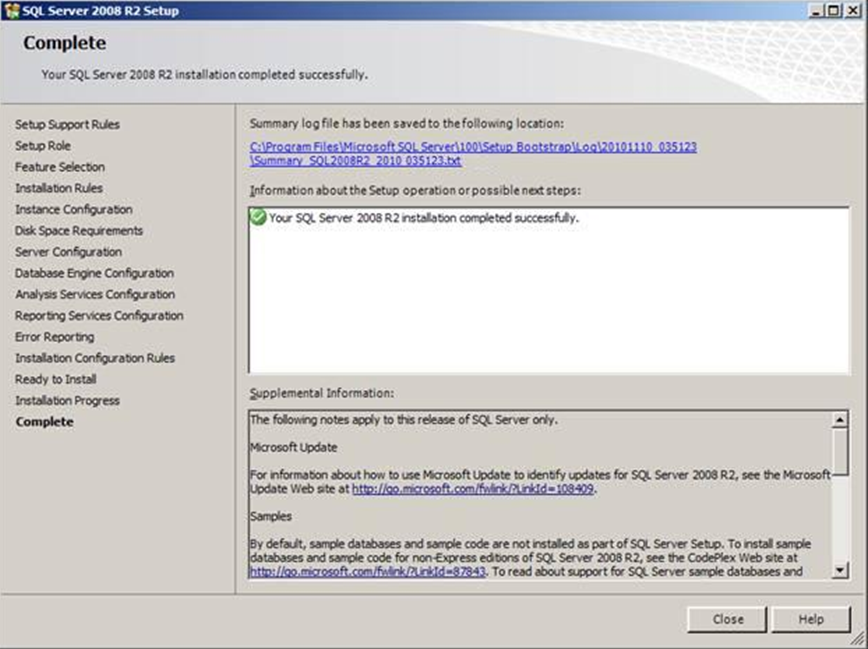
23. In the Complete Screen the location for the summary log file is mentioned. You can click on the link to review the SQL Server 2008 R2 installation summary.
|
|
|
|
|
|
|
|
|
| Article ID: 5078 |