| Bill Of Material Main Screen |
This is the screen that appears when opening the module. The product number is displayed in the Bill of Material Module screen header as a reference. The product information will remain on screen while viewing other sections of the BOM module. BOM Main may be used to view, edit, add or delete a Bill of Material. BOM Header information is displayed for any item located after a FIND. If any Line Items have been added to an assembly in the BOM Header, they will be displayed in the Detail Window below. The lines that are inactive will be highlighted in purple. Selection of a Line Item in the Detail Window will cause the other BOM screens to be populated with default and/or added information for that Line Item. Start with this screen to add a new BOM, edit an existing BOM, add a new Line Item or change detail information for existing Line Items.
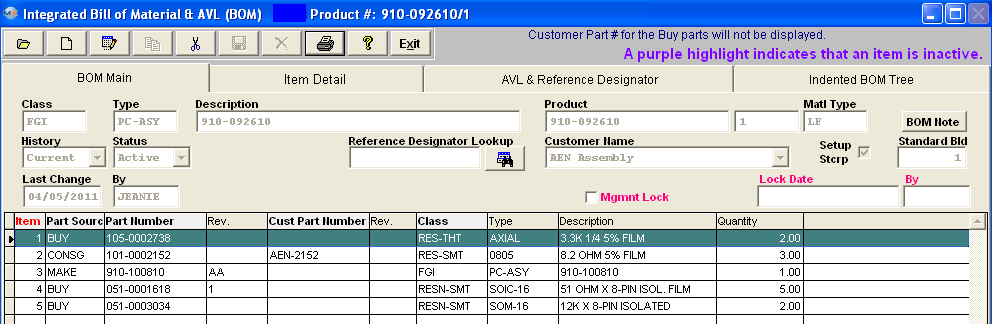
The Header Information fields across the upper half of the screen are populated from the item master and from keyed-in assembly data. The fields in the Body (Detail Window) show information about the components included in the assembly.BOM Main Field Definitions
| Class |
The Part Class assigned to the assembly in the Item Master.
|
| Type |
The Part Type assigned to the assembly in the Item Master.
|
| Description |
The Item Master description for the Assembly Part.
|
| Product |
The Part Number for the assembly. Can be the customers product no. or an auto-assigned internal Part Number.
|
| Rev |
The Part Number Revision for the assembly. An assembly may exist under multiple revisions.A separate BOM is required for each.
|
| Matl Type |
This is defaulted in from Inventory Control |
|

|
Any notes pertaining to the BOM will display upon depress the Note button.
|
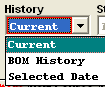 |
Depressing the down arrow will display the history of the BOM components. Current reflects the most recent listing; BOM History will display the history of changes. Selected Date will bring up a selection screen.
Note: If the effectivity and obsolete dates are used, then it is possible to check the specific parts list at any given data using the BOM history.
|
 |
| Status |
The BOM Status: Active - BOM is Active;
Inactive - BOM is Inactive which will affect Cost Roll up. NOTE: Changing the BOM status to Inactive will NOT remove the MRP demands you MUST Inactivate the part number in ICM to remove the MRP demands. See Article #3430 for further detail.
Quote - This status is in case a BOM is in a quote stage and the user needs a reminder that the quote for this BOM is pending.
This status is for the BOM ONLY, it will NOT change the status of the Inventory part. The Inventory part status and BOM status can be different. This is to allow flexibility so the BOM can be inactive and will NOT be displayed in the BOM module, but the part will still be displayed in the inventory listing. Users will be allowed to change the status on a BOM from Active to Inactive with open SO, WO, etc. and MRP will still show demands. Users will also still be allowed to Create NEW SO, WO, etc if ONLY the BOM status is Inactive. Users will NOT be allowed to change the status on the Inventory part from Active to Inactive with open SO, WO, etc.
|
 |
When the BOM is made Inactive this field will display the status along with the date and Initials of the user that Inactivated the BOM. |
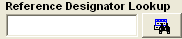 |
This allows the user to find part by Reference Designator. If user starts typing reference designator into the text box it will auto fill the information, when done entering user can press "Enter" or click on the search button next to it and the record pointer in the grid will advance to the part if a match is found. |
|
Customer Name
|
The name of the customer for whom the user is making the assembly.Select from pull-down list. Add new customers in Customer Information Management. Use Standard Pricing as the customer or leave blank if the assembly is built to stock or has more than one potential customer. This field must match the Customer for any Consigned parts used in the BOM.
|
| Setup Stscp |
This box MUST be checked if you wish for the setup scrap qty’s to be included in the Kitting and MRP calculations, Checking this box along with a Standard Bld qty will tell the system to use Setup Scrap when calculating the standard cost. Note: The "Exclude Scrap & Setup Scrap" options within the Kitting Setup module will overwrite this option.
|
|
Standard Bld
|
The quantity normally built. Entering a quantity in this box will be used when calculating the Standard Cost. See Article 3040 for information on how this affects the Std Cost. See Articles #3067 , #3053 , and #3320 for information on how this affects the Configuration Variance. |
| Last Change |
The date and time of the last change to the BOM automatically enters this field.
|
| By |
Initials of user that made last change to BOM. |
| Mgmt Lock |
If locked, all users can access the screen but, will not be able to edit the BOM until Approved users remove the lock. This is controlled within the BOM. |
| Lock Date |
The date the Managment Lock Box was checked. |
| By |
The initials of the user that check the Managment Lock Box. |
COMPONENT INFORMATION (Displayed in the Body (Detail Window)
| Item |
The item numbers assigned to the components in the BOM.
|
| Part Source |
The sources of the assembly components.Select Make, Buy, Consigned or Phantom.
|
| Part Number/Rev |
The components internal Manex part number. The Part Number Revision for the component. A component may exist under multiple revisions. Each Rev. is considered a unique part number and may co-exist with other Revs. or replace other Revs.
|
| Customer Part Number/Rev |
The component's customer part number. The Part Number Revision for the component. A component may exist under multiple revisions. Each Rev. is considered a unique part number and may co-exist with other Revs. or replace other Revs.
|
| Class |
The Part Class of the component part as assigned in the Item Master.
|
| Type |
The Part Type of the component part as assigned in the Item Master.
|
| Description |
The Item Master description of the component part.
|
| Quantity |
The quantity of the component part used in the assembly.Do not add to the quantity field to compensate for setup and run losses; Use the Setup % and Run Qty. fields in the Item Master screen to add components to cover production losses.
|
|
Column Heading in Bold Font
|
These columns, when selected will cause the Detail information below them to be sorted by the field selected. Selected Column headers turn Red. |
|
|
|
|
|
|
|
|
|
| Article ID: 4779 |