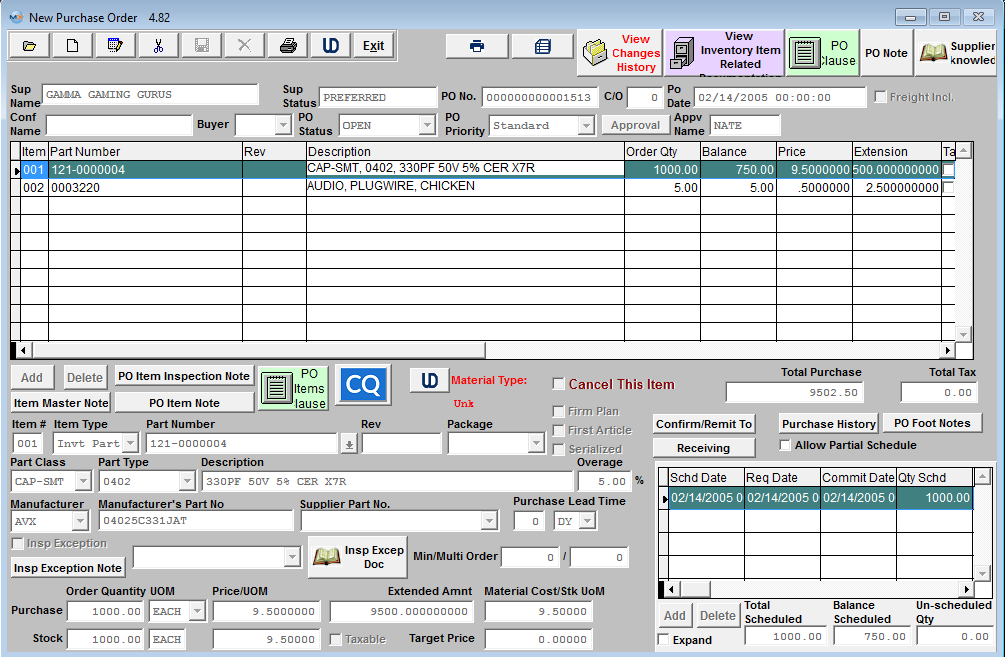
| Sup Name |
The supplier or vendor with whom the order was placed. |
| Sup Status |
The status of the Supplier, whether Approved, Inactive, etc. |
| PO Number |
The Purchase Order number of the order. If PO Numbering is set to Auto (in Number System Setup ) the system automatically places a "T" in the PO number to flag it as a temporary number. Then upon approval the system auto finds and replaces that "T" with a "0". Note: If PO Numbering is set to manual, users enters a PO number manually using a "T", then changes the numbering to Auto, if this PO is edited and approved the "T" will be changed to "0". The system has no way of knowing that the <st1:place w:st="on">PO was manual numbered before the change.
|
| CO |
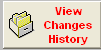
The Change Order revision status of the order. This field can be automatically increased upon approval or controlled by the user and is only changed if the user manually assigns a Change Order number. (This is setup in the System Setup/Material/Purchase Order Setup module). Change Order History is tracked under the View Changes History screen automatically. NOTE: If auto assign the next change order will be referenced in the change history but the PO change order will not increase until PO has been approved. If not auto assigned the change order will be referenced to what ever change order user enters.
|
| Po Date |
The date the purchase order was created. |
| Freight Included |
If this box is checked, the vendor has agreed to pay the freight. "Freight Included" will be added to the print out of the PO form and will be displayed in PO Reconciliation module for reference. If this box is not checked "Freight Not Included" will be displayed on PO Reconciliation module. |
| Conf Name |
The contact at the supplier who confirmed the purchase order. |
| Buyer |
The initials of the buyer for the order. |
| PO Status |
The status of the purchase order. Indicates if the order is new, being edited, is open, closed or cancelled. |
| PO Priority |
The status of the purchase order.Indicate if the order is standard, priority, or hot. |
|
|
When the purchase order is approved, the "T" in the Purchase Order number will be replaced with a "0" and the initials of the person who approved the order will be displayed. (Note: The PO must be approved before being able to create a PO Dock receiver). |
| Final Approval |
When two approvals are required, and both are granted, the initials of the second person approving the purchase order will be displayed in this field. |
Purchase Order Items
| Item |
The purchase order item number of an item being purchased. |
| Part Number |
The part number of the item being purchased. NOTE: User has the option to drill down to view the inventory record info for a part by double clicking on the part number. |
| Rev |
The revision of the part number being purchased. |
| Description |
The Description of the part number. |
| Order Qty |
The quantity of parts being ordered. See Article #1240 for more detail on why the system will not allow user to enter in a fraction of a number, and an alternative. |
| Balance |
The un-received balance of the item. |
| Price |
The agreed upon price for the items being ordered. |
| Extension |
The extension of the price and quantity. |
| Tax |
Indicates whether or not the item is taxable. |
 |
This will allow user to cancel an individual item on a PO. Since the system does not allow you to delete a line item that has had any kind of transaction, we needed a way for users to cancel individual line items without having to cancel the entire order within the system. If any parts have been accepted, it cannot be cancelled. Once a part has any receipts the user cannot delete the line, so if they reject the total received qty they can cancel the line to prevent it from affecting the PO, or PO history for the other line items. If they do not want to reject the entire qty then their only option is to reduce the balance qty to the accepted qty. Cancelled line items will be excluded from the Purchase Order reports within the module.
|
|
|
The total amount of all items on the purchase order (excluding taxes). |
| Total Tax |
The total tax amount of all items on the purchase order. |
Detail Definitions
| Item # |
The purchase order item number of an item being viewed. |
| Item Type |
The type of inventory being purchased (Inventory, MRO, or Services). These are hard coded into the system and cannot be changed or edited in anyway. Inventory is for a part that exists in the ICM module. MRO stands for Management Required Options. Generally this is used for supplies, purchases. Services items are for those instances where the assembly is outsourced. |
|
Part Number
|
The internal part number of the item being purchased. |
|
Rev
|
The revision of the part number. |
|
Package
|
The packaging method used to package the parts.
|
| Material Type |
The material type (per AVL level) will be displayed in Red once user selects the mfgr and mfrg PN. |
| Firm Plan |
If this box is checked, the MRP module will NOT try to override the purchasing decision. For example: If the need is for 100 parts per month for the next six months. But the user makes a decision to block order 600 parts and marks the PO as Firm Planned. Without any Firm Plan command, the MRP module would instruct the user to cancel the PO for 600 quantity and re-issue for 6 separate purchases of 100 each. But since the PO is marked as Firm Planned this tells MRP that the purchasing decision was intentional and NOT to override. So MRP will work around this PO
|
|
|
If this box is checked, this part requires a first article inspection and the users will be required to check off the First Article Done box within PO receiving (This information is usually defaulted from the ICM module, but can be edited within the PO module also).
|
|
|
If this box is checked, the user will be required to enter serial numbers at time of Purchase Order Receipt and Inspection. (This information is defaulted from the ICM module).
|
|
Allow Partial Schedule
|
If user wants this box to be checked at all times they must set the default as checked within the System Setup/Materila/Purchase Order Setup module, and user can change it any time while in the PO module. If user wants to be able to save a partial schedule on a one to one basis they will have the default setup as unchecked within the System Setup/Materila/Purchase Order Setup module. If un-checked user will receive the popup warning them that they have not scheduled all the order qty and ask if they want to finish scheduling the order qty, upon saving a PO with only a partial schedule. If the box is checked the system will not ask any questions when saving a po with only partial schedule. (Note: MRP will NOT acknowledge qty's that are not scheduled).
|
|
Part Class
|
The Part Class of the part number.
|
|
Part Type
|
The Part Type of the part number.
|
|
Description
|
The Description of the part type.
|
|
Overage
|
The percentage of parts allowed to be received over the ordered quantity.
|
|
Manufacturer
|
The manufacturer for the part.
|
|
Manufacturer Part Number
|
The commercial part number.
|
|
Supplier Part No.
|
If the Mfgr AVL has a Supplier and Supplier PN associated within the ICM module, the Supplier PN will be displayed in this field as additional reference.
|
|
Purchase Lead Time
|
The time between the Supplier receipt of the PO and receipt at the users dock.
|
|
Insp Exception
|
Checking this box will allow the receiver to receive the parts for this Purchase Order Only without inspection. Upon checking this box the Insp Exception Note Field and the Insp Excep Doc will become available for use and then user must then select an Insp Exception Type from the pull down screen. User MUST have special rights within the Security module or supervisor rights to edit this field.
|
 |
The Insp Exception box MUST be checked for this field to become available. This information will then be displayed within the PO Receiving as reference information to the users that are processing the Receipts through the system. |
|
|
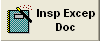
The Insp Exception box MUST be checked for this field to become available. This will allow users to attached documents. This information will then be displayed within the PO Receiving as reference information to the users that are processing the Receipts through the system.
|
|
Min/Multi Order
|
The Min/Multi order quantities are defaulted in from the Inventory Control module (MRP Info tab) to display the minimum quantity that must be ordered for this part and the increments this part must be purchased in. (If this information is edited within the Purchase Order Module, it will be updated to the ICM module upon saving). For Example: if the Min order qty is 500 and the order multi is 100 and the order is for 515, then the order will need to be rounded up to 600.
|
|
Purchase Order Qty
|
The quantity of parts being ordered based on the purchasing units of measure.
|
|
UOM
|
The Purchased unit of measure. (May be different than stocking unit of measure).
|
|
Price/UOM
|
The agreed upon unit price for the items being ordered.
|
|
Extended Amt
|
The extension of the price and quantity.
|
|
Standard Cost/Stock UOM
|
This field displays the Standard MATERIAL Cost. (This is defaulted in from the ICM module, if no standard material cost is found in the ICM module the user will be allowed to enter in a standard material cost at the time of purchase). For a BUY part, this is the value against which PPV should be calculated, and the value the user should expect to pay for the part.
|
|
Stock/Order Qty
|
The quantity of parts ordered based on the stocking unit of measure.
|
|
Stock UOM
|
The stocking unit of measure.
|
| Stock Price/UOM |
The stocking price.
|
|
Taxable
|
Indicates whether or not the item is taxable.
|
|
Target Price
|
The target price is a reference for the buyers to use. (This information is defaulted from the ICM module).
|
Directive Buttons
The following buttons are displayed on the Purchase Order Screen.
After a purchase order is created or edited, it must be approved before it can be printed and issued to a supplier. Certain employees may be granted authority to approve purchases up to a certain total dollar value. Those authorized personnel may approve purchase orders under that amount. If only one signature is required, the order will be finalized and released. If it is a new order, and automatic PO numbering is enabled, Manex will assign the next available number to the order. The action is taken by clicking on the Approval button and responding with an authorized password.
If two signatures are required in order to release a purchase order, then a second person with approval authority for the amount of the order must approve the order, by clicking on the Final Approval button and responding with an authorized password.
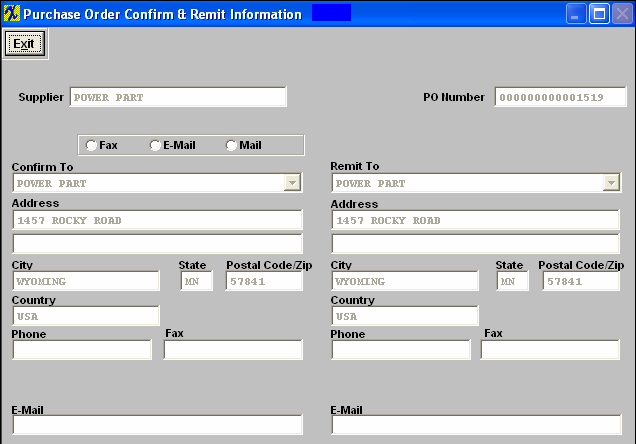
Confirm/Remit Screen Field Definitions
| Supplier |
The supplier or vendor with whom the order was placed. |
| PO Number |
The Purchase Order number of the order. New purchase orders that have not been approved will display a temporary number until approved. |
| Fax, eMail, Mail |
How to communicate with the supplier. |
CONFIRM TO
| Confirm To |
The name of the supplier. |
|
Address, City, State, Postal Code, Country
|
The address of the supplier to which the order is sent. |
| Phone, Fax |
How to communicate with the supplier. |
| E-Mail |
Email address enter within the Supplier Setup module. |
REMIT TO
| Remit To |
The name of the supplier or their agent. |
| Address, City, State, Postal Code, Country |
The address of the supplier to which the payment is sent. |
| Phone, Fax |
How to communicate with the supplier accounting department. |
| E-Mail |
Email address enter within the Supplier Setup module. |
 |
When the user has displayed a purchase order with items on the Purchase Order screen, pressing on the Receiving button will display information about where the supplier is to ship the material on the purchase order, and the terms and conditions of the order.
|
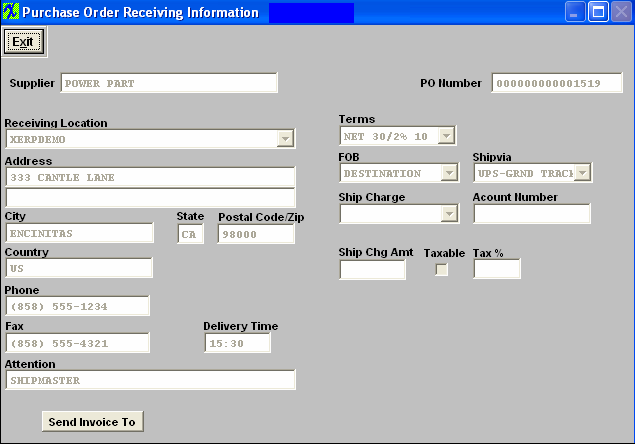
Receiving Screen Field Definitions
|
|
The supplier or vendor with whom the order was placed. |
|
|
The Purchase Order number of the order. New purchase orders that have not been approved will display a temporary number until approved. |
|
|
The company and address to which the order is to be shipped. |
|
|
The terms of the purchase order. |
|
|
The FOB point for the order. |
|
|
The preferred shipping carrier for the order. |
|
|
How the freight costs are to be paid. |
|
|
If needed, the freight company account number for the carrier to charge. |
|
|
The shipping charge cost for the order. This is referenced on Purchase Order Forms Only. These amounts wIll not be carried over to the PO Reconcilliation. |
|
|
Indicates if the freight charges are taxable. This is referenced on Purchase Order Forms Only. These amounts wIll not be carried over to the PO Reconcilliation. |
|
|
The tax rate for the shipping charges. This is referenced on Purchase Order Forms Only. These amounts wIll not be carried over to the PO Reconcilliation. |
|
|
The preferred delivery time for receipts. |
|
|
The name of the person to whom the shipment is directed. |
DIRECTIVE BUTTONS
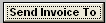 |
When the user has displayed a purchase order with items on the Purchase Order screen, pressing on the Send Invoice To button will display the billing information for the supplier. This button is displayed on the Purchase Order Receiving Information screen |
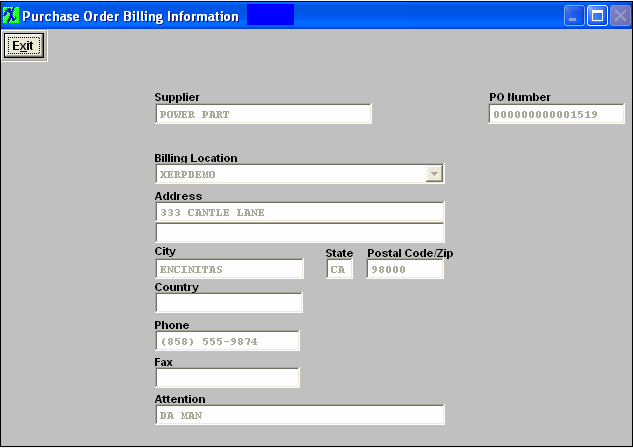
Send Invoice To Screen Field Definitions
|
|
The supplier or vendor with whom the order was placed. |
|
|
The Purchase Order number of the order. New purchase orders that have not been approved will display a temporary number until approved. |
|
|
The users company and address to which the order is to be billed. |
 |
Depressing the Purchase History button will display the purchase history for that line item. The user may sort by Clicking on any of the Headers, and Search for specific items by typing in the column. Note: If an order has status “EDITING” it will not be displayed on the history list. Once the order is approved and the status is changed to "Open" or "Closed" the order will then be displayed on the purchase history list. |

 |
When the user has displayed a purchase order with items on the Purchase Order screen, and has highlighted one of the line items, checking the Expand box will display the schedule information about the item being purchased. |

 |
When the user has finished viewing the schedule information about the item, the user may check the Shrink box and the schedule information will shrink down. |
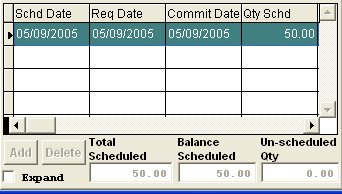
Schedule Field Definitions
|
|
The date the material is due to land on the users dock. This is the date MRP uses. |
|
|
This is the internally required or desired date. It is not used for the supplier or MRP. |
| Commit Date |
The commit date is a reference field for the buyer. |
|
|
The quantity scheduled for the due date. |
|
|
This will display the balance left to receive from the Qty scheduled. |
|
|
The User can choose the Warehouse from the pulldown or leave it blank. The Y next to the Warehouse location indicates that, that Warehouse is set-up in the AVL. The N next to the Warehouse location indicates that, that Warehouse is not set-up in the AVL. If the warehouse field is left blank then the warehouse can then be assigned at PO Receiving Management. Once the record has been saved within the PO Receiving this information will then be updated within the Inventory Control Management under the Qty info screen. |
|
|
The Location field will update automatically from the Inventory Control Management module. The user can edit this field in the scheduling detail. This will not change the location in the Inventory Control Management module under the quantity info screen. |
|
|
This is classification of the distribution of the item when received, either to regular Inventory Receiving or to Allocate to Special Work Order or Project |
|
|
This Field is for future use, it is non-applicable at this time. |
|
|
The General Ledger number where the purchase order will post. These GL numbers are defaulted in from the Purchase Setup under the MRO Receiving Setup. |
|
|
|
Depressing on the  button will bring up a screen where the user can enter in specific notes that pertain to that one schedule, item, and date. Type in the note. Depress the Save button. Exit button will bring up a screen where the user can enter in specific notes that pertain to that one schedule, item, and date. Type in the note. Depress the Save button. Exit |
 |
When Creating a new PO or Editing an existing PO this button will be enable. Depressing this button will allow the user to add additional scheduled deliveries. |
 |
When Creating a new PO or Editing a existing PO this button will be enabled. Highlight a scheduled delivery then depressing this button will delete that delivery from this screen. |
|
|
This field will display the total qty scheduled for the highlighted item. |
|
|
This field will display the Balance left to receive from the qty scheduled for the highlighted item. |
|
|
This field will display the qty un-scheduled for the highlighted item. |
|