|
|
Enter the SQLMANEX.EXE (within the ManEx root directory)
This action will then prompt the user for a password
|
 |
|
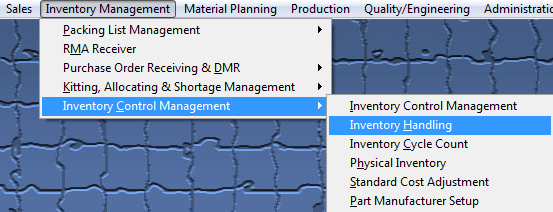
The following screen will be displayed, select Inventory Management/Inventory Control Management/Inventory Handling
|
 |
The following screen will be displayed:
Depress the Transfer tab and the following screen will be displayed:
To transfer inventory from one warehouse to another follow these steps.
- Depress the Add button.
- Enter your password.
- Select the Part Source from the pull down menu. (BUY, MAKE, or CONSG)
- Enter the Part Number, if Part Source is "CONSG" you will need to enter Customer Name from pull down, then you will have a choice to enter in customer PN or Internal PN.
- Part type, class, and description will default in.
- Select the Manufacturer & Manufacturer part number from the pull down list.
- Select the "From" warehouse from the pull down list.
- Then select the "To" warehouse from the pull down list.
- Enter quantity to transfer.
- Select the reason from the pull down list.
- Enter the reference if applicable
- Depress the Save button.
For this feature to work properly, the Inventory Part Number MUST have two warehouse locations assigned to it within the ICM module. The "From" Location MUST have quantity on hand.. If user attempts to transfer parts that do NOT have two warehouse locations, or from regular inventory location to MRB, the following message will be displayed. This screen is used to move parts from a regular warehouse to another regular warehouse, or to move parts that are already located in MRB back into regular stock. (Note: System will NOT allow users to transfer parts out of MRB location to regular inventory if parts were transfered into the MRB warehouse through PO Receiving). To move parts from stock to MRB you will need to use the Inventory Handling MRB screen .

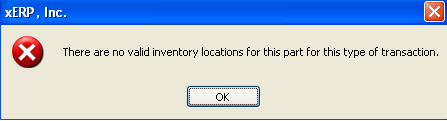 |
This message is a general message that is displayed in Inventory Handling if all locations/AVL's for a part are flagged in a Cycle Count or Physical Inventory and the part has ONLY one WHSE and AVL setup.
User must reconcile and post the cycle count or physical inventory for this part and then you will be able to process the records within Inventory Handling.
|
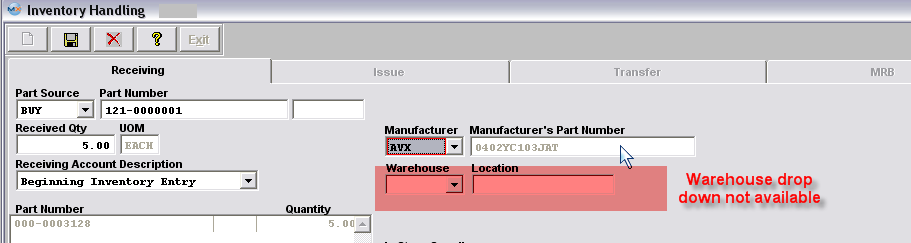
NOT displayed, but the warehouse drop down is not avaiable for selection within the issuing, receiving, transferring, and MRB screens after you select the AVL. As shown in the screen below.
The completed screen will look like this.
If transfering qty from an In-Store warehouse to an Internal warehouse an accounting transaction will be created in Inventory Transfer upon saving the transfer. Then user will then need to create the In-Store PO within the PO module.
|