|
|
Enter the SQLMANEX.EXE (within the ManEx root directory)
This action will then prompt the user for a password
|
 |
|
The following screen will be displayed, enter Sales/Customer Information/Customer Information
|
 |
The following screen will be displayed:
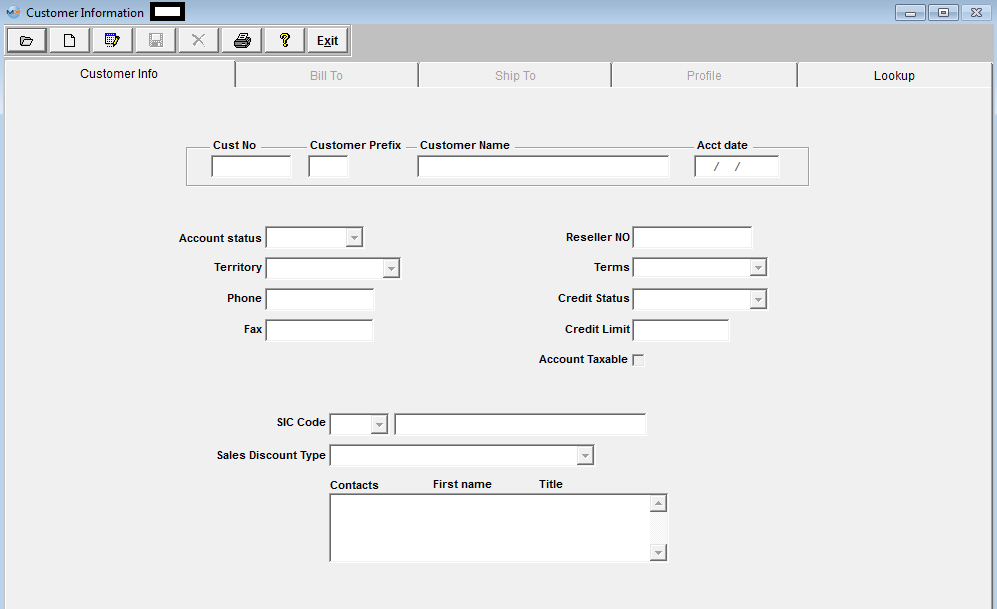
Depress the Add button. User must enter password.
The customer number assigned to the customer. If automatic, will be completed when the data is saved. If manual, must be entered.
Enter the Customer Name.
The date the account was established (defaults to current date).
Enter the account status (Active, Inactive, or Quote). Active is the default.
Choose the Territory for the account from the pull down (Territories are established in System setup/Sales Territory).
Enter the phone number of the Customer.
Enter the Fax Number of the Customer.
The user may include the customer’s resale number for tax purposes.
Enter the standard terms established for the customer from the pull down. Terms must first be established in the System setup/Payment Terms setup. Note that this field may be entered or edited only by a user with full Accounting rights.
Choose the Credit status of the customer from the pull down. May be OK, On Hold or Reject. Note that this field may be entered or edited only by a user with full Accounting rights .
Enter the credit limit established for the customer. The credit limit check takes place within the packing list. (Credit Limit Restrictions). Note that this field may be edited only by a user with full Accounting rights.
Check the box if this account is taxable.
Enter the SIC code for the Customer. If used, must first be established in the System setup/SIC Codes setup.
Enter the Sales Discount available to this customer as established in System setup/Sales Discount Type setup.
Contacts MUST be added for a customer within the Customer Contact module after the Customer has been created within the Customer Information. When this screen is viewed for an existing customer, contacts entered in the Customer Contact Module will show for this customer. This field is NOT editable from this module.
After completing the Customer information screen, the user may click on the Bill To tab.
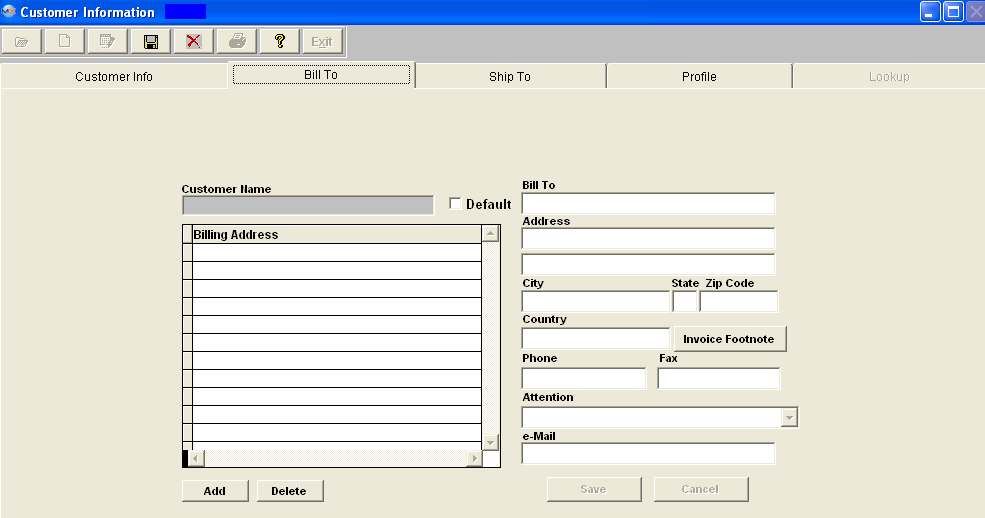
In this screen, the user defines the customer information for invoicing purposes.
The Customer Bill-To Directive buttons will now be active:
 |
This button allows the user to define multiple Bill-To locations for the customer. |
 |
This button allows the user to modify existing Bill-To information about a customer. If more than one Bill-To address exists for a customer, the address highlighted is the one that will be opened for editing.
|
 |
This button allows the user to delete an existing Bill-To record for a customer.
|
 |
This button allows the user to save the modified Bill-To information.
|
 |
This button will cancel any modifications made to the screen after the edit button has been pressed.
|
 |
This button is automatically checked for the first entry. After that, the user may wish to enter other Bill-To locations, and identify one of those as the default Billing address. The Billing address with the default checked is the one that will automatically be placed in new orders. However, the user still has the opportunity to change the Billing address in the order by selecting another address.
|
Depress the Add directive button, located at the bottom of the screen and the following screen will appear:
Enter the name of the organization to which invoicing is to be sent. (It may be a different division, or a drop-ship situation.)
Enter the Customer Bill-To Address (may use two lines).
Enter the City, State and Zip Code for the Customer Bill-To Address.
Enter the Customer Country.
Enter the phone number at the Customer’s Bill-To Address.
Enter the fax number at the Customer’s Bill-To Address.
The Contact Name at the Bill-To Address (if established in the Contact module).
Enter the e-mail address for the Bill-To Customer.
 |
Depressing this button will open a screen for a Invoice Footnote to be added that will appear on all of the Invoices for that customer.
|
After completing the Bill-To information, depress the Save button at the bottom of the screen.

The user then may click on the Ship To tab.
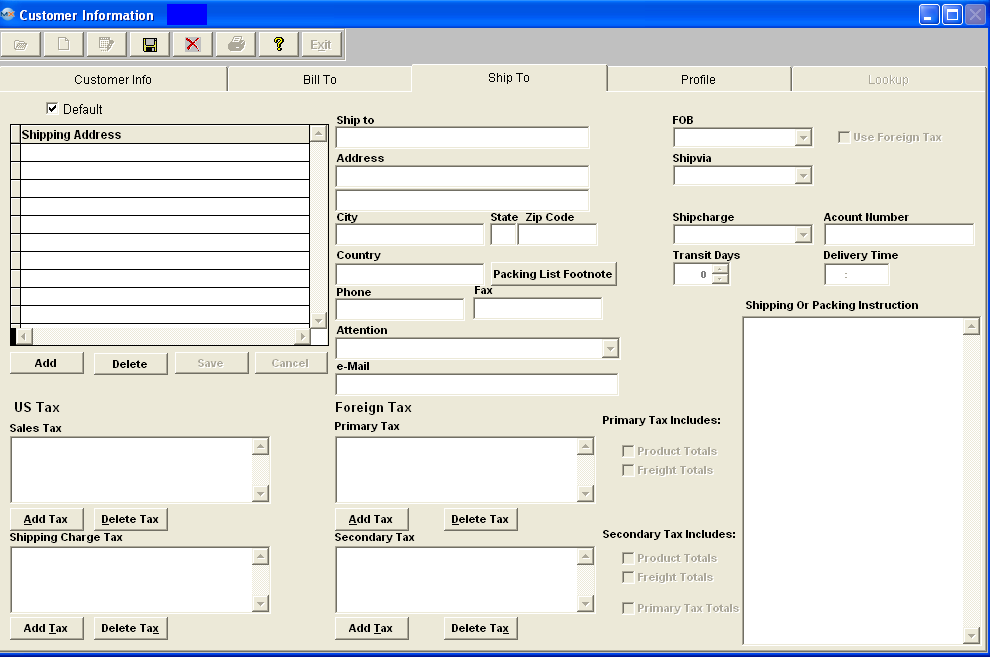
In this screen, the user defines the customer information for shipping purposes. The Ship-To screen has additional tabs for more detailed information. The first screen is the Ship-To Address Information. The screen and fields are identical to the Bill-To screen, except that the information will be used for packing lists.
Pressing the ADD button located at the bottom of the screen will automatically fill the information from the Bill-To screen, if it has been completed. All data may be edited and saved, or new data may be added to the database.
 |
Depressing this button will open a screen for a Packing List Footnote to be added that will appear on all of the Packing Lists for that customer. |
Select the FOB Terms from the pull down established for the customer. Must be established in the System setup/FOB setup prior to use.
Select the Ship Via from the pull down definition established for the customer, as entered in System setup/Ship Via setup.
Select the shipping charge from the pull down classification used for charging the customer, as entered in System setup/Ship Charge setup.
Enter the number of Transit Days from user’s dock to customer’s dock, based on ship-via method. If the Customer transit days are blank or zero that then the system will take from the Delivery Schedule default.
Enter the freight account number if the customer wishes the freight to be shipped against their own account.
Enter the customer preferred delivery time to their dock.
When "Use Foreign Tax" box is checked, the foreign tax setup will be visible and US Tax setup will be invisible. When "Use Foreign Tax" box is unchecked the foreign tax set up will be invisible and the US Tax setup will be visible.
Check the "Use Foreign Tax" button to calculate foreign tax, if foreign tax applies to this Ship To address. This will allow users to use multiple taxes, based on the Province. See the Foreign Tax Overview below. Once this box has been checked for a specific address it should not be unchecked. If customer also uses US Tax user should setup another ship to address for US Tax. This box should not be checked and uncheck per shipment.
Enter the Primary and/or Secondary tax information to be charged on taxable items shipped to this address, by depressing the "Add Tax" button and selecting a tax rate from the Pull Downs. Information being displayed in the pull downs is from the information entered in System Setup/Sales Tax Authority Table setup. The User can modify how the tax should be calculated by checking or unchecking the box on the right of the screen.
If not using foreign tax, enter the sales tax to be charged on taxable items shipped to this address. See the US Sales Tax Overview below.Enter the shipping charge tax to be charged on freight costs for shipping to this address.
Adding a Sales Tax or a Shipping Charge Tax in Customer Information requires that those items added be entered in System Setup/Sales Tax Authority Table setup.
The Delete Tax button allows the user to select an existing tax authority for the customer for deletion.
Sales Tax Overview
Sales Orders/Customer Information
US Sales Tax Overview
For Sales Order Items with no Tax, leave the Tax box unchecked. No further action is required.
To Manually add US Tax (if not set up in Customer Information), enter line item and then in Pricing Screen click on Add Line and enter description of Sales Tax and Tax Amount manually. A Sales Type for the appropriate Tax G/L number should be setup in Accounting so that it can be selected when entering the Sales Tax manually. The full amount of the Tax will be Invoiced upon shipment of the first item so using manual sales tax entries may not be useful for shipments with multiple shipments against the same line item.
Checking the Tax box in Sales Order Pricing will not calculate or add US Tax for a line item unless the Shipping Address for the particular Customer selected in the Sales Order Header has been set up. Shipping Address Tax Setup is done in the Tax and Shipping Mode screen under the Ship To tab under Customer Information Management.
If a particular Customer Ship To Address has more than one US Tax (such as a Sales, Use, Excise, etc. tax), then the taxes may be entered in System Setup individually and added individually to the appropriate Customer Ship To addresses.
If there are more than one US Tax setups for a Customer Ship To Address, Manex will add up all the tax rates and apply the combined percentage to the pre-tax line item total.
Foreign Tax Overview
User CANNOT manually add Foreign tax to Sales Orders or Invoices. The Foreign tax box must be checked for the Shipping Address for the particular Customer selected in the Sales Order Header.
If the Foreign tax box is checked for the Shipping Address for the particular Customer selected in the Sales Order Header. Pricing will be listed as follows on the Sales Order Acknowledgement, Invoice, RMA, and Credit Memo: First the Product Sub-tot AMT, the Sales Discount (if applicable), the Freight AMT (if applicable), a SUB-TOTAL, the GST TAX (Primary tax) (Note: the Primary tax will always be displayed even if it is zero, if a Secondary Tax is present), then a second Sub-Total, PST TAX (secondary tax), and last the TOTAL. If no PST tax (secondary Tax), Sales Discount, or Freight is involved, then no lines would print for these items. See the Foreign Tax Examples.xls attachment to see how the Primary and Secondary taxes are calculated.
The Primary tax and Secondary tax is divided into the Sales tax and Shipping tax on the Sales Tax reports.
For Example:
Primary Tax (GST): 144*10% (sales tax) + 0 (no freight tax is calculated) =$14.40
Secondary Tax (PST): 144*8% (sales tax) + 12*8% (Freight tax) = $12.48
Divided into sales tax and freight tax:
Sales Tax: 144*10% (sales tax) + 144*8% (sales tax) = $25.92
Freight Tax 0 (from primary tax) + 12*8% (from secondary tax) = $0.96
Enter the Shipping Instructions - This field is a memo field that may be used to record directions, notes, cautions, etc. for shipping to this Customer Address.
After completing the Ship To information select either the Save or the Cancel button located below the Shipping Addresses.
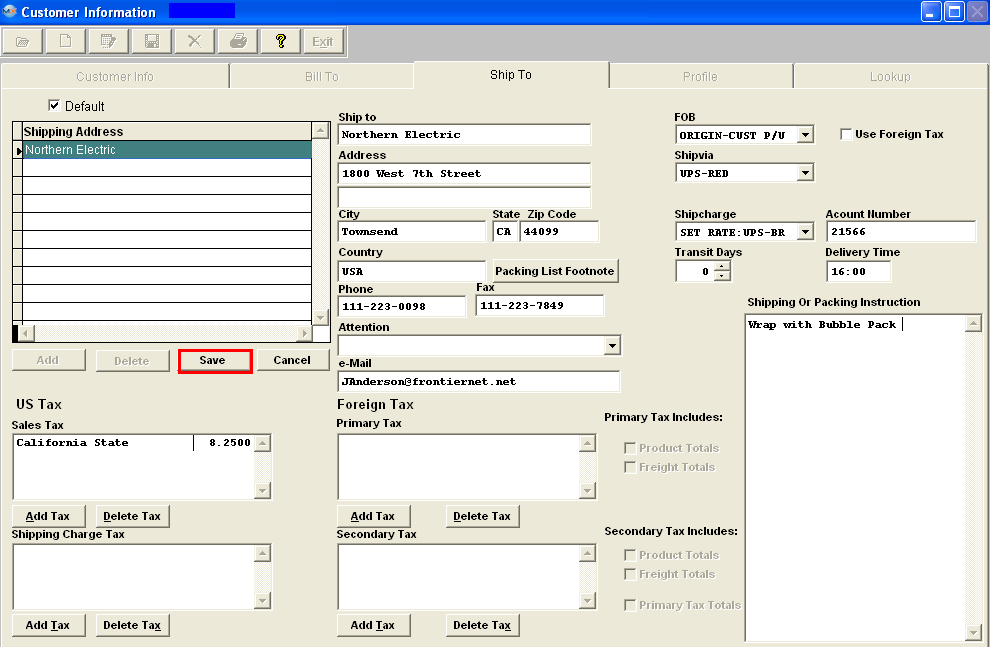
Then the user may click on the Profile Tab. In this screen, the user defines the Customer Profile notes for internal purposes. This screen is a memo field that may be used to record customer company information. 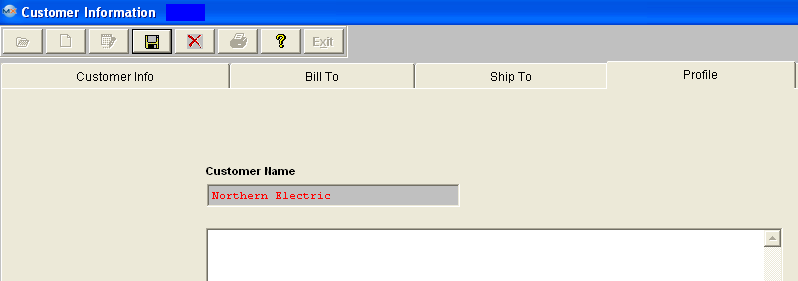
Once the record is complete user must depress the Save changes icon to save changes or the Abandon changes icon if you do not want to save change.
|