ArticlesArticles Most Helpful ArticlesMost Helpful Articles Language SettingsLanguage Settings LoginLogin
RSS Feeds
DrillDown Icon Table of Contents Back
 . . . . . . . . . . . . .
DrillDown Icon Purchase Order Management
DrillDown Icon Prerequistes
DrillDown Icon Introduction
DrillDown Icon Fields & Definitions
DrillDown Icon How To .....
DrillDown Icon Find Purchase Order
DrillDown Icon Add A Purchase Order
DrillDown Icon Inventory Part
DrillDown Icon MRO Items
DrillDown Icon Service Items
DrillDown Icon Edit, Cancel, or Close a Purchase Order
DrillDown Icon E-mail Purchase Order(s)
DrillDown Icon Approve a Purchase Order
DrillDown Icon Load Supplier Acknowledgement
DrillDown Icon Copy "View Change History" Notes
DrillDown Icon Reports
DrillDown Icon FAQs
DrillDown Icon ManEx Minutes (PO)
DrillDown Icon Open Purchase Order Status
DrillDown Icon Supplier Line Card Information
DrillDown Icon Part Manufacturer List
DrillDown Icon Supplier Rolodex
DrillDown Icon Upload New Purchase Orders
DrillDown Icon Upload PO Items Deletions
DrillDown Icon Upload PO Items Additions
DrillDown Icon Material Requirement Planning (MRP)
DrillDown Icon Master Production Schedule (MPS) & Forecast (OPTIONAL Module)
DrillDown Icon Purchase Setup
DrillDown Icon In-Plant Store (IPS) (OPTIONAL Module)
  Email This ArticlePrint PreviewPrint Current Article and All Sub-Articles
 
MRO Items

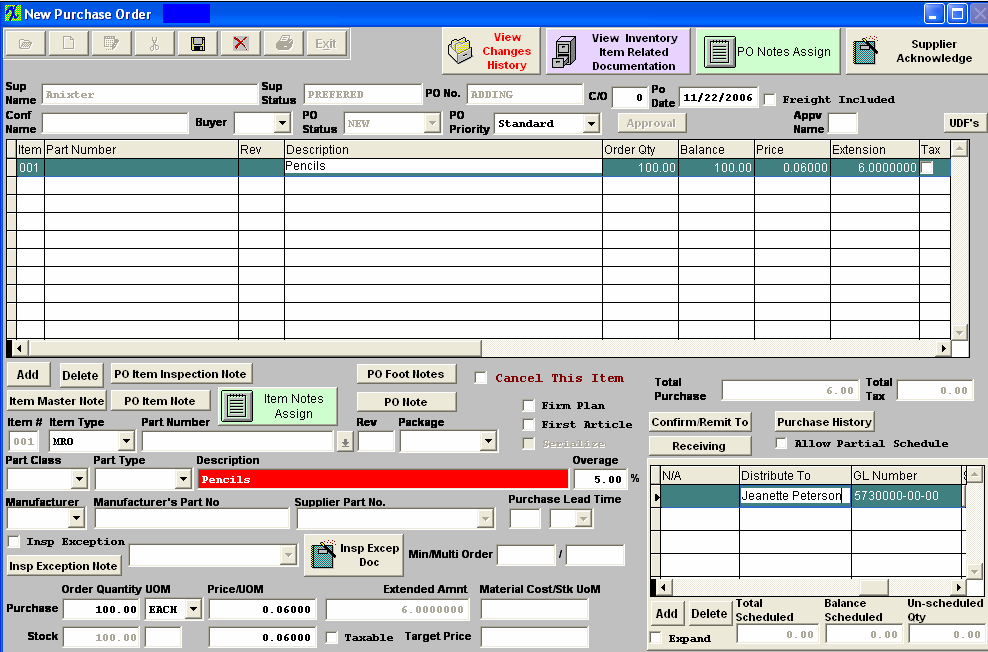
MRO stands for Maintenance, Repair and Operations.  Generally this is used for supplies, etc. purchases.

After selecting the Item Type to be "MRO"

If the MRO item is included in inventory 
      a.  The user may jump directly to the part number box (click on it) and enter a part number. Or, the user may step through the Part Classes and Part Types to narrow 
the focus and then select a part from the desired part type.
 
      b.   Fill in the quantity and unit price. 

If the MRO item is NOT included in inventory
      a.   The user may enter in the Suppliers part number manually (or leave blank) and then jump to the description field and enter the description.

The finished screen should look like the screen displayed:

     
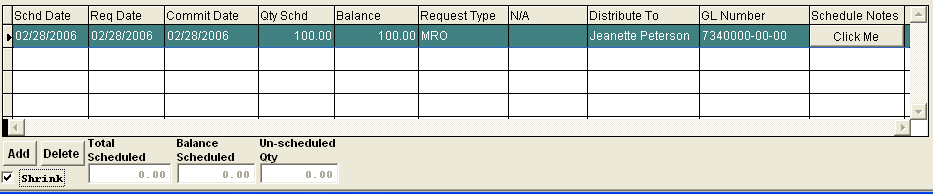
  1. Check the Expand box in the Schedule screen.
  2. Enter schedule dates and quantity scheduled.
  3. Type in the title or name of the person requesting the item in the “Distribute To” field.
  4. Enter a General Ledger account number in the GL Number field.

The completed Schedule screen will appear as follows:

  1. At the conclusion of entry for the item, the user may depress the Save record action button or the Abandon record action button.
  2. Approve record. 


Article ID: 414