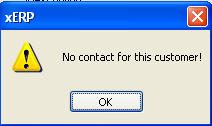
|
|
|||||
|
|
|
After selecting a part number, ManEx requests the quantity to be ordered. The user enters the Ord Qty (The quantity being ordered by the customer for the part number and the system automatically displays the Back Order, which is the quantity still due to be shipped for the order).
Once this quantity is entered, ManEx populates the first open line in the sales order with the data from inventory tables. At this time user may assign a project number to the product if applicable.
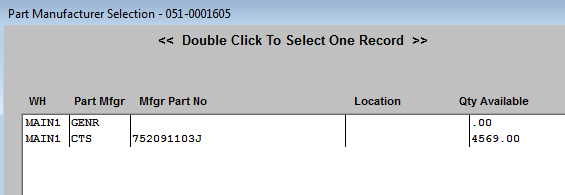
 You may view additional information about the part by sliding the scroll bar at the bottom of the grid to to the right.
Once user has made their selection the part will be added to the Sales Order with the part information. The user must then move to the Order Quantity on the screen and enter the quantity ordered.
Once this quantity is entered, ManEx populates the line in the sales order with the data from inventory tables. At this time user may assign a project number to the product if applicable. If parts are allocated to a project and the project is selected in SO for the SO item, when the part is shipped, those allocated to that project parts will be available to be shipped. After the project is selected in SO, the new created WO will link to that project.
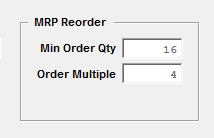
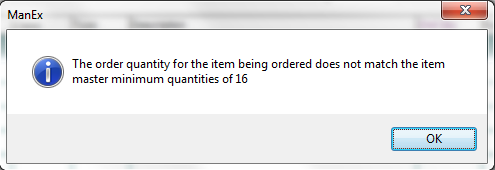
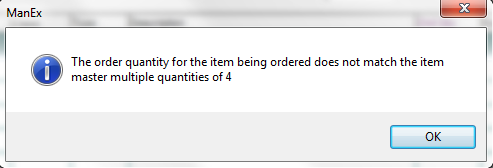
 Note: When the user enters a quantity for a part, the system will check to see if there is a minimum and/or multiple setup in Inventory for this particular part/product.
If the order quantity doesn't meet the requirements, the statements shown below will popup and display in the item master min and mult order quantity with an OK button. No other action is required. The user can choose to change the order quantity to match, or proceed as entered
The "Add Miscellaneous" button is to add any miscellaneous items to the sales order. This may be prototype items, engineering charges, or any item that is not manufactured nor is it in inventory. Pressing this button adds a line to the Sales Order and moves the cursor to the description field. The user enters the description, quantity and may then move to the pricing screen to complete the data. The user is reminded that the scroll bars at the right side and bottom of the information box allow the information to be scrolled sideways and up or down to see additional information.
The "Delete Line" button is to delete a line already entered from the Sales Order. The user selects the line to be deleted from the Sales Order tab, and presses the button.
|


| If user has the "SO Approval Required" box check in Sales Order Defaults & Sales Discount Type module checked, then user will be required to check the "SO Approved" box before being able to Issue a Work Order. If the "SO Approved" box is NOT checked user will receive the message located to the right. | 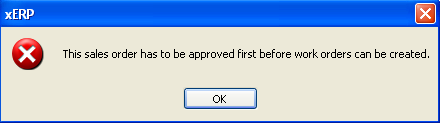 |
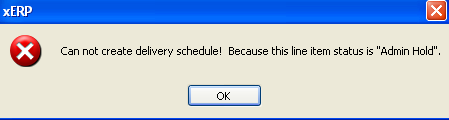
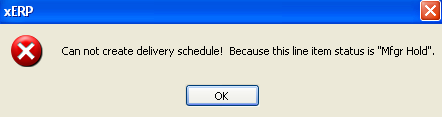
| If line item is on Admin Hold or Mfgr Hold user will receive one of the following messages and will be unable to Auto create a WO until the status has been changed for this specific line item. User will be able to manually add a Work Order for this product in the Work Order Management module. |
|
|
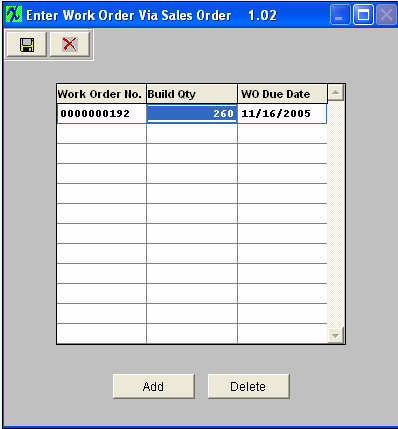
If there is only one delivery scheduled for the sales order, and the work order setup is established as automatic numbering, then the following screen appears:
Keep in mind though that even if you have the SO linked to a WO does not mean that the quantities will always be the same. The link is for reference only between the two modules and they are still individual records so when any changes are made to either the SO or the WO the change will not update or be carried forward to the other. A message is displayed to the users that they will have to make the same changes to the WO. |
 |
|
If the user has established more than one delivery date for the sales order, then pressing this button brings up the following: |
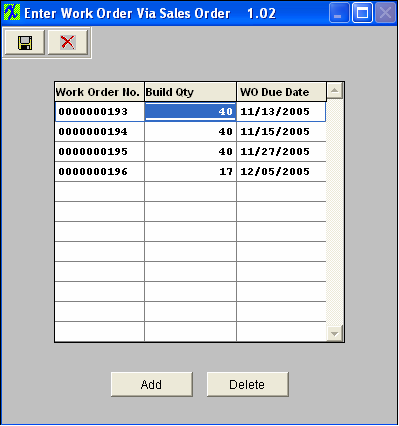 |
Depress the Save action button to finish creating the Work Order(s).
After completing all of the Sales Order data, the Sales Order must be saved. Then pressing the WO List tab will display all of the work orders created for the current sales order.
Schedule Tab
There are two modes available for completing a scheduled delivery for a product: Automatic and Manual. In the Automatic mode, ManEx will take a beginning date and a quantity to be delivered each period (Days, Weeks or Months) and schedule out the delivery using the Delivery Schedule Default Days which are setup in the Delivery Schedule Default Setup module.
Clicking on the Schedule screen tab brings up the following:
![]()
Sales Order Line number: Select the line number by depressing the LN down arrow. The following selection will be displayed:

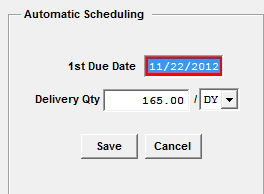
| Automatic Scheduling |
Pressing this button enables the scheduling box and places the default lead time date in the Due Date box. (The user may establish a default number of days setup in the Delivery Schedule Default Setup module). The user can then use that date, or enter the first (beginning delivery) date the customer expects to receive the order. The Delivery Qty screen allows the user to divide the shipment into multiple deliveries of equal parts. For example, if the order is for a total of 100 pieces, and the customer wishes delivery to be at the rate of 10 units each day, then the delivery quantity should be entered as 10. The next box allows the user to select the delivery intervals. The options are by day (DY), week (WK) (7 days) or month (MO) (30 days).
Note: In using the term Weekly and Monthly, it doesn't matter what the holidays or what the weekends are (i.e. that they are not excluded from the total time of a week or month), but are considered when the final date is calculated. |
 |
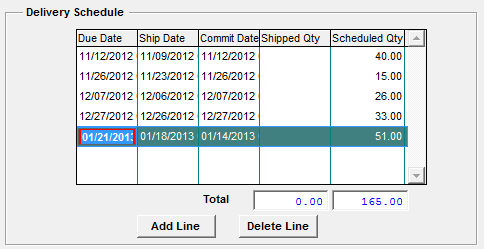
| Manual Scheduling |
Pressing the Add Line button enables the delivery schedule box and places the cursor in the Due Date box. The user can then enter the first (beginning delivery) date the customer expects to receive the order. Next, the Ship Date (the date the order is to leave the user’s dock) will be entered by ManEx based on the transit days entered. This date can then be modified by the user if a different date is desired. Then the scheduled quantity is entered. The Shipped quantity will be completed by ManEx when the line has material shipped against it. Additional lines may be added or deleted by pressing the appropriate button. The total number of units scheduled will be displayed at the bottom of the box, so the user can verify all units have been scheduled. |
 |
After you’ve scheduled all assemblies, you may go back into the Sales Order tab and issue the Work Orders for those assemblies. Please refer to the instructions above regarding the Issue Work Order button.
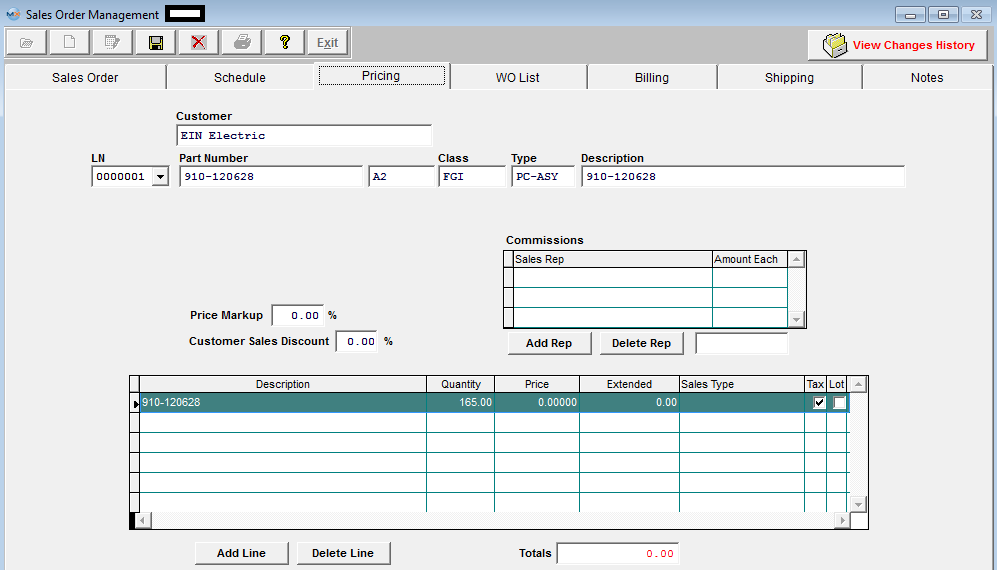
Pricing Tab
Clicking on the Pricing screen brings up the following screen:
Depress the down arrow next to the LN field. The following list will appear:

Select the desired line number. If the user has completed the Pricing Screen for the product, then the pricing will be automatically entered. See Article #766 for more detail.
|
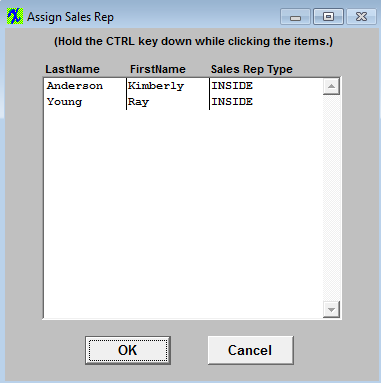
Depress the "Add Rep" button to add a Sales Rep. The following screen will appear listing all the Sales Rep's setup in the Sales Rep Information module.
Highlight the Sales Rep or Reps, then depress the OK button and they will appear in the commissions box as displayed below.
|
 |
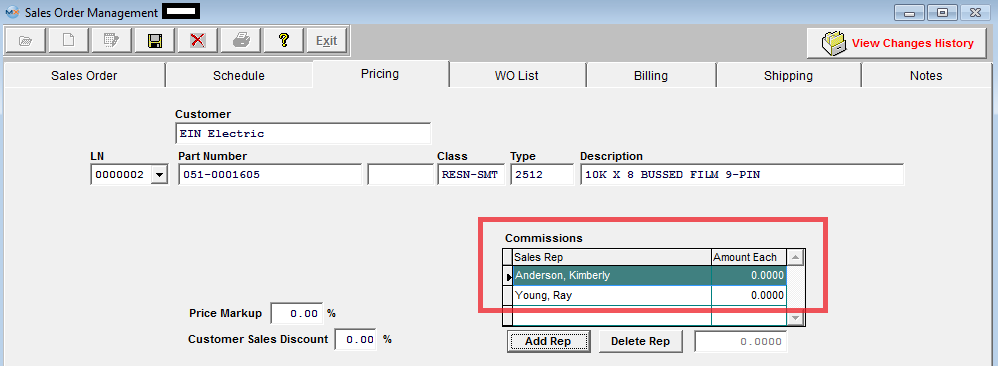
Enter in the commission amount for that specific Sales Rep.
If accounting is installed,the user selects the Sales Type. The user can select the Sales Type from the drop down list:

If the user has completed the Pricing Screen for the product, then the pricing will be automatically entered. See Article #766 for more detail.

For Sales Order Items with no Tax, leave the Tax box unchecked. No further action is required.
Adding a US Sales Tax or a US Shipping Charge Tax in Customer Information requires that those items added be entered in System Setup under Sales Tax Authority Table.
If a particular Customer Ship To Address has more than one US Tax (such as a Sales, Use, Excise, etc. tax), then the taxes may be entered in System Setup individually and added individually to the appropriate Customer Ship To addresses.
User CANNOT manually add Foreign tax to Sales Orders or Invoices. The Foreign tax box must be checked for the Shipping Address for the particular Customer selected in the Sales Order Header.
If the Foreign tax box is checked for the Shipping Address for the particular Customer selected in the Sales Order Header. Pricing will be listed as follows on the Sales Order Acknowledgement, Invoice, RMA, and Credit Memo: First the Product Sub-tot AMT, the Sales Discount (if applicable), the Freight AMT (if applicable), a SUB-TOTAL, the GST TAX (Primary tax) (Note: the Primary tax will always be displayed even if it is zero, if a Secondary Tax is present), then a second Sub-Total, PST TAX (secondary tax), and last the TOTAL. If no PST tax (secondary Tax), Sales Discount, or Freight is involved, then no lines would print for these items. See the Foreign Tax Examples.xls attachment to see how the Primary and Secondary taxes are calculated.
The Primary tax and Secondary tax is divided into the Sales tax and Shipping tax on the Sales Tax reports.
For Example:
Primary Tax (GST): 144*10% (sales tax) + 0 (no freight tax is calculated) =$14.40
Secondary Tax (PST): 144*8% (sales tax) + 12*8% (Freight tax) = $12.48
Divided into sales tax and freight tax:
Sales Tax: 144*10% (sales tax) + 144*8% (sales tax) = $25.92
Freight Tax 0 (from primary tax) + 12*8% (from secondary tax) = $0.96
If the user wants to use a Lot Charge instead of unit pricing, click on the Lot box. This will take the unit cost as a lot charge for the item without extending the units by the price. This may be used if a flat fee is charged for a number of parts.
Clicking on the Add Line button may enter additional charges for the product. These charges may carry a different unit price, and may be of any description. A Non-inventory line added on this screen will be invoiced on the first shipment made for this sales order.
Work Order List Tab
Clicking on the Work Order List tab brings up the following:
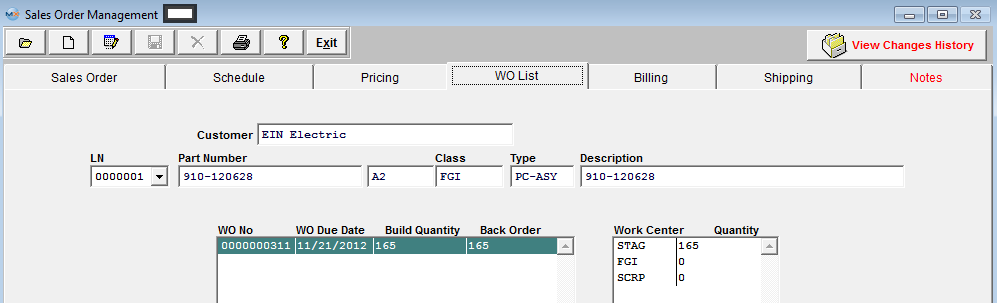
Depress the down arrow next to the LN field. The following will display:
Select the line item containing an assembly for which Work Orders have been created.
This screen is for information only, providing the user with status of work orders created for the current sales order. The user has the option of creating multiple work orders for a sales order line item. To see the Work Orders for the next line item, depress the LN down arrow and select the desired line item.
Billing Tab
Clicking on the Billing screen tab brings up the following:

In this screen, a Bill-to address will be completed with the default address established in the Customer Information Module. The Bill-to address also may be selected from any other addresses entered in the Customer Information Module. The first prompt is to enter the Bill-to address. The user may accept the default address, or select from any address established in the Customer Information Module. All address information in the set up will be displayed when the down-arrow is pressed at the right side of the field:
After selecting the appropriate bill-to address, the information fields on the screen are populated with the correct data.
Shipping Tab
Clicking on the Shipping screen tab brings up the following:

As in the Billing screen, the user may select from established ship-to addresses by pressing on the down-arrow key at the right of the first field:
Notes Tab
The last screen, the NOTES screen, provisions are made to establish Sales Order Notes and/or Sales Order Acknowledgment Footnotes. These notes are available on their respective screens.

Note that when any note is entered on this screen, the screen tab NOTES turns red to indicate there is data in the notes.
Once all Tabs have been complete Depress the Save action button to save changes or the Abandon changes action button to abandon changes.
| ManEx, Inc. Content intended for information only. Do not redistribute without written consent. |
Knowledge Base Software Powered By: NovoSolutions, Inc. |