Selecting Inventory Parts as the item type, the user may jump directly to the part number box (click on it) and enter a part number. Or, the user may step through the Part Classes and Part Types to narrow the focus and then select a part from the desired part type. Once a part number from Inventory has been entered, ManEx completes the boxes associated with the item master.
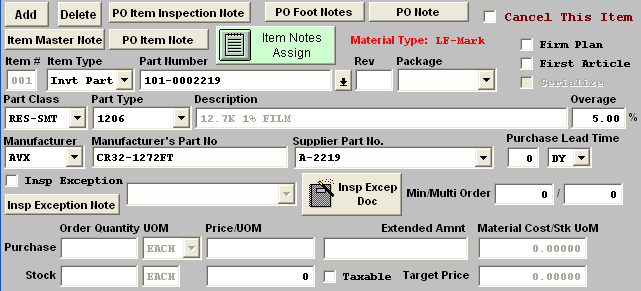
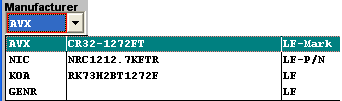
| If more than one manufacturer exists for the part, the user may click on the down-arrow next to the manufacturer edit box and select the appropriate manufacturer for the order. The Material type will be displayed in the pulldown next to the Mfg. and Mfgr. PN. |
 |
|
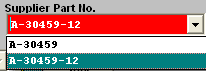
If more than one supplier part number exists for the part, the user may click on the down-arrow next to the supplier part no. edit box and select the appropriate supplier part no. for the order.
The system will look for the preferred supplier part number and if found will show it as a display. At this time the user can leave the part number as is or select a different one if available. After a user will save the PO, the supplier part number will be saved and next time you will see the selected suppler part number when viewing the same PO.
No history will be saved because this field is for the information only.
|
 |
| Firm Plan |
If this box is checked, the MRP module will not try to override the purchasing decision. For Example: The user makes a decision to block order 600 parts, but the need is only for 100 parts per month for the next six months. Without the Firm Plan command, the MRP module would tell the user to cancel the PO for 600 quantity and re-issue for 6 separate purchases of 100 each. With the Firm Plan command, this tells MRP that the purchasing decision was intentional. (Please refer to the Material Requirements Planning article).
|
| First Article |
This box will be checked if set-up in the Inventory Control Management Module. You may uncheck it or check it if user has been instructed that it may be changed for this item only. This information will be carried forward to the PO Receiving screen for reference. |
| Serialized |
This box will be checked if set-up in the Inventory Control Management Module and will not be editable within the Purchase Order Management. This indicates to the user that this BUY part has been marked as Serialized and any product coming in or out of the system will require serial number tracking. |
The user may edit or add a percentage amount of extra material that will be allowed to be shipped against the order. By entering a percentage in the OVERAGE field, receiving will be allowed to receive extra parts up to the limit imposed in this field.
The user may also edit or add in purchasing lead time and min/mult order quantities through the Purchase Order Management module.Once the record has been saved this information will then be updated within the Inventory Control Management under the MRP Info screen.
The user may check the box for Inspection Exception and select from the Inspection Exception Pulldown (which is established in the Inspection Exception Setup module). The user will then also be allowed to enter any Inspection Exception Notes and/or Load Insp Excep doc that pertain to that PO line item. This information will then be displayed within the PO Receiving as reference information to the users that are processing the Receipts through the system.
The user is then prompted for the purchase order quantity of parts to be ordered. The user may enter either the Purchase Quantity or the Stocking Quantity, and ManEx will complete the other field based on the purchase/stocking unit of measure and conversion field.
NOTE: When creating a PO for an item with different purchasing and stocking UoMs, be sure to enter the MRP suggestion into the Stocking qty field rather than the purchasing qty field. The system will automatically convert the stocking unit into the purchasing unit for the purchase order qty.
For example if the buyer is creating a PO for an item that is used by inches but sold by the foot, the user would enter qty of 24 into the stocking qty field and the PO would automatically convert it to 2 feet in the purchasing qty field. So the supplier deals in feet, but ManEx deals in inches. The conversion between the two are established in the Unit of Measure & Conversion module.
Then the unit price is entered (Price Each). The extended amount is shown, calculated by extending the quantity by price. (If the inventory part that you are creating a line item for currently has a standard cost of 0.00 within inventory control the system will prompt the user if you wish to take that Purchase Order Price entered and use it as the standard cost for that item within inventory control). This can not be controlled by the Security level due to the fact that it is better practice to have a $$ assigned to the ICM record before the Purchase Order Receipt is accepted into the system. Otherwise you will have stock that is not valued properly, accounting records that will not be correct, etc. . . . So this is why ManEx allows any Purchase Order user to populate the STD cost field for that record with the purchase $ that you are loading. BUT . . Once a Std Cost is associated with the ICM record - the users within Purchase Order Management should no longer be able to change that value through the PO module.
The user may then indicate that the items are taxable by clicking on the Taxable check box.
The Stock/BOM field will update automatically based upon the conversion table defined in setup. The completed screen should appear as follows:
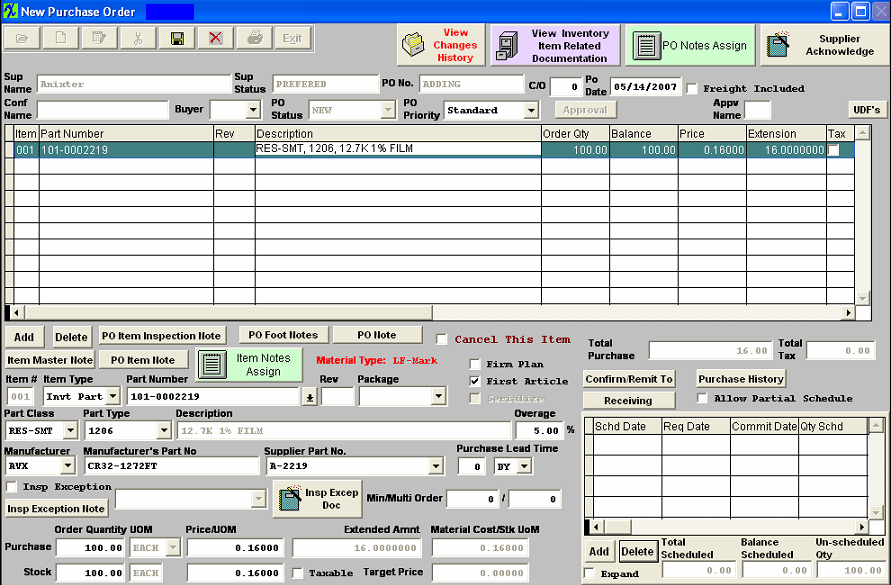
Before saving the order you will need to check the expand box and enter the Schedule detail information.
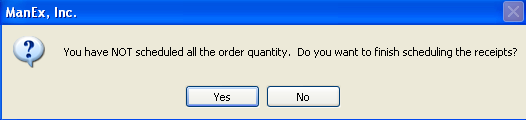
There are situations when the users will either not enter a schedule or enter a partial schedule at time of creating PO. If the scheduled qty does not match the order qty or the "Allow Partial Schedule" box is unchecked, upon depressing the Save button the following message will be displayed. This gives the user the option to stop the save process and return to the item and schedule or continue on and save without scheduling. Some users may not know an exact date for scheduling at the time of the PO creation and just create the PO to get the part on order. Then upon the supplier response add the scheduled dates to the PO at a later time. This is why we do not enforce the scheduling at the time of the PO creation.
If the "Allow Partial Schedule" box is checked upon saving the PO without a schedule or a partial schedule this message will not be displayed.
Entering Schedule Detail Information
The item will schedule automatically by adding the lead time to todays date and schedule the entire order amount. (Note: MRP will NOT acknowledge qty's that are not scheduled).
At this time the user has the option to change the Schd date/Req date/commit date information and also the Qty Schd.
Note: If user is not following MRP suggestions when creating POs they need to keep in mind inspection time when entering a schedule for a PO.
|
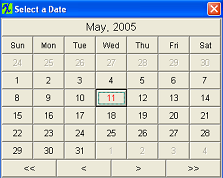
If the user wants to modify the automatic scheduled date, they can either manually adjust the Date information by highlighting the field and typing in the new date, or place the cursor in the Due Date field.Type in a ?. A calendar will appear.
Depress the desired delivery date.To advance into the next month, depress the > button.
|
 |
Schedule Field Definitions
| Schd Date |
The date the material is due to land on the users dock. This is the date MRP uses. |
| Req Date |
This is the internally required or desired date. It is not used for the supplier or MRP. |
| Commit Date |
The commit date is a reference field for the buyer. |
| Qty Schd |
The quantity scheduled for the due date. |
| Warehouse |
The User can choose the Warehouse from the pulldown or leave it blank. The Y next to the Warehouse location indicates that, that Warehouse is set-up in the AVL. The N next to the Warehouse location indicates that, that Warehouse is not set-up in the AVL. If the warehouse field is left blank then the warehouse can then be assigned at PO Receiving Management. Once the record has been saved within the PO Receiving this information will then be updated within the Inventory Control Management under the Qty info screen. |
| Location |
The Location field will update automatically from the Inventory Control Management module. The user can edit this field in the scheduling detail. This will not change the location in the Inventory Control Management module under the quantity info screen. |
| Distribute To |
This is classification of the distribution of the item when received, either to regular Inventory Receiving or to Allocate to Special Work Order or Project |
| GL Number |
The General Ledger number where the purchase order will post. |
| Schd Notes |
Depressing on the  button will bring up a screen where the user can enter in specific notes that pertain to that one schedule, item, and date. Type in the note. Depress the Save button. Exit button will bring up a screen where the user can enter in specific notes that pertain to that one schedule, item, and date. Type in the note. Depress the Save button. Exit |
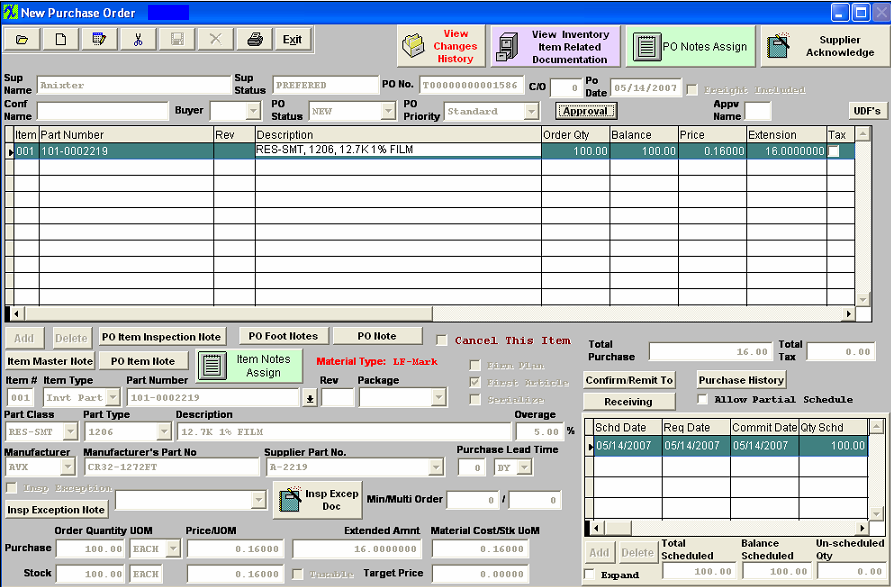
Pressing the Save button at the top of the screen saves the order and item(s) entered, and assigns a temporary number to the order. After adding items to the purchase order and saving them, the Purchase Order will display all items added to the order.
The user may use the scroll bars at the right and bottom of the items listed to scroll over additional information.
The user may modify the column widths in the current view by placing the cursor on the right border of the column in the column header, and pressing the left mouse button. Moving the border while holding the mouse button then releasing at the new location resizes the columns.
|