ArticlesArticles Most Helpful ArticlesMost Helpful Articles Language SettingsLanguage Settings LoginLogin
RSS Feeds
DrillDown Icon Table of Contents Back
 . . . . . . . . . . . . .
DrillDown Icon Hardware and Software Requirements for Installing SQL Server
DrillDown Icon List of Modules Converted to MANEX Client Server
DrillDown Icon Installing SQL Server
DrillDown Icon System Administrator
DrillDown Icon Security System
DrillDown Icon Accounting Setup
DrillDown Icon System Setup
DrillDown Icon General Setup
DrillDown Icon General Setup Introduction
DrillDown Icon Number System
DrillDown Icon Calendar Setup
DrillDown Icon Administrative Departments
DrillDown Icon Prerequisites
DrillDown Icon Introduction
DrillDown Icon Fields & Definitions
DrillDown Icon How To .....
DrillDown Icon Setup the Administrative Departments
DrillDown Icon Designate a PDF directory
DrillDown Icon Payment Terms
DrillDown Icon Sales Tax Authority Table
DrillDown Icon Standard Foot Notes
DrillDown Icon User Defined Reports Setup
DrillDown Icon System Appearance
DrillDown Icon Sales
DrillDown Icon Production
DrillDown Icon Material
DrillDown Icon FAQs
DrillDown Icon Operations Manuals
DrillDown Icon System Utilities
DrillDown Icon SQL Server Memory Settings and Performance
DrillDown Icon Definitions
DrillDown Icon How to schedule and automate backups of SQL Server databases in SQL Server Express
DrillDown Icon SQL_FAQ's
  Email This ArticlePrint PreviewPrint Current Article and All Sub-Articles
 
Setup the Adminstrative Departments

Enter SQLSYSSETTING.EXE  (within the ManEx root directory)  
This action will then prompt the user for a password
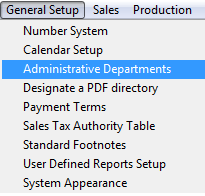
 The following screen will be displayed, enter the General Setup/Adminstrative Departments Module  

The following screen will be displayed:
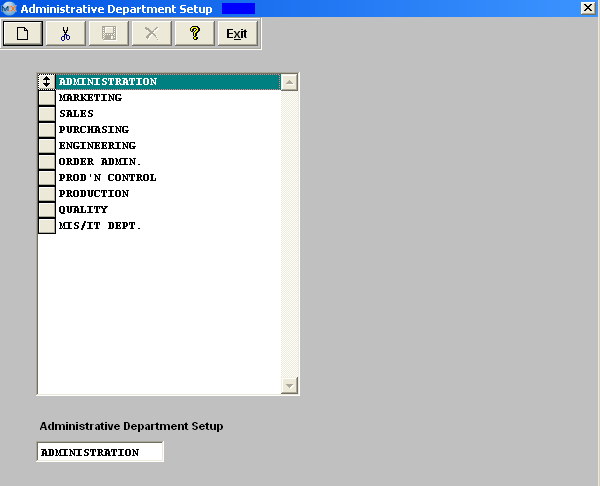
To modify this screen, the user must click on the Add or Delete button and supply the password. That action will enable the screen.

The user may either add or delete department names to the list. After adding or deleting a department name, the user must Save or Abandon changes.

These items may be rearranged in any order by clicking on and dragging the box to the left side to the (vertical) position desired. This order will be the order the user sees when using this list in other modules within the system. Suggestion: Have the one most used at the top of the list.

Where Used: When assigning non-production users to an administrative department, and in establishing accounts for the departments.

«Mark as Completed in RoadMap Section B Item 1-c»

Article ID: 3644