ArticlesArticles Most Helpful ArticlesMost Helpful Articles Language SettingsLanguage Settings LoginLogin
RSS Feeds
DrillDown Icon Table of Contents Back
 . . . . . . . . . . . . .
DrillDown Icon Accounting Setup
DrillDown Icon Prerequisites & Introduction
DrillDown Icon Access Levels
DrillDown Icon General Ledger
DrillDown Icon A/R-A/P Setup
DrillDown Icon Sales - A/R Setup
DrillDown Icon Prerequisites
DrillDown Icon Introduction
DrillDown Icon Fields & Definitions
DrillDown Icon How To ............
DrillDown Icon Sales-A/R Setup
DrillDown Icon Purchases - A/P Setup
DrillDown Icon Bank Setup
DrillDown Icon Inventory Setup
DrillDown Icon FAQs - Accounting Setup
DrillDown Icon Accounts Receivable
DrillDown Icon Accounts Payable
DrillDown Icon General Ledger
DrillDown Icon Accounting Transaction flow examples
DrillDown Icon FAQs - General Accounting
  Email This ArticlePrint PreviewPrint Current Article and All Sub-Articles
 
Sales/Accounts Receivable Setup


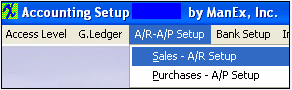
Enter ActSetup.exe/A/R-A/P Setup/Sales - A/R Setup

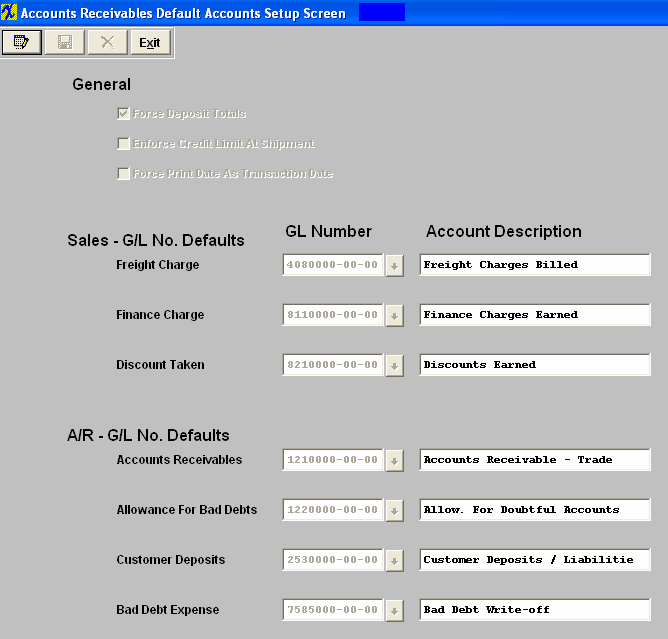
The following screen will appear:


The user may Edit information on this screen. At the conclusion of any modifications, the user must Save or Cancel to leave the screen.

If you are a Multi-Plant user, select the Division at the top of the screen.  Enter the defaults for that division.  Save the data.  Repeat this process until all divisions are entered.

Where Used:  This Setup is used in Sales Orders and Invoicing.

After completing this section:                              «Mark as Completed in RoadMap in Section C Item 3-a»

Article ID: 321