The inventory class and types are one of the most powerful parts of the ManEx system. These classifications allow the users to break up large inventories into groups and sub-groups. The smaller groups make it easier to locate an item, to view reports by classes, and easier to identify a part. In ManEx, it also guides users in the addition of new parts, insuring that there are common approaches to descriptions for common parts. ManEx even will allow for automatic part number generation, where the user has only to enter a description, after selecting a part class and type. Utilization of the class and types greatly simplifies the amount of information that must be contained in the description and part number for each part. The user must enter part classes for each part, but is not required to enter part types. However, without the part types established, the user is required to enter much more data when adding specific items to the item master.
Be sure to check out the automatic part numbering system described at the end of this section.
 |
This gives the user the option to re-sort the order the part types are displayed in the pulldown when setting up parts in the Inventory Control Mgmt module.
(See Article #1519 for further detail). |
| Part Class |
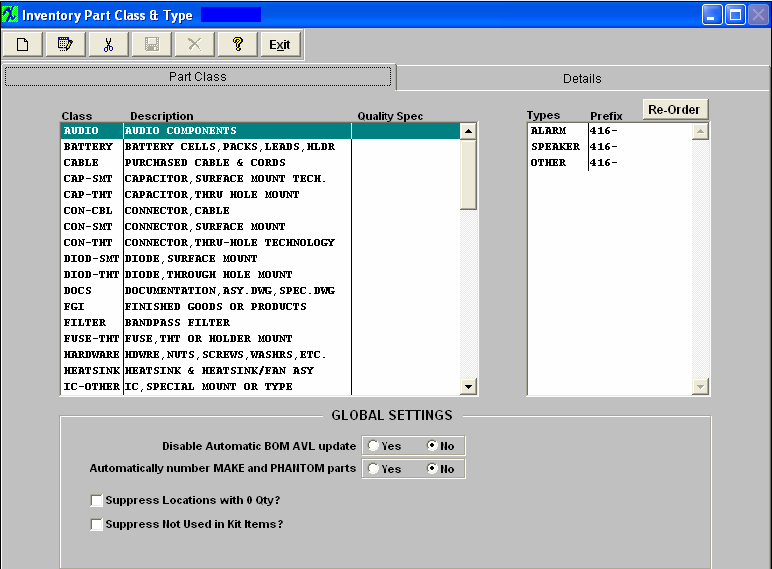
The first major classification is the part Class. This classification may be used to identify major groups of parts. For example, classes may include specific part genres, such as Resistors, Capacitors, Diodes, Transistors, Connectors, Relays, PC Boards, LEDs, Wire, Hardware, etc. Part classes must also be assigned to assemblies, and may be defined as Top Assy, Sub-Assy, Spares, etc. All item master parts must have a part class assigned to them in ManEx. If you want to separate Finished Goods and Raw Material Inventory, be sure to include a Finished Goods Class, as illustrated. The Part Class can be a max of 8 characters, the Part Class description can be a max of 30 characters.
|
Once a part classification has been established, then sub-groups may be assigned to each class. The sub-groups are called Part Types, and each part type may have a number of different characteristics associated with it.
| Part Type |
Examples of part types for the part class HARDWARE might be: Nuts, Screws, Washers, Bolts, Grommets, etc. Examples of part types for the part class CAPACITOR might be Ceramic, Tantalum, Mica, Mylar, etc.For RESISTOR, perhaps Carbon-Comp, Precision, Ceramic Wirewound, etc. Another way of setting up part types might by by configuration, for example for CAPACITORS, use Radial, Axial, SMT, etc. Or these may be further divided up by size, for CAPACITOR Class, SMT 1205, SMT 0805, SMT 1210, etc. For even more definition, the part types could be identified by both, so that part types might be: Tant–Rad, Tant-Axial, Cer-1205, etc. The Part Type can be a max of 8 characters, the PartDescription Template can be a max of 30 characters.
|
| Quality Spec |
Here you may enter a quality specification number (10 characters) that will be associated with each class. This specification number will print on purchase orders whenever placed for the part class. |
GLOBAL SETTINGS
| Disable Automatic BOM AVL update |
When adding new AVL's to the item master, here is where you would choose YES or NO to automatically update the BOMs. If you choose NO - ManEx will add the new AVL to all existing BOMs and check them as approved. If you choose YES - The AVL information will appear on the BOM's but they will be marked as not approved. Then they will not drive any demands or be available for pulling to that kit. Then you will have to manually go into each individual bom and Check mark the ones that you do intend to use that new AVL on.
|
| Automatically number MAKE and PHANTOM parts |
You may choose YES or NO to have the system automatically number new MAKE and PHANTOM parts added. |
| Suppress Locations with 0 Qty |
This allows the users to select the default to Suppress Locations with "0" Qty - The following reports will take this default when printing: ICM Module Reports: Inv on hand report; Inv and WIP Valuation report; Unused INV list report. Kitting and Shortage Report: Kit pick work sheet.
|
| Suppress Not Used in Kit Items |
This allows the users to select the default to Suppress Not Used in Kit items - The following reports will take this default when printing: ICM Module Reports: Inv on hand report; Inv and WIP Valuation report; Unused INV list report. Kitting and Shortage Report: Kit pick work sheet.
|
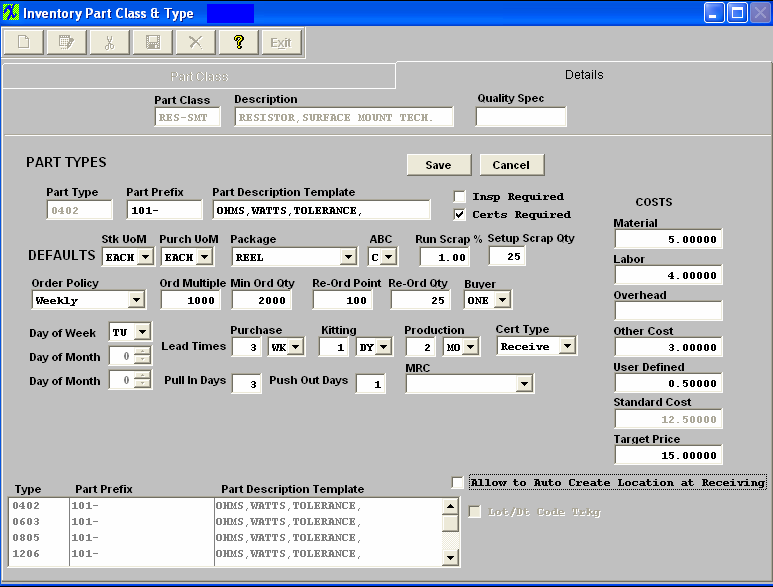
Once a part type is defined, the user’s workload in entering new part numbers is greatly reduced. For each part type, the user may set up parameters for that part type that will automatically be entered as the default condition when adding a new part for the same type.
If the user wishes, there can be a specific prefix (15 characters) added to each part number within a part type to distinguish the component from other types. The use of the prefix is entirely optional, and can be anything the user would like it to be numerical, alphabetical or both. A given prefix is tied to a part type, it is not exclusive, and can be the same prefix for many part types. When using a prefix it must have the "-", this is how the system identitifes it as the prefix. An example of a prefix might be “CS05-”, which would be the prefix for all Ceramic Capacitors in the part type SMT-0805. Then, anyone looking at the part number would know much more than otherwise possible. Also, because the part class and type is assigned to each part number, it may not be necessary to repeat the information in the description, leaving more room for specifics. If a part was in the CS05- type just described, the description would not have to include “SMT 1205” or “CER”, because they are already contained in the part type and prefix. Setting up a prefix is NOT required.
Each part type may also have a specific description template (30 characters) assigned to it to be used as a guide when entering new parts. In the example just defined, the template might appear like this: ”value xxFxx%,xxxV”. The words “CAP” and “CER” are not necessary, as all reports print out the class next to the part number. However, the user may wish to include “CAP” to aid in understanding BOMs, and searches based on part descriptions. The template entered in this setup will show under the description when defining a new item number description.
In addition to the prefix and description template, additional parameters may be set up and be defaulted into the item master when setting up a new part. These parameters are: Units of Measure, both stocking and purchasing; Packaging, ABC codes, Buyer Code, Run (production) Scrap percentage; Setup Scrap Quantity; Costs – Material, Overhead and/or User Defined, Material Requirements Planning Order Frequency, Order Multiples; Order Minimums; Re-order points (safety stock); Re-order qty; and lead-times for purchasing, kitting and production. There is also provision for MRP adjustment sensitivity in the Push-out, Pull-in days. Each of these will be discussed below.
Also, for each part type, the user may define whether or not the parts in the type are to be tracked by lot number and/or date code, inspected at incoming or require certification.
There is in MANEX the provision to automatically create part numbers for assemblies when they are added to the database. This option is invoked by selecting the YES button on the bottom of the setup screen for Automatic Numbering of MAKE and Phantom parts.
|
Inspection Required
|
This box, when checked, flags the receiving department that the parts must be placed in Receiving Inspection prior to the stockroom.
|
|
Certification Required
|
This box, when checked, flags the receiving department to check that the vendor included the appropriate certification for the parts, and/or the shipping department included certification. The types of certificates are Receiving, Shipping or Both.
|
|
Unit of Measure
|
The unit of measure for both stocking and purchasing must have already been entered in the “Unit of Measure” setup.
|
|
Package
|
The packaging description for the parts must have already been entered in the “Part Package” setup.
|
|
ABC
|
The ABC codes for the parts must have already been entered in the “ABC Types” setup.
|
|
Run Scrap %
|
This is the amount (in percentage of the parts issued to a work order) that will be added to the kit to compensate for materials normally lost in the production processes. It is typical to have some floor losses associated with very small and inexpensive parts that may have to be replaced in the kit. This percentage will be used to issue additional parts to a kit for a work order, and by Material Requirements Planning when generating requirements for un-kitted work orders and forecasts. This number should be at a minimum to avoid ordering excess material, but should be practical enough to avoid shortages when needed for work orders in production.
|
| Setup Scrap Qty |
This is the amount (in fixed quantity) of parts that, on the average, are consumed in the set up of the parts when tape leaders are used. Sometimes a user knows that there may be several setups from one reel of parts, and that for each setup there are a fixed number of parts on the tape that will be lost when the lot runs. Then this number may be used to ensure that sufficient parts are ordered and available for kitting. Material Requirements Planning uses this number based on the number of work orders required to meet demand.
|
|
Order Policy (frequency)
|
This value determines how often an order action is created for a part. If the part is used in many different assemblies, with many different work orders, then the Material Requirements Planning module may create many purchasing actions for the same part. In order to reduce the work load in purchasing, the user is offered a choice of order conditions which accumulates the orders into one action. These choices are: Lot for Lot; Daily; Weekly; Semi Monthly; Monthly; and Quarterly.
|
| Lot for Lot |
This means that each work order will create a demand and separate purchasing order action. The order action will be initiated based on the due date for each of the intended work orders. |
| Daily |
This means that instead of creating an order action for each and every work order, all of the work orders with actions due on the same day are grouped together. The order action is created once per day, with the total quantity needed for the day included in the order action. |
| Weekly |
This works the same way, except that all order actions due within a week period are pulled forward to a specific day and all actions combined for that day. Part of selecting weekly includes selecting the day of the week that the order action is to be effective. Once the day is established, the Materials Requirements Planning module will move all order actions in the interval to the beginning of the interval and combine them. The user may wish to use different days for different part classes and types, so that the buyer’s work load is distributed throughout the week. |
| Semi Monthly |
And so on, except that in semi-monthly, the user may select the days of the month in which the order action takes place. For example, the 1st and the 15th may be chosen, or the 10th and the 25th. Again, these dates may be arranged for different part types to spread the load in purchasing. |
| Monthly |
In this case, only one day of the month is requested, and all order actions will be moved forward to that date. |
| Quarterly |
In this case, only one month of the quarter is requested, and all order actions will be moved forward to that date. |
NOTE: The most expensive parts will probably be with the shortest order policy. This will help control the customer’s inventory turns, and maintain tight control over the parts. On the other hand, the least expensive parts may be better positioned towards monthly purchases, since the cost to process purchase orders may exceed the cost of the parts and of maintaining the inventory. It is up to the user to determine the best balance between order policies, inventory turns and the cost of procurement.
|
Order Multiple Quantity
|
This value is used by Material Requirements Planning module to determine how to order parts over and above the minimum quantity. If a part comes in 5000 unit reels, and only in 5000 unit reels, the order multiple would be entered as 5000. If the Material Requirements Planning module determines that a quantity of 5010 is needed, it will create an order action for the full 10000 parts.
|
|
Minimum Order Quantity
|
This value is used by MRP to determine how to order parts. Although this may be less than the order quantity, it is more likely that the vendor will not sell (for the price) less than a certain quantity, with order multiples beyond that quantity. For example, there may be an order minimum of 50,000 parts, but order multiples of 5,000 are offered beyond that quantity.
It is especially important to watch this value in connection with the order frequency, as a part with an order frequency of lot-for-lot and a minimum order quantity may result in purchasing actions of multiple requirements at the minimum, instead of combining the requirements to meet the minimum.
|
|
Reorder Point
|
This is the Safety Stock quantity. It is established so that whenever the inventory drops below this point, order actions are initiated to purchase additional parts. This feature might be used to maintain free stock items, such as nuts and bolts, and set at the approximate usage experienced in the time it takes to replace the parts.
|
|
Reorder Quantity
|
The is the number of parts to be ordered whenever a reorder point is encountered. The Materials Requirement Planning module will use this quantity in the order action.
|
|
Buyer
|
The Buyer Code for the parts must have already been entered in the “Inventory Buyer” setup.
|
|
Lead-times
|
All lead times are calculated with the Production Calendar. There are three types of lead-times available in MANEX to describe the duration required for an operation:
|
| Purchasing |
This is the amount of time that the vendor needs to have the parts delivered to the user’s dock. It begins when the order is placed with the vendor, and ends when the part arrives at the user’s dock. The Materials Requirements Planning module uses this value to determine when the order action dates should occur in order to have the parts in stock when the kit is due to be picked. |
| Kitting |
This is the amount of time that the stockroom needs to pull a kit for the product. It is used only in assemblies, and not available for purchased parts. The Materials Requirements Planning moduleuses this value to add to the production lead-time to determine when the kitting should begin. |
| Production |
This is the amount of time that it takes to manufacture or assemble the product. It includes the duration from the time the kit is released to production to the time the product is shipped. The Materials Requirements Planning moduleuses this value to determine when all parts must be in stock and the work order initiated in order to meet the delivery date. |
Note: The value of each of these terms may be in days, weeks or months.
|
Push-out / Pull-in
|
These values, in days, determine the sensitivity of The Materials Requirements Planning moduleto changes in demand. If the due date for an order moves within these values, then no order action is initiated to modify purchase orders or work orders in progress. If the due date falls beyond these parameters, then order actions to move the purchase orders or work orders will be initiated. The values used here should be influenced by the part cost (more expensive, the tighter the control) the order frequency (should be about one-half the order frequency) and a user’s policy regarding the cost of purchasing versus the cost of inventory. The lead-time and part availability may also be a consideration, with very difficult to obtain parts having tighter sensitivity. The Materials Requirements Planning module takes these parameters into account for changes in scheduled dates, but not for changes in quantities, since it is assumed that changes in quantity should be addressed regardless of the push-out/pull-in days.
|
Costs – These are the standard (budgeted) costs associated with the item.
| Material Cost |
In Systems with ManEx Accounting installed, the amount entered in this field is used for Cost Accounting functions. If Cost Accounting is not being used, the field can show actual, target or user defined cost. The Material Cost field adds into the Standard Cost total.
Important Note - If accounting is installed: For all buy parts, the material cost field must have data entered.If this data is missing (or wrong), the Raw Materials Inventory and theWork In Process (WIP) will be incorrect for the accounting records. All make parts which are not labor only (the customer brings you the kit and all you do is apply the labor), must have data entered in the material cost field. Additionally, the data entered in the material cost field for the make part must equal the sum of the Bill of Materials components.(Please refer to Bill of Materials Reports – Bill of Material With Standard Cost.) If the data is missing or wrong on a Make Part, the Work In Process, Cost of Goods Sold and Finished Goods Inventory will be wrong for the accounting records.If the sum of the Bill of Materials components does not equal the standard cost per the Item Master, a configuration variance will generate.
|
| Labor Cost |
This is the cost of the labor associated with the part. The Labor cost field will add into the Standard Cost total. |
| Overhead Cost |
This is the overhead burden if the user wants to capture the overhead at the assembly level. The Overhead cost field will add into the Standard Cost total. |
| Other Costs |
This is any other costs associated with the part. The Other costs field will add into the Standard Cost total. |
| User Defined Cost |
This is any additional cost associated with the part, as defined by the user. The User Defined cost field will add into the Standard Cost total. |
| Standard Cost |
This is the total of the following costs: Material, Labor, Overhead, Other Costs, and User Defined. |
| Target Price |
This field is currently only a data entry field and will be reflected in the Purchase Order module for "BUY" or "MAKE/BUY" parts. |
|
Tracking by Lot number / Date code
|
If this box is checked, the user will be required to enter a lot number, date code, expiration date (optional) and internal lot number information whenever performing a transaction for the part. If the user wishes to maintain inventory to this level, then they must enter information each time a part is moved. This will allow complete traceability by date and lot code for products assembled. The user will be able to determine all work orders or sales orders in which a certain date code was used. This field can not be edited once this part type record has been saved.
|
|
Auto-date for Internal Lot Code
|
When using Lot Tracking, this feature will automatically assign the current date as the internal lot code. This field may be appended or overwritten by the user during the transaction, if desired.
|
|
Product Expiration Days
|
When using Lot Tracking, this feature will automatically assign the current date plus the product expiration days as the expiration date on completed products moved to Finished Goods. This field may be appended or overwritten by the user during the transaction if desired. |
AUTOMATIC PART NUMBERING
And now, if the user has completed this information for a part type, the user may wish to use automatic part numbering. This feature is uniquely available for MANEX users, and requires only the following:
Part Class Part type Part Description
The Part Class and type must already be existing in the setup, if the user wishes to add a part to the item master within the Inventory Control Management module. Once the part class and type are entered, complete the description according to the description template established for the part type in this section. ManEx will then assign a prefix to a new part number according to the prefix in the part type setup, pick the next available sequential number, and complete all of the Inventory and Material Requirements Planning module data based on the part type. The user may, if needed later, adjust any of these values within the Inventory Control Management module.
|