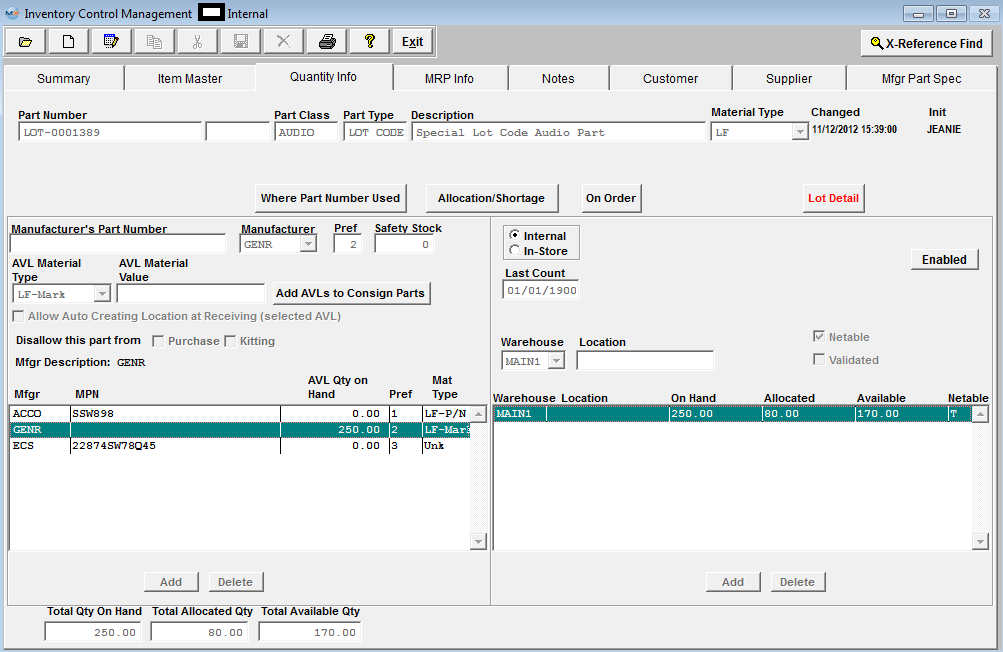
This screen is used to enter, edit and display Warehouse, Location, Manufacturer, and Safety Stock information for an inventory item. Also, after an item has been entered, complete inventory stock, allocation and usage information by Manufacturer is displayed or available at the click of a button. All current inventory information about any selected part can be displayed here.
Header Information fields
Part Number, Part Class, Part Type, Description and Material Type are Item fields which repeat at the top of all Tabs to display the selected Item.
 |
Clicking on this button will display all Active assemblies and sub-assemblies with this item appearing in their BOM. This screen allows user to Sort, Search and Drill Down to Selected Records. |
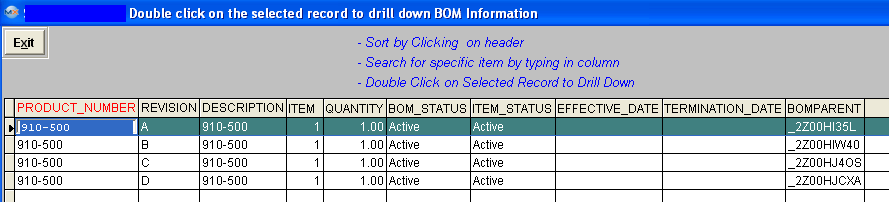
Where Part Used field Definitions
| Product Number |
Is the number assigned to the assembly for which the internal Part Number is a component |
| Revision |
Is the revision number of the assembly |
| Description |
Is the description of the assembly |
| Item |
Is the item number on the Bom |
| Quantity |
Pertains to the amount of the component used for 1 unit of the completed assembly |
| Bom Status |
Is status of the Bom (Active, Inactive,etc.) |
| Item Status |
Is status of the assembly (Active, Inactive, etc.) |
| Effective Date |
Pertain to any effective dates regarding the assembly |
| Termination Date |
Pertain to any obsolete dates regarding the assembly |
| BOM Parent |
|
 |
Clicking on this button will display Inventory Allocations and Shortages for this item by Work Order number, as displayed: This screen allows user to Sort, and Search for Selected Records.
|
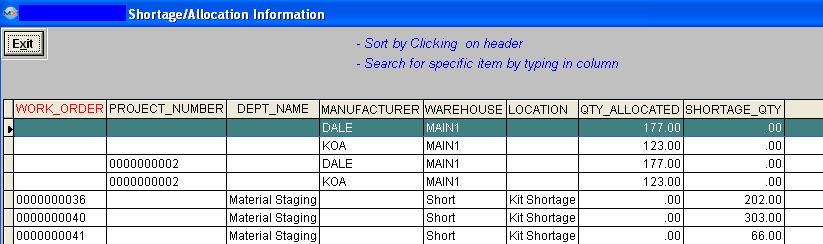
Part Shortage and Allocation Field definitions
| Work Order |
Is the number assigned to the Work Order for which the component part is short |
| Project Number |
Is the number assigned to a work order for a special project |
| Dept Name |
Is the name of the Work Center where the Part Number is short |
| Manufacturer |
Is the name of the manufacturer of this part. |
| Warehouse |
Is the name of the warehouse where this Part Number is stored |
| Location |
Displays if the shortage is a kit shortage, line item shortage, or an allocation. |
| Qty Allocated |
Displays the quantity allocated to a specific Work Order or Project |
| Shortage Qty |
Shows the number of units short for the Work Order |
The User may sort on Work Order Number, Project No, Work Center, Part Manufacturer or Warehouse by depressing the appropriate button.
 |
Clicking on this button will display all Open, Approved Purchase Orders for this item, as displayed: (The quantity being displayed is the qty scheduled not the qty on order) This screen allows user to Sort, Search and Drill Down to Selected Records. |
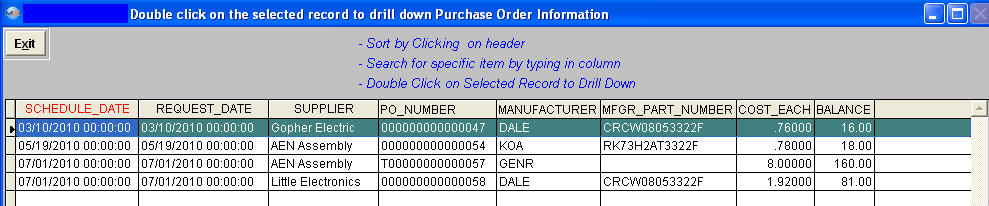
On Order Field definitions
| Schedule Date |
Represents the calendar date of the Purchase Order |
| Request Date |
|
| Supplier |
Is the name of the Supplier to which the Purchase Order was sent |
| PO Number |
Is the internal number assigned to that Purchase Order |
| Manufacturer |
Is the name of the Manufacturer specified in the Purchase Order |
| Mfgr Part Number |
Is the Manufacturer Part Number on order. |
| Cost Each |
Is the amount of money to be paid for one unit in the Purchase Order line item |
| Balance |
Is the amount of unit(s) scheduled on the PO, not the qty on order |
The User may sort on Date, Supplier, PO Number, Manufacturer or Price by depressing on the appropriate button.
 |
This field is read only. The button will be displayed in Red when there are serial numbers present. Clicking on this button will display all serial numbers assigned to this item, as display: (only if this item is serialized). This information comes from the PO Receiving module or Inventory Handling (Receiving) module and is not editable. This screen allows user to Sort, and Search for Selected Records. |
Serial Number Field definitions
| Serial Number |
Is the number assigned to that part |
| Manufacturer |
Is the name of the mfg. specified |
| Manufacturers Part Number |
Is the mfg. part number on order |
| Warehouse |
Is the name of the warehouse the parts are being stored in |
| Location |
Displays where the parts can be found |
| Lotcode |
Lot Code number if part is lot coded |
| Exp Date |
Displays the date the parts can no longer be used. This field is for reference only. Manex doesn't act on that date to expire the part. But it is part of the unique combination users can have LOT code A, exp date 01/10/2005 and LOT code A, exp date 01/01/2010 and the system will consider it as a completely different LOT. |
| Reference |
Is a name/number to identify the Lot. |
| PO Number |
Is the internal number assigned when order is placed. |
| Reserved |
|
 |
This field is read only and is not editable. The button will be displayed in Red and will be only displayed if the item is Lot Coded. Clicking on this button will display all the Lot Code Detail assigned to this item, as display below. All Lot Codes received by Purchase Order (in the PO Receiving module) will have a PO Number displayed against which they were received. If received using the Inventory Handling (Receiving) module the PO Number will be empty. This screen allows user to Sort, and Search for Selected Records |
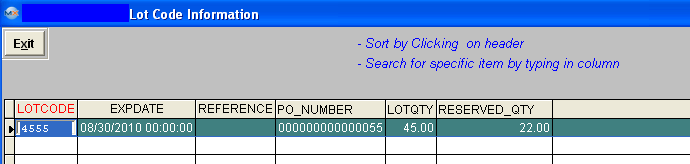
Lot Detail Field Definitions
| LotCode |
Is the number of the Lot/Date Code |
| ExpDate |
Displays the date the parts can no longer be used. This field is for reference only. Manex doesn't act on that date to expire the part. But it is part of the unique combination users can have LOT code A, exp date 01/10/2005 and LOT code A, exp date 01/01/2010 and the system will consider it as a completely different LOT.
|
| Reference |
Is a name/number identify the Lot |
| PO Number |
Is the internal number assigned when order is placed |
| Lot Qty |
Displays the qty available in Inventory |
| Reserved Qty |
Displays the quantity allocated to a specific Work Order or Project |
|
AVL Information
This section will define all the AVL, and Safety Stock information assigned to the inventory part. The user may Add, Delete, or Edit the AVL information here.
When adding new MPN's to the item master, if you do not want the BOM's automatically updated be sure that the "Disable Automatic BOM AVL update" is Enabled. See article #4010 for more information.
Note: When deleting an MPN - keep in mind that the MPN will be deleted from the screen but NOT from the tables. The MPN's that have been deleted are retained in the tables for history tracking purposes.
|
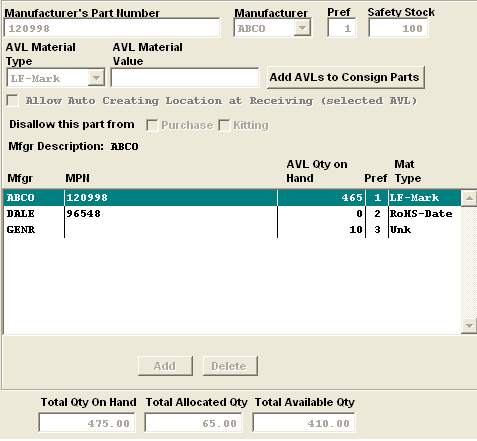 |
AVL Field Definitions
| Manufacturers Part Number |
Displays the Mfg. Part Number for an existing highlighted Mfg. Also, Used to enter Mfg. Part Number during data entry. If no manufacturers Part Number is entered into the Inventory Master during data entry, GENR (Generic) will be automatically entered by the system as the Manufacturer and the Manufacturers Part Number will be left blank. If a Buy item is fabricated by a customer, then the Customers name must be added to the list of Manufacturers and the Customers Part Number entered in the Manufacturers Part Number field.
|
| Manufacturer |
Any Manufacturer entered in Part Manufacturer Setup can be selected in this field. If no specific Manufacturer is required, GENR. (Generic) may be used to show that any Manufacturer is usable. Also displays Manufacturer for an existing inventory record choosen.
|
| Pref |
This is a number indicating the preference for use in Work Order Kitting for each Manufacturer shown. The number 1 indicates 1st ranking, 2 is 2nd ranking, etc. User will only be allowed to enter postive numbers (1 through 99). If no preference code is entered the preference automatically is assigned 99. All items will be at the bottom of the preference list unless the user assigns another number to it. For further detail on how the preference code is used in MRP see Article #3032 . |
| Safety Stock |
Enter in a qty that you want kept on hand for this specific AVL. User may have safety stock for more than one AVL for a given part number. (Safety stock is calculated in MRP at the AVL level NOT the part number level). This qty is in addition to the MRP demands. ManEx will ensure that there is always the safety stock qty on hand regardless of the MRP demands. Please see Article #2331 for more detail. (This field is calculated off of the Stock UOM).
|
| AVL Material Type |
Select from the pull down, Unk, LF-P/N, LF-Date, LF-Mark, RoHS-P/N, RoHS-Date, RoHS-Mark. See Article 2267 for definitions. These choices have been defaulted in. Customers may establish the logic by which the material type for the parts are established by the material types at the AVL level in Material Type Setup.
The AVL Material Type is carried forward for the consign part when the consign part is first added to the system or when new AVL was added to the internal part and the user elects to add this AVL to the existing consign parts. If the user later changes the Material Type on the internal part, the change is NOT carried over to the consigned part.
If the Inventory Material Type is set to "Auto" (within the Material Type Setup), everytime the user modifies the AVL material type, the program will update the Inventory Material Type automatically, if the control is set to "Manual", then the user will be able to modify the Inventory Material Type from the Material Type pulldown. Keep in mind that the program will NOT validate if the material type in Inventory and AVL levels are in sync.
|
| AVL Material Value |
This field is a text modifier for a given material type. For example, if the material type was "LF-Date", the text in the field could be a date code. This value could be different for various AVL with the same Material Code. This field is optional and does not have to be populated. |
 |
This field is to add the AVL(s) to a consigned part. Note: This button is disabled when in Add or Edit mode.
|
| Allow Auto Creating Location at Receiving (Selected AVL) |
Note: Users have to have special access in order to modify this checkbox, this access is assigned through Security/User Rights.
If the box is checked (for the highlighted AVL) it will allow the user to create a location when entering the Purchase Order or at PO Receiving. Note: The "Allow Auto Creating Location at Receiving" box must be checked also in Warehouse Setup.
If the user has the " Remove location with this warehouse from the Inventory when qty on hand gets to zero Box" box checked within the Warehouse Setup Setup module this box MUST be checked also. |
 |
There are situations where the Users customers will allow them to use up non-conforming inventory, but cannot replace the same AVLs. So, at the AVL level, we added two logic fields that would signify that the AVL is NOT to be purchased and/or kitted. In such a circumstance, it is NOT appropriate to delete the parts, but neither can they be purchased for future requirements. Likewise, they may want to avoid kitting so you would check these boxes to "Disallow this part from Purchase and/or Kitting". For special circumstances, the user can override the block from kitting if their customer permits it. For further information on how to use these fields effectively refer to Article #2329. For information on how these fields affect MRP refer to Article #3211 . (See the non-nettable function for the warehouse level described below).
|
| AVL Qty on Hand |
Total qty on hand for each individual mfg. |
| Total Qty on Hand |
Total qty on hand for all mfg.'s combined
|
| Total Allocated Qty |
Total qty allocated to a specific work order or project |
| Total Available Qty |
Total qty available minus the allocated qty
|
| Add |
Allows data entry to add Manufacturer record. Enter Manufacturer part number and a drop down list will appear to choose the Manufacturer. Click on the save button and the information entered will be displayed in the screen.
|
| Delete |
Deletes the highlighted manufacturer part number record. A ????? screen will appear. Click the NO button to restore the deleted record if this button is clicked in error. Deletion of manufacturer part number records is not allowed if a Warehouse quantity other than zero (0) is shown for that record. Before manufacturer records are deleted, please realize that SOME of the history regarding the manufacturer may also be deleted.
|
| Save |
Appears after clicking the Add button. Clicking on this button saves the record |
| Cancel |
Appears after clicking the Add button. Click to abort saving a new record or changes to existing records.
|
|
Warehouse Information
This section will define all the Warehouse information assigned to the inventory part. The user may add or edit the Warehouse information here also.
|
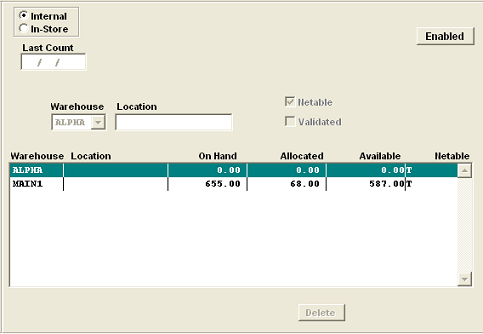 |
Warehouse Field Definitions
 |
One of these radials must be checked. Internal (User owned) or In-Store (supplier owned). This selection is available only for "BUY" parts. This selection will not be displayed for "MAKE" or "PHANTOM" parts.
|
| Last Count |
Displays the date of the last physical Inventory or Cycle Count for the highlighted item in the Warehouse/Location/Manufacturer display window.
|
| Warehouse |
Used to display the stocking Warehouse for an existing item or to select a Warehouse during entry of a new Location or Manufacturers Part Number. Only Warehouses entered in Warehouse Setup may be selected in this field.
|
| Location |
Allows entry of any Location code desired. It could be an area assigned for Finished Goods, High Value items, Programmed parts or a Row, Aisle and Shelf Code. Also displays Location for an existing highlighted Warehouse record. This field is flagged "Read Only" for MRB whse (meaning you can not create a location for an MRB whse).
|
| Netable (box) |
If this is checked, any On Hand inventory of the item in the Warehouse location being added or highlighted (if already added) will be used to fill Material Requirements Planning stipulations when processing the MRP. If you want to exclude this part from MRP, uncheck this box. You Cannot have a netable part that is excluded by MRP. The only warehouse that is non-netable is the MRB warehouse. Any parts in that warehouse are deemed questionable until the parts are validated and returned to a normal warehouse. So they will not be considered by MRP.
|
| Validated (box) |
This is for reference only and does not affect any other modules in Manex. This is simply to help users keep track of changes and for the users to check that the part being added has been verified as appropriate.
|
 or or  |
If Enabled ManEx will add the new AVL to all existing BOMs and check them as approved. If Disabled ManEx will add the new AVL to all existing BOMs but will NOT mark them as approved. Then they will not drive any demands or be available for pulling to that kit. Then you will have to manually go into each individual BOM and Check mark the ones that you do intend to use that new AVL on. See article #4010 for more information.
|
| On Hand |
Shows the total quantity of the Manufacturer Part Number indicated which is currently in the Warehouse and Location shown.
|
| Allocated |
Quantity of the item that has been allocated to a Work Order in the Inventory Mgt./ Kitting, Allocating and Shortage Management/ Work Order Allocation screen.
|
| Available |
(Calculated field) Equals the quantity On Hand minus the Allocated quantity.
|
| Add |
Allows data entry to add a Warehouse, and Location. A drop down list appears to select a warehouse. Enter in a location if you choose. Click on the save button and the information entered will appear in the screen.
|
| Delete |
Deletes the highlighted Warehouse record. A reminder screen will appear. Click the NO button to restore the Deleted record if this button is clicked in error. Deletion of Warehouse records is not allowed if a Warehouse quantity other than zero (0) is shown for that record.Before warehouse records are deleted, please realize that SOME of the history regarding the warehouse may also be deleted.
|
| Save |
Appears after depressing the Add button. Depressing this button saves the record.
|
| Cancel |
Appears after depressing the Add button. Depress to abort saving a new record or changes to existing records.
|
|
